<protocolの使い方>
protocol
Swift 2.0 以降では Protocol Extension の機能が追加
protocol(インタフェースの定義)を拡張し、メソッドの実装を追加できる機能
protocol MyProtocol {
    func hoge()
}

extension MyProtocol {
    func hoge() {
        print("hoge")
    }
}
extensionで追加できないのは
格納型(stored)のインスタンスプロパティ
プロパティオブザーバ
ちなみに、staticなプロパティは追加できる(タイププロパティという)
<KotlinのinterfaceとSwiftのprotocol>
どちらもデフォルト実装を持てる
Swiftは拡張時、インスタンスプロパティを追加できない
Kotlinはプロパティに値を持てない
->Kotlinはこの理由から、「interfaceを最優先で、classを最小限」ということができない
<Swiftとclassとstructの違い>
struct
->値型。
プロパティは全て値型なので、インスタンスをコピーしたら、コピー元の値は変わらない。
比較的単純なデータをカプセル化するのに適している
class
->参照型
https://qiita.com/narukun/items/24d9e68ff965f8da09ad
<Androidのdata classとclassの違い>
data classはデータだけを保持する
どちらもclassなので、参照型
<値型と参照型>
kotlinは常に参照型。プリミティブ型はない
Swiftはstructと配列は値型。
https://books.google.co.jp/books?id=hH2GDwAAQBAJ&pg=PA25&lpg=PA25&dq=kotlin+%E5%8F%82%E7%85%A7%E5%9E%8B&source=bl&ots=gYW0BW9Ekz&sig=ACfU3U1JZRVli0CvkO2XZylUuJ3wBqssUQ&hl=ja&sa=X&ved=2ahUKEwjrqqPbltzpAhXUF4gKHWOgDEAQ6AEwBnoECAkQAQ#v=onepage&q=kotlin%20%E5%8F%82%E7%85%A7%E5%9E%8B&f=false
<値渡しと参照渡し>
Kotlinは、参照型しかないので、常に参照渡し。
Swiftは、基本値渡し。&をつけると、参照渡しになる
※値型の変数を参照渡しすると、参照型のように値が変わる
※参照型の変数を参照渡しすると、参照元に代入できる(使い道ある?)
https://qiita.com/chihayafuru/items/f6bb38c4a34d8cf62aa9
<AssociatedType>
protocolで定義する。
・associatedtype ResponseEntity
->これは、任意の型に名前をつけること。要はGeneric
・associatedtype ResponseEntity: Codable
->これは、ResponseEntityはCodableのサブタイプという制約
https://medium.com/finc-engineering/casting-to-protocol-having-associatedtype-e5854994a97f
<@escapingについて>
https://qiita.com/ottijp/items/e45b65263c53037af1ee
関数インスタンスは、メソッド実行後に消えてしまう。
インスタンスが消えても問題ないコードはescapeが不要。
  func foo(_ closure: () -> Void) {
    closure()
  }
なので、インスタンスが消えないようにメモリにコピーすること。これがないとコンパイルエラー。
  func foo(_ closure: @escaping () -> Void) {
    storedClosure = closure
  }
->escapeがないと、storedClosureを後で実行するときにnilになってしまう
ちなみに、オプショナルだと@escaping不要
func foo(_ closure: (() -> Void)?) {
    storedClosure = closure
  }
<whereについて>
変数に対して、条件を絞り込める
for num in numbers where num % 2 == 0 {
    print(num)
}
class A<str:String, str2:String> where str == str {
	...
}
とか
// プロトコルを準拠する型がSomeClassを継承しているクラスの場合のみ有効
extension SomeProtocol where Self: SomeClass { }
->Selfとは、SomeProtocol自身の型のこと
https://qiita.com/shtnkgm/items/63b453069ff6b745c04b
<mutating funcについて>
struct, enumで自身の値を変更する場合、funcの前にmutatingキーワードを書く。
Classの場合はmutating funcをかけない。
正し、extension でprotocol拡張すると、mutatingをかける
https://qiita.com/shtnkgm/items/3a00117c9b918616d116
<(set)funcについて>
セットする時だけprivateにできる構文
public struct Counter {
    public var count: Int = 0 // it's public!!
    mutating func increment() {
        count += 1
    }
}
->これでは、countを外部から変えられてしまう。
public struct Counter {
    private (set) public var count: Int = 0 // <-- !!!
    public mutating func increment() {
        count += 1
    }
}
->これで、countのsetは内部のみ、countを外部から参照できる。
<weakと循環参照>
https://qiita.com/ottijp/items/e45b65263c53037af1ee
クラスAとクラスBがお互いを保持する時、循環参照になる。
(リファレンスカウンタが0にならないため)
先に消える方のクラスはweak修飾子をつけると、強制的に開放されて循環参照されないようにできる
https://qiita.com/1234224576/items/2241266f7d307cd25ba9
クロージャではよく循環参照が発生することがよくあるらしい。
キャプチャとかキャプチャリストという概念を理解する必要(Swift詳解で)
https://scior.hatenablog.com/entry/2018/12/24/132704
クロージャも型と考えると、確かに、クロージャからそれを定義しているクラスのselfや別クラスを参照(=キャプチャ)すると
循環参照になる。
クロージャから参照できる変数や定数の集合をコンテキストと呼ぶ。
そこで、クロージャがそれを定義しているクラスのselfや別クラスを参照するときに[weak self] in書けば、弱参照で循環参照を避けることができる
(クラスが開放されたらクロージャがキャプチャしているクラスはnilが入る)
※[weak self] inは配列ではなく、ループでもない。キャプチャ方法の指定方法
https://qiita.com/_tid_/items/df7f1b76f156bd758c1a
例
lazy var myClosure: () -> Void = { // 実行時にselfが暗黙的に強参照としてキャプチャされる
        print(self.title)
    }
これを↓のように変える
lazy var myClosure: () -> Void = { [weak self] in // selfを明示的にweakとしてキャプチャする
        print(self?.title)
    }
<subscript>
配列の[]のこと。
こうやって要素を引数で取得したいときに定義する。サンプル↓
subscript(index: Int) -> String{
	return AA[index]
}
<defer>
メソッドを抜けるときに必ず実行するコードを書く。
finallyみたいなもの
<lazy>
参照されるときに初めて初期されるプロパティにつける修飾子
使いどころは、初期値がインスタンス生成後の状態に依存しているとき
kotlinにもある。
<Swiftの??>
Kotlinのエルビス演算子
<FluxとReduxの違い>
https://qiita.com/syossan27/items/7e1b2e07ac68b96bdaa7
https://qiita.com/kumabook/items/808c7aab3eb4320c5776
ReduxはStateを管理するStoreがシングルトン
データ処理ロジックを分割したい場合は、storeを複数使う代わりにreducer compositionを使用します。
https://qiita.com/kamykn/items/4481e9dec0249cb34fc9
ページ間での状態共有や変更の依存関係をうまく表現するため
あとは、3原則に従うことと、
Middleware(使いたければ使う)を使うこと
<Fluxのライブラリ>
ReactorKit
->RxSwiftをFluxに準拠するよう拡張
<Redux>
Middlewareは使っても使わなくてもいい
Reduxには、dispatchを拡張するための方法が予め用意されている。
それが Middleware である。
https://numb86-tech.hatenablog.com/entry/2018/04/17/203802
Reducerの実行前後に処理を追加するための仕組み。
->非同期処理の送信とコールバックで利用
https://qiita.com/yasuhiro-okada-aktsk/items/1fe3df267a6034d970c1
ReSwift
https://qiita.com/hachinobu/items/19265ee6c987844e7b08
ContainerView
->「ViewController の中に ViewController を配置する」ことができるもの
https://qiita.com/ponnjinnka/items/a9bf82b2767a67f12335
http://crossbridge-lab.hatenablog.com/entry/2015/12/10/125749
【Xcode】Storyboard Referenceを活用してみた
https://qiita.com/chubura/items/03a3cddf8fe17361c5b2
http://hoshi0523.hatenablog.com/entry/2015/10/04/024324
<AutoLayout で UIButton の image が拡大しない>
https://ofsilvers.hateblo.jp/entry/uibutton-image-expansion
<UIButtonのimageの位置調整>
https://blog.piyo.tech/posts/2014-01-10-215106/
https://qiita.com/exilias/items/7867a4cb6afe85084b8e
【Xcode】StoryboardでViewを角丸にする
https://qiita.com/turmeric/items/046acb987c4353b3f308
https://cpoint-lab.co.jp/article/201912/13056/
コードで角丸にする
label.layer.cornerRadius = 10
label.clipsToBounds = true
UICollectionViewでSelfSizingを行う
https://qiita.com/y__n/items/7fdecc425427ca628ba8
UITabBarControllerを触らず切り替える
http://montan.hateblo.jp/entry/2012/10/02/121636
fastlane
https://labs.septeni.co.jp/entry/2016/09/14/162643
Swinject概念
https://qiita.com/yoichitgy/items/ed8aac4d6f1e6666a4aa
Swinjectのassemble
https://qiita.com/sakuraihiromi/items/3279160612f83085f803
Swinjectサンプル1(スタブはテストデータの返却)
https://qiita.com/yoichitgy/items/75b09e6ff06199d7cf80
Swinjectサンプル2(ViewControllerでモックを呼ぶ:モックは回数の記録のみ)
https://qiita.com/yoichitgy/items/91ab2b4fa604391619bd
Swinject使い方
https://dev.classmethod.jp/articles/swinject-dependency-injection/
RxSwift + ReSwift + MVVM
https://qiita.com/takehilo/items/d8bd22bf384c6c5d3b16
xibとstoryboardの違い
https://www.slideshare.net/nakiwo/1storyboard-36133648
https://www.slideshare.net/TomoIta/11storyboard
https://qiita.com/am10/items/b7e959e34c9f5d0f55f2
Static CellsとDynamic Prototypesの違い
->Dynamic Prototypes はセルやセクションの要素数が可変の時
Static Cells は動的に要素数を変更できない制約がある分、手軽にレイアウトが決められる
https://dev.classmethod.jp/articles/ios-8-static-cells/
ファイルをxcodeに直接追加するときは「✅Copy items if needed」、「✅Create group」
https://fukatsu.tech/file-treatment-xcode#i-2
https://qiita.com/OSR108/items/c0bbe020662acc415ddb
http://0gravity000.web.fc2.com/a002/Tip_02_01_007.html
storyboardでtableviewを簡単に作る方法
https://i-app-tec.com/ios/tableview.html
StoryboardでtableviewをつくるときのPrototypeCellの使い方
https://qiita.com/orimomo/items/e12a0e468f083bcb7a50
weak/unownedの違い
循環参照を防ぐしくみ。
weak:selfが解放されていたらnilになる
unowned:selfが開放されていているとき、selfはnilにならず、利用時にクラッシュする)
https://qiita.com/ottijp/items/e45b65263c53037af1ee
DisposeBagを解放すると、subcribeが止まる。
自動解放するために、あるクラスでdisposeBagという変数にDisposeBagオブジェクトを保持させておく。
クラスが解放されるとdisposebagも解放される
https://speakerdeck.com/matsuokah/rxswiftfalsedisposableda-wokoshao-jie-e5e83286-9ffa-4291-b183-6a3b4f608f04
https://qiita.com/syou007/items/41ff1469ee7a92e7ec57
https://qiita.com/syou007/items/d527b4486c34686d0acd
unownedかweakか
->weakは安全だが、unwrapしないといけないので、unownedでかけるならそっちの方がいい。
subscribeのクロージャーで書く場合、非同期処理をしているならweak
非同期処理していないならclosureが実行される段階ではdisposeBagがdisposeされていない、すなわちselfも存在しているはずなので unowned で問題ない?
https://qiita.com/_ha1f/items/e16ddc6017c4ad807c3c
storyboardからViewControllerをインスタンス化する方法
// CalendarDetail.storyboardに定義されているとする
let storyboard = UIStoryboard(name: "CalendarDetail", bundle: nil)

// Identity Inspectorのstoryboard IDにCalendarDetailと指定した場合
let vc1 = storyboard.instantiateViewController(identifier: "CalendarDetail") as CalendarDetailViewController

// Attributes Inspectorの is Initial View Controllerをチェックした場合
let vc2 = storyboard.instantiateInitialViewController()
StoryboardでNavigationControllerを定義せずに、コードからナビゲーションバー付きのViewControllerを表示する方法
let vc = CalendarDetailViewController()
        let naviVc = UINavigationController(rootViewController: vc)
        naviVc.modalPresentationStyle = .fullScreen
        self.present(naviVc, animated: true, completion: nil)
StoryboardでNavigationControllerとViewControllerが定義されているときにViewControllerに値渡しをする方法
https://qiita.com/wadaaaan/items/7529266cfdba92c376c4
        let storyboard = UIStoryboard(name: "CalendarDetail", bundle: nil)
        let naviVc = storyboard.instantiateViewController(withIdentifier: "CalendarDetailNavigationController") as! UINavigationController
        // topViewControllerでViewControllerを取得する
        let calendarDetail = naviVc.topViewController as! CalendarDetailViewController
        // これでも同じ
        // let calendarDetail = naviVc.viewControllers[0] as! CalendarDetailViewController
        // なぜか、Date()を次のViewControllerへ渡すと必ずnilになっていた。。
        calendarDetail.dateStr = date.string()
        self.present(naviVc, animated: true, completion: nil)
StoryboardとViewControllerの追加
https://capibara1969.com/1118/
このあとis Initial View Controllerをチェックして、以下で呼び出す
// Second.storyboardというファイルのInitial ViewControllerに指定されているSecondViewControllerを生成
let secondViewController = UIStoryboard(name: "Second", bundle: nil).instantiateInitialViewController() as! SecondViewController
// push遷移
self.navigationController?.pushViewController(secondViewController, animated: true)
StoryboardとViewControllerの追加(NavigationControllerも一緒に)
https://qiita.com/mas821/items/43ab9894c944047eb58d
storyboardの遷移(コードなしのsegue)
※以下サイトの「遷移元と同じStoryboard内で遷移する場合(ソースコードなしver)」を参考
https://qiita.com/ryu1_f/items/4a0e452e94c9ba609220
これだけだと
storyboard doesn't contain a view controller with identifier 'foo''
となる。Storyboard idの設定ができていないから
https://qiita.com/colorrabbit/items/c8cb6f815e6dc0b6beba
CalendarをStoryboard idに設定した場合は、以下のコードでVCを取得
        // カレンダータブ
        let calendarStoryboard = UIStoryboard(name: "Calendar", bundle: nil)
        let calVc = calendarStoryboard.instantiateViewController(withIdentifier: "CalendarViewController")
storyboardの遷移(segueにIdentifierを設定して、コードからそれを実行する)
※以下サイトの「遷移元と同じStoryboard内で遷移する場合(ソースコードありver)」を参考
https://qiita.com/ryu1_f/items/4a0e452e94c9ba609220
     @IBAction func goNextButton(_ sender: Any) {
         performSegue(withIdentifier: "goNext", sender: nil)
     }
storyboardの遷移( Storyboard Reference で異なるStoryboardにコードなしで遷移)
※Atributes inspectorでIs Initial View Controllerにチェックが入っていないとエラーなので注意
https://www.ukeyslabo.com/development/iosapplication/screen_transition/
https://qiita.com/turmeric/items/179ef61428e9bf9d648e
storyboardの遷移(segueなしのコード)
https://capibara1969.com/684/
 //Next.storyboardにある初期画面のViewControllerに遷移(storyboard IDはview2を指定)
 let storyboard: UIStoryboard = UIStoryboard(name: "Next", bundle: nil)
 let nextView = storyboard.instantiateInitialViewController() as! View2ViewController
 self.present(nextView, animated: true, completion: nil)

 //Next.storyboardにあるViewControllerに遷移(storyboard IDはview2を指定)
 let storyboard: UIStoryboard = UIStoryboard(name: "Next", bundle: nil)
 let nextView = storyboard.instantiateViewController(withIdentifier: "view2") as! View2ViewController
 self.present(nextView, animated: true, completion: nil)
■UITableViewのセルタップ時にSegueで画面遷移(パラメータも渡す)
https://i-app-tec.com/ios/tableview-cell.html
->「ストーリーボードで Segue を設定」を実施。
ここでは、identifierを「showTestDetail」という名前にする
あとは、以下のコードでパラメータを渡せる
// 遷移前にパラメータを取り出して次のVCへ渡す
override func prepare(for segue: UIStoryboardSegue, sender: Any?) {
    if segue.identifier == StoryboardSegue.TestStoryboardName.showTestDetail.rawValue {
        guard
            let detailViewController = segue.destination as? TestDetailViewController,
            let param = sender as? TestParameter else {
            return
        }
        detailViewController.configure(storeATMEntity: param)
    }
}

// セルタップ時にパラメータを設定
func tableView(_ tableView: UITableView, didSelectRowAt indexPath: IndexPath) {
    guard indexPath.row < testParameterList.count else { return }
    let entity = testParameterList[indexPath.row]
    perform(segue: StoryboardSegue.TestStoryboardName.showTestDetail, sender: entity)
}
ドキュメントアウトライン
First Responder : このViewControllerを最初に起動した時に反応するクラスを制御する。
Exit : このViewContorollerを終了して他の画面に遷移するときの処理を制御する。
https://qiita.com/inuha/items/8065459924de283172fa
https://qiita.com/tak_staygreen/items/525fc403f9cae19ee935
storyboard上でscrollviewの上にstackviewを載せる
https://qiita.com/ryu1_f/items/94e0e8ced1067ee3eedb
https://qiita.com/Masataka-n/items/c19456f172627359d0d8
StackViewのbackgroundに色はつけられない
https://www.it-swarm.dev/ja/ios/uistackview%E3%81%AE%E8%83%8C%E6%99%AF%E8%89%B2%E3%82%92%E5%A4%89%E6%9B%B4%E3%81%99%E3%82%8B%E6%96%B9%E6%B3%95%E3%81%AF%EF%BC%9F/822591092/
https://qastack.jp/programming/34868344/how-to-change-the-background-color-of-uistackview
UITextFieldで文字列が変換中かどうかを調べる = TextField.markedTextRange
https://qiita.com/hidekuro/items/284e822057effc9aa726
        testTextField.rx.text.orEmpty
            .filter { [unowned self] _ in self.testTextField.markedTextRange == nil }
            .bind(to: viewModel.inputs.didInputTestTextField)
            .disposed(by: disposeBag)
濁点・半濁点ありの半角文字のカウントについて
->濁点・半濁点ありの半角文字は1文字としてカウントされる
->2文字としてカウントしたい場合はUnicodeScalarを使う
https://qiita.com/gfx/items/e739b2d38b3a7423a86d
->String.unicodeScalarsは文字ごとのunicodeを保持したUnicodeScalarViewを取得できる
https://www.366service.com/jp/qa/c97510d2c654f83be68a498ed287c7b0
->使い方1
// UnicodeScalarViewを取得(配列ではない)
let array2 = "bar".unicodeScalars
let str2 = String(array2)
print(str2)
->使い方2
let testStr = "オハヨウゴザイマス"

var scalarView = String.UnicodeScalarView()
let array = testStr.unicodeScalars.map { $0 }
for ( index, value ) in array.enumerated() {
    scalarView.append(UnicodeScalar(value))
    print("\(index) \(value)")
}
print(String(scalarView))
->その場合、絵文字は2文字以上でカウントされる場合がある
https://qiita.com/aqubi/items/032e9a07b856150de46a
->理由はunicode情は2つのコードポイントで表現される文字があるから「か゚」など
UTF-8,UTF-16,UTF-32:
「Unicode」という文字コードのビット値を計算する方式
EUC-JP,Shift_JIS,ISO-2022=JP:
「JIS X 0208」という文字コードのビット値を計算する方式
https://qiita.com/omiita/items/50814037af2fd8b2b21e
http://appakumaturi.hatenablog.com/entry/20120414/1334334986
文字化けの要因:
Excel日本語版がCSVファイルを読み込む際のデフォルト文字コードはShift-JIS
そこにUTF-8で格納されたデータを読み込んだ結果、文字化けが発生
https://qiita.com/hiroyuki_mrp/items/f0b497394f3a5d8a8395
マルチバイト:
「マルチバイト」と言うのは取り扱うライブラリーやフレームワーク側の用語で、UTF-8自体には「マルチバイト」と言う概念はありません。
「UTF-8表現で2バイト以上で表現されるUnicodeのコードポイント」が正確な表現
UTF-8の1バイト文字はASCII文字セットと同一。128個の半角英数字および記号と制御文字が含まれ、半角カナは含まれない
https://ja.stackoverflow.com/questions/21960
基底文字
unicodeのコードポイントは1つ(utf-8で2バイト以上の文字でも)
結合文字
unicodeのコードポイントは1つ
それ自体は幅を持たず、前の文字に結合してひとつの形になる文字
半濁点/濁点/囲い文字
結合文字には「何文字まで結合できる」という限度がありません。
https://ja.wikipedia.org/wiki/%E7%B5%90%E5%90%88%E6%96%87%E5%AD%97
異体字=合成文字:
unicodeのコードポイントは2つ以上
基底文字+結合文字で構成される漢字(無数にあるので結合が効率的だった)
「邊󠄆」(U+908A)->規定文字
「邊󠄄」(U+908A U+E0104)->異体字
「邊󠄆」(U+908A U+E0106)->異体字
(確認したところ、これらはサロゲートペアという仕組みで、2つのコードポイントを1つのコードに合成して使われていた)
・𠮷(つちよし) ->(U+D842 U+DFB7)を組み合わせた(U+00020BB7)が利用される
・𡈽方の「ひじ」 -> U+0002123D
https://tech.sanwasystem.com/entry/2017/11/13/102531
https://ja.wikipedia.org/wiki/%E5%90%88%E6%88%90%E6%B8%88%E3%81%BF%E6%96%87%E5%AD%97
https://tama-san.com/combining_character_sequence/
異体字でも、
JIS第三・四水準に割り当てられていたり、->𩸽(ほっけ)/
それ以外にIBM拡張文字に含まれていたり、->髙(はしごだか)
どこにも割り当てられなかったりする->𠮷(つちよし)
これらの一部はunicodeが割り当てられておらず、サロゲートペアという仕組みで描画されている
https://qiita.com/yuba/items/83a81a0de09a8d8655f1
https://bookprint.jp/guideline/tokusyu/inpu_txte.html
サロゲートペア
Unicodeでは2byte(65536種類)で全世界の字を取り込む予定でしたが、文字数が足りなくなったためにUTF-16では4byte(2文字)で20bit(1024*1024=1,047,576)の範囲を表すように修正されました。これをサロゲートペアといいます。
https://itsakura.com/it-unicode-utf#s4
https://qiita.com/deco/items/81338e744945f9fef5b2
https://itsakura.com/it-unicode-utf#s4
サロゲートペア一覧
https://www.magata.net/memo/index.php?%A5%B5%A5%ED%A5%B2%A1%BC%A5%C8%A5%DA%A5%A2
JIS第三水準漢字
http://www13.plala.or.jp/bigdata/jis_3.html
絵文字=合成文字:
unicodeのコードポイントは1つ以上
Unicode emoji には、単体のコードポイントからなる singleton と、複数のコードポイントからなる emoji sequence がある
絵文字と結合文字を組み合わせる場合もある
https://qiita.com/_sobataro/items/47989ee4b573e0c2adfc
その他の合成文字:
・濁点/半濁点ありの半角カナ
・発音記号:éなどはunicodeのコードポイントはあるが、->(e + 発音マーク)の合成文字が使われることもある
・ツールなどで作られた文字「か゚き゚く゚け゚こ゚」など
Unicode一覧
このページの*がついているものは結合文字
http://www.shurey.com/js/works/unicode.html
JISの漢字コードについて:
JIS X 0208 - 非漢字、第1・第2水準漢字
0x889F-0x9872(SJIS第一水準)
0x989F-0xEAA4(SJIS第二水準)
テキストの高さについて(line-heigh)
https://developer.apple.com/library/archive/documentation/StringsTextFonts/Conceptual/TextAndWebiPhoneOS/CustomTextProcessing/CustomTextProcessing.html
http://akisute.com/2016/09/ios.html

モーダル表示した時に前の画面に値を渡すときなどに使うpresentingViewController
https://your3i.hatenablog.jp/entry/2018/09/22/170455
https://qiita.com/wadaaaan/items/acc8967c836d616e3b0b
ナビゲーション表示した時に前の画面に戻る
https://capibara1969.com/203/#toc4
self.navigationController?.popViewController(animated: true)
ナビゲーション表示した時に前の画面を取得する
前の画面に値を渡す
https://rara-world.com/swift-protocol-delegate/
let nav = self.navigationController
// 一つ前のViewControllerを取得する
let createGroupViewController = nav?.viewControllers[(nav?.viewControllers.count)!-2] as! CreateGroupViewController
// 値を渡す
createGroupViewController.setSelectedImage()

// popする
_ = navigationController?.popViewController(animated: true)
<Observable.combineLatest>
-> 2つのObservableの値を監視し、両方を使って別のObservableにする
http://reactivex.io/documentation/operators/combinelatest.html
-> mergeとの違い=mergeは単に、2つのObservableの内、発生順に1つずつ流すObservable
http://reactivex.io/documentation/operators/merge.html
http://reactivex.io/documentation/operators/combinelatest.html
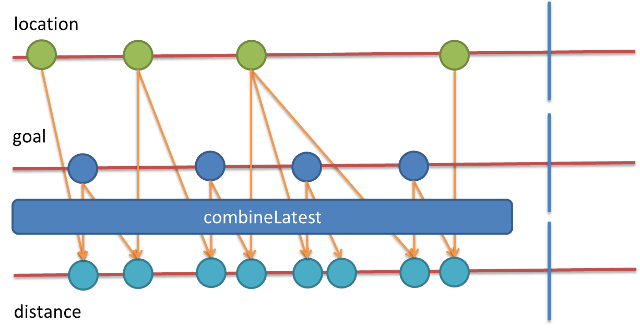
例)rowが0なら"" rowが0でないならageを文字列にするObservable
        // 型指定しない場合はObservable<String>.combineLatestにする必要
        let stringObservable: Observable<String> = Observable.combineLatest(rowObservable, ageObservable) { row, age in
            print(row)
            print(age)
            return row > 0 ? String(age) : ""
        }
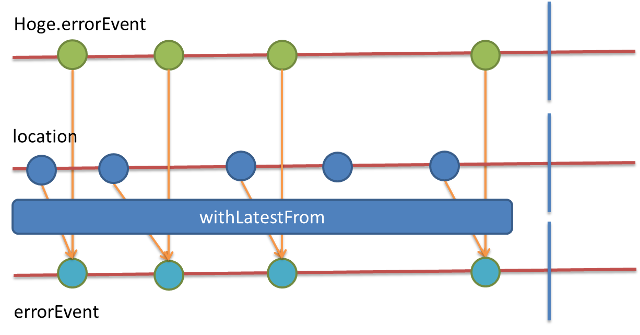
<withLatestFrom>
mapと似ているが、別のOservableに変換する
https://rxmarbles.com/#withLatestFrom
また、combineLatest と似ている。
二つのovservableを合成するという点では一緒
でも発火のタイミングが違う。
combineLatest が各 Observable いずれかの値が流れるタイミングでイベント発火するのに対して
withLatestFromは、元になるObservableが発火するタイミングだけ実行される。その際、ついでにもう一つのobservableを使うイメージ
<map>
ストリームから排出されたアイテム一つ一つになにかしらの関数を適用させて形を変える
https://qiita.com/yuzushioh/items/634a96c6fd69de4acdd0
<その他Arrayクラスのメソッド>
Rxのデータストリームから得られる値は時間軸をベースとした配列で扱えるため、SwiftのArrayクラスの要素を操作するメソッドなども利用できる
https://codezine.jp/article/detail/11091
        let stringObservable = observable1
            .compactMap { row in
                row > 0 ? String("row != 0") : nil
        }
・iOS Deployment Target(アプリが対応する最低のバージョン)
->Xcode ⇒ PROJECT ⇒ Info ⇒ Deployment Target ⇒ iOS Deployment Target
・Base SDK(アプリが対応する最新のバージョン。通常は "Latest iOS (iOS x.x)"
->Xcode ⇒ PROJECT ⇒ Build Settings ⇒ Architectures ⇒ Base SDK
https://www.chihayafuru.jp/tech/index.php/archives/1035
https://www.it-swarm.dev/ja/objective-c/1042290032/
https://akataworks.hatenadiary.jp/entry/2018/06/14/195602
https://qiita.com/akatsuki174/items/45d4bd7cb150defbf116
Xcode lldbコマンド
https://kosukeblog.com/2018/02/debug/
https://yokaze.github.io/2018/01/06/
Debug View Hierachy
https://qiita.com/akatsuki174/items/45d4bd7cb150defbf116
labelの高さを動的に変える
https://note.com/mizutory/n/nd594026cbc86
https://qiita.com/eKushida/items/e574b30fee811c297ea9
不等号制約(>= <=)
https://qiita.com/Simmon/items/0f3b82e98d56bd476f7a
Xcode6にてConstraintの値を0に設定してもマージン16pxが取られてしまう場合の対処
->Relative to marginのチェックが勝手についてしまうのが原因
https://makotton.com/2014/12/06/690
XCUITest
https://qiita.com/rnishimu22001/items/5be161e0350dfc3aa788
https://qiita.com/hiroism/items/8acefc6fbf6a570eaf25
ライブラリが読み込めずにエラーになるので、以下のpodfile修正必要
https://oishi-kenko.hatenablog.com/entry/2019/07/29/143920
ジェネリクスまとめ
associatedtypeは、protocol内にあいまいな型を定義
typealiasとは、上記のassociatedtypeに対して具体的な型を指定すること(typealias Element = T
みたいに)
https://qiita.com/ktaguchi/items/fc260a0af506f258177d
関数にかかれたジェネリクスについて
func makeTuple(a: T, inout _ b: T) -> (T, T) {
こういうのは、実際に呼び出される時にTが確定する(ただし、TはComparableに準拠する必要)
protocol内でweek selfを使いたい場合
->protocol SamplePtotocol : classとする
理由:
class以外のenumやstructはweekにできない
(コンパイルエラー:'unowned' must not be applied to non-class-bound 'Self'; consider adding a protocol conformance that has a class bound)
protocolをclassのみに適用できるようにすればweekにできる
https://qiita.com/yimajo/items/892bd2fe1ccb808ffe49
->classは非推奨になったので、参照型全般を表すAnyObjectを使う
https://qiita.com/lovee/items/a686e11f00b31323e683#20181106-%E8%BF%BD%E8%A8%98
正規表現
"^(?=.?[a-z])(?=.?\d)[a-z\d]$"
の(?=.?[a-z])(?=.?\d)部分の意味(肯定的先読み半角英数が混在で6文字以上)
http://ssk-development.blogspot.com/2013/08/blog-post.html
https://qiita.com/momotaro98/items/460c6cac14473765ec14
https://qiita.com/momotaro98/items/460c6cac14473765ec14
FSCalendar(カレンダー表示ライブラリ)
CalculateCalendarLogic(祝日表示ライブラリ)
https://qiita.com/Koutya/items/f5c7c12ab1458b6addcd
keypath
let userNames = users.map(\.name)
と書けるようになった。プロパティにアクセスするための型のこと"\ .name"がkeypath型のオブジェクト
https://qiita.com/shiz/items/b49251001a9ea54e4beb
RxSwift
distinctUntilChanged(引数なし)
->値が変わるまでイベントをスキップ
distinctUntilChanged(引数1 引数2)
->引数2が比較するロジック
->引数1は、比較する前に任意の変換をするためのロジック
例)引数1で四捨五入 引数2でその値が2以上差があれば異なるとみなす
https://qiita.com/k5n/items/e80ab6bff4bbb170122d
■collectinViewの行間の幅指定
minimumLineSpacingを使う
https://uruly.xyz/%E3%80%90swift%E3%80%91-uicollectionviewflowlayout%E3%81%AE%E4%BD%99%E7%99%BD%E8%AA%BF%E6%95%B4%E3%81%AB%E3%81%A4%E3%81%84%E3%81%A6/
https://qiita.com/takehilo/items/d0e56f88a42fb8ed1185
let layout = UICollectionViewFlowLayout()
layout.minimumLineSpacing = 30
collectView.collectionViewLayout = layout
■その他のセル間の余白
UIEdgeInsetsを使う
https://qiita.com/takehilo/items/d0e56f88a42fb8ed1185
// headerとのスペース/leadingとのスペース/trailingとのスペース/footerとのスペース
        let layout = UICollectionViewFlowLayout()
        layout.sectionInset = UIEdgeInsets(top: 24, left: 24, bottom: 24, right: 24)
        collectionView.collectionViewLayout = layout
■テーブルビューヘッダー(セクションヘッダーではない)
tableView.tableHeaderViewというプロパティに設定すればよい
https://ez-net.jp/article/28/YtO14llM/A51MLAEBlatq/
collectionViewではそういうプロパティはなさそう
セクションヘッダを使うしかない
https://www.fixes.pub/program/113945.html
■CollectionViewにヘッダを追加する方法
https://qiita.com/tetsukick/items/07a8b41a42a6542d6708
storyboard上でCollectionViewを選択し、Section HeaderにチェックをつけるとCollection reusable viewを自動で追加されるので、そこにレイアウトを配置
ClassとIdentifierを指定。
final class TestViewHeader: UICollectionReusableView {
を定義し、Outletをつなぐ
VCで以下を定義
    func collectionView(_ collectionView: UICollectionView, viewForSupplementaryElementOfKind kind: String, at indexPath: IndexPath) -> UICollectionReusableView {

        if kind == UICollectionView.elementKindSectionHeader {
            let header = collectionView.dequeueReusableSupplementaryView(ofKind: UICollectionView.elementKindSectionHeader, withReuseIdentifier: "testCollectionViewHeader", for: indexPath) as! TestCollectionViewHeader
            header.configure()
            return header
        }
    }
ヘッダの高さを動的に計算する方法1
https://qiita.com/AkkeyLab/items/9864c741b9adb633b321
ヘッダの高さを動的に計算する方法2
	private var headerHeight: CGFloat?

    func collectionView(_ collectionView: UICollectionView, viewForSupplementaryElementOfKind kind: String, at indexPath: IndexPath) -> UICollectionReusableView {

        if kind == UICollectionView.elementKindSectionHeader {
        // ヘッダーの処理
            let header = collectionView.dequeueReusableSupplementaryView(ofKind: UICollectionView.elementKindSectionHeader, withReuseIdentifier: "testHeader", for: indexPath) as! TestHeader
            header.configure()
            headerHeight = header.height
            return header
        } else {
            // フッターの処理
        }
    }

extension TestViewController: UICollectionViewDelegateFlowLayout {

    func collectionView(_ collectionView: UICollectionView, layout collectionViewLayout: UICollectionViewLayout, referenceSizeForHeaderInSection section: Int) -> CGSize {
        return CGSize(width: self.view.bounds.width, height: headerHeight ?? 1) //🌟ここを0にしてしまうとcollectionView(_ collectionView: UICollectionView, viewForSupplementaryElementOfKind..が呼ばれないので注意!
    }
}
final class TestCollectionViewHeader: UICollectionReusableView {

    @IBOutlet private weak var testLabel: UILabel!

    // Height Constraint
    @IBOutlet private weak var testLabelTopConstraint: NSLayoutConstraint!
    @IBOutlet private weak var testLabelBottomConstraint: NSLayoutConstraint!

    // Width Constraint
    @IBOutlet private weak var testLabelLeadingConstraint: NSLayoutConstraint!
    @IBOutlet private weak var testLabelTrailingConstraint: NSLayoutConstraint!

    var height: CGFloat {
        // testLabelContainer height
        let maxSize = CGSize(width: UIScreen.main.bounds.width - testLabelLeadingConstraint.constant - testLabelTrailingConstraint.constant, height: .greatestFiniteMagnitude)
        let testLabelHeight = testLabel.sizeThatFits(maxSize).height
        return  testLabelTopConstraint.constant + testLabelHeight + testLabelBottomConstraint.constant
    }
■collectionViewはまりどころ1
<collectionViewHeader内のlabelが見切れる問題>
1.以下で設定しているCGSizeのheightとwidthは想定通りかprintで確認
func collectionView(_ collectionView: UICollectionView, layout collectionViewLayout: UICollectionViewLayout, referenceSizeForHeaderInSection section: Int) -> CGSize
⭐️ここではheader内に表示するlabelの高さをboundingRectで計算して、それにマージンを加えた値とする
(補足)
疑ったこと1.ここの⭐️でwidthが適正な値じゃなく、改行されない高さが計算されている可能性
疑ったこと2.ここの⭐️でlabeの改行がされていない可能性
->「絶対に1行でおさまるテキスト」、「文字列に改行コードを入れて絶対に2行になるテキスト」、「実際に表示したいテキスト」の3パターンのprintを確認したところ、計算段階では3つとも想定通りの値だったので、「疑ったこと1と3」が原因でないことがわかった。
2.レイアウトデバッグにて、1と同じheightが実際に描画されているか確認
3.⭐️で計算したcollectionViewHeader内のlabelの高さは想定通りかprintで確認。
4.それがレイアウトデバッグのheightと同じ大きさになっているか確認。
もし、想定よりも低い高さになっている場合は、⭐️で事前に計算していたlabelの大きさには上下のマージンやpaddingやlineHeightの加算が足りていなかったことが考えられる。
つまり、事前に計算していたlabelの高さよりも実際に表示すべきlabelの高さが高いため、Header内におさまらず、labelだけが縮小されて、結果的に見切れている
■collectionViewはまりどころ2
<collectionViewFooterの下に謎の余白ができる問題>
(footerに色をつけている場合、footerとは違う色の余白が表示されてしまう)
<原因>
1.collectionViewはstoryboard上で高さを決めなければならない
2.collectionViewのfooterはCollectionViewCellのすぐ下に表示される
3.collectionViewに表示するheader/collectionViewCell/Footerの高さの合計が1よりも低い場合、footerの下には余った余白が表示される
<防ぐ方法1>
->collectionViewの高さを動的に変更して余白を消す方法
1.collectionViewに表示するheader/collectionView/footerの高さの合計を取得
(header/footerの高さは以下で設定する値と同じものにする)
func collectionView(_ collectionView: UICollectionView, layout collectionViewLayout: UICollectionViewLayout, referenceSizeForHeaderInSection section: Int) -> CGSize

func collectionView(_ collectionView: UICollectionView, layout collectionViewLayout: UICollectionViewLayout, referenceSizeForFooterInSection section: Int) -> CGSize
(collectionViewの高さは以下で設定する値と同じものにする)
func collectionView(_ collectionView: UICollectionView, layout collectionViewLayout: UICollectionViewLayout, sizeForItemAt indexPath: IndexPath) -> CGSize
2.viewDidLayoutSubviewsの中でcollectionView.frame.size = 1の値とする
->1の値とcollectionViewの高さと完全に一致しておれば余白は消える
->1の値がcollectionViewの高さよりも少しでも高い場合は、変わらず余白が表示される
->1の値がcollectionViewの高さよりも少しでも低い場合は、余白は消えるが、collectionViewの高さが内部に表示するコンテンツより低くなってしまうため、collectionViewが治りきれずスクロールされる形になる。
<防ぐ方法2>
->余白が出ることは許容し、余白に表示されても良い色をつける方法
1.collectionViewの直下にViewを配置(これは自動的にCollectionViewと同じ大きさになる)
2.1に余白として表示されても良い色をつける
->これでcollectionView自体の色が変わる。
->もしcollectionViewの色はそのままで、footerの下に表示される余白だけに色をつけたいなら
1の下にsubviewを追加し、そのbottomマージンの高さはfooterと同じ高さとする
そうすると、collectionViewのしたからfooterと同じ高さの部分だけ2の色が表示される
<防ぐ方法3>
下スクロールして、さらに下にスワイプするとcollectionViewの背景色が表示されてしまう。
これを防ぎたい場合は、
1.scrollviewの中にcollectionviewを入れる
2.collectionViewの直下に背景カラーを設定する
3.scrollviewの中にcollectionviewを入れる時にheightを指定しないとエラーになるので、
暫定のheightを入れる
4.viewDidLayoutSubviewsの中でcollectionViewの実際のサイズを確定させる。
5.そのとき、↓で指定したheightを加算して計算すること
UICollectionViewDelegateFlowLayoutをextionsionして、header/footer/cell/の高さを指定する
また、↓で指定したセル間のspace/行間のtop/bottomも加算すること
■その他のセル間の余白
■collectinViewの行間の幅指定
■collectionViewはまりどころ3
<prepareForReuseが呼ばれない>
これは、初期表示時は呼ばれない。再利用する際に呼ばれるので、viewDidAppearなどでcollectionView.reloadDataを呼ぶとprepareForReuseが呼ばれる。
->なので、prepareForReuseには初期化ロジックを入れないこと
■CollectionViewCellを動的に
estimatedItemSizeを使って、
flowLayout.estimatedItemSize = CGSizeMake(1, 1)
とかにすると、勝手にセルの大きさを計算してくれた。
ただし、collectionViewの高さをあとで確定したい場合
■UILabelのサイズを計算する方法
UILabel#sizeThatFits
と
boundingRect
がある。若干結果は変わる。
boundingRectは小数点そのまま。
sizethatFitsは小数点が四捨五入?
sizethatFitsの方が完結にかけて、実際のサイズに近かった。
https://qiita.com/roba4coding/items/c3e7ac47c2d5e5bd3c3a
■アプリアイコンの設定手順
Home画面用
iPhoneでは60pt(180@3x、120@2x)
iPad Pro では167@2x、iPadでは 152@2x
Spotlight用 iPhone 40pt(@2x,@3x)、iPad 40pt(@1x,@2x)
Settings(設定) iPhone 29pt(@2x,@3x)、iPad29pt(@1x,@2x)
Notifications(通知)iPhone 20pt(@2x,@3x)、iPad 20pt(@1x,@2x)
一つのアイコンをMacOSX固有コマンドsipsを利用してファイルのリサイズを行う。
Application用のAsset設定ファイルを更新する
https://qiita.com/44nobu/items/c543742eb8f5f031dad4
■constraintsの値を動的に変える方法
constraintsをIBOutletでつないで、
constantを変える
https://yuu.1000quu.com/change_autolayout_value
@IBOutlet weak var blueViewHeightConstraint: NSLayoutConstraint!
blueViewHeightConstraint.constant = 0
UILabelのフォントサイズの変更
https://qiita.com/shocho0101/items/678aef624fbcf87b5a51
labelMy2.font = UIFont(name: "Henderson BCG Sans", size: 50)
->これだと50にならなかった
Dateから年月日時分秒曜日を取得
https://qiita.com/isom0242/items/e83ab77a3f56f66edd2f
https://swiswiswift.com/2018-04-20/
https://qiita.com/kkoide1332/items/e491b6e0c2b676b0e89b
日付の加算
https://qiita.com/SaturnR7/items/ac304afee7358584b817
日付の比較
https://qiita.com/takashings/items/06b85a427aa560041a91
【Swift】日付の差分を計算
https://qiita.com/wadaaaan/items/d75b67ef712d49b2399e
■タイムゾーンについて
DateFormatterにタイムゾーンを設定した場合、
出力時は、そのタイムゾーンに応じた表示となる。
時間設定時は、そのタイムゾーンの時間から計算したGMT時間が設定される
(タイムゾーン日本で11/3 1:00 を設定してそのままprintすると11/2 16:00が表示。DateFormatterで表示すると11/3 1:00で表示)
(JST(日本時間)はGMT(グリニッジ標準時)の9時間後)
※GMT≒UTC
let fmt = DateFormatter() // イニシャライザでgregorian:西暦、japanese:和暦など指定可能
fmt.timeZone = .current // 例:日本時間。アメリカにしたければ「TimeZone(identifier: "America/Los_Angeles")」とする
fmt.locale = .current // 例:日本フォーマット(~時~分とか)
fmt.dateFormat = "yyyy-MM-dd HH:mm:ss"

var startDate = fmt.date(from: "2020-11-03 01:00:00")! //例:fmtにタイムゾーン指定しているので、日本時間(JST=GMT+9時間)で設定。自動的に-9時間のGMT時間で保存してくれる
print("test! startDate1 \(startDate)") //結果:GMT時間となる->test! startDate1 2020-11-02 16:00:00 +0000
print("test! startDate2 \(fmt.string(from: startDate))") // 結果:JST時間となる->test! startDate2 2020-11-03 01:00:00
日付のテスト
https://qiita.com/tamappe/items/c1a1a72cc5069cfb085d
日付関連クラスのまとめ
https://qiita.com/eKushida/items/541a65800efe1ffc523f
【Swift】Dateの王道 【日付】
->2017/08/13 16:37とかを表示したいならDateFormatterにあらかじめスタイルが用意されているので、
dateFormatter.timeStyle = dateFormatter.mediumとdateStyle = .short
だけでよい
https://qiita.com/rinov/items/bff12e9ea1251e895306
■Locale(identifier: "en_US_POSIX")指定の推奨
https://capibara1969.com/2120/
https://qiita.com/rinov/items/bff12e9ea1251e895306
https://qiita.com/gonsee/items/d3fb641914d2ca45e858
let fmt = DateFormatter()
let dateStr = "2020/11/12"
fmt.dateFormat = "yyyy/MM/dd"
fmt.locale = Locale(identifier: "ja_JP") // -> Locale(identifier: "en_US_POSIX")にすべき。

// String -> Dateへの変換
let date = fmt.date(from: dateStr) // ->和暦の場合、令和で換算されて4039/11/12になってしまう

// Date -> Stringへの変換
let nowDate = Date() // -> 2020/11/12(JST)
let str = fmt.string(from: nowDate) // -> 和暦の場合、令和2年だから「0002/11/12」となってしまう

/*
DateFormatterにLocale(identifier: "ja_JP")
とした場合、端末で「和暦」と「西暦」どちらが設定されているかが判定される。その後、

<Dateへの変換時>
「西暦」の場合はそのまま「(西暦)2020/~」となるが、
「和暦」の場合は「(令和)2020/~」->を西暦に換算し、「(西暦)4039/~」となってしまう。
<Stringへの変換時>
「西暦」の場合はそのまま「(西暦)2020/~」となるが、
「和暦」の場合は「(西暦)2020/~」->を和暦に換算し、「(令和)0002/~」となってしまう(YYYY/~で表示するのは不適切)

これらを防ぐためには、「Locale(identifier: "en_US")」を指定すると、「今のところ」常に西暦で表示される。
ただし、アメリカの文化や習慣によって西暦表示がスタンダードじゃなくなると西暦じゃなくなるかもしれない。
「Locale(identifier: "en_US_POSIX")」を指定するがベスト。
en_US_POSIXは、西暦で、将来的にも書式が変わらないとAppleが保証している特別なLocale。
*/
textFieldのフォーカスを外す(その結果、キーボードが非表示になる)
textField.resignFirstResponder()
https://qiita.com/takehito-koshimizu/items/d4bff11017c8f387486d
textFieldのイベント
https://qiita.com/takehilo/items/bcabb2a5052c9c93e6fd
kern: iOSのLabelの文字間隔を指定可能にする
https://qiita.com/Tsuyoshi84/items/3ce90907bf7620200a22
stackview内の部品に余白をつける
https://qiita.com/kinopontas/items/d08f84dbb711c5acbe28
【Swift】Modalでpresent表示した子画面の閉じるイベントを親画面で検知する
https://qiita.com/o_mo_te/items/9ffd22873303d873bbed
    let vc = NextViewController()
    vc.presentationController?.delegate = self
    self.present(vc, animated: true, completion: nil)

extension ParentViewController: UIAdaptivePresentationControllerDelegate {
  func presentationControllerDidDismiss(_ presentationController: UIPresentationController) {
    // ChildViewControllerのDismissを検知
    print("closed")
  }
}
上記だけでは、モーダルで表示した画面を下スワイプで閉じても検知してくれない。そこで、以下を実装
https://qiita.com/fummicc1_dev/items/a30e3cbfbf1148b0ec84
	func dismiss(animated flag: Bool, completion: (() -> Void)? = nil) {
        super.dismiss(animated: flag, completion: completion)
        guard let presentationController = presentationController else {
            return
        }
        presentationController.delegate?.presentationControllerDidDismiss?(presentationController)
    }
※子画面がNavigationbarありなら、guardの部分を以下にする
    guard let presentationController = self?.navigationController?.presentationController else {
        return
    }
暗号化と電子署名と証明書(概念)
https://qiita.com/nkmk1215/items/f45ecf7c27520cbff673
暗号化と電子署名と証明書(iOSで実装)
https://qiita.com/e9d26/items/bb57b35c1ba7726c33d5
X.509 証明書
->X.509とは証明書の記述形式(フォーマット)のこと。
->それに従ったものをX.509 証明書という
->X.509はただのフォーマットなので、実際にバイト配列にするためにはDERやXERなどの技術が必要
->上記で作成されたバイト配列をBASE64などでテキストデータに変換(エンコード)して、証明書に適用する
https://qiita.com/TakahikoKawasaki/items/4c35ac38c52978805c69
base64
->バイナリデータを英数のテキストデータに変換する技術(エンコード)
https://qiita.com/PlanetMeron/items/2905e2d0aa7fe46a36d4
■xcodeの設定(build target/build scheme/byuildConfiguration)
build schme(起動時に端末と一緒に選択する実行環境 = 以下をまとめたもの)
・build target(ビルド情報:プロビジョニングプロファイルとかを設定)
・build configuration(コード上でdebug/releaseを分けたいときに利用)
->build targetを追加すると、自動でbuild schemeも追加される(build configurationは特に設定していない)
https://qiita.com/takehilo/items/2d222748abd4db3da5e1
■DatePickerの分刻みを変更
https://blog.77jp.net/uidatepicker-swift-japanese-document-xcode
// 分刻みを30分単位で設定
uiDatePicker.minuteInterval = 30
■UITextFieldの入力をUIPickerからのみ受け付けるための実装
class TestViewController: UIViewController {
    override func viewDidLoad() {
        super.viewDidLoad()
        // 後述のdelegateを適用
        testTextField.delegate = self
        // カーソルは透明にする
        testDateTextField.tintColor = UIColor.clear
    }
}
extension TestViewController: UITextFieldDelegate {
    func textField(_ textField: UITextField, shouldChangeCharactersIn range: NSRange, replacementString string: String) -> Bool {
        // UITextFieldの入力をUIPickerからのみ受け付けるための実装
        return false
    }
}
■UIPickerViewのエリア外でタップすると閉じる
タップの検知のためのUITapGestureRecognizerをstoryboardで定義
https://yuu.1000quu.com/use_storyboard_and_ui_tap_gesture_recognizer
あとはtapGestureRecognizerをOutletで紐付け、
以下でOK
tapGestureRecognizer.rx.event.asDriver()
.drive(onNext: { [unowned self] _ in
self.view.endEditing(true)
})
.disposed(by: disposeBag)
■AutoLayoutのFirst ItemとSecond Itemの謎を追う
->FirstとSecondの入れ替え方:First Itemを選択し、ポップアップからReverse First and Second Itemを選択
http://chicketen.blog.jp/archives/31223964.html
Safe Areaの活用
->Use Safe Area Layout GuideをチェックするとSafeAreaを使えるようになる
https://qiita.com/roba4coding/items/5a0794cf7cd13c82b2b5
Enum
https://blog.foresta.me/posts/swift_case_iterable/
enum ColorType:Int {
    case blue
    case yellow
    case red
    case green
    case purple
    case brown
}

ColorType(rawValue: 2)
->ColorType.yellowが取得できる

ColorType.yellow.rawValue
->2が取得できる

Color.allCase
->CaseIterableに準拠している場合、全要素の配列を取得できる(例:enum ColorType:Int, CaseIterable { ... }とする)
tableviewの更新
https://blog.mothule.com/ios/uitableview/ios-uitableview-reload-basic
↓後者だけだと、データは前のままなので表示が変わらない。前者でデータを再取得
viewModel.updateViewItems()
tableView.reloadData()
XcodeとSwiftの対応バージョン
https://qiita.com/uhooi/items/b16c0959aa6e3caf5426
12.2 (12B45b)   5.3.1   2020/11/12
12.0 (12A7209)  5.3 2020/09/16
SwiftはXcodeの一部として提供されています。
そのため、どちらか片方のみをバージョンアップすることは(私の知る限り)できません。
->ビルドする時のSwiftのバージョンをさげることはできる
https://dev.classmethod.jp/articles/swift-2-3/
ライブラリがビルドするswiftバージョンを指定する方法参考
https://rarejob-tech-dept.hatenablog.com/entry/2019/05/10/190000
http://caters.works/2017/01/cocoapods-swift-23/
初心者向けCocoaPodsで最低限必要な用語の解説とTips
https://qiita.com/masaori/items/e5b8bda8f5847d5b4392
<CocoaPods/Specs>
公式のSpecsリポジトリ
はじめてpod installするときにデフォルトでクローンされるリポジトリ。
保存先は~/.cocoapods/repos/master
https://qiita.com/msh5/items/c35717b27975c9e48d15
pod コマンドはライブラリのメタ情報をローカルにキャッシュする。
->podコマンドを使うとSpecsが更新されるってこと?
<podspec>
https://efcl.info/2013/1003/res3440/
https://qiita.com/taji-taji/items/e23373f9b8124de728a2
https://qiita.com/key/items/663b0757f57434701fdb#podspec%E6%9B%B8%E3%81%8F
https://qiita.com/key/items/663b0757f57434701fdb
https://dev.classmethod.jp/articles/cocoapods/
CocoaPods でライブラリを公開するにはライブラリの定義ファイルであるpodspecを、
CocoaPods/SpecsにPullRequestして取り込んで貰う必要がある
->更新のたびにやる必要があるっぽい
ライブラリの入手先(github)や、ビルド方法の定義が入ったメタデータ
JSON形式でもOK(CocoaPodsレポジトリ内はJSONで管理されているみたい)で、LibraryName.podspec.jsonというファイルが利用できる。
[SPEC_NAME].podspec.json
または
[SPEC_NAME].podspec
の形式になっているっぽい
<Podfile>
xcodeprojと同じディレクトリに置く
どのライブラリをインストールするかを記載するテキストファイル
ライブラリ名だけを記載した場合、~/.cocoapods/repos/にクローンしてあるSpecsから一致するものが探される
<Podfile.lock>
pod install
->Podfile.lockがなければ作る
->Podfile.lockがあれば、そこに書かれたライブラリとバージョンのものをインストール
->バージョンは上がらない。Podfile.lockも更新しない。
pod update
->updateはPodfile.lockをみずに、ライブラリを最新化する
->バージョンが上がり、Podfile.lockが更新される。
https://qiita.com/shtnkgm/items/db45fd85c63696fd769b
https://qiita.com/KakeruFukuda/items/369b71d074c12b449e09
<configuration>
https://qiita.com/key/items/cff126e1863890d96a29
pod "TestFlightSDK", :configuration => ["Debug", "Adhoc"]
CocoaPods could not find compatible versions for pod “~~~~
が出た場合の対処法
https://mjeld.com/swift-cocoapods-could-not-find/
bundler:cocoapods自体のバージョンが上がってしまうのを防ぐ
https://qiita.com/fuwamaki/items/443a210a1b92e4f2c6e6
bundlerインストール後は
pod install
ではなく
bundle exec pod install
と打つ。
カルタゴ(カーセッジ)
https://qiita.com/yutat93/items/97fe9bc2bf2e97da7ec1
https://qiita.com/tsuzuki817/items/8f6e2e0c2b3f9d197097#5-run-script%E3%82%92%E6%9B%B8%E3%81%8F
インストール後の手順
・cartfileに使いたいライブラリを書く
・ライブラリをビルド
-> carthage update --platform iOS
・Xcodeのプロジェクトにビルドしたライブラリを入れる
・Run Scriptを書く
->Build PhasesのRun Scriptを追加し、そこに/usr/local/bin/carthage copy-frameworksを追加
Swiftのバージョンを上げるとCarthage経由でインストールしたパッケージでエラーが起きる ( importでエラー )
->コンパイルしてるバージョンとimportしてるバージョンの差分がある
https://qiita.com/gaipoi/items/7259f7b2ecbe34a1ea3a
https://qiita.com/190yamashita/items/262d5e1db5e30f0305f1
Command Line Tools for Xcode
Xcodeをコマンドで操作するツール
https://style.potepan.com/articles/9093.html
コマンドまとめ
https://qiita.com/susieyy/items/f522e87e547adbc0bd6d
https://qiita.com/kazuhidet/items/82dbb0aab46b6bd3f010
<tableview/collectionViewなどのスクロールを無効にする方法>
tableView.scrollEnabled = false
https://suer.hatenablog.com/entry/2015/01/05/200344
<Navigation controllerのライフサイクル>
http://blog.hikware.com/article/177622706.html
次の画面にpushする直前、willMoveが実行される
UIAlert
https://i-app-tec.com/ios/uialertcontroller.html
ナビゲーションバー で戻るボタンを押したことを検知する
https://qiita.com/fuwamaki/items/a5d8594086d2f813e72f
■■■■■■■
sublime textのuml設定方法
https://gist.github.com/webgyo/b91d0e9e266e393b117bf4cc9880072f
jdkのインストールが必要とのこと
unable to load diagram plugin check console for details
以下でjdkをインストール
https://maysatsuki.com/mac/jdk/90
Diagram
じゃなく
sublime_diagram_plugin
をインストールするっぽい
エラーが消えなかったのでVS codeで試す
https://qiita.com/watamura/items/51c70fbb848e5f956fd6
VSCodeの拡張機能を特定のバージョンに簡単に戻す方法
https://qiita.com/suusan2go/items/962c761349e2f59715a3
拡張に対するアップデートをさせない方法
https://qiita.com/binary2/items/a14ed7c6ee352ccf9e62
VSCode拡張のPlantUMLプレビューが表示されない場合の対応
https://qiita.com/zonbitamago/items/7946acfb4cbaa139f00a
jdk8じゃないとエラー
https://smile-jsp.hateblo.jp/entry/2020/04/13/131446
jdk8をインストール
https://weblabo.oscasierra.net/java-install-oracle-jdk8-macosx/
場所は以下を指定
/Library/Java/JavaVirtualMachines/jdk1.8.0_271.jdk/Contents/Home/bin/java
VSCode拡張のPlantUMLプレビューが表示されない場合の対応
https://qiita.com/zonbitamago/items/7946acfb4cbaa139f00a
fireFoxでフォルダを開く
https://qiita.com/lulucowcow/items/c29ca8255a149364e728
■■■■■■■■■■■■■
gitのコンフリクト時
https://www-creators.com/archives/1938#Git
https://qiita.com/hkengo/items/f47b9f50ac2dca407d12
git mergetool
https://blog.eiel.info/blog/2013/06/26/git-mergetool-opendiff/
master -> branch1 -> branch2
があるとして、
branch1を修正してPR作成
branch2を修正してPR作成してマージ
branch1をローカルで直してpushするとrejectされる。
git pullだけではダメ。
git pull origin branch1とする必要がある。
そのあとpushは正常にできる
【Swift】protocol で関数を定義する際にデフォルト引数を定義したいとき
https://blog.cybozu.io/entry/2018/08/15/080000
https://qiita.com/nakagawa1017/items/18ff5b040957cba8e7e5
CompositeDisposable
->複数のDisposableをまとめて破棄したりしてくれるクラス
https://blog.xin9le.net/entry/2012/02/27/214955
https://blog.cybozu.io/entry/2018/08/15/080000
    private func bindViewModel() {
        self.viewModel.itemLoaded.subscribe(
            onNext: { [unowned self] in
                // リロード
                self.cellDisposables.dispose()
                self.cellDisposables = CompositeDisposable()
                self.tableView.reloadData()
            }
        ).disposed(by: self.disposeBag)
    }

    func tableView(_ table: UITableView, cellForRowAt indexPath: IndexPath) -> UITableViewCell {
        let cell = table.dequeueReusableCell(withIdentifier: "tableCell", for: indexPath)

        // チェックボックスタップイベント
        let checkButtonObservable = checkButton.rx.tap.asObservable()
        let disposable = checkButtonObservable.subscribe(
            onNext: { [unowned self]  in

                // アラートダイアログ
                let alertController: UIAlertController =
                    UIAlertController(title:"完了状態変更", message: "未完了状態に戻しますか?", preferredStyle: .alert)
                self.present(alertController, animated: true, completion: nil)
            }
        )
        _ = cellDisposables.insert(disposable)
        return cell
    }
モーダルビューと、呼び出し元の関係としては、
presentingViewController ⇔ presentedViewController
という関係
https://ssdkfk.wordpress.com/2012/07/24/modalview%E3%81%AE%E5%BE%8C%E3%82%8D%E5%81%B4%E3%81%AB%E3%81%82%E3%82%8Bviewcontroller%E3%82%92%E6%93%8D%E4%BD%9C%E3%81%99%E3%82%8B%E6%96%B9%E6%B3%95/
local notificationの実装
https://qiita.com/mshrwtnb/items/3135e931eedc97479bb5
登録済みlocal notificationの更新・削除
https://dev.classmethod.jp/articles/update-unnotificationrequest/
通知がタップされたときの処理
https://dev.classmethod.jp/articles/wwdc-2016-user-notifications-7/#toc-4
    private func createOrUpdateNotification() {
        // 時間の設定
        let alarmDate = viewModel.todo.alarmDate
        let calendar = Calendar.current
        var notificationTime = DateComponents()
        notificationTime.year = calendar.component(.year, from: alarmDate)
        notificationTime.month = calendar.component(.month, from: alarmDate)
        notificationTime.day = calendar.component(.day, from: alarmDate)
        notificationTime.hour = calendar.component(.hour, from: alarmDate)
        notificationTime.minute = calendar.component(.minute, from: alarmDate)
        let trigger = UNCalendarNotificationTrigger(dateMatching: notificationTime, repeats: false)

        // 通知のメッセージセット
        let content = UNMutableNotificationContent()
        content.title = viewModel.todo.title
        content.body = viewModel.todo.memo
        content.sound = UNNotificationSound.default

        // 通知スタイルを指定
        let request = UNNotificationRequest(identifier: viewModel.todo.id, content: content, trigger: trigger)
        let center = UNUserNotificationCenter.current()

        // 通知をタップした際に呼び出されるクラスを設定
        // (UNUserNotificationCenterDelegateを実装しているクラス)
        if let nvc = self.navigationController {
            nvc.viewControllers.forEach { vc in
                if let top = vc as? TopViewController {
                    center.delegate = top
                }
            }
        }

        center.add(request, withCompletionHandler: nil)
    }
extension TopViewController: UNUserNotificationCenterDelegate {
    // 通知をタップするとこのメソッドが呼ばれる
    func userNotificationCenter(_ center: UNUserNotificationCenter,
                                didReceive response: UNNotificationResponse,
                                withCompletionHandler completionHandler: @escaping () -> Void) {

        let todoId = response.notification.request.identifier
        print(todoId)
    }
}
ローカル通知から画面遷移を行う
https://qiita.com/PictoMki/items/19ea9ba8787bcbebd15c
UIColorを16進数カラーコードで初期化
https://qiita.com/Kyome/items/eae6216b13c651254f64
アラーム時計の作り方
https://qiita.com/K_Kenty/items/d589a0f0e1949e167aab
iOSアプリ開発初心者向けに公式ドキュメントの読み方・探し方を解説します
https://egg-is-world.com/2020/07/03/apple-official-document/
【Swift】NotificationCenterの使い方 - Qiita
https://qiita.com/ryo-ta/items/2b142361996657463e5f
<アプリのアイディア>
https://apps.jp.net/introduction/idea/#i
<アプリの収益化選択肢>
https://apps.jp.net/introduction/estimated-income/
■tableViewのスクロール位置
参考
https://grandbig.github.io/blog/2018/01/28/tableview-scroll/
<tableviewの再描画時に、スクロール位置を記憶1>
->セクション単位で指定
            tableview.reloadData()
            DispatchQueue.main.async {
                guard let visibleIndexPath = tableView.indexPathsForVisibleRows?.first else {
                    return
                }
                let indexPath = IndexPath(row: visibleIndexPath.row, section: visibleIndexPath.section)
                self.tableview.scrollToRow(at: indexPath, at: UITableView.ScrollPosition.top, animated: false)
                self.tableview.scrollRectToVisible(CGRect(x: 0, y: 0, width: 1, height: 1), animated: false)
            }
<tableviewの再描画時に、スクロール位置を記憶2>
->詳細な位置で指定
            let savedOffset = tableview.contentOffset
            tableview.reloadData()
            DispatchQueue.main.async {
                self.tableview.contentOffset = savedOffset
            }
<フォント一覧>
https://frog9.com/posts/20
<ナビバーのスタイル変更>
https://qiita.com/tomotaka_s/items/87e298c6ac9b8b6e6aa6
そのまま次の画面にプッシュ遷移すると、ナビバーのタイトルが反映されたままになる。
元に戻したければ、遷移の直前に以下を実行
// ナビゲーションバーのスタイルを元に戻す
        self.navigationController?.navigationBar.titleTextAttributes = .none
        self.navigationController?.navigationBar.barTintColor = .none
<シミュレータ のwebViewをデバッグ>
safari->環境設定->詳細->メニューバーに"開発"メニューを表示
シミュレータ でwebViewを開き、
safari->開発->シミュレータ xxx -> webviewタイトルを選択でデバッグ可能
あとは、コンソールの下の部分から、以下のコマンドでJavascriptからSwiftのメソッドを実行可能
window.webkit.messageHandlers.hoge.postMessage({"fugaParam":"hugaValue"})
参考:JavascriptからSwiftのメソッドを実行する(ネイティブ関数)
https://qiita.com/usayuki/items/6979d0d6f7d8f5b302ad
<RxSwiftのprotocol>
https://qiita.com/satoru_pripara/items/b757c4b3020fe8e02bcb
ObservableTypeに準拠: Observer, etc
PrimitiveSequenceに準拠 :Single, MayBe, Completable
SharedSequenceに準拠: Driver, Signal
<Driverの拡張>
https://engineering.mercari.com/blog/entry/2017-12-04-103247/
以下SharingStrategy == DriverSharingStrategyがDriverであることを表す ->replay(1) = 直近の値を含めてイベントを流す
private extension SharedSequence where SharingStrategy == DriverSharingStrategy, Element == HogeType {
    var isHuga: SharedSequence<SharingStrategy, Bool> {
        return true
    }
<シミュレータ で生体認証をONにする>
https://qiita.com/MilanistaDev/items/b0cd432290d18f336766
デフォルトではOFFなので
Features -> Touch ID もしくは Face ID
->EnrollでOK
■flatMapの特徴
・flatMapの引数はObservableやSingleなどにする必要
->Observableを直列で順番に実行したい時に便利
https://qiita.com/crea/items/d46360e1eac709d6a632#%E5%90%8C%E3%81%98%E3%81%93%E3%81%A8%E3%81%AFmap%E3%82%92%E4%BD%BF%E3%81%A3%E3%81%A6%E3%82%82%E6%9B%B8%E3%81%91%E3%82%8B%E3%81%AE%E3%81%A7%E3%81%AF
・flatMapの中のObservableはcompleteは握りつぶされる。errorは外に流れる
https://qiita.com/_ha1f/items/db72471d0c9e82fab13d#%E4%B8%AD%E8%BA%AB%E3%81%AE%E3%82%A4%E3%83%99%E3%83%B3%E3%83%88
mapとflatmapで処理を比較↓
outerObservable
	.map { [unowned self] param in
		// ここはなんでも良い
		// もしここにObservableを書いた場合..
		self.innerObservable(param: param)
	}.subscribe (
	    onNext: { [unowned self] innerObservable in
	    	// こんな感じでsubscribeがネストして見にくい(コールバック地獄)
		    innerObservable.subscribe(onNext: { text in
		        print(text)
	    	})
	    }, onError: { (error) in
	        print("error: \(error)")
	    }).disposed(by: disposeBag)

outerObservable
	.flatMap { [unowned self] param in
		// ここをObservable(やSingleなど)にする必要がある
		self.innerObservable(param: param)
	}.subscribe (
	    onNext: { [unowned self] text in
	    	// subscribeがネストせず、見やすい。
			// innerObservableのonNextが流れてくる
			// innerObservableのcompletedは握りつぶされる(innerObservableがcompleteになっても、outerObservableの処理を継続しないといけないから)
	        print(text)
	    }, onError: { (error) in
	    	// ここのerrorは、outerObservableとinnerObservableのerrorが流れる
	        print("error: \(error)")
	    }).disposed(by: disposeBag)
■flatMapでSingleを直列で処理する例
todoIdを使って、todoを検索
todo.todolistIdを使って、todolistを検索
todolist.categoryIdを使ってcategoryを検索する例
func getTodoSingle(id :String) -> Single<TodoDisp> { ... }
func getTodolistSingle(id :String) -> Single<TodolistDisp> { ... }
func getCategorySingle(id :String) -> Single<CategoryDisp> { ... }

func test() {
        getTodoSingle(id: todoId)
            .flatMap { [unowned self] todo in
                self.getTodolistSingle(id: todo.todolistId)
            }
            .flatMap { [unowned self] todolist in
                self.getCategorySingle(id: todolist.categoryId)
            }
            .subscribe(
                // 大元のgetTodoSingleがSingleなのでsuccessが流れてくるからonSuccessを定義
                onSuccess: { [unowned self] category in
                    print(category.name)
                }, onError: { (error) in
                    print("error: \(error)")
                }).disposed(by: disposeBag)
}
参考
https://qiita.com/sho_v00/items/e1bd4855707faae66a4e
https://qiita.com/cross-xross/items/b94745097acf765ffefe
■flatMapでObservableとSingleを直列で処理する例
func getTodoSingle(id :String) -> Single<TodoDisp> { ... }

func test() {
	// これはOK
    outerObservable
        .flatMap { [unowned self] todoId in
            self.getTodoSingle(id: todoId)
        }.subscribe (
        	// Singleのsuccessじゃなく、大元のObservableのnextが流れてくるからonNextを定義
            onNext: { [unowned self] todo in
                print(todo.title)
            }, onError: { (error) in
                print("error: \(error)")
            }).disposed(by: disposeBag)

    // これはコンパイルエラー
    // Extra argument 'onSuccess' in call
    outerObservable
        .flatMap { [unowned self] todoId in
            self.getTodoSingle(id: todoId)
        }.subscribe (
        	// Singleのsuccessじゃなく、大元のObservableのnextが流れてくるからonSuccessは定義できない
            onSuccess: { [unowned self] todo in
                print(todo.title)
            }, onError: { (error) in
                print("error: \(error)")
            }).disposed(by: disposeBag)

    // これでもOK(onNextだけ処理をしたいので、subscribe内のonNext,onErrorの記載を省略)
    outerObservable
        .flatMap { [unowned self] todoId in
            self.getTodoSingle(id: todoId)
        }.subscribe { todo in
            print(todo.title)
        }.disposed(by: disposeBag)
}
■型の確認
type(of: 確認したいもの)
https://programfromscratch.com/%E3%80%90swift%E3%80%91type-of-%E3%81%A7%E5%9E%8B%E5%90%8D%E3%82%92%E5%8F%96%E5%BE%97%E3%81%99%E3%82%8B/
var typeCheck = "日本"
type(of: typeCheck) //String.Type
■Behaviorについて
BehaviorSubjectとBehaviorRelay
https://qiita.com/yyokii/items/81dc182dc4a6f1b9fd1f
BehaviorRelayはBehaviorSubject のwrapper。
BehaviorSubjectと同様、初期値設定可能
nextだけが流れ、BehaviorSubjectと違い、errorやcompleteは流れません。
なので、valueを取得する際にtry catchが不要になる
do {
    let test = try testBehaviorSubject.value()
} catch {}

// これでOK
let test2 = try testBehaviorRelay.value
■Relayについて
Observable の一種で、.next だけが流れ、終了しないというもの
accept で Relay に .next イベントを送る
BehaviorRelay / PublishRelay の違い
初期値を持つ / 持たない
value プロパティで現在値が取得できる / できない
subscribe したとき現在値が流れる / 流れない
->両者の違いは、値を保持するかしないかの違い
https://qiita.com/usamik26/items/444d6dd7386b2949c06b#relay
■Content hugging priorityとContent Compression Registance Priority
https://qiita.com/yum_fishing/items/933e04bf40862a78e106
https://grandbig.github.io/blog/2018/08/04/content-hugging-priority/
https://moneyforward.com/engineers_blog/2016/04/05/auto-layout/
■Content hugging priority
本来のサイズよりも大きくなりにくさ = ひっぱられにくさ = 余白のできにくさ
本来のサイズよりも大きくなることに抵抗する度合い
この値が大きくなればなるほど、Viewの矩形がそのコンテンツよりも大きくならないようになる
Low(デフォルト)
他のConstraintsの影響があると
Viewの矩形がコンテンツよりも大きくなりやすい
ひっぱられやすい
=余白ができやすい
High
他のConstraintの影響があると
Viewの矩形がコンテンツよりも大きくなりにくい
ひっぱられにくい
=余白ができにくい
Required
他のConstraintの影響があると
Viewの矩形がコンテンツよりも大きくならない
ひっぱられない
=余白ができない
■Content Compression Registance Priority
本来のサイズよりも小さくなりにくさ = つぶれにくさ = 見切れにくさ (= horizontalで複数行可能なら、改行されにくさ)
本来のサイズよりも小さくなることに抵抗する度合い
この値が大きくなればなるほど、Viewの矩形がそのコンテンツよりも小さく縮小されないようになる
Low
他のConstraintsの影響があると
Viewの矩形がコンテンツよりも小さくなりやすい
つぶれやすい
見切れやすい
horizontalで複数行可能なら、改行されやすい
Hight(デフォルト)
他のConstraintsの影響があると
Viewの矩形がコンテンツよりも小さくなりにくい
つぶれにくい
見切れにくい
horizontalで複数行可能なら、改行されにくい
Required
他のConstraintsの影響があると
Viewの矩形がコンテンツよりも小さくならない
つぶれない
見切れない
horizontalで複数行可能なら、改行されない

■Display Name
ホーム画面で表示されるアプリ名
https://qiita.com/temoki/items/fc3b62bc088f96184f8f
■Bundle ID
アプリを一意に識別するIDで、ドメインのようなもの。
Xcodeのプロジェクト作成時に適当なIDを設定してしまっている場合、Store公開の前に以下の手順で変更が必要
<変更例>
ドメインを取得している場合は以下の命名規則にすることが推奨されている。
test.com というドメインを取得している場合
->「com.test.アプリ名」にする
http://psychedelicnekopunch.com/archives/467
test.co.jp というドメインを取得していて「LINE Chat」というチャットアプリを作る場合
->「jp.co.test.LineChat」にする
■App ID
Apple Developerにて、bundle identifierを入力することで発行
■証明書要求ファイル
CertificateSigningRequest.certSigningReques
->Developerに登録することで、証明書(Certificate)をダウンロードできるようになる
■証明書(Certificate)
ios_distribution.cer
->ダブルクリック->ログインを選択することで、キーチェーンに登録される
■プロビジョニングプロファイル
【任意の名前】.mobileprovision
->App IDと証明書(Certificate)を紐づけるもの。
->ダブルクリックしてXcodeに登録することでアプリの申請が可能になる。
■アプリの申請に必要な情報
Apple Developer Programへ登録したApple ID
App ID(bundle identifierを入力することで発行)
証明書(Certificate)をキーチェーンに登録
プロビジョニングプロファイルをXcodeに登録
■アプリ申請手順
https://qiita.com/Labi/items/3b71b8f5ef065904c1de
■バージョン番号とビルド番号
初期値は1.0と1
アプリで申請するときに指定する必要がある。
https://www.swift-study.com/ios-app-version-and-build/
■カスタムViewをxibではなく、storyboardでデザインする
https://qiita.com/ika_tarou/items/6ae6e61518c26781539e
コードから生成する場合は、上記ページの
「storyboardのカスタムviewとswiftファイルを紐付けします」以下はなしで、
以下の定義をするとインスタンス取得できた。
// storyboards や nib を利用する場合に必要
required init?(coder aDecoder: NSCoder) {
	super.init(coder:aDecoder)
}

// コードから利用する場合に必要
// https://medium.com/@bj1024/swift-uiview%E3%81%AE-init-coder-initializer-66d1eeaf746f

override init(frame: CGRect) {
	super.init(frame: frame)
}
■StackViewの高さを中身のコンテンツで決める方法
StackViewにコードからaddArrangedSubviewしたいとき、StackViewに何も配置せずにheightもきめたくない時がある。
heightを決めないとエラーになる。storyboard上で以下を実施
・StackViewとその親Viewとのtopとbottomのマージンを0にする
・StackViewを選択し、StackViewの親Viewにドラッグ->Equal Heightを選択(親と同じ高さにする)
・StackViewに -- spacer --など、何かしらスペースを入れるためのViewを入れる
->これでもエラーになるならDistribution=Equal Spacingを試す
->参考
http://blog.ayakix.com/2017/03/blog-post_29.html
UIKitのアトリビュート徹底解説〜UILabel編〜
https://tech.pjin.jp/blog/2016/06/24/uikit%E3%81%AE%E3%82%A2%E3%83%88%E3%83%AA%E3%83%93%E3%83%A5%E3%83%BC%E3%83%88%E5%BE%B9%E5%BA%95%E8%A7%A3%E8%AA%AC%E3%80%9Cuilabel%E7%B7%A8%E3%80%9C/
■Constraintsをコードで付与する方法
firstBaselineAnchorは最初の行のbaseLineに合わせる
lastBaselineAnchorは最後の行のbaseLineに合わせる
↓firstBaselineAnchorの例
// addSubviewしてから使うこと
testView1.translatesAutoresizingMaskIntoConstraints = false
testView1.firstBaselineAnchor.constraint(equalTo:
testView2.firstBaselineAnchor).isActive = true
■StackView
https://qiita.com/yucovin/items/ff58fcbd60ca81de77cb
■gitで特定commitのファイル一覧を見る方法
https://teratail.com/questions/189250
git show commit_id --name-only
■gitで特定ファイルを特定のcommitに戻す
https://qiita.com/ritukiii/items/5bc8f74dbf4dc5d1384c
git checkout [コミット番号] [ファイルパス]
■特定のコミットを取り消す
git revert
https://qiita.com/chihiro/items/2fa827d0eac98109e7ee
■git resetの種類
https://qiita.com/Sammy_U/items/e37c7242544fd1da81be
■gitで特定のブランチをチェックアウトする
git checkout -b local_branch_name origin/remote_branch_name
普通はlocal_branch_nameとremote_branch_nameを同じにしておけば良い
別名にした場合、pushするときは(■git push でブランチを指定する)に記載した方法でpushする
■git push でブランチを指定する
https://www-creators.com/archives/5206
// ローカルの my-master ブランチを、origin 上の master ブランチに push する
git push origin my-master:master
■git pull すると「There is no tracking information for the current branch.」となる
https://gotohayato.com/content/455/
以下を実行すればOK
git branch --set-upstream-to=origin/remote_branch_name local_branch_name
■gitで日本語ファイルをステージング エリアから削除したり、コミットを取り消したい
http://toconango.hatenablog.com/entry/2016/02/25/115243
■gitでファイルを戻す(ステージング前もステージング 後もコミット後もこれでいい)
git checkout [コミット番号] [ファイルパス]
■git hubショートカット
https://docs.github.com/ja/github/getting-started-with-github/keyboard-shortcuts
■git のコンフリクトの種類
UU(both modified)
AA(both added)
UD(deleted by them)
DU(deleted by us)
https://qiita.com/hkengo/items/f47b9f50ac2dca407d12
■git マージ時のコンフリクトで片側の変更だけ適用する方法
https://qiita.com/nantekkotai/items/2ed17c3d774211d234a4
# 2つのブランチ間でコンフリクトしているファイル fileA.txt と fileB.txt があるとする

# fileA.txt を現在チェックアウトしているブランチ側の対応に合わせる場合
$ git checkout --ours fileA.txt
$ git add fileA.txt    # add を忘れずに

# fileB.txt をマージさせたブランチ側に合わせる場合
$ git checkout --theirs fileB.txt
$ git add fileB.txt

$ git commit
■chromeショートカット
アドレスバーに移動 command L
リンクを新しいタブで開いて移動 command shift クリック
ウェブページを 1 画面ずつ下にスクロールする space
ウェブページを 1 画面ずつ上にスクロールする shift+space
リンクでコピーでテキストだけコピーできる
■gitで起こったエラー
https://qiita.com/w-tdon/items/24348728c9256e5bf945
*** Please tell me who you are.
と言うエラーになったら以下を打てばいい。
$git config --global user.email ここに自分のアドレス
$git config --global user.name ここに自分の名前
名前をgit hubで使っている名前にしたいときは、gitの自分のアカウントページに行って、Repositoriesのボタンをおす
RepositoriesのURLに含まれるのが、自分の名前
https://github.com/【ここ】?tab=repositories
■textFieldの入力制限
https://qiita.com/it_climber/items/468f45974b262450eb1f
class swift:TestViewController: UIViewController {
        ...
        self.textField.delegate = self
        ...
}

extension TestViewController: UITextFieldDelegate {
    func textField(_ textField: UITextField, shouldChangeCharactersIn range: NSRange, replacementString string: String) -> Bool {

        guard let text = textField.text, !string.isEmpty else {
            return true
        }

        let textFieldCount = text.count
        let inputCount = string.count

        switch textField {
        case textField:
            // 100文字まで許容
            return  textFieldCount + inputCount <= 100
        default:
            return true
        }
    }
}

// UITextViewでやりたいとき
        ...
        self.memoTextView.delegate = self
        ...

extension TestViewController: UITextViewDelegate {
    func textView(_ textView: UITextView, shouldChangeTextIn range: NSRange, replacementText text: String) -> Bool {

        guard let textViewText = textView.text, !text.isEmpty else {
            return true
        }

        let textViewCount = textViewText.count
        let inputCount = text.count

        switch textView {
        case memoTextView:
            // 250文字まで許容
            return  textViewCount + inputCount <= 250
        default:
            return true
        }
    }
}
■xcode12
ドキュメントタブ
https://developer.apple.com/jp/xcode/
新しいドキュメントタブでは、ワークスペース内で作業用のファイルセットを簡単に作成できます。
ドキュメントタブを従来の表示に戻す方法
https://note.com/kaigian/n/n0974b1b982dc#LPJFp
■ array.contains(where: )とかの使い方
https://rusutikaa.github.io/docs/developer.apple.com/documentation/swift/array/2297359-contains.html https://qiita.com/tikidunpon/items/9c458bfdc66bce04da20#%E9%85%8D%E5%88%97%E8%A6%81%E7%B4%A0%E3%81%AE%E5%AD%98%E5%9C%A8%E3%83%81%E3%82%A7%E3%83%83%E3%82%AF
// 存在チェック
let hasResistered = categoryArray.contains { $0.type == .category && $0.id == category.id }
let array = [2,4,6,8]
let has = array.contains(8)
array.first(where: )の使い方
let category = categoryArray.first { $0.type == .category && $0.id == category.id }
firstIndexにするとインデックスにできる
■playground
https://qiita.com/darling977/items/8577aa59797faa938264
File -> New -> Playground
■po "debug deleted (continuousRowEventIdArray)"
■xcodeのでバッグで以下のエラーでpoやexpressionが表示できない件について
error: Couldn't IRGen expression, no additional error
■文字変換
「Windows風のキー操作」にしていない場合
https://support.apple.com/ja-jp/guide/japanese-input-method/jpimf6ffb247/mac
「Control」+「J」 ひらがなに変換
「Control」+「K」 カタカナに変換
「Control」+「:」 半角英字に変換
「Control」+「L」 全角英字に変換
「Windows風のキー操作」にしている場合
「Control」+「U」 ひらがなに変換
「Control」+「I」 カタカナに変換
「Control」+「T」 半角英字に変換
「Control」+「O」 半角英字に変換
「Control」+「P」 全角英字に変換
http://inforati.jp/apple/mac-tips-techniques/windows-hints/how-to-enable-windows-key-mode-of-mac-kotoeri.html
https://qiita.com/YumaInaura/items/ef407423da042944bb60
■Project Navigatorのファイル名の横に表示されるM、A、U、?、R、I、↓、Cの意味
https://cloud6.net/so/xcode/1475196
https://seesaawiki.jp/xcode/d/%5BM%5D%5BA%5D%5B%3F%5D%C5%F9%A4%CE%A5%DE%A1%BC%A5%AF%A4%CB%A4%C4%A4%A4%A4%C6
■プロビジョニングプロファイルの有効期限(1年)が過ぎた場合は更新が必要になる
https://qiita.com/Labi/items/d93624e4f6ec7d073e76
■Provisioning Profileの種類
https://hirokuma.blog/?p=2783
Development(開発用)
->Xcodeを用いたアプリのインストール、デバッグなど開発作業が許可するためのProvisioning Profile
このProvisioning ProfileではアプリのStoreへのリリースはできません。
⭐️これをするとXcode経由のインストールだけできるようになる
Distribution(配布用)
->配信するためのアプリであることを証明する場合はこちらを選択
このProvisioning Profileで署名したアプリは開発では使用することができません。
配信方法も選んで選択します。
社内評価のための評価チームへAd Hocで提供したものが間違ってリリースされては困ったり、
App Storeにリリース予定のものがMac App Storeに間違ってリリースされることを防ぐことなど
配信方法の選択(https://qiita.com/isaac-otao/items/126bced83d9af86c7ce5)
・AdHoc
->開発評価用配布(インストールを許可するデバイスのUDIDをProvisioning Profileに登録する必要)
⭐️これをするとipaの直接インストールとtestFlightだけできるようになる
・App Store
->ストアに一般公開
⭐️これをするとストア公開だけできるようになる
・In-House
->企業の社内用(クリアする条件が厳しい+別途契約が必要)
■プロビジョニングプロファイルを適用する方法
https://qiita.com/mas821/items/ba3fda9f900e426f884e
■Archiveとビルド
xcodeで実機デバッグ:
Developmentのターゲットで実機に繋げてビルド
storeアップロード:
versionとbuildをインクリメントし、
Distribution(store配布)のターゲットでarviveし、store(App Store Connect)に反映
testflightアップロード:
versionとbuildをインクリメントし、
Distribution(Adhoc配布)のターゲットでarviveし、store(App Store Connect)に反映
https://onetech.jp/blog/how-to-use-testflight-6064
https://qiita.com/zkkn/items/59358d07307e776a3c70
ipa出力:
Distribution(Adhoc配布)のターゲットでarviveし、export
■testFlightにあげようとして、distribute appしようとしたら
No accounts with iTunes Connect access have been found for the team
のエラーが出た時
1.エラーが出ている「No iTunes Connect account」画面で画面下部の「Manage Account…」を押下
2.「Accounts」画面が表示される
->ここでNo accountとなっていた。xcodeバージョンをあげたから?
3.再度ログイン
4.Download Manual profiles」ボタンを押します。
->これで、再トライしたらできた。
https://aqlier.com/2017/12/19/xcode%E3%81%A7archive%E6%99%82%E3%81%AE%E3%80%8Cno-accounts-with-itunes-connect%E3%80%8D%E3%82%A8%E3%83%A9%E3%83%BC%E5%AF%BE%E5%87%A6%E6%96%B9%E6%B3%95/
■Xcode12でのタブ挙動を以前の設定に切り替える
https://qiita.com/m_orishi/items/2d6f3797cd6c0e9dffb5
■[Swift]Realmファイル内容の確認方法
https://qiita.com/orimomo/items/79a91639c277fa6721d4#realm-studio
->Realm Browserは2017年でアップデートが終わっているとのこと
->Realm Studioが公式。かつ力を入れて開発されているらしい
https://qiita.com/mercy-333/items/c5b34ad08f17ba8c2169
->この方法で、Realm Studioの中を一回見れたが、その後Realmを初期化するたびにクラッシュ(対策未確認)
■if case の使い方
https://medium.com/swift-column/if-guard-case-529af6a50351
https://xyk.hatenablog.com/entry/2016/08/07/102459
https://qiita.com/fmtonakai/items/2dd356f18846a3ea5768
// a は Optional
if case let x? = a {
}

// 以下と同じ
if case .Some(let x) = a {
}

// a, b, c は Optional
if let x = a, let y = b, let z = c {
}

// 以下と同じ
if case let (x?, y?, z?) = (a, b, c) {
}

// 例
enum Animal2 {
    case
    🐶(name: String),
    🐱
}

// コンパイルエラー
if animal2 == .🐶 {
    print("イッヌ🐶")
}

// コンパイル通る(associated value省略)
if case .🐶 = animal2 {
    print("イッヌ🐶")
}

// コンパイル通る(associated value省略なし)
if case .🐶(let name) = animal2 {
    print("イッヌ🐶(name: \(name))")
}

switch animal2 {
	case .🐶(let name):
		...
	default:
		break
}
のように、caseが1パターンしか使わないならif caseの方がいい
===========
■rxtableviewdatasourceType
使い方
https://qiita.com/hironytic/items/71bc729abe73ab9f0879
https://qiita.com/yuzushioh/items/43e4b392976964544776
UITableViewDataSource
を別クラスにする
RxTableViewDataSourceType
を継承する
func tableView(_ tableView: UITableView, observedEvent: RxSwift.Event) {
を実装する
あとは、delegateをやめてrx.itemSelectedとかにする?
->やってみたいけど、tableViewを新規で作るときに試す
メリット
tableViewを加工するところ
データを作るところ(->VMにもっていくことでMVVMにしやすい)
を分離して見やすくすること?
でも、それはrx使わなくてもできるから他にあるはず
以下をVC内でかけるので、各Delegateを実装しなくよく
rxの書式に合わせれるのがメリットかも
tableView.rx.itemDeleted
tableView.rx.itemSelected
tableView.rx.items(dataSource: dataSource)
https://grandbig.github.io/blog/2018/12/28/rxdatasources/
===========
■複数バージョンのXcoxeを共存させる方法
https://fukatsu.tech/xcode-multiple#Developer
Developerから欲しいバージョンのXcodeをダウンロード
名前を変えてApplicationフォルダへ移動
今のxcodeの起動バージョンを確認
xcode-select -p
xcodeを切り替え
sudo xcode-select -s /Applications/Xcode_(version).app/Contents/Developer
切り替わったか確認
xcode-select -p
storyboardでキーボードの上にUIToolbarを実装する方法(閉じるボタンとかをtextfieldの上に表示する)
https://mike-neko.github.io/blog/extra-input/
storyboardでオブジェクトを前面・背面に移動する
->意図せず、他のViewが前面にありボタンが押せない時などの対処
https://qiita.com/koogawa/items/7ec4c6663ba009e0783f
コードでオブジェクトを前面・背面に移動する
https://cpoint-lab.co.jp/article/202004/14732/
viewに枠線をつける
https://program-life.com/439
https://qiita.com/ktaguchi/items/c95821b6b1c53a79c5c2
TextFieldのclearボタンはstoryboard上で表示/非表示を設定できる
clearボタンを押したことをハンドリングしたいとき
http://kussuue.com/2017/09/textfielddelegate_method_detail/
TextFieldDelegate
//クリアボタンを押したとき
//戻り値true:クリア完了
//戻り値false:そのまま(無視)
func textFieldShouldClear(_ textField: UITextField) -> Bool {
<#code#>
}
■アプリのデフォルト言語を日本語に設定する方法
->プロジェクト作成時のデフォルトは言語が英語になっている。
->UITextfieldの長押しメニューが「選択」「コピー」ではんく「select」「copy」などの英語になっている。これを日本語にする方法
https://cpoint-lab.co.jp/article/201802/1564/
https://qiita.com/ko2ic/items/8918034d940f66fee97d
上記サイトは
developmentRegion = Japanese;
にするとあるが、これは非推奨とのこと。
developmentRegion = ja;と変更する
http://hiiro-game.seesaa.net/article/465170992.html
【Swift】UIPickerViewのデフォルト値を変更する
https://qiita.com/ermkx/items/a839e3ca30c2e76162f2
RxSwiftでUIPickerViewとUITextFieldのテキストをバインドする
https://culumn.hatenablog.com/entry/2018/06/07/120000
■AppDelegateから一番上のUIViewControllerにアクセスする方法
https://qiita.com/NaoSekig/items/fb8270503910bbe22082
https://techblog.istyle.co.jp/archives/7983
svg画像を追加する方法
https://qiita.com/Hackenbacker/items/a2a28aa57ec633f92529
■配列Aと配列Bの重複しないものだけを取得
=XOR/排他的論理和/対象差集合
=symmetricDifferenceを使う
https://www.lanches.co.jp/blog/6456
https://qiita.com/m_orishi/items/433e3cd3c54fc013ad96
https://qiita.com/hmhmsh/items/3d2d8715a3b43e90af9b#%E6%8E%92%E4%BB%96%E7%9A%84%E8%AB%96%E7%90%86%E5%92%8Csymmetricdifference
// 使われている色の配列:usedColors
// 全ての色の配列:allColors
// の重複しない配列 = 使われていない色の配列

let unUsedColors = Set(usedColors).symmetricDifference(allColors)
UITextField.rx.textがイベントを発行するタイミング
https://qiita.com/takehilo/items/bcabb2a5052c9c93e6fd
->UITextField.textにコードから文字を代入するだけでは、イベントが発行されない
        // bindコード
        searchBoxTextField.rx.text
            .orEmpty
            .asDriver()
            .drive(viewModel!.inputs.searchBoxText)
            .disposed(by: disposeBag)

        self.searchBoxTextField.text = "test"
        // このコードがないと、上記のbindコードの中に通知が飛ばない
        self.searchBoxTextField.sendActions(for: .valueChanged)
        self.viewModel?.inputs.searchEvent.onNext(())
        // ハンドリング
        inputs.searchEvent
            .withLatestFrom(inputs.searchBoxText)
            .subscribe(onNext: { [unowned self] in
                // なので、.valueChangedを送らないとここの$0は前回の値のままになっている
                self.updateViewItems(searchWord: $0)
            }).disposed(by: disposeBag)
■UITabBarControllerの現在選択中のindex
self.selectedIndex
■UITabBarControllerで現在選択されているタブをタップされた時に処理をする
<UITabBarControllerのサブクラス>
protocol SelectedMyOwnTabDelegate {
    func didSelect()
}

extension MainTabBarViewController: UITabBarControllerDelegate {
    override func tabBar(_ tabBar: UITabBar, didSelect item: UITabBarItem) {
        guard let viewControllers = self.viewControllers else { return }
        for (index, vc) in viewControllers.enumerated() {
            // 今選択しているタブだけが処理対象
            if self.selectedIndex != index { continue }
            // 今選択しているタブがタップされた場合、VCに通知
            if vc.tabBarItem.tag == item.tag,
               let navVc = vc as? UINavigationController,
               let childVc = navVc.viewControllers.first as? SelectedMyOwnTabDelegate {
                childVc.didSelect()
            }
        }
    }
}
<利用側(NavigationViewController内のVCとする)>
extension SearchViewController: SelectedMyOwnTabDelegate {
    func didSelect() {
        // 何らかの処理
    }
}
■list.reduceの使い方
https://blog.shota-ito.com/2020/02/07/post-123/
■プッシュ通知用のDevice Tokenについて
UIApplication.shared.registerForRemoteNotifications()
を実行するとdeviceTokenが更新される
deviceTokenが更新されると以下が呼び出される
func application(_ application: UIApplication, didRegisterForRemoteNotificationsWithDeviceToken deviceToken: Data)
deviceTokenは32個の10進数の配列。
これを以下のように加工する
->各配列の10進数を16進数に変換
->それを文字列結合する=64文字になる
コード
https://qiita.com/mono0926/items/3cf0dca3029f32f54a09
let token = deviceToken.map { String(format: "%.2hhx", $0) }.joined()
DeviceTokenManager.saveDeviceToken(deviceToken: token)
<10進数 -> 16進数>
138 -> 8a
102 -> 66
20 -> 14
13 -> 0d
164 -> a4
194 -> c2
218 -> da
163-> a3
122 -> 7a
172 -> ac
197 -> c5
106 -> 6a
170 -> aa
170 -> aa
58 -> 3a
237 -> ed
83 -> 53
84 -> 54
50 -> 32
154 -> 9a
205 -> cd
236 -> ec
143 -> 8f
118 -> 76
110 -> 6e
85 -> 55
127 -> 7f
120 -> 78
69 -> 45
21 -> 15
218 -> da
151 -> 97
<結果>
8a66140da4c2daa37aacc56aaaaa3aed5354329acdec8f766e557f784515da97
■10進数・16進数変換ツール
http://tool.muzin.org/16/
■16進数文字列表記(hexString)
->これとDevice Tokeの10進数->16進数変換は別の話。
https://ts0818.hatenablog.com/entry/2019/02/27/224919
これは、文字を16進数に置き換えるということ
https://kujirahand.com/web-tools/Hex.php?ve=A&charset=SJIS
■apnsToken
https://qiita.com/natsumo/items/d5cc1d0be427ca3af1cb
https://github.com/KnuffApp/Knuff/releases
tokenには以下で取得したものを指定
    func application(_ application: UIApplication, didRegisterForRemoteNotificationsWithDeviceToken deviceToken: Data) {
        let token = deviceToken.map { String(format: "%02.2hhx", $0) }.joined()
    }
cocoaPodsでインストールしたライブラリの現在のバージョンと最新のバージョンの確認方法
->pod outdated
https://program-life.com/266
特定のライブラリを指定してpod updateする方法
->pod update AFNetworking
https://qiita.com/tmnb/items/9f7b7fca0e9b71e673e4
pod installするときに
Unable to find a target named ProjectName
というエラーが出たとき
XcodeでTARGETを複数作ったら、ちゃんとPodfileで作ったターゲット分installしましょう的なお話
http://watanabeyu.blogspot.com/2019/10/xcodetargetpodfileinstall.html
GitHubでパスワード認証廃止による認証エラーが出た件
https://qiita.com/atsymd/items/a1ff5a496b78f47ce80e
【突然GitHubにpushできなくなった】 トークン生成で解決:The requested URL returned error: 403
https://zenn.dev/yuri0427/articles/9587ae6a578ee9
do {
try ...
} catch let erro {
}
のテストをするときは
throw NSError(domain: "error", code: -1, userInfo: nil)
■CollectionViewにて、背景グレーのヘッダを出すため、以下の実装としたところクラッシュ
(TableViewではこの実装でもクラッシュしない)
https://www.fixes.pub/program/1769.html
https://qiita.com/ARATAYOKOYAMA/items/f594fa789890b78776ec
    func collectionView(_ collectionView: UICollectionView, viewForSupplementaryElementOfKind kind: String, at indexPath: IndexPath) -> UICollectionReusableView {
		let header = UICollectionReusableView()
		header.backgroundColor = UIColor.gray
		return sectionHeader
	}
以下のように登録しないといけない
    override func viewDidLoad() {
        super.viewDidLoad()
        // ヘッダの場合
        self.collectionView.register(UICollectionReusableView.self, forSupplementaryViewOfKind: UICollectionView.elementKindSectionHeader, withReuseIdentifier: "default")
        // 通常のセルの場合
        self.collectionView.register(UICollectionViewCell.self, forCellWithReuseIdentifier: "default")
    }

        // ヘッダの場合
    func collectionView(_ collectionView: UICollectionView, viewForSupplementaryElementOfKind kind: String, at indexPath: IndexPath) -> UICollectionReusableView {
		let header = collectionView.dequeueReusableSupplementaryView(ofKind: UICollectionView.elementKindSectionHeader, withReuseIdentifier: "default", for: indexPath)
		header.backgroundColor = UIColor.gray
		return sectionHeader
	}

        // 通常のセルの場合
    func collectionView(_ collectionView: UICollectionView, cellForItemAt indexPath: IndexPath) -> UICollectionViewCell {
		let header = collectionView.dequeueReusableCell(withReuseIdentifier: "default", for: indexPath)
		header.backgroundColor = UIColor.gray
		return sectionHeader
	}
■初期表示時にTextFieldにフォーカスする
viewDidLoadで
testTextField.becomeFirstResponderIfNeeded()
■git二段階認証にしたらpushできない
fatal: Authentication failed for
トークンを再発行して、パスワードにそれを入れるとpushできた
https://zenn.dev/shuzon/articles/66cef6debf17159a4011
■bashかzshか確認
echo $0
https://programmer-life.work/programming-terms/bash-profile
https://qiita.com/takutoki/items/021b804b9957fe65e093
~/.zprofile
~/.bash_profile
ログイン時に1回、実行される。
例えば、ターミナル.appを起動した際に読み込まれる。
環境変数(exportで宣言する変数)
を設定すると良い。
~/.bashrc
~/.zshrc
シェル起動時に1回、実行される。
コマンドライン上でbashと叩くと再度.bashrcが読み込まれる。(.bash_profileは読まれない)
シェルを起動する度に毎回設定したい場合はこのファイルに設定を入れる。
このファイルには具体的に何を設定すれば良いのかは、
エイリアス
シェル関数
コマンドラインの補完
https://gallard316.hatenablog.com/entry/2020/11/24/185634
↑と言ってることが異なるが、さらに詳しい説明
https://qiita.com/muran001/items/7b104d33f5ea3f75353f
これも詳しい
FFmpegとAutomatorでgif変換を自動化する
https://unity-yuji.xyz/ffmpeg-automator-auto-convert-gif/
NSLog(xcodeじゃなく、コンソールに出力)
https://qiita.com/m_orishi/items/c5593878e1ab55d5c3f2
行番号等のリテラル(#function,#line,#file,#column)
https://medium.com/@bj1024/swift4-special-literal-de20ab86cf0b
tableviewの幅を取得してレイアウトしたい場合、viewWillAppearだとまだAutoLayoutで幅が決まっていない場合がある。
viewWillLayoutSubviewsでもまだ決まってなくて
viewDidLayoutSubviewsの時点では決まっている。
viewDidAppearだと、すでに表示されているのでレイアウト処理を書くとがたつく
https://qiita.com/motokiee/items/0ca628b4cc74c8c5599d
DateFormatに渡す文字列にて、
日時の形式に記載した文字列の一部が書式指定子として変換されてしまう場合は、変換しない文字列をシングルクォーテーション( ' )で囲む
"yyyymmdd 'd'"
->dを日付ではなく、文字として認識させたい例
ナビゲーションバーのアイテムを消す
右のボタン
navigationItem.rightBarButtonItem = nil
左のボタン
navigationItem.hidesBackButton = true
◼️rebase
派生元のブランチを変更する
コミットメッセージを後から変更する
複数のコミットを一つにまとめる
コミットした内容を変更する
などができる
<基本>
git checkout (自分のブランチ)
git rebase master
<インタラクティブモード>
git fetch origin
git checkout (自分のブランチ)
git rebase -i master --no-verify
破棄したいコミットがあれば、pickをdに書き換えて:wq
(dはdropと打っても。pickやd以外の詳しいコマンドはhttps://hackmd.io/@ibuki2003/rJrrtxnXU)
warningで止まったらgit rebase --continue
最後に
git push origin (自分のブランチ) --force-with-lease
-> --force-with-lease は誰もブランチのアップストリームを変更していないなど、期待された状況にならない限りはブランチへの更新を拒否してくれるオプション
rebaseを途中でやめたいときは、
git rebase --abort
※補足
--no-verify
はなくてもいい
gitのフックを使うことで、コミットやプッシュ時にテストやlintを走らせることができるが、
そのフックを一時的に無効にするということ
■git rebaseでコミットメッセージの変更
2つ前のコミットメッセージを変更したい場合は、
$ git rebase -i HEAD~2
と入力する。
修正したいコミットメッセージのpickをeもしくはeditに変更する。
esc wqで保存。
この時点で、先ほどeditを指定した段階のコミット直前まで戻っている。
以下のコマンドでコミットメッセージを変更。
$ git commit --amend -m "コミットメッセージ"
最新の状態に戻す
$ git rebase --continue
プッシュする
$ git push origin main --force-with-lease
■Swiftのキャプチャとは
クロージャ内でクロージャ外の変数を保持すること
https://qiita.com/hinakko/items/48dd8e1867d3ef14d2ef
メモリグラフでは
リークのマークでリークの特定ができるが、リークのマークがつかないこともある。
不本意にインスタンスが残っているかどうかチェックする。
https://blog.penginmura.tech/entry/2019/08/15/084629#%E3%83%A1%E3%83%A2%E3%83%AA%E3%83%AA%E3%83%BC%E3%82%AF%E3%81%AE%E6%A4%9C%E7%9F%A5
Android studioでxcodeの
cmd E
はHighlight Usages in File
cmd K
はNext Highlight Usage
Oh My Zsh!とは
■webViewでiOSの任意のネイティブ関数を呼び出すデバッグ
safariのコンソールで
window.webkit.messageHandlers.ネイティブ関数名.postMessage("callback")
■xcodeのバージョンを指定するコマンド
sudo xcode-select -s /Applications/Xcode15.0.app
■xcodeのバージョンを確認するコマンド
xcodebuild -version
■carthageで一個だけ更新
carthage bootstrap realm-cocoa
■sublimetext
Farzherをインストールして、
select color schemeで以下選択するといけた
Farzher/WebDeveloperBright.tmTheme
■modalPresentationStyleの違い
navigator.modalPresentationStyle = .fullScree
でモーダル遷移した画面を閉じる時にviewWillAppear呼ばれる
navigator.modalPresentationStyle = .overFullScreen
でモーダル遷移した画面を閉じる時にviewWillAppear呼ばれない
■collectionViewでdelegateでサイズを返さずにautolayoutで決める方法
CollectionViewのEstimate SizeをAutomaticにする
->これでautolayoutでサイズが決まる(Noneにすると✖️)
でもCollectionViewCellで幅を指定していないので、幅が画面幅を超える
それを回避するために
セルに適当なviewを配置し、content Viewとの上下左右を一致させ、
withに制約をつけて、outletで接続
接続先のクラスで
widthConstraint.constant = UIScreen.main.bounds.width
こんな感じで幅を指定すると治る
アイテム間の縦のスペースができてしまうとき
Stroyboard上で
Collection View Flow Layoutの
MinSpacing のFor linesを0にする
->そうしないと、デフォルトの10が適用されてスペースができてしまう
以下サイトのminimumLineSpacingをコードで適用しようとしたがうまくいかなかった。
storyboard上で上記の設定をするとうまくいった。
https://hiromiick.com/collection-view-sizing/#minimumLineSpacing_CGFloat
■collectionViewでサイズ指定しても、autolayoutで自動計算されてセルが意図しない大きさになる時
func collectionView(_ collectionView: UICollectionView, layout collectionViewLayout: UICollectionViewLayout, sizeForItemAt indexPath: IndexPath) -> CGSize {
でセルのサイズを決めてるのに
contentView に張り付けた UIImageView の制約の方が優先されて指定したセルサイズにならない現象が起きた。
    if let flowLayout = collectionView.collectionViewLayout as? UICollectionViewFlowLayout {
        flowLayout.estimatedItemSize = .zero
    }
こいつをviewDidLoadに書くと解決
セルの推定サイズestimatedItemSizeプロパティにデフォルトでUICollectionViewFlowLayout.automaticSizeが指定されているのでこれを 0 に変更する。
■collectionViewのヘッダとフッタに固定の大きさの空白Viewを表示したい時
https://qiita.com/akatsuki174/items/626fe4d71990694f946f
以下を書くだけ
if let flowLayout = collectionView.collectionViewLayout as? UICollectionViewFlowLayout {
flowLayout.headerReferenceSize = CGSize(width: self.view.bounds.width, height: 8)
flowLayout.footerReferenceSize = CGSize(width: self.view.bounds.width, height: 8)
}
■tableViewでdelegateでサイズを返さずにautolayoutで決める方法
CollectionViewと同じようにできる。
■ただそのときUITableViewCellの高さが不正になるときがある
原因はtopとbottomがSuperview.Top MarginとBottom Marginになってるから。
Marginの余分な高さが入ってしまう。
Superview.TopとBottomにすると解消される。
例えば、UILabelViewにtop20 bottom20 height20 = 高さ60にしたい場合、親viewのmarginで80ぐらいになってしまう。
UILabelのconstraintsを見ても
Top Space to: Super View 20
としか書いていないので気づかないが、
親Viewのconstraintsを見ると
Top Margin Space to: label 20
となっている。こっちを見ないと気づけない
ここを
Top Space to: label 20
になるように修正すればOK
■uitableviewの中にuiviewを入れる
->ドラッグ&ドロップでtableHeaderViewに設定できるというだけっぽい
->self.tableView.tableHeaderView?.backgroundColor = UIColor.redすると、該当部分が赤くなった
https://qiita.com/eggmobile/items/bae2d4038bea20d5c20f
->ただ、ここでstackviewを入れて、とるつめとかしたくてもならない
autolayoutが更新されないっぽい
setNeedsLayoutやlayoutSubviewsなどを実行しても同じ
->一旦、headerviewをswiftで定義してみる
->やめて、以下試したら、成功
https://qiita.com/nnsnodnb/items/23a5e8236337eb4a370c
		こういうのもあったが、試していない
		https://www.webdevqa.jp.net/ja/ios/tableheaderview%E3%81%A7%E3%81%AEautolayout%E3%81%AE%E4%BD%BF%E7%94%A8/1051800839/
■UITableViewのセルに影をつける
角丸と影は片方が有効になるともう片方が無効になるので、
影専用の透明のviewを追加して、下に載せればよい
TableViewCell間には余白(スペース)を入れる機能は提供されていない
https://qiita.com/Riscait/items/5f3c026ee87c2df960c7
なので、20ptの余白をつけたいならsection内の一番上と一番下に10ptのviewを置き、cell内部で10ptのpaddingをすれば、見た目は常に20ptの余白になる
シャドーの設定
https://tech.playground.style/swift/view-shadow/
■uinavigationBarのタイトルを文字列縮小
navigationItem.titleView =
    let label = UILabel(frame: .zero)
    label.text = "title"
    label.font = フォント
    label.textColor = UIColor.blue
    label.textAlignment = .center
    label.adjustsFontSizeToFitWidth = true
    navigationItem.titleView = label
■kotlinのlongとswiftのint64
https://qiita.com/shimesaba/items/dbbc0f4ec80d011273d6
https://www.web-knowledge-info.com/wp/kotlin2/
■setNeedsLayoutやlayoutSubviewsなど
https://blog.mothule.com/ios/ios-ui-constraint-layout-update#%E5%88%B6%E7%B4%84%E5%A4%89%E6%9B%B4%E3%81%97%E3%81%A6%E3%81%99%E3%81%90%E3%81%AB%E3%83%AC%E3%82%A4%E3%82%A2%E3%82%A6%E3%83%88%E3%81%8C%E6%AC%B2%E3%81%97%E3%81%84%E5%A0%B4%E5%90%88
■name space(名前空間)
https://tsuchikazu.net/swift_namespace
https://qiita.com/yimajo/items/56c51228ca29c817f3c1
https://qiita.com/townsoft/items/dbec2f06fcd76890811d
https://qiita.com/takasek/items/3497188559fbf717751b
■ipaのインストール
https://pursue.fun/tech/how-to-ipa-install/#toc2
■subscript
https://qiita.com/happy_ryo/items/72b68859ed8ace9f5fb4
private subscript(indexPath: IndexPath) -> Any {
return values[indexPath.section][indexPath.item].value
}
■event
event: Stream に流れるイベント. 値、 error, complated のどれか.
Observer: on(event:) を持っている = event を流せる.
Observable: subscribe(observer:) -> Disposable を持っている = event を受け取れる/
Binder
: エラーイベントを処理しない。bind(to:) で bind 可能になる.
指定した Schedulerで実行(デフォルトは main)
(⏩多分、observerに準拠してると使える)
■Traits
https://www.bouzuyahonpo.com/swift-rxswift-driversignal/#toc1
Observableのラッパー。
UIに特化したObservable。
以下がある。
Driver(🌟メインスレッドで動かして、エラー出したくない時。かつ値を保持するとき)
->subscribeの代わりにdriveを使う
->エラーを流さない
->メインスレッドで実行される
->hot変換されている
->直前の値をとれる(⏩値を保持?)
->subjectをdriverに変換(⏩BehaviorSubjectをDriverに変換?)すれば、relayと同じことができる?
->relayとdriver(⏩BehaviorRelayとDriver?)の違いはメインスレッドで実行するかどうかだけ?
->そう考えると、subjectとrelay(⏩BehaviorSubjectとBehaviorRelay?)は、driverと違い、バックグラウンドスレッドで非同期実行するために必要。
->逆に、Driverはメインスレッドで実行するのでViewControllerのUIバインディングで使える
->もう一点、SubjectDriver(⏩BehaviorSubjectとDriver?)はcompleteが流れるが、Relayは流れない。completeが来てストリームが終わることを防ぐことができる
(⏩BehaviorRelayにバインド?)
->また、初期値ありかなしか(⏩値を保持するかしないか?)でpublishかbehaviorかを使い分けると可読性も上がる
Signal(🌟メインスレッドで動かして、エラー出したくない時。かつ値を保持しなくていいとき)
->subscribeの代わりにemitを使う
->relayしないDriver。(⏩値を保持しない?)
->hot変換されている
->メモリ領域少なくて済む
(⏩PublishRelayにバインド?)
ControlProperty
-> UI 部品のプロパティ(rx.text, rx.title など)
ObservableType と ObserverType を継承しているので、Observable として扱うこともできるし、bindTo の引数に指定することもできます。
->メインスレッドで実行、エラーを発生させない
(⏩当然、値を保持する)
ControlEvent
->UI 部品の発生させるイベント(rx.tap など)
->ControlProperty と違って現在値を持たない
->ObserverType でない
(⏩だからbindToが提供されていない?書き込み(外側からイベント発生)できないから)
Single
Completable
Maybe
■hot/colodはovservableの性質
https://speakerdeck.com/ukitaka/cold-at-she-nei-rxswiftmian-qiang-hui
■observable
subject
publishSubject
BehaviorSubject
ReplaySubject
->これらはHot
operator
multicast / publish
replay / replayAll
connect / refCount
share / shareReplay
shareReplayLatestWhileConnected
->これらのみHot
operator
map
filter
flatMap
create / of / just(これらはcreate系)
error
など、Hotじゃないもの以外の全てのoperator
->これらはCold
■cold
subscribeされるまで動作しない
Observale.of(1, 2, 3)
.map { n -> Int in
print(n)
return n
}
このままだと何も動作しない
.subscribe(observer)
これを書くと、1 2 3が出力される
■hot
hotになった瞬間値が流れる。
let subject = PublisSubject()
subject
.map { n -> Int in
print(n)
return n
}
subject.onNext(1)
subject.onNext(2)
subject.onNext(3)
このままだと何も動作しない
理由は
subjectはhotだが、
mapでcoldになる
coldはsubscribeされるまで値を受け取ることすらしない
let subject = PublisSubject()
subject
.map { n -> Int in
print(n)
return n
}
.hotOperation() // 何らかのHotOperation
subject.onNext(1)
subject.onNext(2)
subject.onNext(3)
何らかのHotOperationを書くと、coldなMapを動作させる
->要は、hotは内部でsubscribeを呼ぶ
■coldはobserverを二つ持てない
Observerとは、 onNext [unowned self] in
の部分のことっぽい
let o = Observable.of(1,2,3)
.map ( n -> Int in
print(n)
return n
}
o.subscribe(observer1)
o.subscribe(observer2)
とすると、ストリームが2本になる
1 2 3 1 2 3と2回表示される
■hotはobserverを二つ持てる
let o = Observable.of(1,2,3)
.map { n -> Int in
print(n)
return n
}
.publish()// これは、hotにする前準備のオペレータ
o.subscribe(observer1)
o.subscribe(observer2)

o.connect() // ここでhot変換完了し、ストリームが開始する。
こうすると、ストリームは1本のまま、
observer1とobserver2に処理が流れる。(1本->各observerへ分岐する)
つまり、1 2 3のみ表示される
■hotなobservableのイベントは各Observerで共有される
一つ上の例のように、1回のストリームがobserver1とobserver2に共通で流れる
let o = Observable.of(1,2,3)
.map { $0 *2 }
.publish() // これは、hotにする前準備のオペレータ
o.subscribeNext { print($0) }
o.connect() // ここでhot変換完了し、ストリームが開始する。開始段階のovserverは1つ
o.subscribeNext { print($0) } // 結果、こっちは出力されない
2 4 6が一回だけ表示される
■cold -> hot変換
https://speakerdeck.com/ukitaka/jin-ri-kosoli-jie-suruhotbian-huan-at-she-nei-rxswiftmian-qiang-hui?slide=55
operatorによるhot変換は、
ConnectableObservableを返却。
内部でsubjectを利用しており、operatorに応じたタイミングでhot変換が完了する
(内部では、そのタイミングでsubjectに値を流している?)
(脱線するが、hotとは、subjectのonNextで、rxの外部から値を流すときの管理方法らしい。つまり、subjectを使う=hot(https://qiita.com/acple@github/items/8d3a4d3414fa59adff70#hot)
publish()を使う場合、connect()を実行した時点でhot変換完了
shareはややこしいことにhotのくせに、subscribeした時点で初めて動作する
■operatorについて
https://speakerdeck.com/ukitaka/rxswift-kodorideingufalsekan-suo-at-she-nei-rxswiftmian-qiang-hui?slide=98
create系以外のoperatorは、
そのoperatorを呼び出したoperatorをsourceとしてもつ
Observable.of(1,2,3)
.map { $0 * 2 }
.filter { $0 % 4 == 0 }
mapのsourceはsequence (sequenceはObservable.ofの内部表現)
filterのsourceはmap
operatorはsource(=observable)を適当なタイミングでsubscribeして、
適当な処理を加えて次に流す
sinkとは、sourceのobserverになるやつのこと。
FilterにはFilterSink/ MapにはMapSinkのようになんちゃらSinkを内部に持つ
subsctibeされたらrunというメソッドが呼ばれる
runはsinkを生成し、sourceをsubscribeし、
値が流れたらsinkの処理が実行される
sinkに値が流れたらonというメソッドが呼ばれる
onの中には、filterやmap独自のやりたいことが書かれていて、結果を次に流している
■Driverについて
https://qiita.com/k5n/items/44ef2ab400f47fb66731
メインスレッドで通知
shareReplayLatestWhileConnected を使った Cold-Hot 変換
エラー処理
を一気にやってくれるというだけ
shareReplayLatestWhileConnectedは、connectedの間だけ値を読み込めるhot変換のこと。
hot変換のメリット
coldはsubsctibeするたびにストリームが生成され何回もcoldのオペレータの処理が実行されて効率が悪い
それを防ぐ
■カスタムのクラス
private extension SharedSequence where SharingStrategy == DriverSharingStrategy, Element == DepositViewState {
SharedSequence
->Driver, Signalのprotocol
SharingStrategy == DriverSharingStrategy
->Driverと同じく、behaviorみたいに、subsctibe時に直近の値を読み込む
Element == DepositViewState
->DepositViewStateを要素とする
UniRxのオペレータCombineLatestとWithLatestFrom
VC.viewにはデフォルトで左右に16ptのmarginが設定されている
https://qiita.com/yimajo/items/10f16629200f1beb7852
■Xcodeをgit連携する
git initをする
場所は,
hogehoge
– hogehoge
– hogehoge.xcodeproj
というふうに構成されているが,
1つ目のhogehogeフォルダの中(hogehogeとhogehoge.xcodeprojがある場所)で
git initを実行したらOK
同じディレクトリで
touch .gitignore
中に
.DS_store
を入力して保存
■翻訳
2種類のやり方
https://note.com/shu223/n/n1f00a1460fd0#f94045cf-6bcb-40b1-ac60-a7ba42ae6511
ハーフモーダル
https://qiita.com/mashunzhe/items/d90ae92e7daba800abaf