iOSアプリのテストを始めたい、やったほうが良いのはわかる、 けど…
という方のための、
公式フレームワークXCTestとXCUITestで自動テストを始めるまでの記事です。
セットアップ
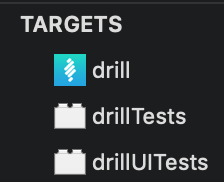
※ 既に「アプリ名+Tests/UITests」のグループやTARGETSがある場合は不要

プロジェクト作成時に「include Unit/UI Tests」にチェック
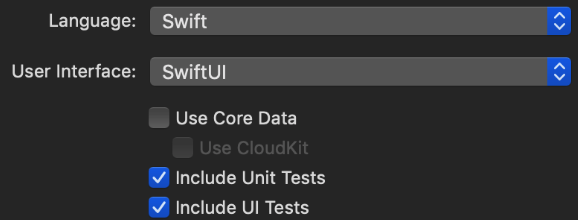
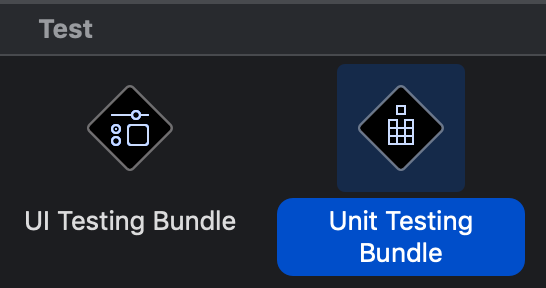
もしくはプロジェクト作成後、File→New→Target→

Unit/UI Testing Bundleを追加して
XCTest
テストクラスの作成
まず、Testsグループ内にUnitTestクラスを作成。

↓選択

すると以下のような雛形が出来る。
import XCTest
class QiitaTest: XCTestCase {
    override func setUp() {
        // Put setup code here. This method is called before the invocation of each test method in the class.
    }
    override func tearDown() {
        // Put teardown code here. This method is called after the invocation of each test method in the class.
    }
    func testExample() {
        // This is an example of a functional test case.
        // Use XCTAssert and related functions to verify your tests produce the correct results.
    }
    func testPerformanceExample() {
        // This is an example of a performance test case.
        self.measure {
            // Put the code you want to measure the time of here.
        }
    }
}
[1] setUp
テスト開始時に動く。共通の準備等に使う。
[2] testExample
名前がtestから始まる関数がテスト扱いとなって実行される。
[3] tearDown
テスト終了時に動く。共通の確認等に使う。
例:test1(), test2()を書いた場合
setUp() > test1() > tearDown() > setUp() > test2() > tearDown()
の順で動く。
Membershipの登録
他のファイルのクラスの呼び出しにはMembershipの登録が必要。
例えばLangというクラスを呼ぶ場合、アプリ内の該当ファイルを選択し…

Testsにチェックを入れる。
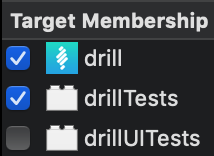
この操作は複数ファイルを選択して同時に適用できる。グループ単位はできませんでした。
テストの実行
アプリ内のコードを実行し、XCTAssert〜系メソッドでチェックする。
※以下のコード例ではアプリ特有のクラスが出てきますが、要は関数の呼び出し結果が期待値と一致するかをチェックする単体テストです。
import XCTest
class ProductIdCoderServiceTests: XCTestCase {
    override func setUp() {}
    override func tearDown() {}
    func testEncodeLesson() {
        let lesson = Lesson(lang: Lang(rawValue: "ja")!, courseId: 3, lessonId: 6)
        let coderService = ProductIdCoderService()
        let productId = coderService.encodeLesson(lesson)
        XCTAssertEqual(productId, "ja.course.3.lesson.6")
    }
    func testDecodeLesson() {
        let productId = "ja.course.3.lesson.4"
        let coderService = ProductIdCoderService()
        let lesson: Lesson = coderService.decodeLesson(productId)!
        XCTAssertEqual(lesson.lang.rawValue, "ja")
        XCTAssertEqual(lesson.courseId, 3)
        XCTAssertEqual(lesson.lessonId, 4)
    }
}
テスト別に開始ボタンを押すか、Cmd+U等でテストを実行。

通るとこのように表示される。

XCUITest
アプリを起動し、外から操作するイメージで行われるテスト。
実際のアプリに近い画面操作をテストできるが、画面に出てこない内部情報を扱うのは難しい。
テストクラスの作成
まず、UITestsグループ内にUITestクラスを作成。

↓選択
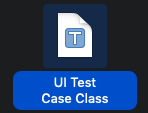
すると以下のような雛形ができる。
import XCTest
class QiitaUITest: XCTestCase {
    override func setUp() {
        // Put setup code here. This method is called before the invocation of each test method in the class.
        // In UI tests it is usually best to stop immediately when a failure occurs.
        continueAfterFailure = false
        // UI tests must launch the application that they test. Doing this in setup will make sure it happens for each test method.
        XCUIApplication().launch()
        // In UI tests it’s important to set the initial state - such as interface orientation - required for your tests before they run. The setUp method is a good place to do this.
    }
    override func tearDown() {
        // Put teardown code here. This method is called after the invocation of each test method in the class.
    }
    func testExample() {
        // Use recording to get started writing UI tests.
        // Use XCTAssert and related functions to verify your tests produce the correct results.
    }
}
XCTestに比べ continueAfterFailure と XCUIApplication() が追加されている。
continueAfterFailure = false
どこかで失敗した時にそこでテストを打ち切るという設定。UIテストは多大な時間をかけて流れを追うものなので、そうするのがオススメというもの。
XCUIApplication().launch()
アプリを起動するという操作。
Membershipの登録
XCTestと同じなので割愛。
ライブラリ探索を追加
UITests => Build Settings => Runpath Search Pathsに$(FRAMEWORK_SEARCH_PATHS)を追加

この方法がスタンダードかは不明だが、
バンドル“appUITests”は、壊れているか必要なリソースがないため読み込めませんでした。 バンドルを再インストールしてください。
とエラーが出る場合に有効。
テストの実行
テストの実行方法自体はXCTestと同じだが、XCUIApplicationやXCUIElementを使ってコードからアプリを操作する必要がある。
操作法の一部を紹介します。
class PurchaseLessonUITests: XCTestCase {
    var app: XCUIApplication!
    override func setUp() {
        continueAfterFailure = false
        app = XCUIApplication()
    }
    override func tearDown() {}
    func testPurchase() {
        app.launch()
        addUIInterruptionMonitor(withDescription: "アラート検知") { (alert) -> Bool in
            alert.buttons["OK"].tap()
            return true
        }
        app.buttons["purchaseButton"].tap()
        XCTAssert(XCUIApplication().alerts["お買い上げありがとうございます"].exists)
    }
}
割り込みへの予約
発生タイミングが定かでないものに対してアクションを予約しておける。
アラートを検知した時に即OKボタンを押す例。
        addUIInterruptionMonitor(withDescription: "アラート検知") { (alert) -> Bool in
            alert.buttons["OK"].tap()
            return true
        }
要素を探す
accessibilityIdentifierをアプリケーション内で設定しておくと、
    @IBOutlet weak var purchaseButton: UIButton! {
        didSet {
            purchaseButton.accessibilityIdentifier = "purchaseButton"
        }
    }
テストでこのように探し出してタップなどができる。
app.buttons["purchaseButton"].tap()
UIによるが、単にタイトル等で探せる場合もある。
        // `exists`を呼び出して`XCTAssert`に放り込めば存在をチェックできる
        XCTAssert(XCUIApplication().alerts["お買い上げありがとうございます"].exists)
XCTestとXCUITestの基本は以上です。
応用:XCUITestで軽めにモックを挟む
テストにおいて、状況設定に応じたコードを走らせたい場合があると思います。
XCUITestはアプリを外から操作するイメージで行われるため、内部の状態把握やコントロールが少し難しいです。
XCUIApplicationのlaunchArgumentsとlaunchEnvironmentを使ってアプリケーション内のコードを切り替える例を紹介します。
Argumentsを使ってテスト用モックを挟む
まず、launchArgumentsにテストである旨を追加。
import XCTest

class UITests: XCTestCase {
    var app: XCUIApplication!
    override func setUp() {
        continueAfterFailure = false
        app = XCUIApplication()
        app.launchArguments.append("UI_TEST") // ← これ
    }
    override func tearDown() {}
    func testHoge() {
        app.launch()
        // Hogeをテストするコード
    }
}
アプリケーション側にテスト用のクラスを追加で用意し、
protocol HogeService {
    // ..略
}
class DefaultHogeService { // 本来使用するクラス
    // ..略
}
class TestHogeService { // テスト用クラスを追加
    // ..略
}
例えばインスタンス生成時に必要に応じて選択するように変更する。
func hogeService() -> HogeService {
    if ProcessInfo.processInfo.arguments.contains("UI_TEST") { // テストかを判定
        return TestHogeService()
    } else {
        return DefaultHogeService()
    }
}
ここはアプリ本体への追記になってしまうが、致し方ない。
これでテスト時はTestHogeService()が使われるようになった。
Environmentsを使って分岐を制御する
次は、HogeServiceが成功・失敗した後それぞれのケースもテストしたい。
launchEnvironmentに命令を書くことにする。
import XCTest

class UITests: XCTestCase {
    var app: XCUIApplication!
    override func setUp() {
        continueAfterFailure = false
        app = XCUIApplication()
        app.launchArguments.append("UI_TEST")
    }
    override func tearDown() {}
    func testHogeSuccess() {
        app.launchEnvironment["HOGE_SERVICE"] = "success" // HogeServiceの挙動を成功と指定
        app.launch()
        // Hogeが成功した後の挙動が正しいかをテストするコード
    }
    func testHogeFailure() {
        app.launchEnvironment["HOGE_SERVICE"] = "failure" // HogeServiceの挙動を失敗と指定
        app.launch()
        // Hogeが失敗した後の挙動が正しいかをテストするコード
    }
}
TestHogeServiceで読み取り、分岐させる。
protocol HogeService {
    func fuga()
}
class DefaultHogeService {
    // ..略
}
class TestHogeService: HogeService {
    func fuga() {
        if ProcessInfo.processInfo.environment["HOGE_SERVICE"] == "success" {
            // 成功時にやること
        } else if ProcessInfo.processInfo.environment["HOGE_SERVICE"] == "failure" {
            // 失敗時にやること
        } else {
            fatalError()
        }
    }
}
以上です。お役に立てば幸いです。
