以前、【Swift】UIViewの各辺を指定してborderをつけるExtension という投稿を書きました。
今回はそのようなExtensionをまとめてライブラリとしてCocoaPodsに登録してみたので、その手順をざっくりと書き残します。
おかしな点があればご指摘ください ![]()
はじめに
下記記事を参考に進めていきました。記事内にはCocoaPodsのインストールから書かれていますが、この投稿ではCocoaPodsはインストールされている前提で書き進めます。
http://code.tutsplus.com/tutorials/creating-your-first-cocoapod--cms-24332
実行環境
- OS X El Capitan バージョン 10.11.2
- git version 2.5.4 (Apple Git-61)
- CocoaPods 0.39.0
1. ライブラリの作成
pod lib create [ライブラリ名]
このコマンドからライブラリを作成していきます。
コマンド実行すると、ライブラリを作成するために幾つかの質問に答えていくことになります。
以下、ライブラリ名をSampleLibとした時の実行例です。
$ pod lib create SampleLib

Cloning `https://github.com/CocoaPods/pod-template.git` into `SampleLib`.
Configuring SampleLib template.

------------------------------

To get you started we need to ask a few questions, this should only take a minute.

If this is your first time we recommend running through with the guide:
 - http://guides.cocoapods.org/making/using-pod-lib-create.html
 ( hold cmd and double click links to open in a browser. )


What language do you want to use?? [ ObjC / Swift ]
 > Swift

Would you like to include a demo application with your library? [ Yes / No ]
 > Yes

Which testing frameworks will you use? [ Quick / None ]
 > Quick

Would you like to do view based testing? [ Yes / No ]
 > No

Running pod install on your new library.

Updating local specs repositories
Analyzing dependencies
Fetching podspec for `SampleLib` from `../`
Downloading dependencies
Installing Nimble (3.0.0)
Installing Quick (0.8.0)
Installing SampleLib (0.1.0)
Generating Pods project
Integrating client project

[!] Please close any current Xcode sessions and use `SampleLib.xcworkspace` for this project from now on.
Sending stats
Pod installation complete! There are 3 dependencies from the Podfile and 3 total pods installed.

 Ace! you're ready to go!
 We will start you off by opening your project in Xcode
  open 'SampleLib/Example/SampleLib.xcworkspace'

To learn more about the template see `https://github.com/CocoaPods/pod-template.git`.
To learn more about creating a new pod, see `http://guides.cocoapods.org/making/making-a-cocoapod`.
Would you like to include a demo application with your library?
では私はもともとサンプルアプリを作っていたので Yes としました。
Which testing frameworks will you use?
ではQuickを選択しましたが、結局テストを書きませんでした、、 ![]()
以上、成功するとXcodeで作成したライブラリが開かれます。
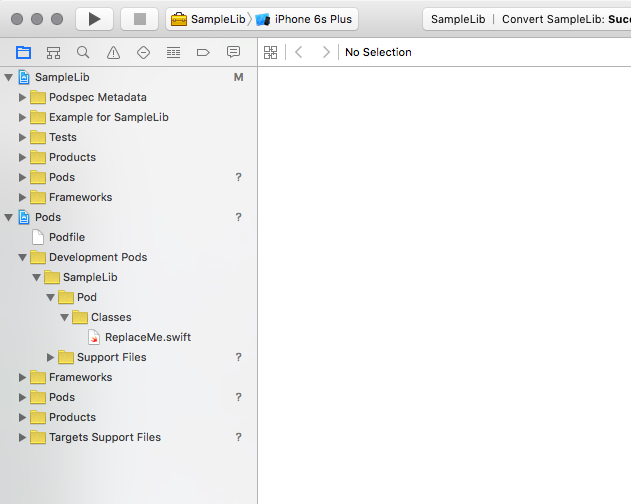
今回はデモアプリの作成をYesにしたので、Example for SampleLibというグループができています。
2. Githubに公開
ここで、一旦Githubに公開しましょう。
git add .
git commit -m "Initial Commit"
git remote add origin https://github.com/[Githubユーザ名]/SampleLib.git
git push -u origin master
リポジトリ名とライブラリの名前を合わせておいたほうがいいようです。
(ここではSampleLib)
3. podspecファイルの編集
pod lib createが成功するとpodspecファイルができます。
podspecファイルには作成したライブラリの情報を記入します。
#
# Be sure to run `pod lib lint SampleLib.podspec' to ensure this is a
# valid spec before submitting.
#
# Any lines starting with a # are optional, but their use is encouraged
# To learn more about a Podspec see http://guides.cocoapods.org/syntax/podspec.html
#

Pod::Spec.new do |s|
  s.name             = "SampleLib"
  s.version          = "0.1.0"
  s.summary          = "A short description of SampleLib."

# This description is used to generate tags and improve search results.
#   * Think: What does it do? Why did you write it? What is the focus?
#   * Try to keep it short, snappy and to the point.
#   * Write the description between the DESC delimiters below.
#   * Finally, don't worry about the indent, CocoaPods strips it!
  s.description      = <<-DESC
                       DESC

  s.homepage         = "https://github.com/<GITHUB_USERNAME>/SampleLib"
  # s.screenshots     = "www.example.com/screenshots_1", "www.example.com/screenshots_2"
  s.license          = 'MIT'
  s.author           = { "[作成者名]" => "[メールアドレス]" }
  s.source           = { :git => "https://github.com/<GITHUB_USERNAME>/SampleLib.git", :tag => s.version.to_s }
  # s.social_media_url = 'https://twitter.com/<TWITTER_USERNAME>'

  s.platform     = :ios, '8.0'
  s.requires_arc = true

  s.source_files = 'Pod/Classes/**/*'
  s.resource_bundles = {
    'SampleLib' => ['Pod/Assets/*.png']
  }

  # s.public_header_files = 'Pod/Classes/**/*.h'
  # s.frameworks = 'UIKit', 'MapKit'
  # s.dependency 'AFNetworking', '~> 2.3'
end
s.sourceのgitのURLには、前項で公開したGithubのリポジトリのURLを設定しておきましょう。
私の場合は、s.summary, s.descriptionを記入したのと、<GITHUB_USERNAME>を自分のGithubユーザネームに変更した程度で大丈夫でした。
以下、私の作成したpodspecファイルです。
https://github.com/taji-taji/TJExtensions/blob/master/TJExtensions.podspec
podspecの内容チェック
pod lib lint SampleLib.podspec
このコマンドでpodspecの内容をバリデーションチェックしてくれます。不十分な点があれば教えてくれるのでpodspecファイルを書いたらチェックしてみましょう。
以下は、podspecファイル作成直後に実行した例
 -> SampleLib (0.1.0)
    - WARN  | summary: The summary is not meaningful.
    - ERROR | description: The description is empty.
    - WARN  | url: There was a problem validating the URL https://github.com/<GITHUB_USERNAME>/SampleLib.

[!] SampleLib did not pass validation, due to 1 error and 2 warnings.
You can use the `--no-clean` option to inspect any issue.
ちなみに私の場合、s.summaryとs.descriptionに同じことを書いていたら注意されました。
4. README.mdの編集
以下のようなテンプレートができているので、必要に応じて編集しましょう。
# SampleLib
[](https://travis-ci.org/[作成者名]/SampleLib)
[](http://cocoapods.org/pods/SampleLib)
[](http://cocoapods.org/pods/SampleLib)
[](http://cocoapods.org/pods/SampleLib)
## Usage
To run the example project, clone the repo, and run `pod install` from the Example directory first.
## Requirements
## Installation
SampleLib is available through [CocoaPods](http://cocoapods.org). To install
it, simply add the following line to your Podfile:
```ruby
pod "SampleLib"
```
## Author
[作成者名], [メールアドレス]
## License
SampleLib is available under the MIT license. See the LICENSE file for more info.
5. 自作ライブラリファイルの配置
Pod/Classes/ReplaceMe.swiftを削除し、同階層のPod/Classes/以下に自作のライブラリファイルを配置します。
6. 動作確認
※この項はWould you like to include a demo application with your library?にてYesと回答し、ライブラリにデモアプリを含んでいる場合を想定しています
Exampleにデモアプリを作成し、pod installを実行します。
cd Example
pod install
うまく動けばOKです。
7. CocoaPodsにアカウント登録
podの配布関連にはpod trunkコマンドを使います。
pod trunk register [メールアドレス] '[名前]'
例)pod trunk register hoge@example.com 'Taro Tanaka'
メールアドレスにCocoaPodsよりメールが届くので、メール本文に記載のリンクをクリックしてアクティベートします。
pod trunk me コマンドを実行して、先ほど登録したアカウント情報が表示されればアカウント登録が完了しています。
8. git tag でバージョン付け
git tag 0.1.0
git push origin 0.1.0
gitのタグがpodのバージョンになるので、タグをつけてpushします。
9. 最終確認
pod spec lint SampleLib.podspec
コマンドでpodspecのバリデーションを行います。
バリデーションが通れば公開しましょう。
10. CocoaPodsへ公開
pod trunk push SampleLib.podspec
とすれば公開されます。
詰まった点
ライブラリ登録というよりはSwiftの文法的なことですが、、
作成したextensionをライブラリ化する前はextensionのアクセス修飾子をデフォルトのままで使用していました。
しかし、ライブラリ化にあたって外部モジュールとなるため、public extensionというふうにpublicなアクセス修飾子を明示的に付与する必要がありました。
最後に
今回、実際にCocoaPodsに公開したのが こちら になります。
拙いままに公開をしてしまいましたが、改善していければと思います。。
参考
- http://code.tutsplus.com/tutorials/creating-your-first-cocoapod--cms-24332 (これを中心に進めました)
-
http://qiita.com/hayashi311/items/06cf9ecd7bc59c8a6676 (
pod tryのことも書いてあり、とてもわかりやすかったです) - https://guides.cocoapods.org/making/index.html (公式ドキュメント)