TL;DR
iOS 10からWWDC 2016で発表されたUser Notifications Frameworkの使用が推奨され、お馴染みの通知系クラスはDeprecated(非推奨)となりました。
UNでは通知にアタッチメント(画像、動画など)が追加可能となり、通知の訴求力の増加が望めます。
この記事では、User Notifications Frameworkを使った実装パターンをまとめて紹介していきます。
参考:iOS10で非推奨になった通知系クラス
UILocalNotification
UIMutableUserNotificationAction
UIMutableUserNotificationCategory
UIUserNotificationAction
UIUserNotificationCategory
UIUserNotificationSettings
環境
- iPhone 5 iOS 10 Public Beta
- Xcode Version 8.0 beta
- Swift 3.0
- NIFTY Cloud mobile backend
通知許可リクエスト
はじめにUser Notifications(UN)をimportをします。
import UserNotifications
UNではrequestAuthorization(options:completionHandler:)を呼ぶことで、通知許可ダイアログが表示されます。
以下ではAvailability ConditionでiOS 9, 10のフローを分けていますが、今のところ、iOS 10でもUIApplicationを使った従来型の通知許可リクエストは動作します。
        if #available(iOS 10.0, *) {
            let center = UNUserNotificationCenter.current()
            center.requestAuthorization(options: [.badge, .sound, .alert]) { (granted, error) in
                if error != nil {
                    // エラー
                    return
                }

                if granted {
                    // 通知許可された
                } else {
                    // 通知拒否
                }
            }
        } else {
            let settings = UIUserNotificationSettings(types: [.badge, .sound, .alert], categories: nil)
            UIApplication.shared.registerUserNotificationSettings(settings)
        }
通知受信 & ハンドリング
フォアグラウンドで通知を表示したり、通知に対するアクションをハンドリングするにはapplication(_:didFinishLaunchingWithOptions:)で、UNUserNotificationCenterDelegateを設定します。
アプリ起動後にdelegateを設定してもコールバックが呼ばれないので注意が必要です。
delegate - Apple Developer Documentation
To guarantee that your app is able to respond to actionable notifications, you must set the delegate before your app finishes launching. For example, this means setting the delegate before an iOS app’s applicationDidFinishLaunching(_:) method returns.
delegateの設定方法はいつものとおり
let center = UNUserNotificationCenter.current()
center.delegate = self
フォアグラウンド
フォアグラウンドで通知を表示するにはuserNotificationCenter(_:willPresent:withCompletionHandler:)を実装します。
実装されていない場合、completionHandlerにUNNotificationPresentationOptionNoneを渡したことと同じになり、通知が何も表示されません。
// フォアグラウンドで通知受信
@available(iOS 10.0, *)
func userNotificationCenter(_ center: UNUserNotificationCenter,
                            willPresent notification: UNNotification,
                            withCompletionHandler completionHandler: (UNNotificationPresentationOptions) -> Void) {
       //...
}
バックグラウンド
バックグラウンドの場合、特に実装をしなくても通知が表示されます。
例:通知受信(Subtitleフィールドが新登場)
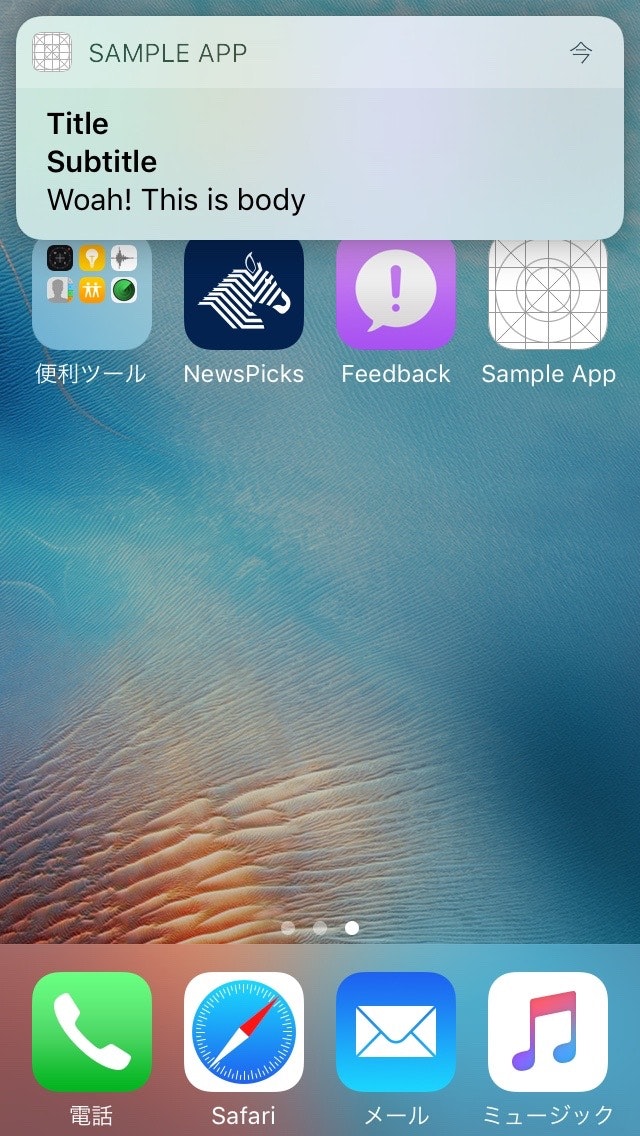
通知オプションのカスタマイズ
UNNotificationRequestはidentifierを持っているため、通知オプション(サウンドの有無など)の出し分けが容易になりました。
例えば、ゲームの途中経過を伝えるために「サウンドなしの通知」を、ステージクリア後に「サウンドありの通知」を、といったカスタマイズが可能です。
@available(iOS 10.0, *)
func userNotificationCenter(_ center: UNUserNotificationCenter,
                            willPresent notification: UNNotification,
                            withCompletionHandler completionHandler: (UNNotificationPresentationOptions) -> Void) {

    // ...

    let identifier = notification.request.identifier
    switch identifier {
    case "alert":
        completionHandler([.alert]) //通知だけ
    case "both":
        completionHandler([.sound, .alert]) //サウンドと通知
    default:
        () // 何もしない
    }
}
通知に対する操作
通知がタップされ、開封されるとuserNotificationCenter(_:didReceive:withCompletionHandler:)が呼ばれます。
   @available(iOS 10.0, *)
    func userNotificationCenter(_ center: UNUserNotificationCenter,
                                didReceive response: UNNotificationResponse,
                                withCompletionHandler completionHandler: () -> Void) {
        debugPrint("opened")
        completionHandler()
    }
通知送信 & トリガー
通知を発生させるトリガーはIntroduction to Notificationで紹介されていたもので4種類あります。
UNPushNotificationTrigger // Push
UNTimeIntervalNotificationTrigger // Time Interval
UNCalendarNotificationTrigger // Calendar
UNLocationNotificationTrigger // Location
Push
Push = Remote Notification(リモート通知)です。
APNsからリモート通知を受け取ると、userNotificationCenter(_:willPresent:withCompletionHandler:)で、UNPushNotificationTriggerインスタンスが生成されます。
// フォアグラウンドで通知受信
@available(iOS 10.0, *)
func userNotificationCenter(_ center: UNUserNotificationCenter,
                            willPresent notification: UNNotification,
                            withCompletionHandler completionHandler: (UNNotificationPresentationOptions) -> Void) {
    // Remote Notification
    if notification.request.trigger is UNPushNotificationTrigger {
        debugPrint("プッシュ通知受信")
        completionHandler([.sound, .alert])
    } else {
        // ...
    }

}
例:NIFTY Cloud mobile backendでリモート通知を打ってみた

Time Interval
特定の時間間隔でローカルプッシュを送るタイプです。UNTimeIntervalNotificationTriggerをインスタンス化し、トリガー設定します。
例:一度だけ通知
let content = UNMutableNotificationContent()
content.title = "Title"
content.subtitle = "Subtitle" // 新登場!
content.body = "Body"
content.sound = UNNotificationSound.default()

// 5秒後に発火
let trigger = UNTimeIntervalNotificationTrigger(timeInterval: 5, repeats: false)
let request = UNNotificationRequest(identifier: "FiveSecond",
                                   content: content,
                                   trigger: trigger)

// ローカル通知予約
UNUserNotificationCenter.current().add(request, withCompletionHandler: nil)
例:繰り返し通知
triggerのrepeatsにtrueを設定します。
// 1時間ごと
let trigger = UNTimeIntervalNotificationTrigger(timeInterval: 3600, repeats: true)
Calendar
特定の日時にローカルプッシュを送るタイプです。UNCalendarNotificationTriggerをインスタンス化し、トリガー設定します。
例:特定の日時に通知
// 日時を設定
let dateComponents = DateComponents()
// ...

let calendarTrigger = UNCalendarNotificationTrigger(dateMatching: dateComponents, repeats: false)
let calendarRequest = UNNotificationRequest(identifier: identifier,
                                    content: content,
                                    trigger: calendarTrigger)

UNUserNotificationCenter.current().add(calendarRequest, withCompletionHandler: nil)
Location
位置情報をもとに発火するローカルプッシュです。UNLocationNotificationTriggerをインスタンス化し、トリガー設定します。
例:新宿フロントタワー半径100m地点で送信
let coordinate = CLLocationCoordinate2DMake(35.695978, 139.689340)
let region = CLCircularRegion(center: coordinate, radius: 100.0, identifier: identifier)
let locationTrigger = UNLocationNotificationTrigger(region: region, repeats: false)

let locationRequest = UNNotificationRequest(identifier: identifier,
                                         content: content,
                                         trigger: locationTrigger)
UNUserNotificationCenter.current().add(locationRequest, withCompletionHandler: nil)
アクション付き通知
アクションをつけた通知も作成可能です。
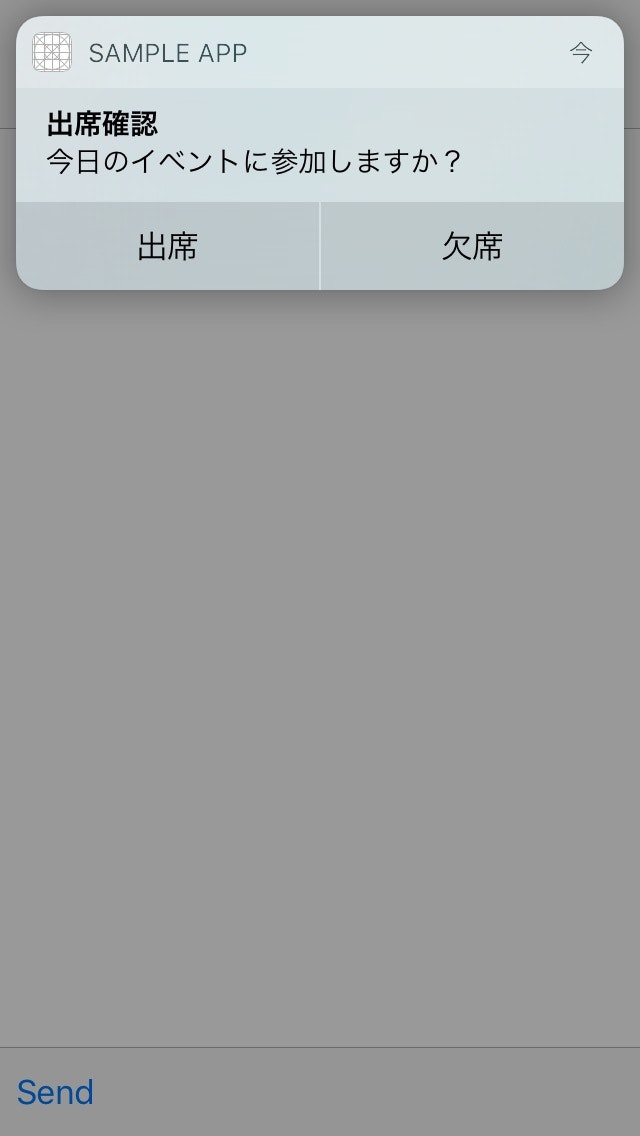
ここではイベントの出欠を取るローカル通知を作成してみます。
例:出席、欠席アクション付き通知
アクションをenumで宣言しておき...
enum ActionIdentifier: String {
    case attend
    case absent
}
actionIdentifierとして設定します。そして、contentにcategoryIdentifierを設定すると、アクション付き通知の完成です。
 let attend = UNNotificationAction(identifier: ActionIdentifier.attend.rawValue,
                                   title: "出席", options: [])

 let absent = UNNotificationAction(identifier: ActionIdentifier.absent.rawValue,
                                   title: "欠席",
                                   options: [])

 let category = UNNotificationCategory(identifier: "message",
                                       actions: [attend, absent],
                                       minimalActions: [attend, absent],
                                       intentIdentifiers: [],
                                       options: [])
 UNUserNotificationCenter.current().setNotificationCategories([category])


 let content = UNMutableNotificationContent()
 content.title = "出席確認"
 content.body = "今日のイベントに参加しますか?"
 content.sound = UNNotificationSound.default()

 // categoryIdentifierを設定
 content.categoryIdentifier = "message"

 // 5秒後
 let trigger = UNTimeIntervalNotificationTrigger(timeInterval: 5, repeats: false)
 let request = UNNotificationRequest(identifier: "FiveSecond",
                                     content: content,
                                     trigger: trigger)

 UNUserNotificationCenter.current().add(request, withCompletionHandler: nil)
アクションハンドリング
「出席」「欠席」が押されたときのアクションハンドリングは、先ほどのuserNotificationCenter(_:didReceive:withCompletionHandler:)で行います。
@available(iOS 10.0, *)
func userNotificationCenter(_ center: UNUserNotificationCenter,
                            didReceive response: UNNotificationResponse,
                            withCompletionHandler completionHandler: () -> Void) {

    switch response.actionIdentifier {
      case ActionIdentifier.attend.rawValue:
          debugPrint("出席します")
      case ActionIdentifier.absent.rawValue:
          debugPrint("欠席します")
      default:
          ()
      }

    completionHandler()
}
アタッチメント付き通知
冒頭の例のような画像付き通知はattachmentを追加します。
もちろん、アタッチメント + アクションの両方も追加可能です。
let content = UNMutableNotificationContent()
content.title = "ライブが始まりました!"
content.body = "来場者特典に応募する場合はチェックインしてください"
content.sound = UNNotificationSound.default()
content.badge = 1

if let url = Bundle.main().urlForResource("live", withExtension: "jpg") {
    let attachment = try? UNNotificationAttachment(identifier: "attachment", url: url, options: nil)
    if let attachment = attachment {
        content.attachments = [attachment]
    }
}

// ...
その他
通知キャンセル
center.removeAllPendingNotificationRequests() //送信待ちの全通知を全削除
center.removePendingNotificationRequests(withIdentifiers: identifier) //送信待ちの通知をidentifier指定で削除

center.removeAllDeliveredNotifications() // 送信済みの全通知を削除
center.removeDeliveredNotifications(withIdentifiers: identifier) // 送信済みの通知をidentifier指定で削除