<科目> 機械学習
目次
第一章:線形回帰モデル
[第二章:非線形回帰モデル]
(https://qiita.com/matsukura04583/items/baa3f2269537036abc57)
[第三章:ロジスティク回帰モデル]
(https://qiita.com/matsukura04583/items/0fb73183e4a7a6f06aa5)
[第四章:主成分分析]
(https://qiita.com/matsukura04583/items/b3b5d2d22189afc9c81c)
[第五章:アルゴリズム1(k近傍法(kNN))]
(https://qiita.com/matsukura04583/items/543719b44159322221ed)
[第六章:アルゴリズム2(k-means)]
(https://qiita.com/matsukura04583/items/050c98c7bb1c9e91be71)
[第七章:サポートベクターマシン]
(https://qiita.com/matsukura04583/items/6b718642bcbf97ae2ca8)
第四章:主成分分析
主成分分析とは
- 多変量データの持つ構造をより少数個の指標に圧縮
- 変量の個数を減らすことに伴う、情報の損失はなるべく小さくしたい
- 少数変数を利用した分析や可視化(2・3次元の場合)が実現
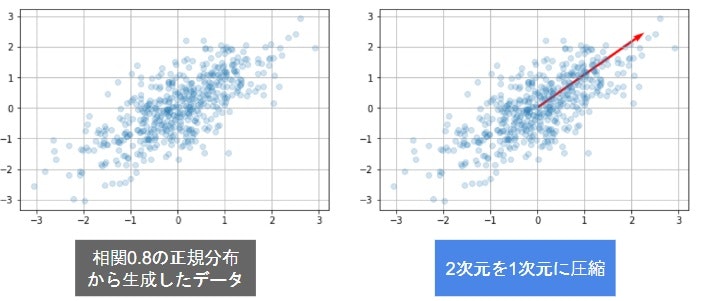
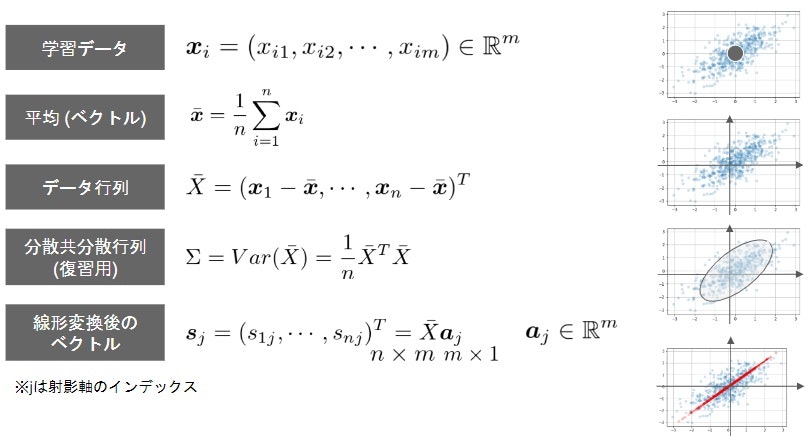
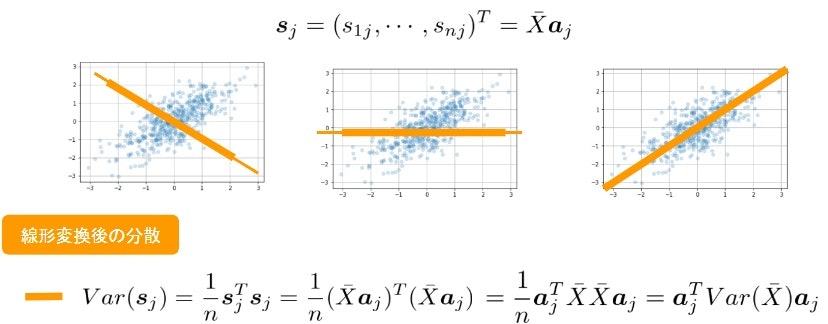
- 係数ベクトルが変われば線形変換後の値が変化
- 情報の量を分散の大きさと捉える
- 線形変換後の変数の分散が最大となる射影軸を探索線形変換後の分散90主成分分析
- 以下の制約付き最適化問題を解く
- ノルムが1となる制約を入れる(制約を入れないと無限に解がある)
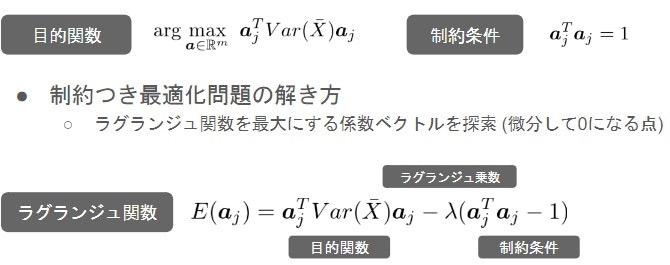
- ノルムが1となる制約を入れる(制約を入れないと無限に解がある)
(演習4)scikit learnをつかった乳がん検査データの次元圧縮
+設定
+ 乳がん検査データを利用しロジスティック回帰モデルを作成
+ 主成分を利用し2次元空間上に次元圧縮
+ レコード数569 カラム数33
- 課題
- 32次元のデータを2次元上に次元圧縮した際に、うまく判別できるかを確認
Google ドライブマップを利用して開始
from google.colab import drive
drive.mount('/content/drive')

import pandas as pd
from sklearn.model_selection import train_test_split
from sklearn.preprocessing import StandardScaler
from sklearn.linear_model import LogisticRegressionCV
from sklearn.metrics import confusion_matrix
from sklearn.decomposition import PCA
import matplotlib.pyplot as plt
%matplotlib inline
sys.pathの設定
以下では,Googleドライブのマイドライブ直下にstudy_ai_mlフォルダを作成し進めています。
cancer_df = pd.read_csv('/content/drive/My Drive/study_ai_ml/data/cancer.csv')
print('cancer df shape: {}'.format(cancer_df.shape))
cancer df shape: (569, 33)
cancer_df

cancer_df.drop('Unnamed: 32', axis=1, inplace=True)
cancer_df

・diagnosis: 診断結果 (良性がB / 悪性がM) ・説明変数は3列以降、目的変数を2列目としロジスティック回帰で分類
# 目的変数の抽出
y = cancer_df.diagnosis.apply(lambda d: 1 if d == 'M' else 0)
# 説明変数の抽出
X = cancer_df.loc[:, 'radius_mean':]
# 学習用とテスト用でデータを分離
X_train, X_test, y_train, y_test = train_test_split(X, y, random_state=0)

# 標準化
scaler = StandardScaler()
X_train_scaled = scaler.fit_transform(X_train)
X_test_scaled = scaler.transform(X_test)

# ロジスティック回帰で学習
logistic = LogisticRegressionCV(cv=10, random_state=0)
logistic.fit(X_train_scaled, y_train)

# 検証
print('Train score: {:.3f}'.format(logistic.score(X_train_scaled, y_train)))
print('Test score: {:.3f}'.format(logistic.score(X_test_scaled, y_test)))
print('Confustion matrix:\n{}'.format(confusion_matrix(y_true=y_test, y_pred=logistic.predict(X_test_scaled))))
Train score: 0.988
Test score: 0.972
Confustion matrix:
[[89  1]
 [ 3 50]]
・検証スコア97%で分類できることを確認
pca = PCA(n_components=30)
pca.fit(X_train_scaled)
plt.bar([n for n in range(1, len(pca.explained_variance_ratio_)+1)], pca.explained_variance_ratio_)

# PCA
# 次元数2まで圧縮
pca = PCA(n_components=2)
X_train_pca = pca.fit_transform(X_train_scaled)
print('X_train_pca shape: {}'.format(X_train_pca.shape))
# X_train_pca shape: (426, 2)

# 寄与率
print('explained variance ratio: {}'.format(pca.explained_variance_ratio_))
# explained variance ratio: [ 0.43315126  0.19586506]

# 散布図にプロット
temp = pd.DataFrame(X_train_pca)
temp['Outcome'] = y_train.values
b = temp[temp['Outcome'] == 0]
m = temp[temp['Outcome'] == 1]
plt.scatter(x=b[0], y=b[1], marker='o') # 良性は○でマーク
plt.scatter(x=m[0], y=m[1], marker='^') # 悪性は△でマーク
plt.xlabel('PC 1') # 第1主成分をx軸
plt.ylabel('PC 2') # 第2主成分をy軸

# 標準化
scaler = StandardScaler()
X_train_scaled = scaler.fit_transform(X_train)
X_test_scaled = scaler.transform(X_test)

# ロジスティック回帰で学習
logistic = LogisticRegressionCV(cv=10, random_state=0)
logistic.fit(X_train_scaled, y_train)

# 検証
print('Train score: {:.3f}'.format(logistic.score(X_train_scaled, y_train)))
print('Test score: {:.3f}'.format(logistic.score(X_test_scaled, y_test)))
print('Confustion matrix:\n{}'.format(confusion_matrix(y_true=y_test, y_pred=logistic.predict(X_test_scaled))))
Train score: 0.927
Test score: 0.944
Confustion matrix:
[[87  3]
 [ 5 48]]
・検証スコア94%で分類できることを確認
次元数を2に下げても、検証スコアが97%から94%とあまり下がることなく精度を保ちながら次元数削減が出た結果となった。
関連サイト
第一章:線形回帰モデル
[第二章:非線形回帰モデル]
(https://qiita.com/matsukura04583/items/baa3f2269537036abc57)
[第三章:ロジスティク回帰モデル]
(https://qiita.com/matsukura04583/items/0fb73183e4a7a6f06aa5)
[第四章:主成分分析]
(https://qiita.com/matsukura04583/items/b3b5d2d22189afc9c81c)
[第五章:アルゴリズム1(k近傍法(kNN))]
(https://qiita.com/matsukura04583/items/543719b44159322221ed)
[第六章:アルゴリズム2(k-means)]
(https://qiita.com/matsukura04583/items/050c98c7bb1c9e91be71)
[第七章:サポートベクターマシン]
(https://qiita.com/matsukura04583/items/6b718642bcbf97ae2ca8)