はじめに
どうも。スクレイピング歴14日の初心者です。
本記事はこちらの続きとなりますのでコードを例として画像収集の方法お伝えできればと思います。
勿論前回を見なくても進められる構成にしております。
環境
windows11
jupyterlab
本記事の目的
教材
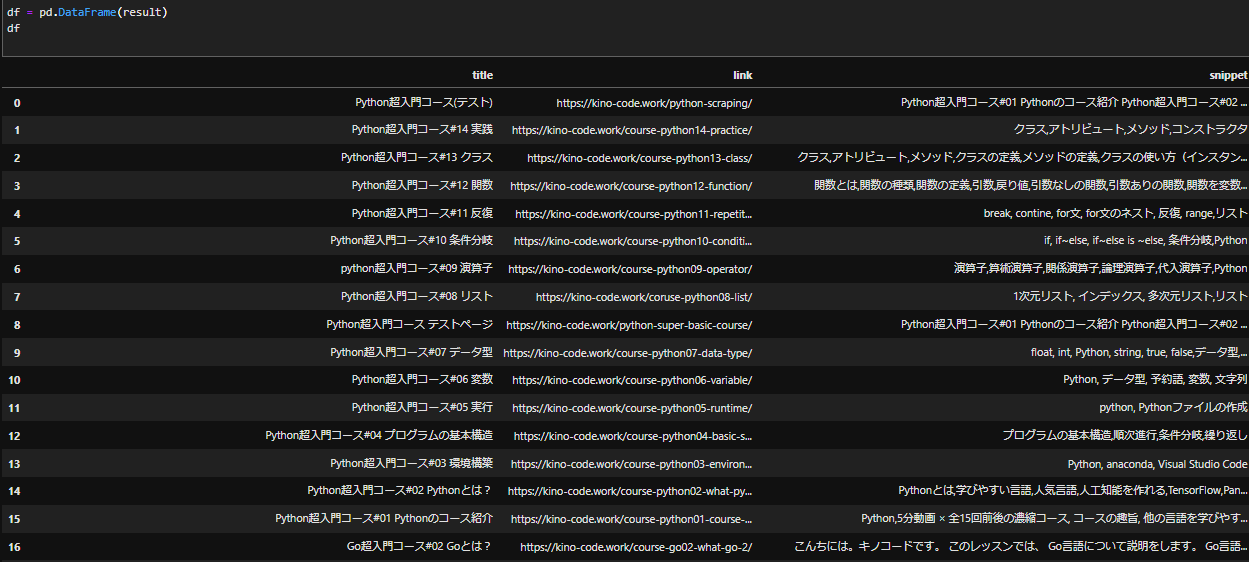
前回の記事です。今回はこの記事で生成したdfを例として扱います。
バックナンバー
-
参考
学習
前回のソースコード
from bs4 import BeautifulSoup
import requests
import bs4
import time
import pandas as pd

keyword = 'Python'

url = 'https://kino-code.work/?s={}'.format(keyword)

r = requests.get(url)
time.sleep(3)

soup = BeautifulSoup(r.text, 'html.parser')
page_na = soup.find(class_ = 'pagination')
page_num = page_na.find_all(class_ = 'page-numbers')

pages = []
for i in page_num:
    pages.append(i.text)

urls = []

if not pages:
    urls = ['https://kino-code.com/?s={}'.format(keyword)]
else:
    last_page = int(pages[-2])

    for i in range(1, last_page + 1):
        url = 'https://kino-code.work/?s={}'.format(keyword) + '&paged={}'.format(i)
        urls.append(url)

links = []
titles = []
snippets = []

for i in range(len(urls)):

    r = requests.get(urls[i])
    time.sleep(3)
    soup = BeautifulSoup(r.text, 'html.parser')
    # find_allの引数に、HTMLタグが持つCSSのクラスで検索をかける。
    get_list_info = soup.find_all('a', class_ =  'entry-card-wrap')

    for n in range(len(get_list_info)):
        # リンクを取得
        get_list_link = get_list_info[n].attrs['href']
        links.append(get_list_link)

        # タイトルを取得
        get_list_title = get_list_info[n].attrs['title']
        titles.append(get_list_title)

        # 説明文を取得
        get_list_snippet = get_list_info[n].find(class_ = 'entry-card-snippet').text
        snippets.append(get_list_snippet)


result = {
    'title': titles,
    'link': links,
    'snippet': snippets
}

df = pd.DataFrame(result)
df
これで出力されたdfがこちらです。
今回はこの沢山のurlのサイトそれぞれにある画像を一気に取得する事が目的です。
とにかくこのdfから始まるのでコピペしてdfを扱えるようにすればOKです。
まず初めに総まとめコードを添付します。最初にコードを読解し少しでもこれから行う処理のイメージをして頂ければと。
images_list = []

for i in range(len(links)):

    r = requests.get(links[i])
    time.sleep(1)
    soup = BeautifulSoup(r.text, 'html.parser')
    get_list_image = soup.find_all('img')

    for n in range(len(get_list_image)):
        # 画像を取得
        try:
            get_image_link = get_list_image[n].attrs['src']
            images_list.append(get_image_link)
        except:
            next

import os
os.mkdir('./images') # imagesフォルダを作成します。

import urllib.error
import urllib.request

#便宜上最初の10個のみ取得する。時間とデータの節約。
images_list_mini = images_list[:10]
images_list_mini


def download_file(url, dst_path):
    try:
        with urllib.request.urlopen(url) as web_file:
            data = web_file.read()
            with open(dst_path, mode='wb') as local_file:
                local_file.write(data)
    except urllib.error.URLError as e:
        print(e)


# 保存の実装
for img in images_list_mini:
    img_name = os.path.basename(img)
    download_file(img, "img/"+img_name)
コードとしてはさして多くないですね。頑張りましょう。
画像の単数取得
r = requests.get(df["link"][0])      # urlの読込
print(r)                             # <Response [200]>
soup = BeautifulSoup(r.text, 'html.parser') # HTMLの解析
soup
通常通りのやり方でbeautifulSoupのhtml取得方法です。詳しくはこちらを参照下さいませ。
次に、find_allメソッドを使って画像データを取得し変数に格納します。
少ない経験ですが、beautiful soupでの画像収集ではこのコードが使用されている事が多いです。
get_image_info = soup.find_all('img')
このようにfind_allはリストで返されるので最初だけ[0]を取得して表示した結果もお見せ致します。
画像の保存先はsrc(source)ですのでsrc属性のみ取得します。
下記のコードで更にsrcのみ抽出する事が出来ます。
get_image_info[0].attrs['src']

#結果
'http://kino-code.work/wp-content/uploads/2019/07/logo-1.png'
下記の動作で、一番最初のurlの1つ目の画像を取得する事が出来ました。
まとめのコード
df["link"][0]
r = requests.get(df["link"][0])
soup = BeautifulSoup(r.text, 'html.parser')
get_image_info = soup.find_all('img')
get_image_info[0].attrs['src']
画像の複数取得
images_list = []               #画像が格納されるリストを準備します。

for i in range(len(links)):    #linksの要素数をカウントしてその個数分forを回します。

    r = requests.get(links[i])
    time.sleep(2)
    soup = BeautifulSoup(r.text, 'html.parser')
    get_list_image = soup.find_all('img')

    for n in range(len(get_list_image)):
        try:
            get_image_link = get_list_image[n].attrs['src']
            images_list.append(get_image_link)       #それぞれのimgから抽出したsrcを作成したリストに追加しています。
        except:
            next


images_list
-
for i in range(len(links)):
linksの要素数をカウントしてその個数分forを回します。例えば今回df["link"]の要素数は25なので25回for文を回します。
回るにつれて当然[i]の値が増加するのでlinks[i]も増加し最終的にすべてのurlを取得することができます。
例:links[0],links[1],links[2],…links[24] -
for n in range(len(get_list_image)):
これも同様に取り出された1つのurlには複数の画像(img)がありますのでその回数分forを回します。 -
try,except構文について。
結論から申し上げますと、いくつかのデータで[src = ]ではなく[data-src = ]が格納されており例外処理が必要となります。今回データを取得するのはget_image_link = get_list_image[n].attrs['src']のみにします。
それ以外はスルー、つまりデータを取らないようにする為の処理です。
・try以下の条件は実行されますが、そうでない場合exceptはnextでスルー。 という意味です。
確認と保存
画像が取得できましたら、lenで個数を確認してみましょう。
len(images_list)
それでは保存を行います。
import os
os.mkdir('./images')

import urllib.error
import urllib.request
import osをして、os.mkdir('./images')。これで現在のディレクトリに新たな"./images"というフォルダを作成する事が出来ます。「.」は現在のディレクトリを意味し、ここに指定した名前(images)のフォルダを作成。という意味です。他はモジュールのインポートです。
- 保存の際の独自関数を作成しました。
def download_file(url, dst_path):
    try:
        with urllib.request.urlopen(url) as web_file:        # データのダウンロード。
            data = web_file.read()                           # ダウンロードしたデータ読込
            with open(dst_path, mode='wb') as local_file:    # open関数。ファイルを開く。
                local_file.write(data)                       # 読込後のデータをファイルに書込む。
    except urllib.error.URLError as e:                       # ダウンロードが失敗した時の処理
        print(e)
urlはそのまま画像のurlですが、dst_pathは画像の後ろ半分にある固有の要素の事です。今回dst_pathを名前として保存します。
失敗した際の処理としてexceptも備えてあります。for文や自動化とのセットでよく使われますね。
-
with urllib.request.urlopen(url) as web_file: それぞれ取り出したurlをrequestで取得する。
-
data = web_file.read() 取得したデータ(web_file)の読込。
-
with open(dst_path, mode='wb') as local_file: ローカルファイルを開く。空のファイルを作るイメージ。
-
local_file.write(data) openしたlocal_fileに読み込んだdataを書き込む。⇒ファイルにデータが入る。
-
そしてこれが保存の実装です。
for img in images_list_mini:
    img_name = os.path.basename(img)      #今回のdst_path を取得できる。
    download_file(img, "img/"+img_name)
for文で要素(画像)を一つづつ抽出し独自関数にかけています。
ポイントとして、os.path.basename(img)でimgのurl、/ の最後の部分が返ってきます。
dst_pathを取得した後に作成した「download_file」に処理を掛けます。
終わりに。
以前も画像収集を行いましたが、ページ数を跨がないのでそちらの方が簡単でした。
更に画像のurlも構成が一律でないので一括保存に苦戦致しました。
それにしてもスクレイピングの学習はpythonの基礎をおさらいするのに有効ですね。for文やtry,exceptから独自関数まで。今後も実践的なミッションを通じて基礎を確認できたらと思います。


