- 1回目: 開発環境の準備
- 2回目: Hello Worldプロジェクト
- 3回目: PSのGPIOでLチカ
- 4回目: PLのAXI GPIOでPSからLチカ
- 5回目: PLだけでLチカ
- 6回目: 自作IPでLチカ
- 7回目: ブートイメージを作る
- 8回目: Linux起動する
- 9回目: Linuxカーネルを少しカスタマイズする
- 10回目: LinuxのRootFSをカスタマイズする / PythonでHello World
- 11回目: LinuxユーザアプリケーションでLチカ
- 12回目: LinuxカーネルモジュールでLチカ
- 13回目: LAN(Ethernet 0)を使う <--- 今回の内容
- 14回目: Linuxユーザアプリをデバッグする / RootFSに取り込む
- 15回目: Linux起動時にアプリケーションを自動実行させる
- 16回目: Linuxから自作IPをUIOで制御する
- 17回目: Linuxで自作IPのデバイスドライバを作る
- 18回目: IoT化してスマホからLチカ
この記事の内容を3分で見る ( https://youtu.be/n2yYwEIjD2Y の前半)
ZYBO (Zynq) 初心者ガイド (13) LAN(Ethernet 0)を使う (PetaLinux)
ZYBOでLAN(Ethernet 0)を使い、ネットワーク接続するための方法です。数時間ハマり、ネットの情報も探しまくってようやくできるようになりました。問題はVivadoでのハードウェア設定でした。(デバイスツリー(dtsi)の編集は不要)
環境
- 開発用PC: Windows 10 64-bit
- Vivado 2017.4 WebPACKライセンス
- Xilinx SDK 2017.4 <- 今回は使わない
- 開発用PC (Linux): Ubuntu 16.04 本家 (日本語版じゃない) (on VirtualBox 5.2.4)
- PetaLinux 2017.4
- ターゲットボード: ZYBO (Z7-20)
Vivadoでハードウェアを作る
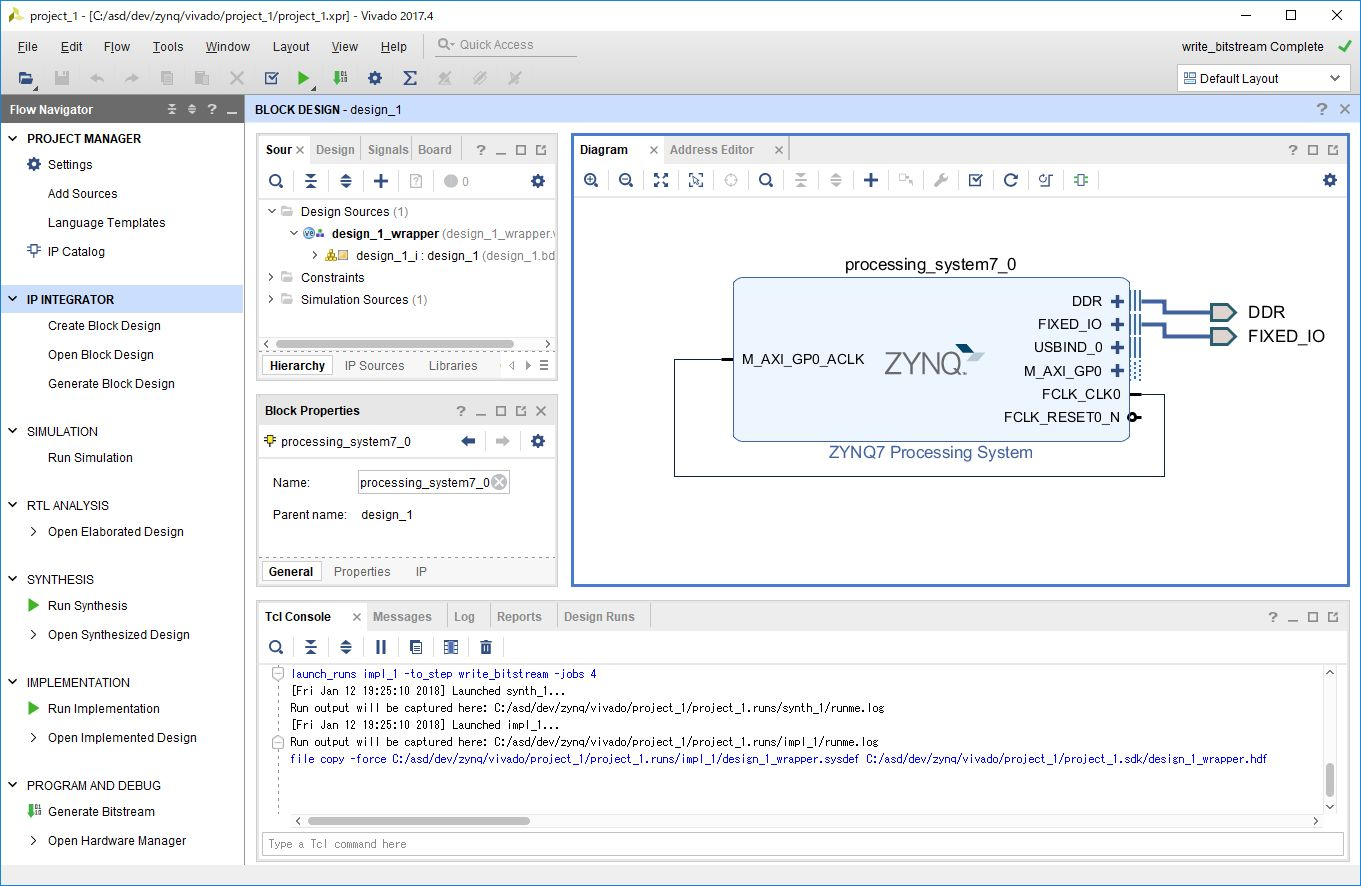
Vivadoプロジェクトを作ります。ボードにはZ7-20を指定して、IP Integrator上でPSのみを配置します。こちらの記事の前半を参考にしてください。
PSのPeripheral I/O Pinsの設定
これが重要です
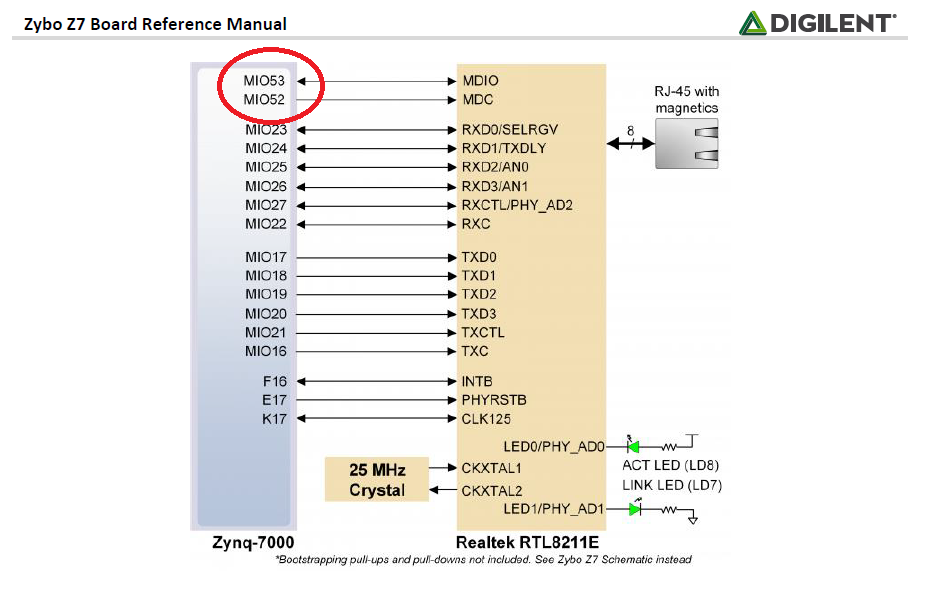
下記はZybo Z7 Board Reference Manual内に記載されているEthernet PHYの信号接続図です。これを見ると、MDIOはMIO52とMIO53に接続されています。
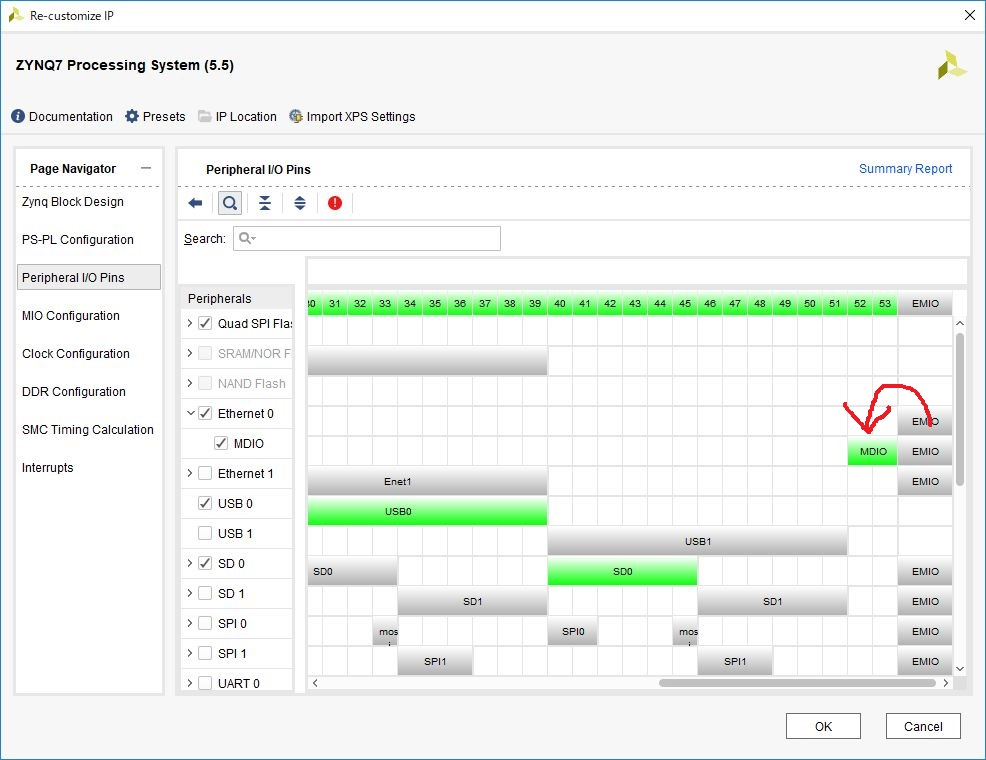
プロジェクトの初期状態だと、Ethernet 0のMDIOはEMIOに接続されているので、それをMIO52とMIO53に変えます。IP Integrator上でPSブロックをダブルクリックして、Peripheral I/O Pinsタブを開き、以下のようにMDIOを選択します。
https://forum.digilentinc.com/topic/4975-solved-ethernet-phy-on-zybo-board-using-vivado-20172/
https://forum.digilentinc.com/topic/4964-zybo-z7-20s-embed-linux-could-not-connect-ethernet-is-there-a-bug-in-the-board-file-of-zybo-z7-20/
2017/10/10に中の人っぽい人が、「ボードファイル作っているエンジニアにこの問題を知らせておくよ」って言っているので、おそらくこれはDigilentのボードファイルのバグ。まだ治っていないもよう。
PetaLinuxでLinuxイメージを作る
PetaLinuxツールでLinuxイメージを作ります。Vivadoで作成したhdf(project_1.sdkフォルダ)をUbuntu側にコピーして、以下コマンドを発行します。こちらを参考にしてください。
cd ~/work/peta
petalinux-create --type project --template zynq --name SimplePS
cd SimplePS/
petalinux-config --get-hw-description=../project_1.sdk
petalinux-build
petalinux-package --boot --force --fsbl images/linux/zynq_fsbl.elf --fpga images/linux/design_1_wrapper.bit --u-boot
カーネルコンフィグやデバイスツリー(dtsi)を変更する必要はありません。
確認する
出来上がったBOOT.binとimage.ubをSDカードにコピーして起動します。なお、ZYBOボードのLANポートにはLANケーブルを刺して、家庭内のルータに接続します(DHCP有効)。
起動後、ifconfigで確認すると、ちゃんとネットワークに接続されて、IPアドレスも取得出来ています。
oot@Eth:~# ifconfig
eth0      Link encap:Ethernet  HWaddr 00:0A:35:00:1E:53
          inet addr:192.168.1.87  Bcast:192.168.1.255  Mask:255.255.255.0
          inet6 addr: fe80::20a:35ff:fe00:1e53%lo/64 Scope:Link
          UP BROADCAST RUNNING MULTICAST  MTU:1500  Metric:1
          RX packets:9 errors:0 dropped:0 overruns:0 frame:0
          TX packets:13 errors:0 dropped:0 overruns:0 carrier:0
          collisions:0 txqueuelen:1000
          RX bytes:1076 (1.0 KiB)  TX bytes:1709 (1.6 KiB)
          Interrupt:27 Base address:0xb000

lo        Link encap:Local Loopback
          inet addr:127.0.0.1  Mask:255.0.0.0
          inet6 addr: ::1%1/128 Scope:Host
          UP LOOPBACK RUNNING  MTU:65536  Metric:1
          RX packets:0 errors:0 dropped:0 overruns:0 frame:0
          TX packets:0 errors:0 dropped:0 overruns:0 carrier:0
          collisions:0 txqueuelen:1
          RX bytes:0 (0.0 B)  TX bytes:0 (0.0 B)
同じルータに接続されているWindows PCからpingを打ってみます。ちゃんと通信出来ていることが確認できます。
C:\Users\tak>ping 192.168.1.87

192.168.1.87 に ping を送信しています 32 バイトのデータ:
192.168.1.87 からの応答: バイト数 =32 時間 <1ms TTL=64
192.168.1.87 からの応答: バイト数 =32 時間 =1ms TTL=64
さらに、Googleさんに接続してみます。ちゃんとコンテンツを取得出来ています。
root@Eth:~# wget http://www.google.co.jp/
Connecting to www.google.co.jp (216.58.196.227:80)

index.html           100% |*******************************| 11289   0:00:00 ETA
root@Eth:~# more index.html
<!doctype html><html itemscope="" itemtype="http://schema.org/WebPage" lang="ja"><head><meta content="
まとめ
ということで、悪いのは全て、Vivado上でのIOの接続設定でした。


