概要
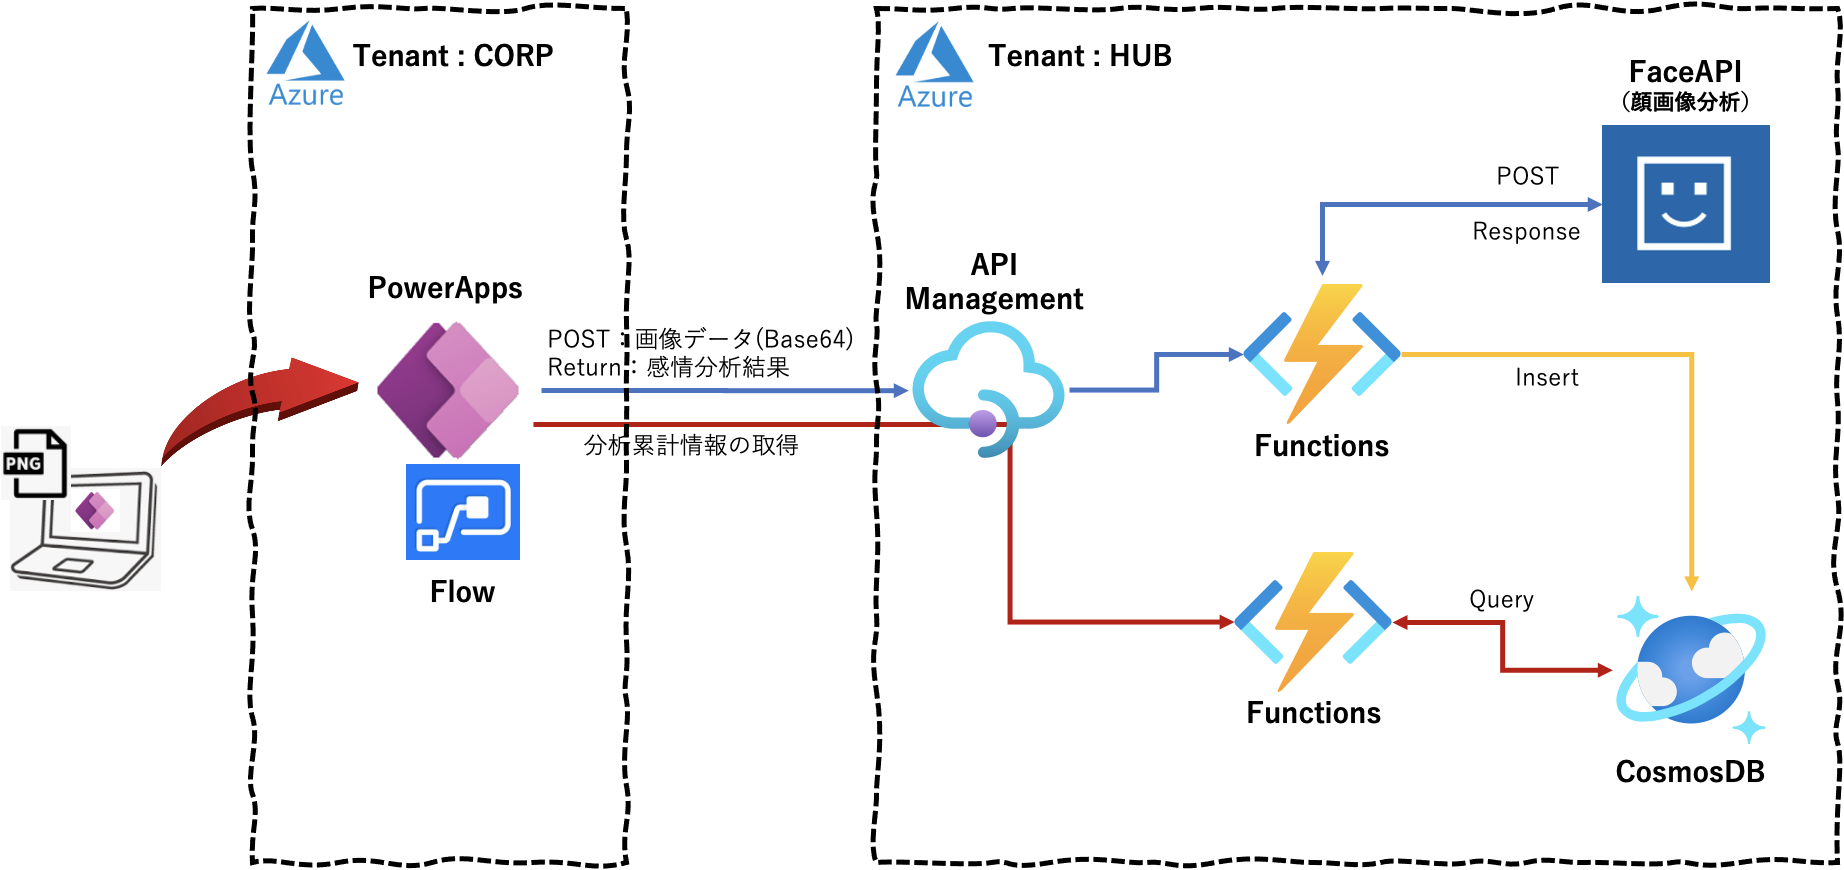
PowerApps のカメラで撮影した画像を API Management 経由で FaceAPI に転送し、その画像の分析結果「感情、性別、年齢」を PoweApps に表示するアプリの実装手順を数回に分け記載しています。また、並行して、その分析結果を CosmosDB に保存しておき、PowerApps からの累積情報取得リクエストにより累積クエリ結果「感情分布、性別分布」を PowerApps に返し、円グラフ表示する機能の実装手順も複数回に分け記載します。なお、PowerApp の画面作成については省略し、APIコール部分とその戻り値の部分に焦点をあてて記載しています。
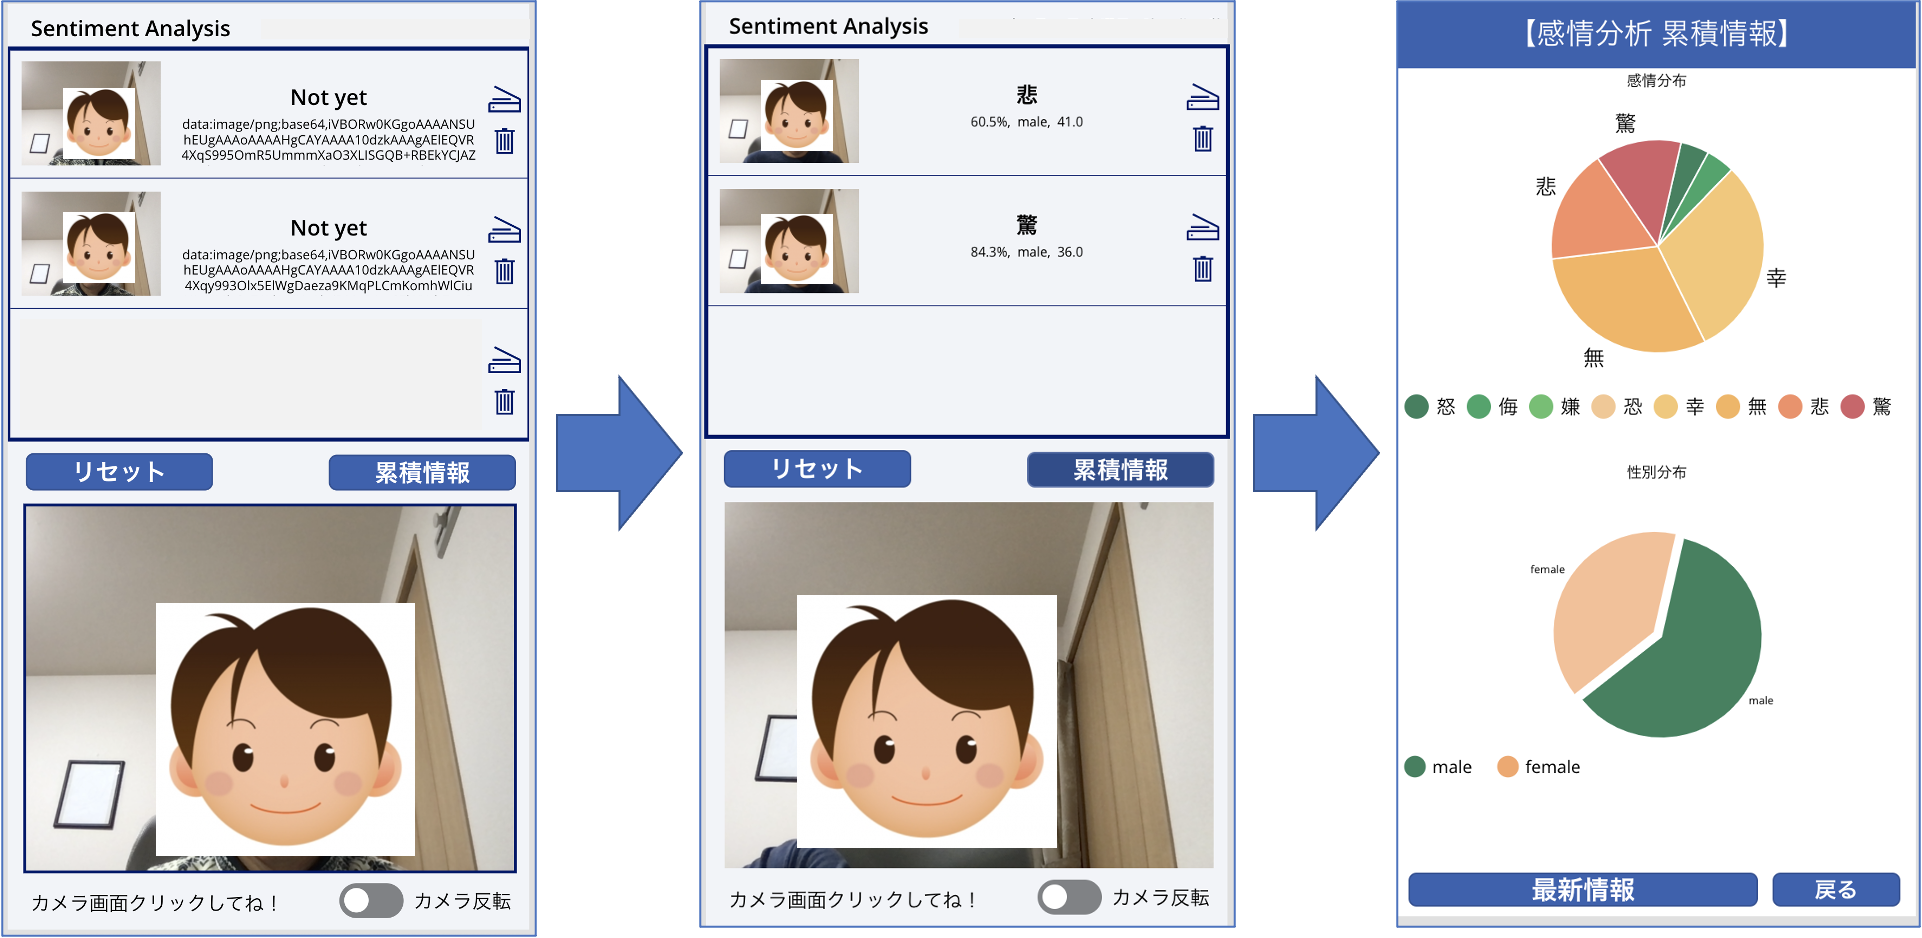
本アプリの実行結果は下図となります。
この時の全体構成は下図のようになります。こちらを全13回に分け実装方法を手順を踏んで説明します。
初回は PowerAppsで扱う画像データの書式と、画像情報を FaceAPI へ転送し分析結果「感情、性別、年齢」を取得するプログラムについて記載します。
なお、PowerApps で扱う画像データの書式についてはこの記事を参考に、
Azure Face API 関連については この記事 と この記事を参考にさせていただきました。
実行環境
macOS Big Sur 11.3
Python 3.8.3
PowerApps 関連
PowerApps のカメラで画像を取得します。

画像データのエンコード
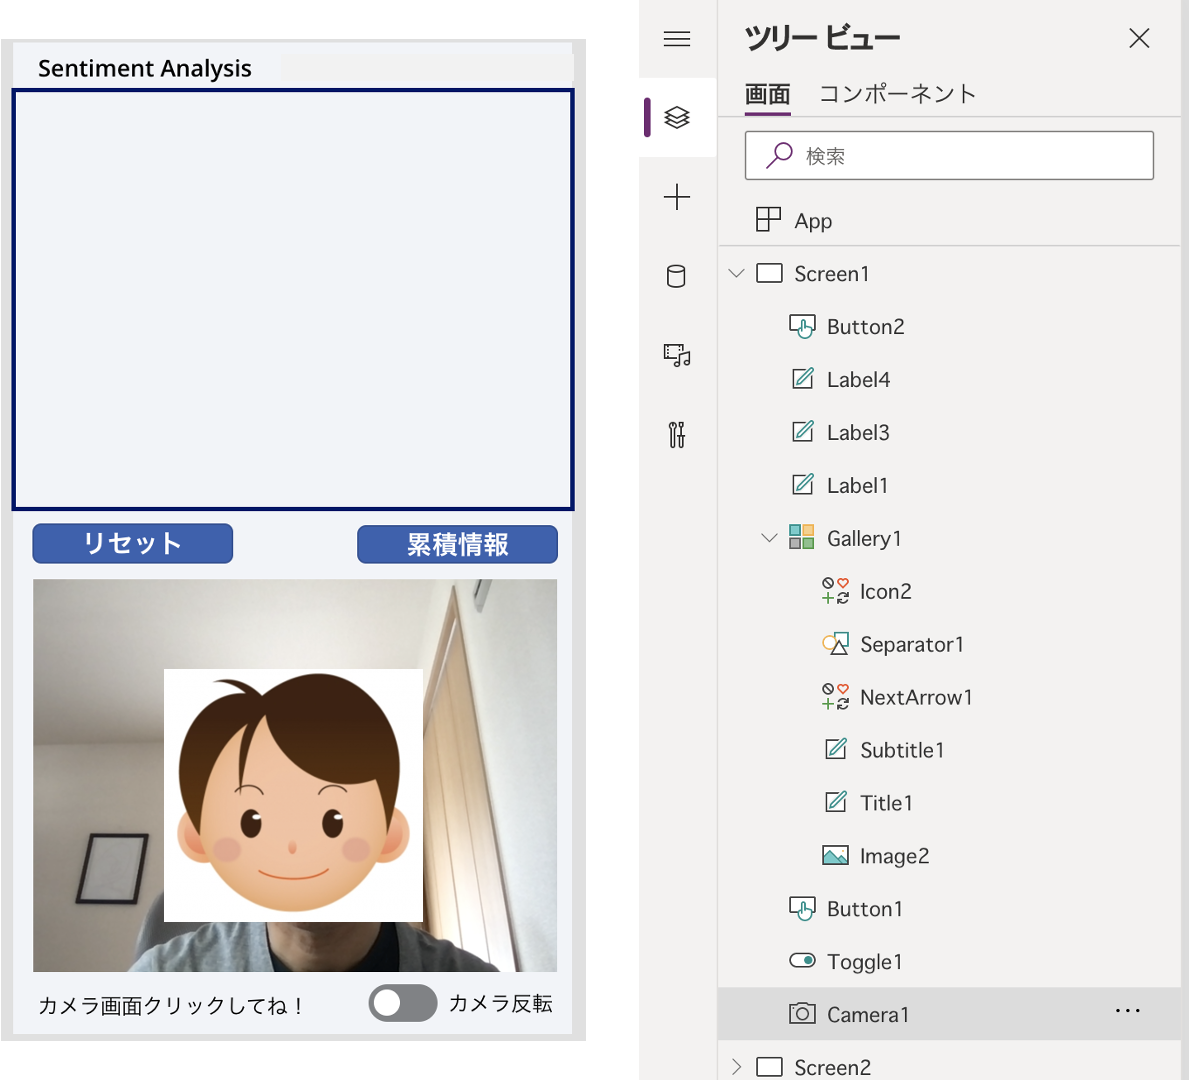
画面構成とそれぞれのオブジェクトは以下となります。
画像データのエンコード
PowerAppsのカメラで撮影した画像データを Data URI Scheme で base64 のテキストに変換します。
Camera1.OnSelect に以下を定義します。
UpdateContext({result: "Not yet"});
UpdateContext({idnum: idnum + 1});
UpdateContext( { photouri: JSON(Camera1.Photo,JSONFormat.IncludeBinaryData) } );
Collect( Photos, { No: idnum, Emotion: result, Data: Substitute( photouri, """",  "" ) , Image:Camera1.Photo} );
画像データのエンコード結果を Gallery1.Subtitle1.Text に表示させておきます(別にする必要はありませんが、、、)。
ThisItem.Data
ちなみに、エンコード結果は以下のような書式となります。
data:image/png;base64,iVBORw0KG・・・・中略・・・・0MbGNgGwPbGNjGwDYG/hgM/H/SA2X6kn3ItwAAAABJRU5ErkJggg==
また、撮影した画像データをGalleryに降順で表示しておきたいので Gallery1.Items に以下を定義しておきます。
Sort(Photos,No,Descending)
分析結果の表示
PowerAppsのカメラで撮影した画像データの Face API での分析結果「感情(確率)、性別、年齢」は以下の位置に表示させます。
- 感情 : Gallery1.Title1.Text
- 感情確率+性別+年齢 : Gallery1.Subtitle1.Text
Face API 関連
次に、PowerAppsのことは一時的に忘れて、画像データをFaceAPIに送って感情分析するローカルプログラムを作成します。

Faceの作成
最初に、以下の内容でFaceを作成します。
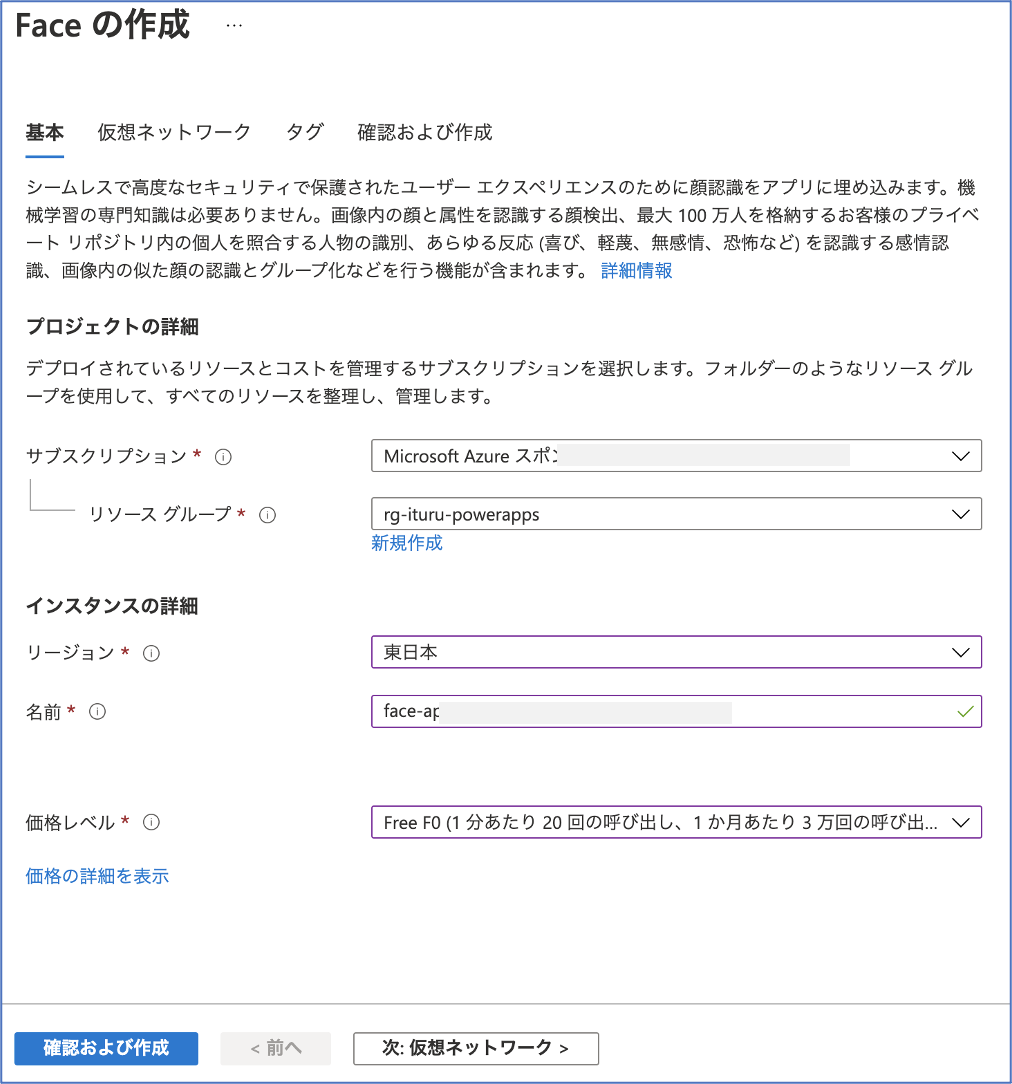
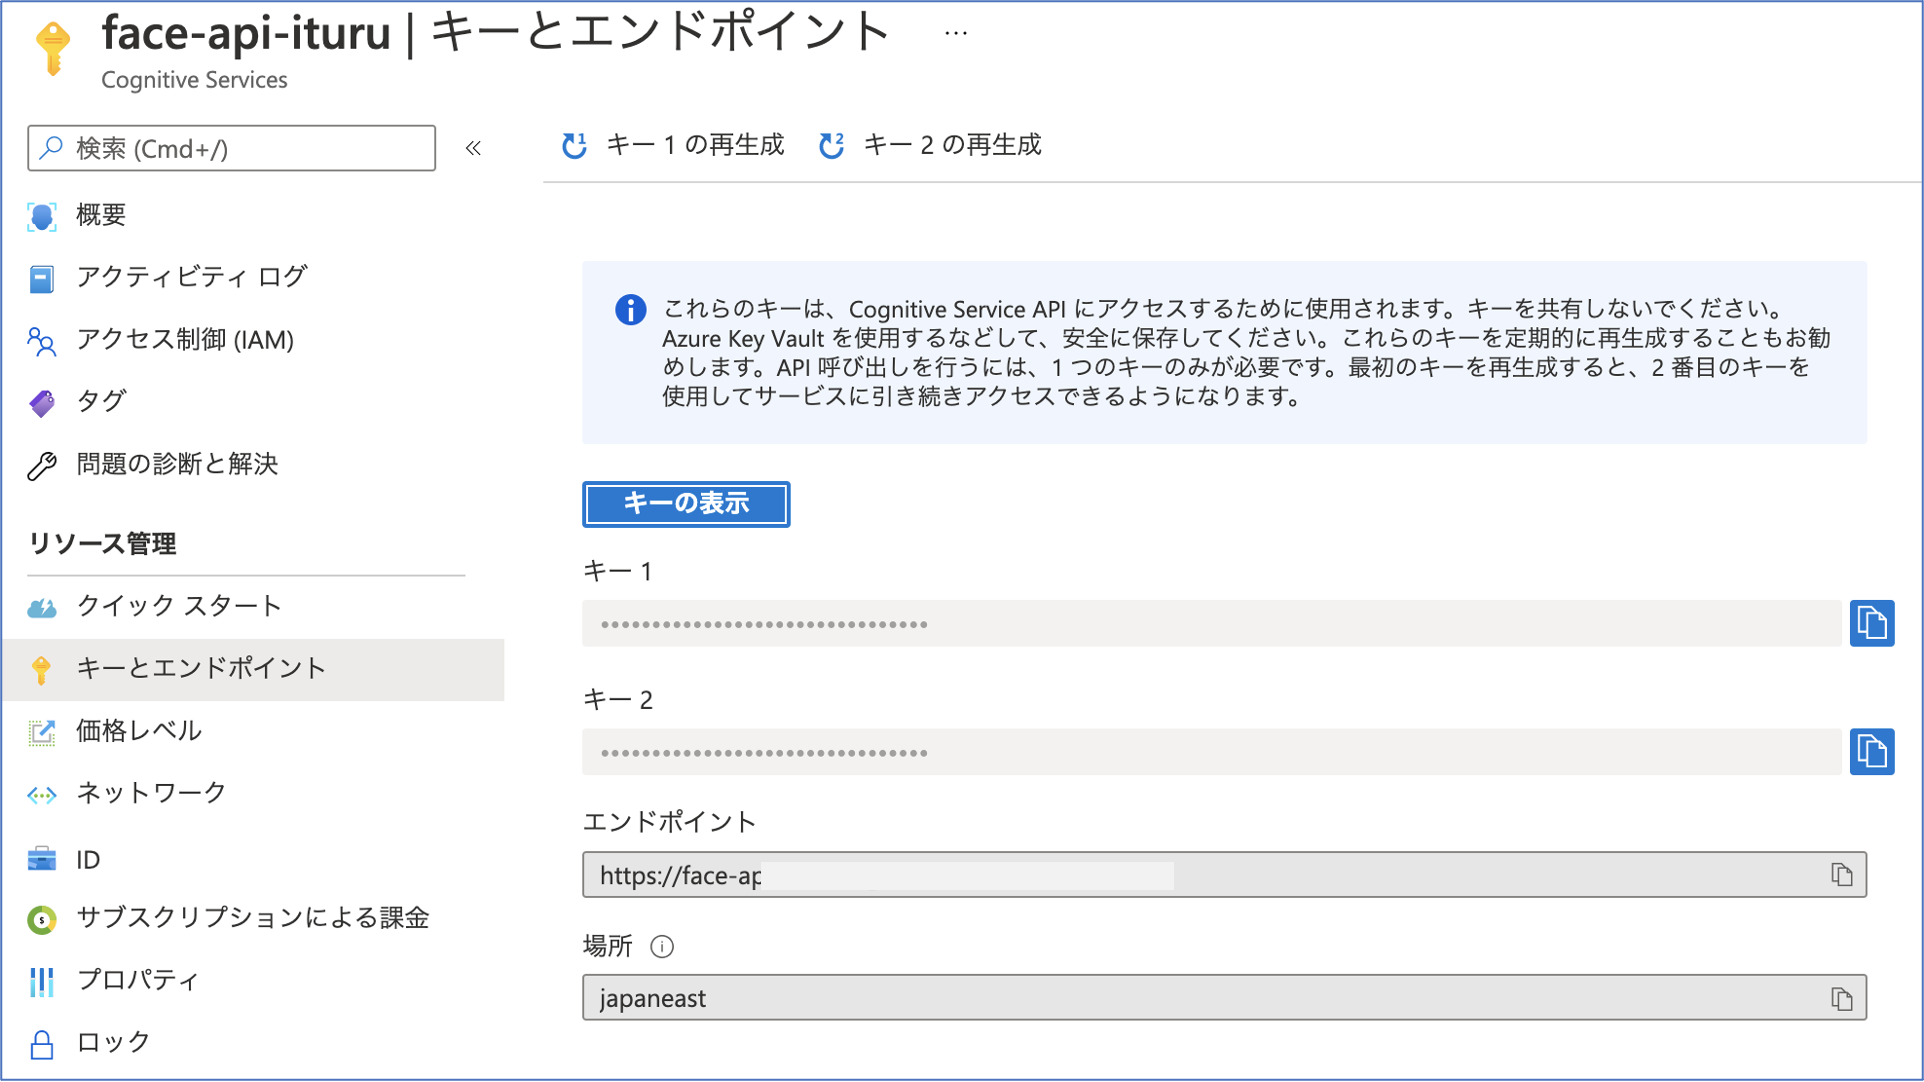
作成されたFaceのキーとエンドポイントを取得しておきます。
バイナリデータでの FaceAPI アクセス
まずは、ローカルにある画像データをバイナリデータとしてして、FaceAPIに送信し分析結果を取得してみます。 プログラムは以下となります。
import cognitive_face as CF
import numpy as np
import argparse
import json
import time
import pprint
import base64
import requests

# FaceAPI情報
KEY = 'zzzzzzzzzzzzzzzzzzzzzzzzzzzz'
ENDPOINT = 'https://face-apxxxxxxxxxxxxxxxx.cognitiveservices.azure.com/face/v1.0/'

# Emotionの定義
emobase = ['anger', 'contempt', 'disgust', 'fear', 'happiness', 'neutral', 'sadness', 'surprise']
emolist = ['怒', '侮', '嫌', '恐', '幸', '無', '悲', '驚']

# 感情分析
def face_emotion(image) :
    print("face_emotion")
    try:
        # FACE_APIの情報セット
        CF.Key.set(KEY)
        CF.BaseUrl.set(ENDPOINT)

        # FACE_APIでの感情分析取得
        faces = CF.face.detect(image, attributes='emotion')
        f=json.dumps(faces)
        j=json.loads(f)

        # 分析する対象の画像に複数人いようが最初の1人のみを分析の対象とする
        emotion_data = j[0]['faceAttributes']['emotion']
        print(emotion_data)

        # 感情分析結果からスコアのみを分別
        emotion = []
        for name in emobase:
            emotion.append(emotion_data[name])

        # スコアの高いものをその人の感情として決定する
        num = np.argmax(emotion)
        emotion_weight = str(emotion[num]*100) + "%"
        emotion_dict = {'emotion': emolist[num], 'data': emotion_weight}    # 辞書データの作成
        emotion_json = json.dumps(emotion_dict, ensure_ascii=False)         # Jsonエンコード
        return emotion_json

    except Exception as e:
        print(e)
        return "ERROR !!!"

if __name__ == '__main__':
    parser = argparse.ArgumentParser(description='顔写真から感情を判断します!')
    parser.add_argument('--image', type=str, default='004.png', help='顔写真ファイル名')
    args = parser.parse_args()

    start = time.time()
    emotion = face_emotion(args.image)
    making_time = time.time() - start

    print("")
    print(f"分析結果:{emotion}")
    print("分析時間:{0}".format(making_time) + " [sec]")
    print("")
実行結果は以下となります(画像はローカルにあるものを使用)。
$ python FaceEmotionBinary.py --image 001.png
face_emotion
{'anger': 0.0, 'contempt': 0.0, 'disgust': 0.0, 'fear': 0.0, 'happiness': 0.982, 'neutral': 0.0, 'sadness': 0.018, 'surprise': 0.0}

分析結果:{"emotion": "幸", "data": "98.2%"}
分析時間:1.2856347560882568 [sec]
問題なく取得できました、、、、、
Base64テキストデータでの FaceAPI アクセス
しかし、PowerAppsから送られてくる画像データはBase64テキストデータなので、そのデータ形式でFaceAPIに送信し分析結果を取得できることを確認します。
プログラムは以下となります。今度は、「感情」だけでなく「感情確率+性別+年齢」も戻り値として取得します。
import cognitive_face as CF
import numpy as np
import argparse
import json
import time
import pprint
import base64
import requests

# FaceAPI情報
KEY = 'zzzzzzzzzzzzzzzzzzzzzzzzzzzz'
ENDPOINTDETECT = 'https://face-apxxxxxxxxxxxxxxxx.cognitiveservices.azure.com/face/v1.0/detect'

# Emotionの定義
emobase = ['anger', 'contempt', 'disgust', 'fear', 'happiness', 'neutral', 'sadness', 'surprise']
emolist = ['怒', '侮', '嫌', '恐', '幸', '無', '悲', '驚']

# 感情分析
def face_emotion_base64(data64) :
    print("face_emotion_base64")
    # data = base64.b64decode(data64.replace("data:image/png;base64,", ""))
    data = base64.b64decode(data64[22:])

    try:
        headers = {
            'Content-Type': 'application/octet-stream',
            'Ocp-Apim-Subscription-Key': KEY,
        }

        params = {
            'returnFaceId': 'false',
            'returnFaceLandmarks': 'false',
            'faceRectangle': 'false',
            'returnFaceAttributes': 'age,gender,emotion',
        }

        # FACE_APIでの感情分析取得
        response = requests.post(ENDPOINTDETECT, params=params, headers=headers, data=data)
        j=json.loads(response.text)

        # 分析する対象の画像に複数人いようが最初の1人のみを分析の対象とする
        # 年齢情報
        age_data = j[0]['faceAttributes']['age']
        print(age_data)

        # 感情情報
        emotion_data = j[0]['faceAttributes']['emotion']
        print(emotion_data)

        # 性別情報
        gender_data = j[0]['faceAttributes']['gender']
        print(gender_data)

        # 感情分析結果からスコアのみを分別
        emotion = []
        for name in emobase:
            emotion.append(emotion_data[name])

        # スコアの高いものをその人の感情として決定する
        num = np.argmax(emotion)
        num = np.argmax(emotion)
        emotion_weight = str(emotion[num]*100) + "%,  " + gender_data + ",  " + str(age_data)
        emotion_dict = {'emotion': emolist[num], 'data': emotion_weight}    # 辞書データの作成
        emotion_json = json.dumps(emotion_dict, ensure_ascii=False)         # Jsonエンコード
        return emotion_json

    except Exception as e:
        print(e)
        return "ERROR !!!"


if __name__ == '__main__':
    parser = argparse.ArgumentParser(description='顔写真から感情を判断します!')
    parser.add_argument('--image', type=str, default='004.png', help='顔写真ファイル名')
    args = parser.parse_args()

    start = time.time()

    with open(args.image, "rb") as f:
        data = "data:image/png;base64," + base64.b64encode(f.read()).decode("UTF-8")
        emotion = face_emotion_base64(data)

    making_time = time.time() - start

    print("")
    print(f"分析結果:{emotion}")
    print("分析時間:{0}".format(making_time) + " [sec]")
    print("")
実行結果は以下となります(画像はローカルにあるものを使用)。
$ python FaceEmotionBase64.py --image 001.png
face_emotion_base64
18.0
{'anger': 0.0, 'contempt': 0.0, 'disgust': 0.0, 'fear': 0.0, 'happiness': 0.982, 'neutral': 0.0, 'sadness': 0.018, 'surprise': 0.0}
female

分析結果:{"emotion": "幸", "data": "98.2%,  female,  18.0"}
分析時間:0.8755090236663818 [sec]
問題なく処理できました。これで想定する戻り値をJSON形式で取得できていることを確認できました。
FaceAPIのエンドポイント(URL)が、画像データの形式(バイナリー or Base64テキスト)により異なるところに注意ください(ハマりました、、、)。
次回について
次回(第2回)は本ローカルプログラムをFunctionsで動作させ、同様の結果が得られることを確認してみます。
参考情報
以下の情報を参考にさせていただきました。感謝申し上げます。
PowerApps のJSON関数を利用した写真の一括登録
Azure Face API で写真から感情判定
LINEボット2 FaceAPI
画像をjsonでPOSTしてflaskで受け取る