概要
PowerApps のカメラで撮影した画像を API Management 経由で FaceAPI に転送し、その画像の分析結果「感情、性別、年齢」を PoweApps に表示するアプリの実装手順を数回に分け記載しています。また、並行して、その分析結果を CosmosDB に保存しておき、PowerApps からの累積情報取得リクエストにより累積クエリ結果「感情分布、性別分布」を PowerApps に返し、円グラフ表示する機能の実装手順も複数回に分け記載します。なお、PowerApp の画面作成については省略し、APIコール部分とその戻り値の部分に焦点をあてて記載しています。
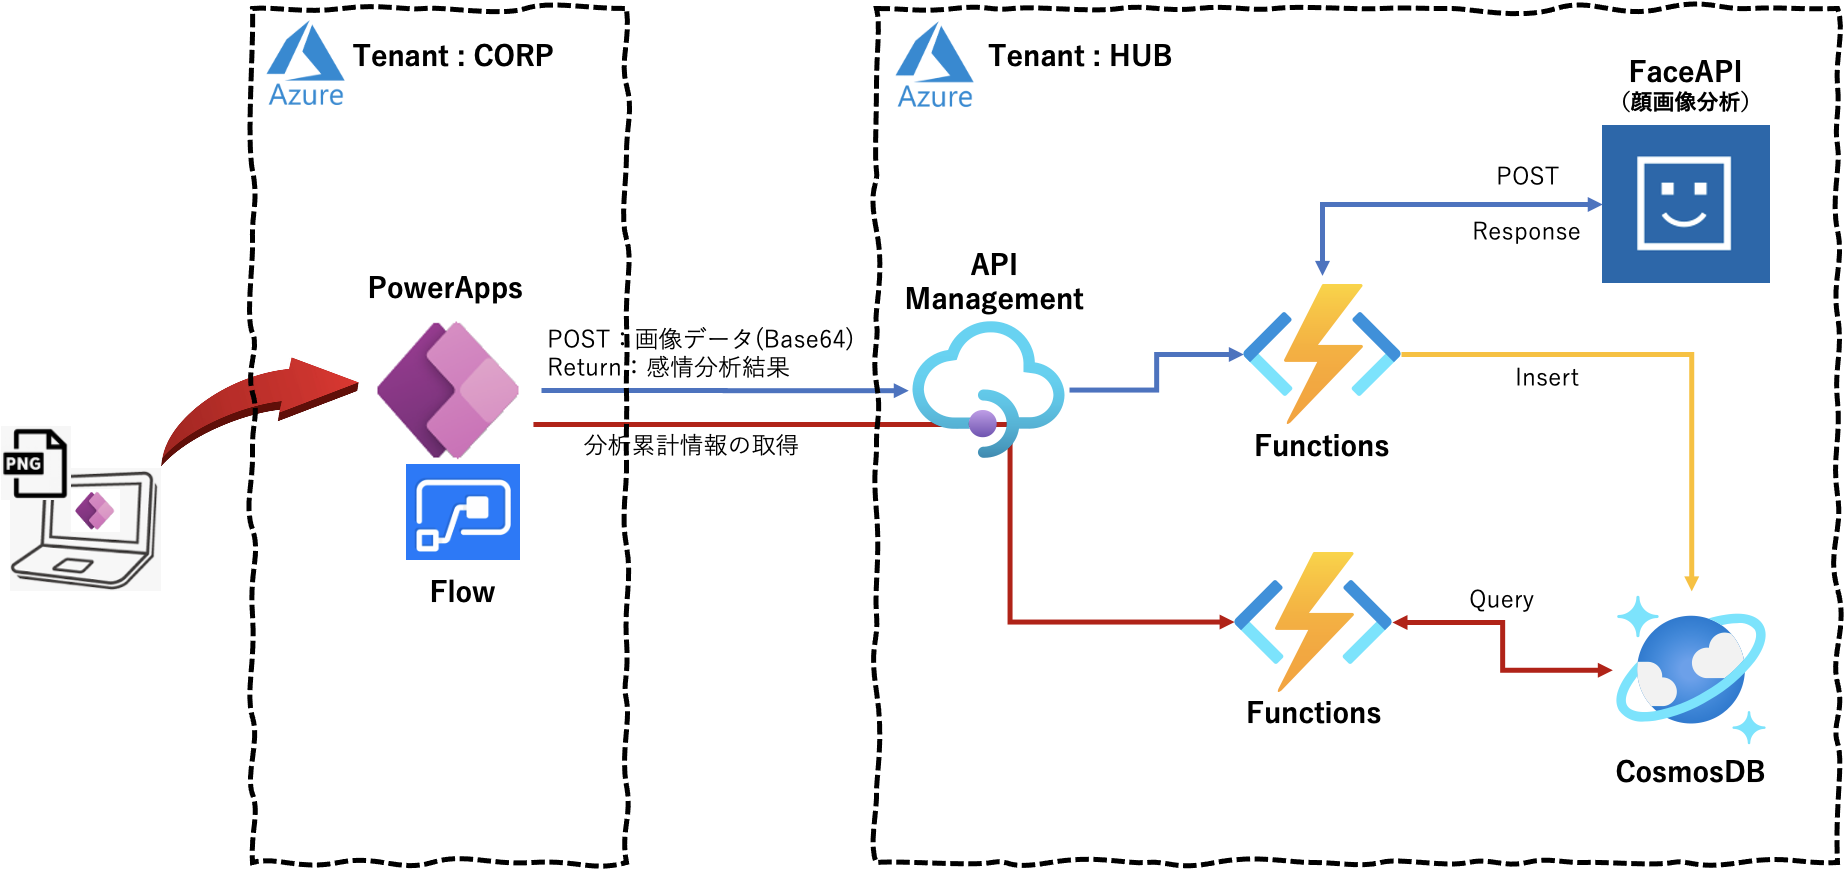
本アプリの全体構成は下図となります。
今回(第2回目)の構成箇所は下図の部分となります。
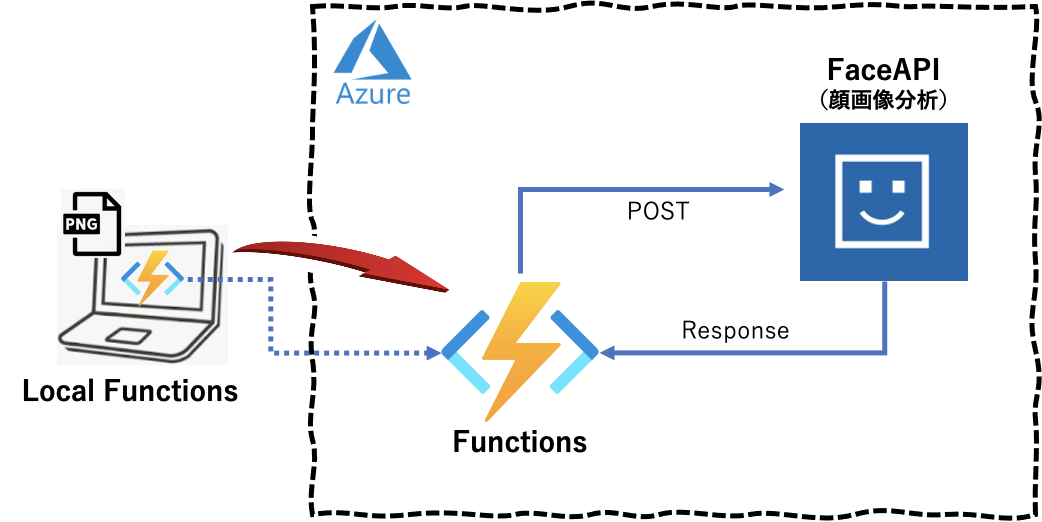
第2回目は、初回 で作成した「FaceEmotionBase64.py」ローカルプログラムを Azure Functions で動作させ、同様の結果が得られることを確認してみます。結果確認のための Functions へのアクセスプログラムを別途作成しています。
実行環境
macOS Big Sur 11.3
Python 3.8.3
Azure Portal上での FunctionsApp の作成
この記事 等を参考にAzureのクラウド環境を準備しておきます。
上記記事の「3.FunctionAppの作成」を実施します。今回は以下の値で設定しています。
| 項目 | 値 |
|---|---|
| Functions App name | iturufuncface |
| Publish | Code |
| Runtime stack | Python |
| Version | 3.8 |
| Region | Japan East |
| Storage Account | storageituru |
| Operating System | Linux |
| Plan type | Consumption |
Azure Portal 上での FaceAPI のキーとエンドポイント情報(クレデンシャル情報)の定義
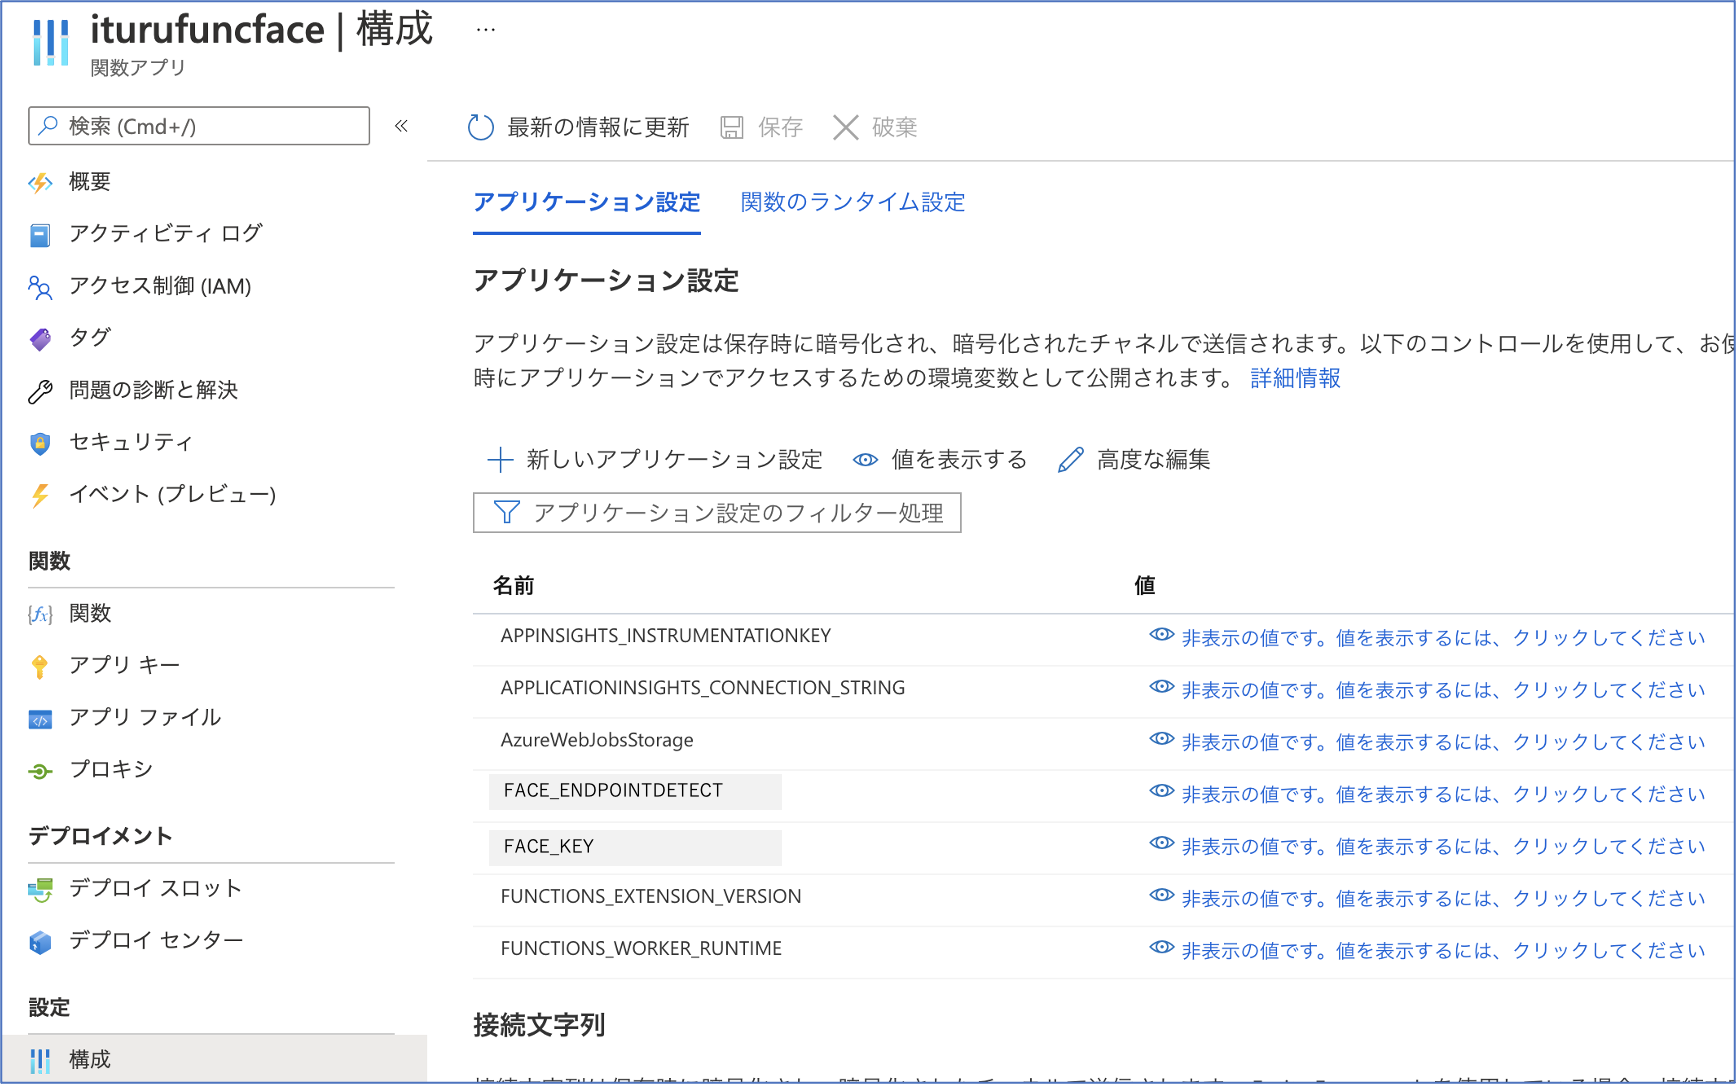
前回で取得した FaceAPI のキーとエンドポイント情報(「FACE_KEY」「FACE_ENDPOINTDETECT」)を Azure Functionsの「設定」 ー 「構成」 ー 「+新しいアプリケーション設定」 で追加定義しておきます。
ローカルでのAzure Functionsの実装
次に、以下の順で Azure Functions を実装していきます。
なお、Azure Functions の作成手順については この記事を参考にしてください。
1.作業実施のための任意のディレクトリを作成
2.Python仮想環境の定義
3.Functionプロジェクトの作成
4.Functionの作成 ⇒ 「HTTP Trigger」を選択します。
Functions で実行されるコード
実行されるコードプログラムを以下のように変更します。
import logging
import azure.functions as func
import cognitive_face as CF
import numpy as np
import os
import json
import base64
import requests
from datetime import datetime

# FaceAPIの情報
KEY = os.environ['FACE_KEY']
ENDPOINTDETECT = os.environ['FACE_ENDPOINTDETECT']

# emotion定義
emobase = ['anger', 'contempt', 'disgust', 'fear', 'happiness', 'neutral', 'sadness', 'surprise']
emolist = ['怒', '侮', '嫌', '恐', '幸', '無', '悲', '驚']


# 感情分析(Base64-Binary)
def face_emotion_base64(data64, name) :
    logging.info("face_emotion_base64 by iTuru")
    # data = base64.b64decode(data64.replace("data:image/png;base64,", ""))
    data = base64.b64decode(data64[22:])

    try:
        headers = {
            'Content-Type': 'application/octet-stream',
            'Ocp-Apim-Subscription-Key': KEY,
        }

        params = {
            'returnFaceId': 'false',
            'returnFaceLandmarks': 'false',
            'faceRectangle': 'false',
            'returnFaceAttributes': 'age,gender,emotion',
        }

        # FACE_APIでの感情分析取得
        response = requests.post(ENDPOINTDETECT, params=params, headers=headers, data=data)
        j=json.loads(response.text)

        # 分析する対象の画像に複数人いようが最初の1人のみを分析の対象とする
        # 年齢情報
        age_data = j[0]['faceAttributes']['age']
        logging.info(age_data)

        # 感情情報
        emotion_data = j[0]['faceAttributes']['emotion']
        logging.info(emotion_data)

        # 性別情報
        gender_data = j[0]['faceAttributes']['gender']
        logging.info(gender_data)

        # 感情分析結果からスコアのみを分別
        emotion = []
        for name in emobase:
            emotion.append(emotion_data[name])

        # スコアの高いものをその人の感情として決定する
        # logging.info(emotion)
        num = np.argmax(emotion)
        emotion_weight = str(emotion[num]*100) + "%,  " + gender_data + ",  " + str(age_data)
        emotion_dict = {'emotion': emolist[num], 'data': emotion_weight}    # 辞書データの作成
        emotion_json = json.dumps(emotion_dict, ensure_ascii=False)         # Jsonエンコード
        return emotion_json

    except Exception as e:
        logging.info(e)
        emotion_dict = {'emotion': "ERROR !!!", 'data': "--.-%"}            # 辞書データの作成
        emotion_json = json.dumps(emotion_dict, ensure_ascii=False)         # Jsonエンコード
        return emotion_json


# main関数
def main(req: func.HttpRequest) -> func.HttpResponse:
    logging.info('Python HTTP trigger function processed a request.')

    name = req.params.get('name')
    req_body = req.get_body()
    res_emotion = face_emotion_base64(req_body, name)

    return func.HttpResponse(
            res_emotion,
            mimetype = "application/json",
            status_code = 201
    )
ローカルでコードを実行してみます
コードを実行する前に、ローカルで環境情報を取得します。以下のコマンドを実行します。
$ func azure functionapp fetch-app-settings iturufuncface
App Settings:
Loading APPINSIGHTS_INSTRUMENTATIONKEY = *****
Loading APPLICATIONINSIGHTS_CONNECTION_STRING = *****
Loading AzureWebJobsStorage = *****
Loading FACE_ENDPOINTDETECT = *****
Loading FACE_KEY = *****
Loading FUNCTIONS_EXTENSION_VERSION = *****
Loading FUNCTIONS_WORKER_RUNTIME = *****
その後、コードを実行します。
$ func host start
Found Python version 3.8.3 (python3).

Azure Functions Core Tools
Core Tools Version:       3.0.3442 Commit hash: 6bfab24b2743f8421475d996402c398d2fe4a9e0  (64-bit)
Function Runtime Version: 3.0.15417.0

Functions:
	HttpTrigger: [GET,POST] http://localhost:7071/api/HttpTrigger

For detailed output, run func with --verbose flag.
[2021-05-14T16:50:27.421Z] Worker process started and initialized.
[2021-05-14T16:50:32.490Z] Host lock lease acquired by instance ID '0000000000000000000000002CF30641'.
Functions へのアクセスプログラムの実行
結果確認のためのFunctionsへのアクセスプログラムは以下となります。
import requests
import base64

url = "http://localhost:7071/api/HttpTrigger"
headers = {
    'Content-Type': 'application/octet-stream',
}

with open("001.png", "rb") as f:
    data = "data:image/png;base64," + base64.b64encode(f.read()).decode("UTF-8")

try:
    response = requests.post(url, headers=headers, data=data)
    print(response.text)
except Exception as e:
    print(e)
実行結果は以下となります(画像はローカルにあるものを使用)。
$ python PostImage.py
{"emotion": "幸", "data": "98.2%,  female,  18.0"}
問題なく処理できました。これで Functions からFaceAPI をコールし、想定する戻り値をJSON形式で取得できていることを確認できました。
Azureへのデプロイ
ローカルで動作確認したコードをAzureにデプロイします。
$ func azure functionapp publish iturufuncface
Getting site publishing info...
Creating archive for current directory...
Performing remote build for functions project.
	:
	中略
	:
Deployment successful.
Remote build succeeded!
Syncing triggers...
Functions in iturufuncface:
    HttpTrigger - [httpTrigger]
    	:
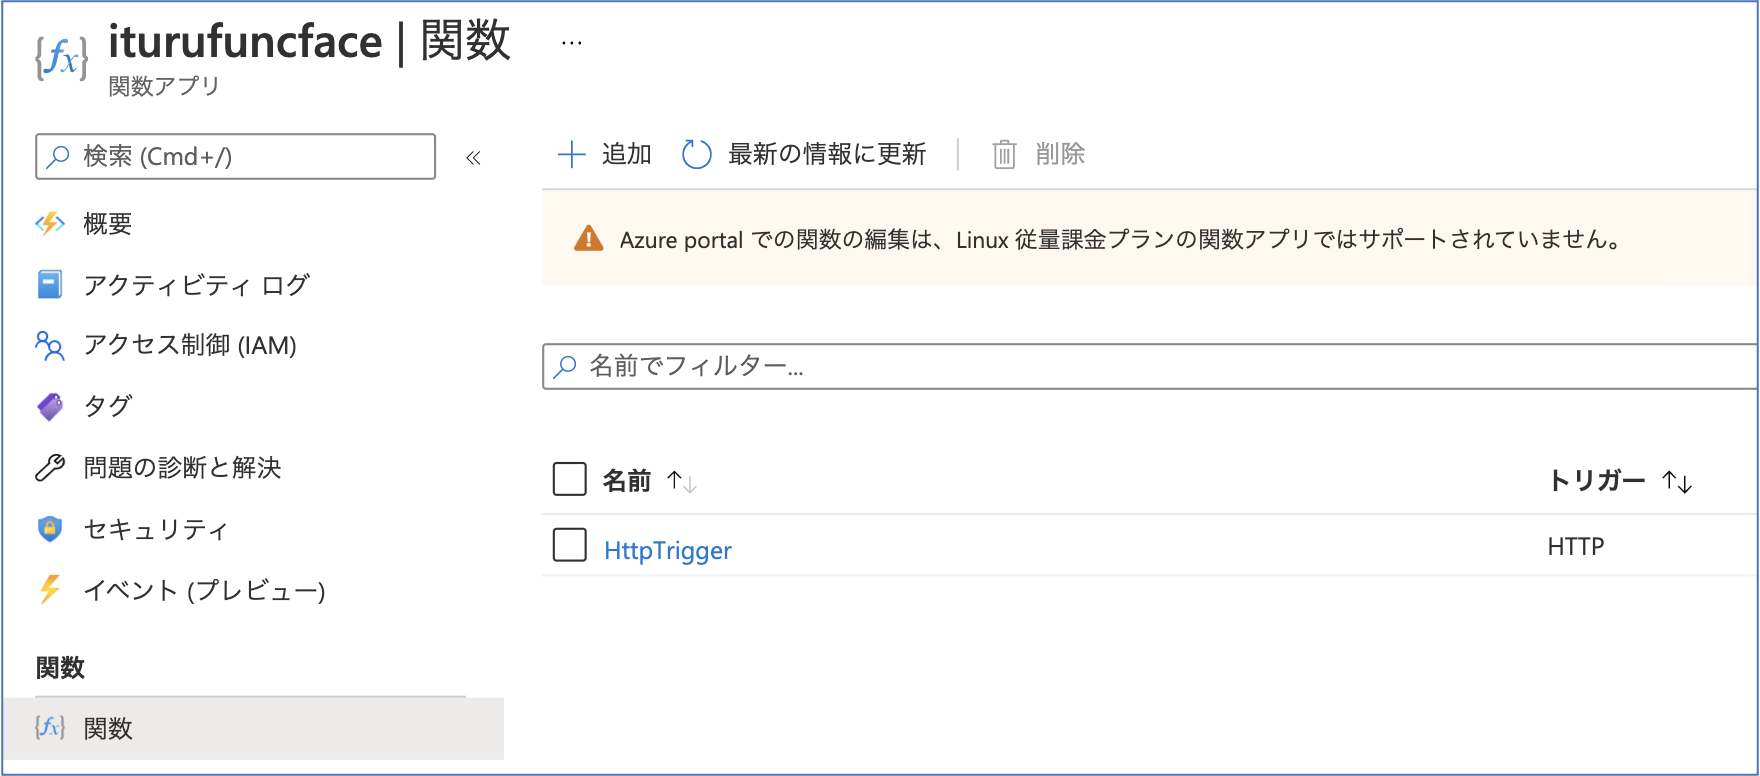
デプロイした結果、該当Functionsの関数として登録されていることを確認できます。
次回について
次回(第3回)は API Management 経由で本FunctionsーFaceAPI をコールし、同様の結果が得られることを確認してみます。
参考情報
以下の情報を参考にさせていただきました。感謝申し上げます。
【備忘録】初めてのAzureFunctionsのデプロイ
Azure Functions での環境変数の切り替え
AzureCLIでAzureFunctionsの構築