1. はじめに
この記事では、AzureFunctions でよく私が利用しているHttpTriggerとTimerTriggerを
デプロイして動かすところまでを解説します。
結構長くなったので、目次と簡単な内容を付与しておきます。
| 節 | 項 | タイトル | 内容 |
|---|---|---|---|
| 2 | - | 前準備 | - |
| 1 | - ローカル環境 | AzureFunctions をデプロイするのに必要なソフトのインストール | |
| 2 | - Azure のクラウド環境 | AzureFunctions をデプロイするのに必要なサービスを事前に作成 | |
| 3 | - | FunctionApp の作成 | コンソールから FunctionApp を作成 |
| 4 | - | AzureFunctions の種類 | 利用可能なTriggerの種類 |
| 5 | - | AzureFunctions の実装 | Python スクリプトの作成と修正 |
| 1 | - requirements.txt の修正 | - | |
| 2 | - HttpTrigger | - | |
| 3 | - TimerTrigger | - | |
| 6 | - | AzureFunctions のデプロイ | - |
| 1 | - Makefile を利用したデプロイ | - | |
| 7 | - | AzureFunctions のデバッグ | コンソールからの実行とデバッグ |
2. 前準備
AzureFunctions をデプロイするために、ローカル環境と Azure のクラウド環境側で以下のような準備が必要です。
2.1 ローカル環境
本記事では Mac で環境構築などを行います。
AzureFunctions をデプロイするために、以下の 2 つのソフトのインストールが必要です。
Mac へのインストールはbrewを利用すれば簡単にできます。
# Azure CLIのインストール
$ brew update && brew install azure-cli

# Azure Function Core Toolsのインストール
$ brew tap azure/functions
$ brew install azure-functions-core-tools@3

# AzureにAzureCLIを利用してログイン
$ az login
今回デプロイするに当たって利用したバージョンは次の通りです。
# Azure CLIのバージョン
$ az --version
azure-cli                         2.16.0
...

# Azure Functions Core Toolsのバージョン
$ func --version
3.0.2912
2.2 Azure のクラウド環境
Azure のアカウントはすでにあることを前提にしています。
AzureFunctions をデプロイするにあたっては、
以下のリソースを前もって準備しておくと便利です。
| サービス名 | 用途 | 推奨される prefix | 必須 |
|---|---|---|---|
| Resource Group | AzureFunctions のデプロイに必要なサービスをまとめる | rg- |
O |
| StorageAccount | ファイルを保持するストレージ | st- |
O |
| Log Analytics | ログを保持する | log- |
O |
| Application Insights | ログを表示する | appi |
O |
これらのリソースは、基本的には一度作成した後に作成する必要はありません。
ただ、今回は AzureFunctions をコンソールから作成していきます。
すでに、上記の必須なサービスがある場合は、次節まで読み飛ばしてもらって大丈夫です。
また、これらのサービスの名前の prefix は、Azure が公式に推薦する形式があります。
そのため、この公式ドキュメントをみておくことをお勧めします。
(今回デプロイしたサービスは一部その例に従ってはいません)
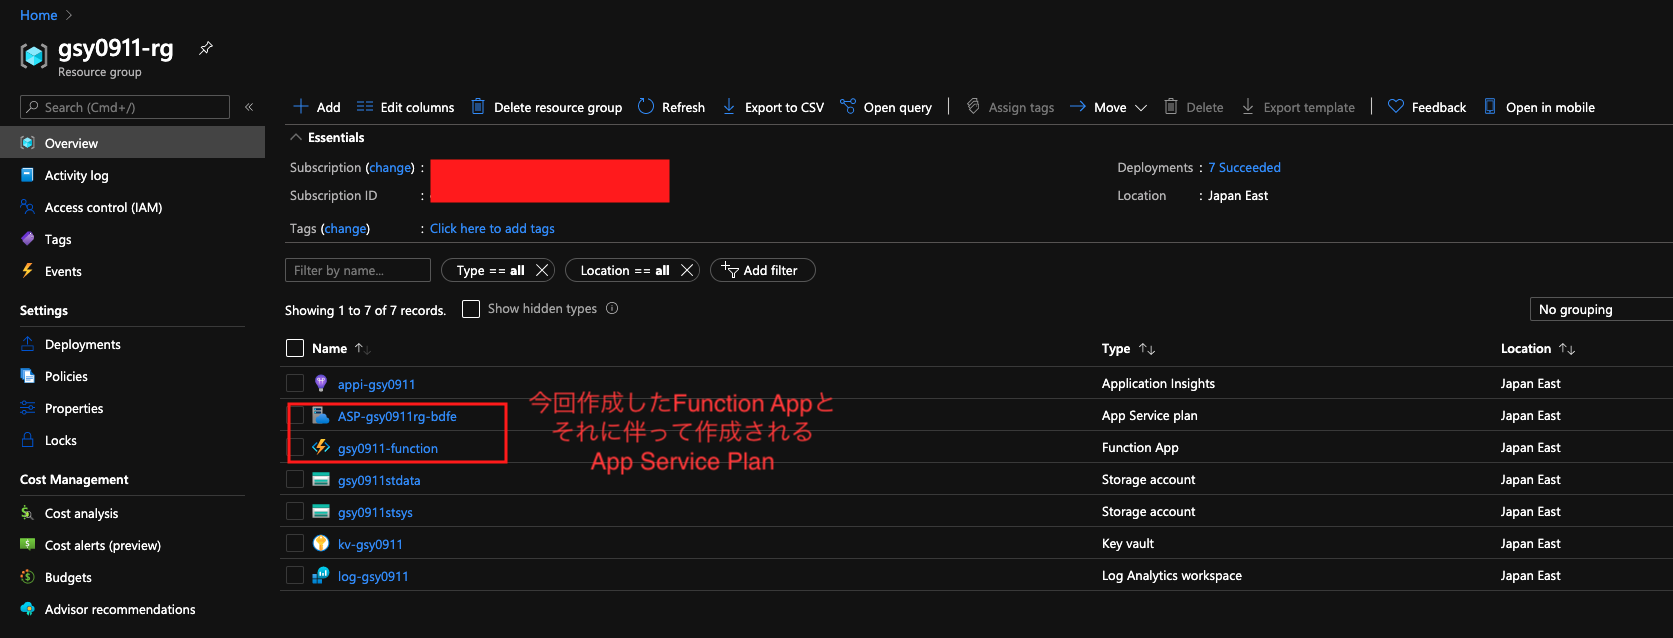
今回作成したサービスは以下の通りです。
-
appi-gsy0911: ログ関連 -
gsy0911stdata: データなどを保存しておくためのユーザが利用するストレージ -
gsy0911stsys: AzureFunctions などのシステムが利用するストレージ -
log-gsy0911: ログ関連

3. FunctionApp の作成
コンソールから AzureFunctions の作成します。
検索ウィンドウにてFunction Appと入れると出てきます。
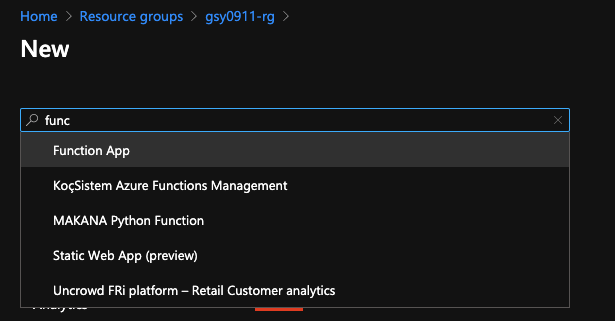
名前が AzureFunctions ではない理由は
このFunction Appの中に複数個の AzureFunctions を作成してくためだと思います。
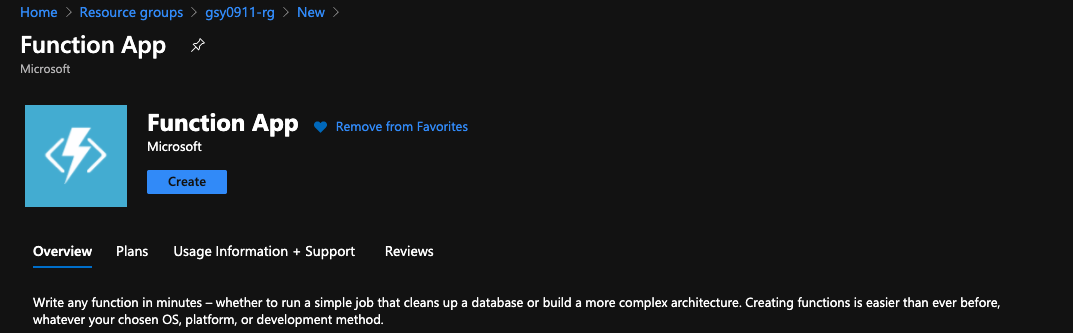
Create ボタンを押下し、作成してきます。
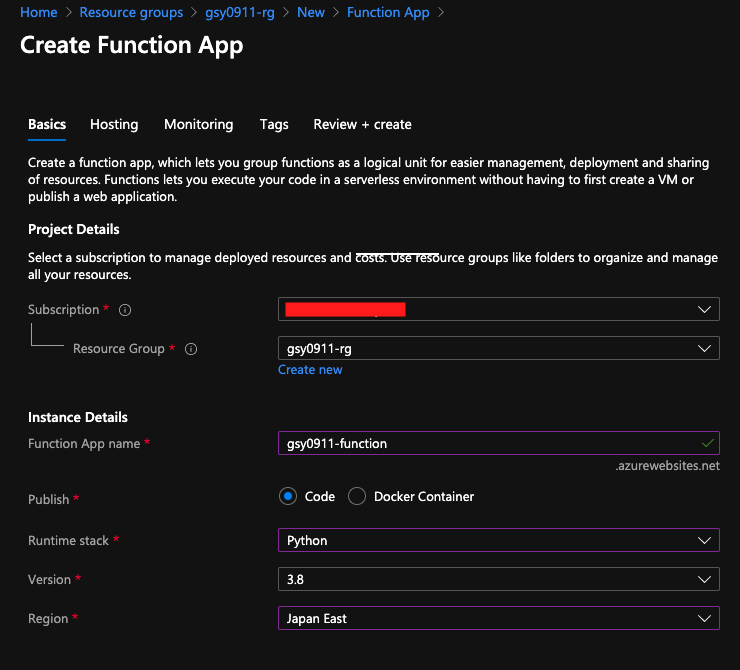
Basicsでの必須項目を埋めていきます。
| 項目 | 値 |
|---|---|
| Functions App name | gsy0911-function |
| Publish | Code |
| Runtime stack | Python |
| Version | 3.8 (※1) |
| Region | Japan East |
※1: ここはローカルの python の環境と必ずしも合わせる必要はありません
Hostingの項目では、さっき作成したStorage Accountのgsy0911sysを選択します。
| 項目 | 値 |
|---|---|
| Storage Account | gsy0911sys |
| Operating System | Linux |
| Plan type | Consumption(※2) |
※2: 最近利用できるようになりました。他のプランもあります。

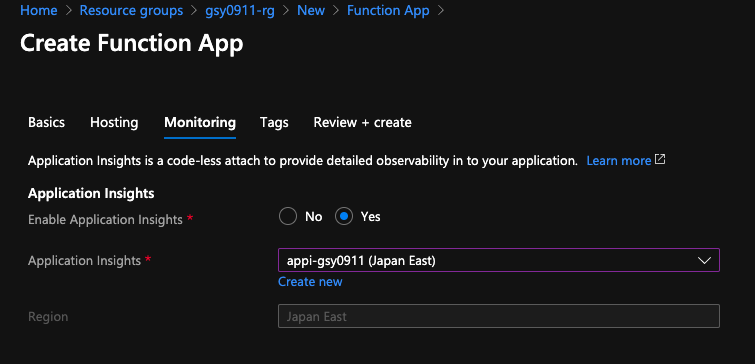
Monitoringの項目も埋めていきます。
| 項目 | 値 |
|---|---|
| Application Insights | appi-gsy0911 |
Tagsは好きな Tag を設定してください。
ここまで作成したら、Create します。
これで、作成すべきサービスは作り終えました。
4. AzureFunctions の種類
AzureFunctions は、様々な起動方法(トリガー)があります。
特に私が利用するのは次の4つです。
それぞれ、その名の通りなのですが、簡単に説明します。
- HttpTrigger
-
GETやPOSTなどでアクセス可能な URL を発行し、URL にアクセスがあったら起動する
-
- TimerTrigger
- cron 式で実行タイミングを決めて、時間になったら起動する
- QueueTrigger
- 設定した Queue に message が enqueue されたら起動する
- BlobTrigger
- 特定の Blob にファイルの入力などがあったら起動する
そのほかのトリガーの例に関しては、公式ドキュメントを確認してください。
また、今回は特に利用しないので説明しませんが、トリガーの他にバインディングという概念もあります。
詳しくは、上記の公式ドキュメントに解説されていますので読んでください。
今回は上記の関数のうちHttpTriggerとTimerTriggerを実装してみます。
5. AzureFunctions の実装
初めから作成する場合は以下のコマンドを実行すると、必要なファイルを生成してくれます。
実行する runtime は Python なので 3 を入力します。
$ func init test_function
Select a number for worker runtime:
1. dotnet
2. node
3. python
4. powershell
5. custom
Choose option: 3 {<- type `3`}
python
Found Python version 3.8.6 (python3).
Writing requirements.txt
Writing .gitignore
Writing host.json
Writing local.settings.json
Writing {current_directory}/test_function/.vscode/extensions.json

# 作成後に関数の名前のフォルダが作成されるのでそこに移動
$ cd test_function

# func initコマンドで作成されたファイル
$ tree
.
├── host.json
├── local.settings.json
└── requirements.txt
これで、AzureFunctions へデプロイするのに必要なファイルが生成されました。
5.1 requirements.txtの修正
バリデーション用にcerberusというライブラリを追加しておきます。
# Do not include azure-functions-worker as it may conflict with the Azure Functions platform

azure-functions
+ cerberus
5.2 HttpTrigger の作成
はじめに HttpTrigger を作成します。
# test_function/以下にて実行
$ func new
Select a number for template:
1. Azure Blob Storage trigger
2. Azure Cosmos DB trigger
3. Azure Event Grid trigger
4. Azure Event Hub trigger
5. HTTP trigger
6. Azure Queue Storage trigger
7. RabbitMQ trigger
8. Azure Service Bus Queue trigger
9. Azure Service Bus Topic trigger
10. Timer trigger
Choose option: 5 {<- type `5`}
HTTP trigger
Function name: [HttpTrigger] http_trigger {<- type `http_trigger`}
Writing {current_directory}/http_trigger/__init__.py
Writing {current_directory}/http_trigger/function.json
The function "http_trigger" was created successfully from the "HTTP trigger" template.

# HttpTriggerの関数を作成したあとのファイル構成
$ tree
.
├── host.json
├── local.settings.json
├── requirements.txt
└── http_trigger
    ├── __init__.py
    └── function.json
5.2.1 HttpTrigger のfunctions.json
ここのnameは、__init__.pyのmain()関数の引数の名前と一致させる必要があります。
{
  "scriptFile": "__init__.py",
  "bindings": [
    {
      "authLevel": "function",
      "type": "httpTrigger",
      "direction": "in",
      "name": "req",
      "methods": [
        "get",
        "post"
      ]
    },
    {
      "type": "http",
      "direction": "out",
      "name": "$return"
    }
  ]
}
今回はPOSTメソッドを受け取る AzureFunctions を作成したいので、getを削除します。
また、API Management と統合した際に URL の route を設定したいので、tech/qiitaを追記します。
{
  "scriptFile": "__init__.py",
  "bindings": [
    {
      "authLevel": "function",
      "type": "httpTrigger",
      "direction": "in",
      "name": "req",
+     "route": "tech/qiita",
      "methods": [
-        "get",
        "post"
      ]
    },
    {
      "type": "http",
      "direction": "out",
      "name": "$return"
    }
  ]
}
5.2.2 HttpTrigger の__init__.py
デフォルトで作成されるのは以下のテンプレートです。
しかし、以下のよくない点が挙げられます。
-
loggingモジュールをそのまま利用していたり、 -
HttpResponseの返り値の長さが 120 文字を超えていたり(PEP8違反) - ValueError の例外処理を
passしていたり
お世辞にも参考にして良いサンプルプログラムではないです。
import logging

import azure.functions as func


def main(req: func.HttpRequest) -> func.HttpResponse:
    logging.info('Python HTTP trigger function processed a request.')

    name = req.params.get('name')
    if not name:
        try:
            req_body = req.get_json()
        except ValueError:
            pass
        else:
            name = req_body.get('name')

    if name:
        return func.HttpResponse(f"Hello, {name}. This HTTP triggered function executed successfully.")
    else:
        return func.HttpResponse(
             "This HTTP triggered function executed successfully. Pass a name in the query string or in the request body for a personalized response.",
             status_code=200
        )
そのため、全て書き換えます。
ここで、先ほど requirements に追記しておいた cerberus というライブラリを利用して入力パラメータのバリデーションを行なっています。
import json
from logging import getLogger, INFO

import azure.functions as func
from cerberus import Validator

logger = getLogger()
logger.setLevel(INFO)


# Validation
SCHEMA = {
    "name": {"type": "string"}
}


def main(req: func.HttpRequest) -> func.HttpResponse:
    """
    以下のようなpayloadを受け取る関数
    {
        "name": "taro",
        "age": 10
    }
    """
    # POSTのみを対象としているため
    payload = req.get_json()

    # バリデータを作成
    # 不明なパラメータの入力も`allow_unknown`で許可している
    validator = Validator(SCHEMA, allow_unknown=True)

    # バリデーションがうまく通らない場合エラーを吐く
    if not validator.validate(payload, allow_unknown=True):
        return func.HttpResponse(
            body=json.dumps(validator.errors),
            mimetype="application/json",
            charset="utf-8",
            status_code=400
        )

    # 正しい入力があった場合は、受け取ったpayloadをそのまま返す
    return func.HttpResponse(
        body=json.dumps(payload),
        mimetype="application/json",
        charset="utf-8",
        status_code=200
    )
これにて HttpTrigger のコードは完成です。
5.3 TimerTrigger の作成
次に TimerTrigger を作成します。
先ほどと同様にコマンドからサンプルのプログラムを作成します。
$ func new
Select a number for template:
1. Azure Blob Storage trigger
2. Azure Cosmos DB trigger
3. Azure Event Grid trigger
4. Azure Event Hub trigger
5. HTTP trigger
6. Azure Queue Storage trigger
7. RabbitMQ trigger
8. Azure Service Bus Queue trigger
9. Azure Service Bus Topic trigger
10. Timer trigger
Choose option: 10 {<- type `10`}
Timer trigger
Function name: [TimerTrigger] timer_trigger {<- type `timer_trigger`}
Writing {current_directory}/timer_trigger/readme.md
Writing {current_directory}/timer_trigger/__init__.py
Writing {current_directory}/timer_trigger/function.json
The function "timer_trigger" was created successfully from the "Timer trigger" template.

# 作成されたファイルの確認
$ tree
.
├── host.json
├── local.settings.json
├── requirements.txt
├── http_trigger
│   ├── __init__.py
│   └── function.json
└── timer_trigger
    ├── __init__.py
    ├── function.json
    └── readme.md
5.3.1 TimerTrigger のfunctions.json
実行タイミングはschedule項目にて修正できます。
この例だと 5 分ごとに実行される設定です。
{
  "scriptFile": "__init__.py",
  "bindings": [
    {
      "name": "mytimer",
      "type": "timerTrigger",
      "direction": "in",
      "schedule": "0 */5 * * * *"
    }
  ]
}
5.3.2 TimerTrigger の__init__.py
TimerTrigger の実行スクリプトです。
こちらも、書き換えます。
import datetime
import logging

import azure.functions as func


def main(mytimer: func.TimerRequest) -> None:
    utc_timestamp = datetime.datetime.utcnow().replace(
        tzinfo=datetime.timezone.utc).isoformat()

    if mytimer.past_due:
        logging.info('The timer is past due!')

    logging.info('Python timer trigger function ran at %s', utc_timestamp)
こちらが修正後の実行スクリプトです。
特に処理は記述していません。
from datetime import datetime, timezone, timedelta
from logging import getLogger, INFO

import azure.functions as func


logger = getLogger()
logger.setLevel(INFO)


def main(mytimer: func.TimerRequest):
    # 日時の取得
    tz_jst = timezone(timedelta(hours=9))
    today = datetime.now(tz=tz_jst)

    logger.info(f"today: {today}")
    # 以下から日付に関する処理を行う
以上で、TimerTrigger のスクリプトも完成です。
6. AzureFunctions のデプロイ
AzureFunctions へのデプロイは、$ az loginにてログインした環境に
自動的にデプロイされるようになります。
複数の subscription を保有している場合は、明示的に選択する必要があります。
6.1 Makefile を利用したデプロイ
デプロイにはMakefileを利用します。
shell scriptなどでも良いのですが、Makefile の方がデフォルトで目的ごとにコマンドで分けられるの便利なためです。
FUNCTION_APP_NAMEを変更すれば、どの AzureFunctions のデプロイでも利用可能です。
# function app name to deploy
FUNCTION_APP_NAME := gsy0911-function


.PHONY: help
help: ## print this message ## make
	@echo "publish to $(FUNCTION_APP_NAME)"
	@printf "\033[36m%-30s\033[0m %-50s %s\n" "[Sub command]" "[Description]" "[Example]"
	@grep -E '^[/a-zA-Z_-]+:.*?## .*$$' $(MAKEFILE_LIST) | perl -pe 's%^([/a-zA-Z_-]+):.*?(##)%$$1 $$2%' | awk -F " *?## *?" '{printf "\033[36m%-30s\033[0m %-50s %s\n", $$1, $$2, $$3}'

.PHONY: clean
clean: ## clean the function app ## make clean
	func azure functionapp publish $(FUNCTION_APP_NAME) --nozip

.PHONY: publish
publish: ## publish to the function app ## make publish
	func azure functionapp publish $(FUNCTION_APP_NAME)
上記の Makefile があるディレクトリにて、以下の$ make publishを実行すれば、
定数で指定した AzureFunctions へデプロイ可能です。
# Makeコマンドの一覧を表示
$ make
publish to gsy0911-function
[Sub command] [Description] [Example]
help print this message make
clean clean the function app make clean
publish publish to the function app make publish
# AzureFunctionsへデプロイ
$ make publish
...
Remote build succeeded!
Syncing triggers...
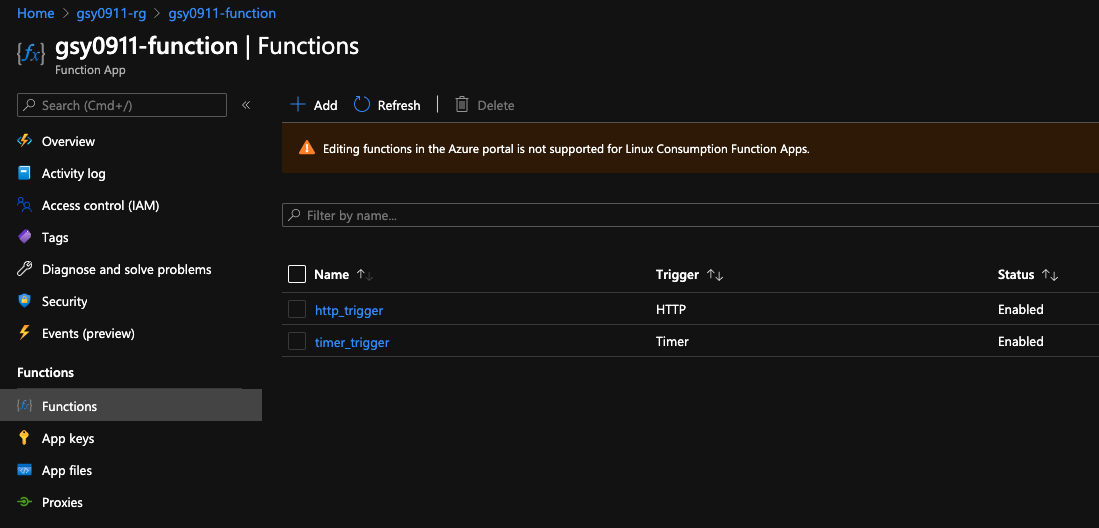
Functions in gsy0911-function:
http_trigger - [httpTrigger]
Invoke url: https://gsy0911-function.azurewebsites.net/api/tech/qiita?code=***
timer_trigger - [timerTrigger]
デプロイが完了すると、コンソールから確認できます。
デプロイした Functions の名前は、ローカルで作成したフォルダの名前と合致します。
7. AzureFunctions のデバッグ
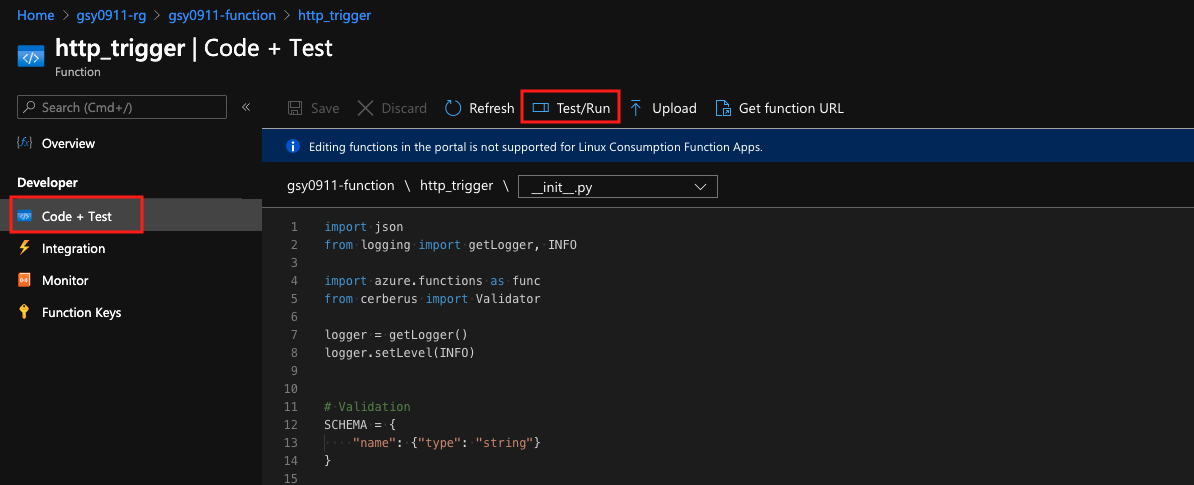
簡単なテストならば、コンソールから AzureFunctions を直接実行するのがおすすめです。
テスト実行したい関数を選択し、Code + TestからTest/Runを選択します。
右から画面が現れるのでそこに json 形式のデータを入れて、Runを実行します。
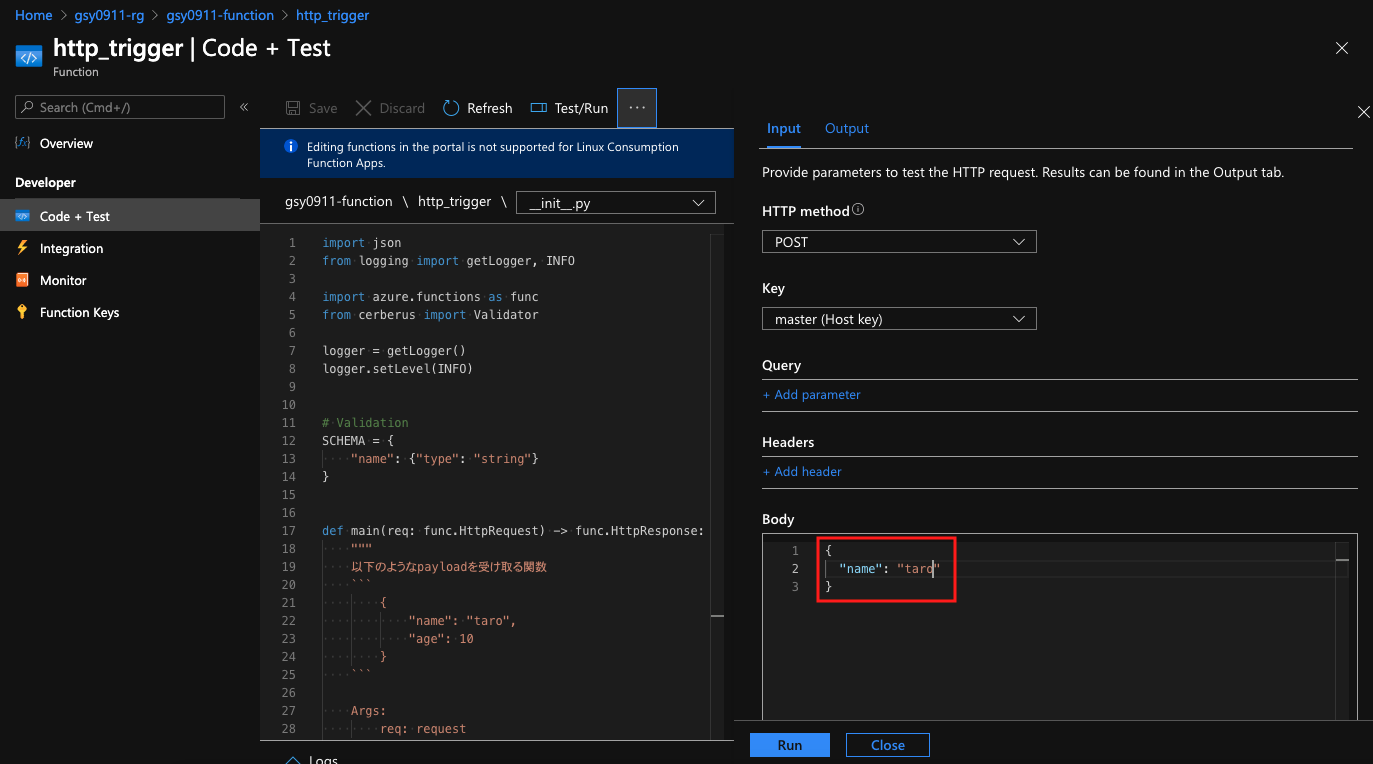
成功すれば、設定した値が返ってきていることがわかります。

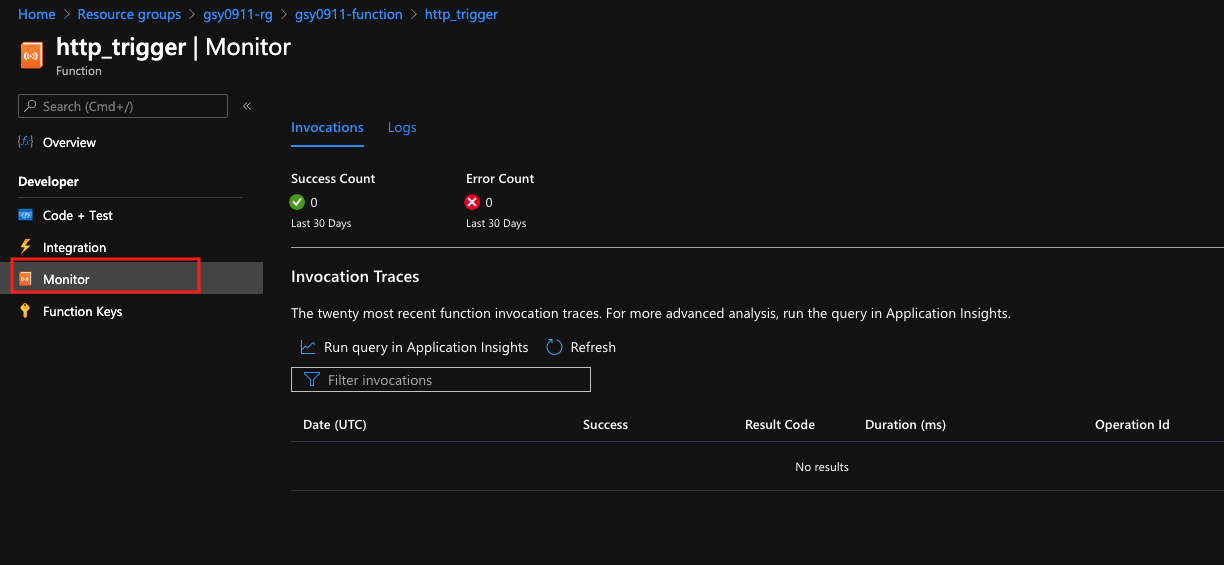
また、実行結果のログなどはMonitorというところに出力されます。
(ただし、実行のログが出力されるのは、関数の実行が完了してから 3 分ほどのラグがあります)
TimerTrigger でも同様の方法でテスト実行可能です。
8. 終わりに
本記事では、以下の内容に関して簡単に触れました。
- AzureFunctions に必要なサービスのデプロイ
- AzureFunctions の作成・デプロイ・デバッグ
-
HttpTriggerとTimerTrigger - Makefile を利用したデプロイ
-
今回触れなかったQueueTrigger に関する記事もありますので、合わせてどうぞ。