はじめに
本記事は、AzureFunctionsのうちQueue Storageのバインドを利用してAzureFunctionsを連鎖させることを目指します。
概要としては以下の通りです。
- HTTP リクエストで起動した
AzureFunctionsがQueueStorageにメッセージをenqueue -
Queueへのenqueueをトリガーに別のAzureFunctionsを起動する
図示するとこんな感じです。
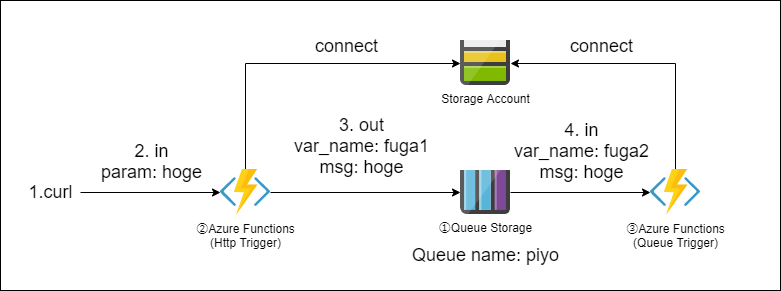
- User が curl を叩く
- ②の
AzureFunctionが起動 -
Queue Storageにメッセージがenqueue -
enqueueを trigger に③のAzureFunctionsが起動
前提
- VSCode などを利用して
AzureFunctionsの作成・デプロイができる - ②と③の
AzureFunctionsは同一リージョン・同一Storage Accountに紐づいている
準備・実装
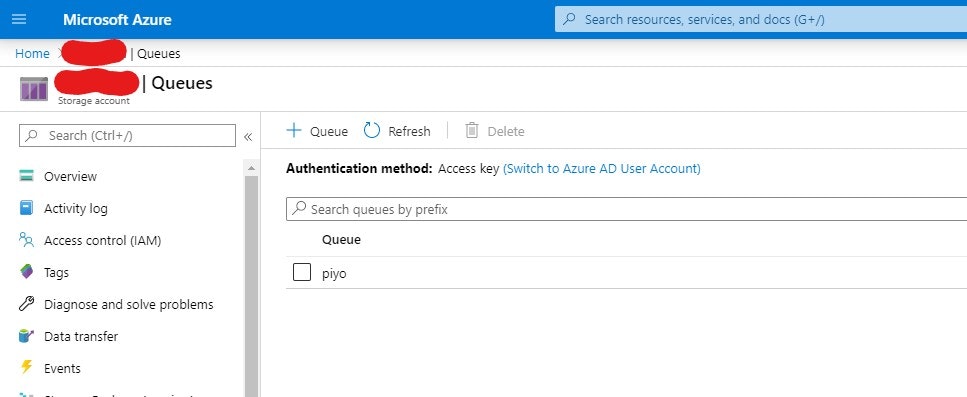
準備:① Queue Storage
Queue Storageに「+Queue」ボタンからpiyoというQueueを作ります。
実装:② AzureFunctions
VSCode から HTTP Trigger のAzureFunctionsを作成し、自動生成されたコードに対して修正していきます。
追加するのは下部の5項目、"type", "direction", "name", "queueName", "connection"です。
(VSCode ならば、add bindingでも追加できます)
{
  "scriptFile": "__init__.py",
  "bindings": [
    {
      "authLevel": "anonymous",
      "type": "httpTrigger",
      "direction": "in",
      "name": "req",
      "methods": [
        "get",
        "post"
      ]
    },
    {
      "type": "http",
      "direction": "out",
      "name": "$return"
    },
    {
      "type": "queue",
      "direction": "out",
      "name": "fuga1",
      "queueName": "piyo",
      "connection": "AzureWebJobsStorage"
    }
  ]
}
以下に簡単に追加項目の説明をします。はまりやすい設定は、nameです。
このnameがPythonプログラム上で受け取る引数名になります。
(最初はここがわからなくて、関数の実行ログも出力が遅いのでエラーの原因の特定に時間がかかりました)
| 項目名 | 定数 | パラメータ | 説明 |
|---|---|---|---|
| type | 〇 | queue |
bindingの種類 |
| direction | 〇 | out |
bindingの方向。出力のためout
|
| name | fuga1 |
Pythonの実行関数で受け取る際の引数の名前
|
|
| queueName | piyo | 上記のステップで作成したQueueの名前 |
|
| connection | 〇 | AzureWebJobsStorage | 今回は同一のStorage Accountのため定数。 |
次に、Pythonのコード本体です。
ここで、main 関数の引数にfuga1を入れます。すなわち、function.jsonと同じ名前を指定します。
注意 nameに_などの記号を入れると動かなくなります。
import logging
import azure.functions as func


def main(req: func.HttpRequest, fuga1: func.Out[str]) -> func.HttpResponse:
    logging.info('Python HTTP trigger function processed a request.')

    # パラメータの取得
    name = req.params.get('name')
    # queueに入れる
    fuga1.set(name)

    # 返り値(自動生成の場合はもうちょっと長いけどここは関係ないので省略)
    return func.HttpResponse("\n".join(return_list))
実装:③ AzureFunctions
②のときと同様に VSCode から、今度はQueue Triggerの関数を自動生成します。
今回は入力のbindingのみです。
queueNameにはQueue Storageのpiyoを指定します。
nameはfuga2にしています。このnameはAzureFunctionsごとに固有に決めることができるからです。
{
  "scriptFile": "__init__.py",
  "bindings": [
    {
      "name": "fuga2",
      "type": "queueTrigger",
      "direction": "in",
      "queueName": "piyo",
      "connection": "AzureWebJobsStorage"
    }
  ]
}
次に、Pythonのコード本体です。
main 関数の引数のみfunction.jsonで指定した変数名fuga2に修正します。
import logging
import azure.functions as func


def main(fuga2: func.QueueMessage) -> None:
    logging.info('Python queue trigger function processed a queue item: %s',
                 fuga2.get_body().decode('utf-8'))
実行例
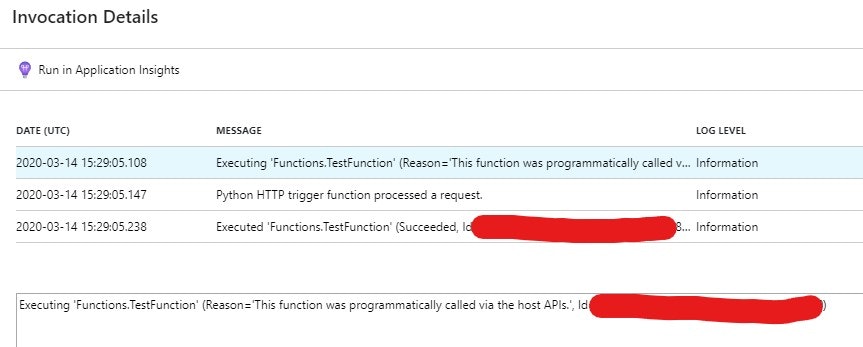
ローカルの curl から叩くと、動いていることがログからわかります。
まずは、HTTP リクエストで②のAzureFunctionsが起動し、
③のAzureFunctionsがQueueをトリガーにして起動しています。
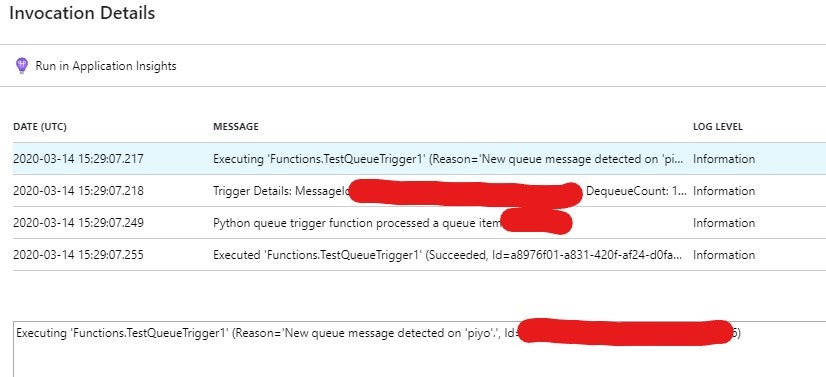
Queueにメッセージが入ってから2秒後にAzureFunctionsが動いているのがわかりますね。
(関数名には目を瞑ってください)
おわりに
AzureFunctionsのQueueTriggerで連鎖できることが分かりました。
実際に動くサービスを作成する場合はQueueの名前を上手に生成したり、複数個のout bindingsを利用したりすることでAzureFunctionsをいい感じに連鎖できそうですね。