はじめに
お勉強のログです。Persistent Volume辺り。
関連記事
コンテナ型仮想化技術 Study01 / Docker基礎
コンテナ型仮想化技術 Study02 / Docker レジストリ
コンテナ型仮想化技術 Study03 / Docker Compose
コンテナ型仮想化技術 Study04 / Minikube & kubectl簡易操作
コンテナ型仮想化技術 Study05 / Pod操作
コンテナ型仮想化技術 Study06 / ReplicaSet, Deployment, Service
コンテナ型仮想化技術 Study06' / Kubernetesネットワーク問題判別
コンテナ型仮想化技術 Study07 / ストレージ
コンテナ型仮想化技術 Study08 / Statefulset, Ingress
コンテナ型仮想化技術 Study09 / Helm
参考情報
Persistent Volumes
【図解】初心者にも分かる iSCSI の仕組み ~NAS(NFS)との違いやメリット,デメリット~
ウマいストレージの選び方。
ストレージの種類の整理
基本、コンテナは独立した稼働環境で、ディスクのイメージもそれぞれ独立していますが、コンテナ間(Pod間)で共有したい情報もあります。その場合、各コンテナから共有できるディスクをアクセスする必要がありますが、共有のための具体的なストレージ実装を抽象化して柔軟に構成できる仕組みをKubernetesでは提供しており、永続ボリューム/Persistent Volumeなどと呼ばれているようです。
利用できるストレージの実装方式はいくつかあり、それぞれ特徴も異なります。例えば以下のようなものがあるようです。
- emptyDir: 同一Pod内のコンテナでノード上のディスクを共有する仕組み。Podをまたぐと共有できない。Pod終了時に削除される。一時的な利用で使われる?
- hostPath: 同一ノード内のコンテナでノード上のディスクを共有する仕組み。ノードのディスクを使うため、別のノードのPodとは共有できない。シングルノード前提でしか使えない。
- NFS: ネットワーク経由で複数ノードからディスクを共有する仕組み。ノードを跨って複数コンテナからディスク共有可能。同時に複数のコンテナからReadWriteモードでマウント可能。
- GlasterFS: OSSのスケーラブルな分散ファイルシステム。ノードを跨って複数コンテナからディスク共有可能。同時に複数のコンテナからReadWriteモードでマウント可能。
- iSCSI: SCSIプロトコルをTCP/IPネットワーク経由で使用するためのプロトコル。ReadWriteモードで接続できるノードは1時点で1つ。
Force write, 排他制御, パフォーマンスあたりが気になる所ですが...
関連リソースの整理
Podで共有するストレージの構成の仕方として、大きくStatic Provisioning / Dynamic Provisioning という2種類の方法があります。
参考: Persistent Volumes
それぞれで定義しなければいけないリソースが若干異なります。
Static Provisioning
関連するリソースとしては、以下のようなイメージとなります。

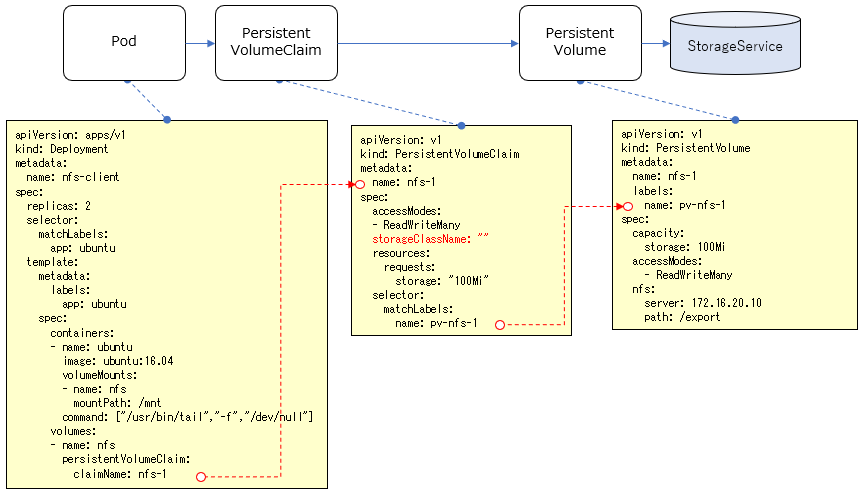
- PersistentVolume(PV): 使用するストレージサービス(NFS,GlasterFSなど)に応じて、それらのサービスを利用するための情報を管理します。これによりストレージサービスの実装が隠蔽されます。
- PersistentVolumeClaim(PVC): 名前の通り、PersistentVolumeに対する"要求"を管理するものです。どのPVを利用して、どういうモード(Read/Write)でアクセスして、どのくらいのサイズを確保するか、といったことを定義します。
事前に、利用するストレージサービスの構成(NFSサーバーやGlusterFSのサーバー構成など)は行っておき、それに応じたPV, PVCをKubernetes Clusterリソースとして定義し、PodからはPVCを指定して共有ストレージを利用する、という流れになります。
Dynamic Provisioning
参考: ボリュームの動的プロビジョニング(Dynamic Volume Provisioning)
関連するリソースとしては、以下のようなイメージとなります。

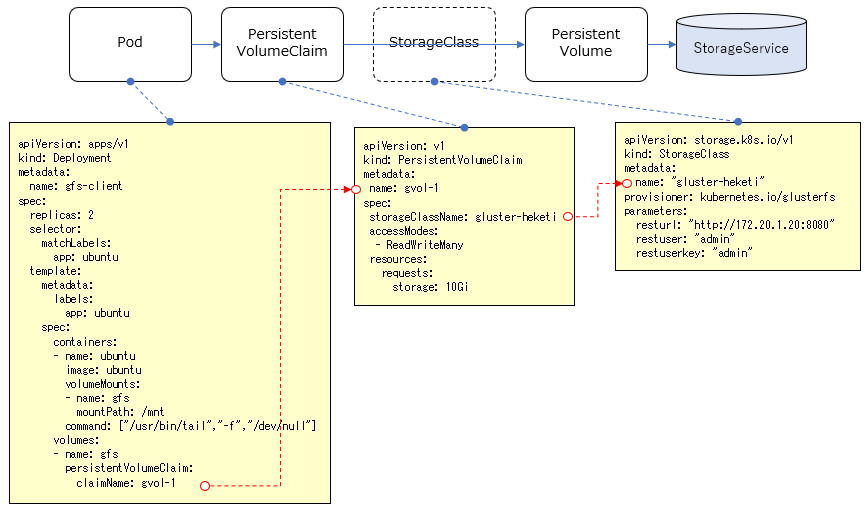
- StorageClass: PVを動的に作成するための情報を管理するリソース。使用するストレージサービスに応じて、PVを動的に作成(Provisioning)するためのProvisioner(pluginモジュール)などを指定することになります。
新たにStorageClassというリソースが関連します。GlusterFSなど動的にストレージを確保するストレージサービスと組み合わせることで、PVを静的に定義するのではなく、PVの定義含めてストレージを動的にProvisioningすることができます。
環境整備
仮想NFSサーバー
以下のVagrantファイルをそのまま使って、VirtualBox上にNFSサーバー用のゲストOSを立てます。
https://github.com/takara9/vagrant-nfs/
git clone して vagrant up
c:\y\Vagrant>git clone https://github.com/takara9/vagrant-nfs
Cloning into 'vagrant-nfs'...
remote: Enumerating objects: 26, done.
remote: Total 26 (delta 0), reused 0 (delta 0), pack-reused 26
Unpacking objects: 100% (26/26), done.

c:\y\Vagrant>cd vagrant-nfs

c:\y\Vagrant\vagrant-nfs>vagrant up
Bringing machine 'nfsserver' up with 'virtualbox' provider...
==> nfsserver: Importing base box 'ubuntu/xenial64'...
==> nfsserver: Matching MAC address for NAT networking...
==> nfsserver: Checking if box 'ubuntu/xenial64' version '20190613.1.0' is up to date...
==> nfsserver: A newer version of the box 'ubuntu/xenial64' for provider 'virtualbox' is
==> nfsserver: available! You currently have version '20190613.1.0'. The latest is version
==> nfsserver: '20191126.1.0'. Run `vagrant box update` to update.
==> nfsserver: Setting the name of the VM: vagrant-nfs_nfsserver_1574923150593_32019
==> nfsserver: Clearing any previously set network interfaces...
==> nfsserver: Preparing network interfaces based on configuration...
    nfsserver: Adapter 1: nat
    nfsserver: Adapter 2: hostonly
==> nfsserver: Forwarding ports...
    nfsserver: 22 (guest) => 2222 (host) (adapter 1)
==> nfsserver: Running 'pre-boot' VM customizations...
==> nfsserver: Booting VM...
==> nfsserver: Waiting for machine to boot. This may take a few minutes...
    nfsserver: SSH address: 127.0.0.1:2222
    nfsserver: SSH username: vagrant
    nfsserver: SSH auth method: private key
    nfsserver:
    nfsserver: Vagrant insecure key detected. Vagrant will automatically replace
    nfsserver: this with a newly generated keypair for better security.
    nfsserver:
    nfsserver: Inserting generated public key within guest...
    nfsserver: Removing insecure key from the guest if it's present...
    nfsserver: Key inserted! Disconnecting and reconnecting using new SSH key...
==> nfsserver: Machine booted and ready!
==> nfsserver: Checking for guest additions in VM...
    nfsserver: The guest additions on this VM do not match the installed version of
    nfsserver: VirtualBox! In most cases this is fine, but in rare cases it can
    nfsserver: prevent things such as shared folders from working properly. If you see
    nfsserver: shared folder errors, please make sure the guest additions within the
    nfsserver: virtual machine match the version of VirtualBox you have installed on
    nfsserver: your host and reload your VM.
    nfsserver:
    nfsserver: Guest Additions Version: 5.1.38
    nfsserver: VirtualBox Version: 6.0
==> nfsserver: Setting hostname...
==> nfsserver: Configuring and enabling network interfaces...
==> nfsserver: Mounting shared folders...
    nfsserver: /vagrant => C:/y/Vagrant/vagrant-nfs
==> nfsserver: Running provisioner: ansible_local...
    nfsserver: Installing Ansible...
Vagrant has automatically selected the compatibility mode '2.0'
according to the Ansible version installed (2.9.1).

Alternatively, the compatibility mode can be specified in your Vagrantfile:
https://www.vagrantup.com/docs/provisioning/ansible_common.html#compatibility_mode
    nfsserver: Running ansible-playbook...

PLAY [nfsserver] ***************************************************************

TASK [Gathering Facts] *********************************************************
ok: [nfsserver]

TASK [Create export dir] *******************************************************
changed: [nfsserver]

TASK [Ensure NFS utilities are installed.] *************************************
[DEPRECATION WARNING]: Invoking "apt" only once while using a loop via
squash_actions is deprecated. Instead of using a loop to supply multiple items
and specifying `name: "{{ item }}"`, please use `name: ['nfs-common', 'nfs-
kernel-server']` and remove the loop. This feature will be removed in version
2.11. Deprecation warnings can be disabled by setting
deprecation_warnings=False in ansible.cfg.
changed: [nfsserver] => (item=[u'nfs-common', u'nfs-kernel-server'])
[WARNING]: Updating cache and auto-installing missing dependency: python-apt

TASK [copy /etc/exports] *******************************************************
changed: [nfsserver]

TASK [restart nfs server] ******************************************************
changed: [nfsserver]

PLAY RECAP *********************************************************************
nfsserver                  : ok=5    changed=4    unreachable=0    failed=0    skipped=0    rescued=0    ignored=0
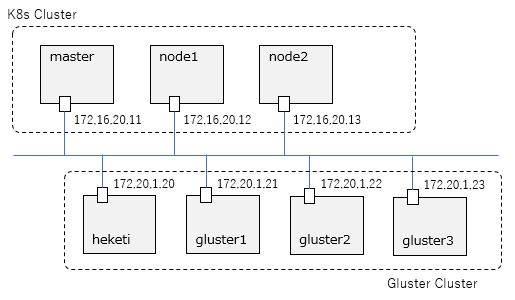
仮想GlusterFSクラスタ
以下のVagrantファイルをそのまま使って、VirtualBox上にGlusterFSのクラスタを構成します(heketi+Glusterクラスタx3の合計4ノード)。
https://github.com/takara9/vagrant-glusterfs
c:\y\Vagrant>git clone https://github.com/takara9/vagrant-glusterfs
Cloning into 'vagrant-glusterfs'...
remote: Enumerating objects: 50, done.
remote: Counting objects: 100% (50/50), done.
remote: Compressing objects: 100% (37/37), done.
remote: Total 126 (delta 26), reused 30 (delta 12), pack-reused 76 eceiving objects:  70% (89/
Receiving objects: 100% (126/126), 29.01 KiB | 345.00 KiB/s, done.
Resolving deltas: 100% (56/56), done.

c:\y\Vagrant>cd vagrant-glusterfs

c:\y\Vagrant\vagrant-glusterfs>vagrant up
Bringing machine 'gluster1' up with 'virtualbox' provider...
Bringing machine 'gluster2' up with 'virtualbox' provider...
Bringing machine 'gluster3' up with 'virtualbox' provider...
Bringing machine 'heketi' up with 'virtualbox' provider...
==> gluster1: Importing base box 'ubuntu/xenial64'...
==> gluster1: Matching MAC address for NAT networking...
==> gluster1: Checking if box 'ubuntu/xenial64' version '20190613.1.0' is up to date...
==> gluster1: A newer version of the box 'ubuntu/xenial64' for provider 'virtualbox' is
==> gluster1: available! You currently have version '20190613.1.0'. The latest is version
==> gluster1: '20191126.1.0'. Run `vagrant box update` to update.
==> gluster1: Setting the name of the VM: vagrant-glusterfs_gluster1_1574936789288_7817
==> gluster1: Clearing any previously set network interfaces...
==> gluster1: Preparing network interfaces based on configuration...
    gluster1: Adapter 1: nat
    gluster1: Adapter 2: hostonly
==> gluster1: Forwarding ports...
    gluster1: 22 (guest) => 2222 (host) (adapter 1)
==> gluster1: Running 'pre-boot' VM customizations...
==> gluster1: Booting VM...
==> gluster1: Waiting for machine to boot. This may take a few minutes...
    gluster1: SSH address: 127.0.0.1:2222
    gluster1: SSH username: vagrant
    gluster1: SSH auth method: private key
    gluster1:
    gluster1: Vagrant insecure key detected. Vagrant will automatically replace
    gluster1: this with a newly generated keypair for better security.
    gluster1:
    gluster1: Inserting generated public key within guest...
    gluster1: Removing insecure key from the guest if it's present...
    gluster1: Key inserted! Disconnecting and reconnecting using new SSH key...
==> gluster1: Machine booted and ready!
==> gluster1: Checking for guest additions in VM...
    gluster1: The guest additions on this VM do not match the installed version of
    gluster1: VirtualBox! In most cases this is fine, but in rare cases it can
    gluster1: prevent things such as shared folders from working properly. If you see
    gluster1: shared folder errors, please make sure the guest additions within the
    gluster1: virtual machine match the version of VirtualBox you have installed on
    gluster1: your host and reload your VM.
    gluster1:
    gluster1: Guest Additions Version: 5.1.38
    gluster1: VirtualBox Version: 6.0
==> gluster1: Setting hostname...
==> gluster1: Configuring and enabling network interfaces...
==> gluster1: Mounting shared folders...
    gluster1: /vagrant => C:/y/Vagrant/vagrant-glusterfs
==> gluster1: Running provisioner: shell...
    gluster1: Running: inline script
==> gluster1: Running provisioner: ansible_local...
    gluster1: Installing Ansible...
Vagrant has automatically selected the compatibility mode '2.0'
according to the Ansible version installed (2.9.1).

Alternatively, the compatibility mode can be specified in your Vagrantfile:
https://www.vagrantup.com/docs/provisioning/ansible_common.html#compatibility_mode
    gluster1: Running ansible-playbook...

PLAY [all] *********************************************************************

TASK [Gathering Facts] *********************************************************
ok: [gluster1]

TASK [Add GlusterFS Repository] ************************************************
changed: [gluster1]

TASK [Ensure PKG are installed.] ***********************************************
changed: [gluster1]

TASK [cp ssh-key] **************************************************************
changed: [gluster1]

PLAY RECAP *********************************************************************
gluster1                   : ok=4    changed=3    unreachable=0    failed=0    skipped=0    rescued=0    ignored=0

==> gluster2: Importing base box 'ubuntu/xenial64'...
==> gluster2: Matching MAC address for NAT networking...
==> gluster2: Checking if box 'ubuntu/xenial64' version '20190613.1.0' is up to date...
==> gluster2: Setting the name of the VM: vagrant-glusterfs_gluster2_1574936997945_17908
==> gluster2: Fixed port collision for 22 => 2222. Now on port 2200.
==> gluster2: Clearing any previously set network interfaces...
==> gluster2: Preparing network interfaces based on configuration...
    gluster2: Adapter 1: nat
    gluster2: Adapter 2: hostonly
==> gluster2: Forwarding ports...
    gluster2: 22 (guest) => 2200 (host) (adapter 1)
==> gluster2: Running 'pre-boot' VM customizations...
==> gluster2: Booting VM...
==> gluster2: Waiting for machine to boot. This may take a few minutes...
    gluster2: SSH address: 127.0.0.1:2200
    gluster2: SSH username: vagrant
    gluster2: SSH auth method: private key
    gluster2:
    gluster2: Vagrant insecure key detected. Vagrant will automatically replace
    gluster2: this with a newly generated keypair for better security.
    gluster2:
    gluster2: Inserting generated public key within guest...
    gluster2: Removing insecure key from the guest if it's present...
    gluster2: Key inserted! Disconnecting and reconnecting using new SSH key...
==> gluster2: Machine booted and ready!
==> gluster2: Checking for guest additions in VM...
    gluster2: The guest additions on this VM do not match the installed version of
    gluster2: VirtualBox! In most cases this is fine, but in rare cases it can
    gluster2: prevent things such as shared folders from working properly. If you see
    gluster2: shared folder errors, please make sure the guest additions within the
    gluster2: virtual machine match the version of VirtualBox you have installed on
    gluster2: your host and reload your VM.
    gluster2:
    gluster2: Guest Additions Version: 5.1.38
    gluster2: VirtualBox Version: 6.0
==> gluster2: Setting hostname...
==> gluster2: Configuring and enabling network interfaces...
==> gluster2: Mounting shared folders...
    gluster2: /vagrant => C:/y/Vagrant/vagrant-glusterfs
==> gluster2: Running provisioner: shell...
    gluster2: Running: inline script
==> gluster2: Running provisioner: ansible_local...
    gluster2: Installing Ansible...
Vagrant has automatically selected the compatibility mode '2.0'
according to the Ansible version installed (2.9.1).

Alternatively, the compatibility mode can be specified in your Vagrantfile:
https://www.vagrantup.com/docs/provisioning/ansible_common.html#compatibility_mode
    gluster2: Running ansible-playbook...

PLAY [all] *********************************************************************

TASK [Gathering Facts] *********************************************************
ok: [gluster2]

TASK [Add GlusterFS Repository] ************************************************
changed: [gluster2]

TASK [Ensure PKG are installed.] ***********************************************
changed: [gluster2]

TASK [cp ssh-key] **************************************************************
changed: [gluster2]

PLAY RECAP *********************************************************************
gluster2                   : ok=4    changed=3    unreachable=0    failed=0    skipped=0    rescued=0    ignored=0

==> gluster3: Importing base box 'ubuntu/xenial64'...
==> gluster3: Matching MAC address for NAT networking...
==> gluster3: Checking if box 'ubuntu/xenial64' version '20190613.1.0' is up to date...
==> gluster3: Setting the name of the VM: vagrant-glusterfs_gluster3_1574937198478_31337
==> gluster3: Fixed port collision for 22 => 2222. Now on port 2201.
==> gluster3: Clearing any previously set network interfaces...
==> gluster3: Preparing network interfaces based on configuration...
    gluster3: Adapter 1: nat
    gluster3: Adapter 2: hostonly
==> gluster3: Forwarding ports...
    gluster3: 22 (guest) => 2201 (host) (adapter 1)
==> gluster3: Running 'pre-boot' VM customizations...
==> gluster3: Booting VM...
==> gluster3: Waiting for machine to boot. This may take a few minutes...
    gluster3: SSH address: 127.0.0.1:2201
    gluster3: SSH username: vagrant
    gluster3: SSH auth method: private key
    gluster3:
    gluster3: Vagrant insecure key detected. Vagrant will automatically replace
    gluster3: this with a newly generated keypair for better security.
    gluster3:
    gluster3: Inserting generated public key within guest...
    gluster3: Removing insecure key from the guest if it's present...
    gluster3: Key inserted! Disconnecting and reconnecting using new SSH key...
==> gluster3: Machine booted and ready!
==> gluster3: Checking for guest additions in VM...
    gluster3: The guest additions on this VM do not match the installed version of
    gluster3: VirtualBox! In most cases this is fine, but in rare cases it can
    gluster3: prevent things such as shared folders from working properly. If you see
    gluster3: shared folder errors, please make sure the guest additions within the
    gluster3: virtual machine match the version of VirtualBox you have installed on
    gluster3: your host and reload your VM.
    gluster3:
    gluster3: Guest Additions Version: 5.1.38
    gluster3: VirtualBox Version: 6.0
==> gluster3: Setting hostname...
==> gluster3: Configuring and enabling network interfaces...
==> gluster3: Mounting shared folders...
    gluster3: /vagrant => C:/y/Vagrant/vagrant-glusterfs
==> gluster3: Running provisioner: shell...
    gluster3: Running: inline script
==> gluster3: Running provisioner: ansible_local...
    gluster3: Installing Ansible...
Vagrant has automatically selected the compatibility mode '2.0'
according to the Ansible version installed (2.9.1).

Alternatively, the compatibility mode can be specified in your Vagrantfile:
https://www.vagrantup.com/docs/provisioning/ansible_common.html#compatibility_mode
    gluster3: Running ansible-playbook...

PLAY [all] *********************************************************************

TASK [Gathering Facts] *********************************************************
ok: [gluster3]

TASK [Add GlusterFS Repository] ************************************************
changed: [gluster3]

TASK [Ensure PKG are installed.] ***********************************************
changed: [gluster3]

TASK [cp ssh-key] **************************************************************
changed: [gluster3]

PLAY RECAP *********************************************************************
gluster3                   : ok=4    changed=3    unreachable=0    failed=0    skipped=0    rescued=0    ignored=0

==> heketi: Importing base box 'ubuntu/xenial64'...
==> heketi: Matching MAC address for NAT networking...
==> heketi: Checking if box 'ubuntu/xenial64' version '20190613.1.0' is up to date...
==> heketi: Setting the name of the VM: vagrant-glusterfs_heketi_1574937397127_53647
==> heketi: Fixed port collision for 22 => 2222. Now on port 2202.
==> heketi: Clearing any previously set network interfaces...
==> heketi: Preparing network interfaces based on configuration...
    heketi: Adapter 1: nat
    heketi: Adapter 2: hostonly
==> heketi: Forwarding ports...
    heketi: 22 (guest) => 2202 (host) (adapter 1)
==> heketi: Running 'pre-boot' VM customizations...
==> heketi: Booting VM...
==> heketi: Waiting for machine to boot. This may take a few minutes...
    heketi: SSH address: 127.0.0.1:2202
    heketi: SSH username: vagrant
    heketi: SSH auth method: private key
    heketi:
    heketi: Vagrant insecure key detected. Vagrant will automatically replace
    heketi: this with a newly generated keypair for better security.
    heketi:
    heketi: Inserting generated public key within guest...
    heketi: Removing insecure key from the guest if it's present...
    heketi: Key inserted! Disconnecting and reconnecting using new SSH key...
==> heketi: Machine booted and ready!
==> heketi: Checking for guest additions in VM...
    heketi: The guest additions on this VM do not match the installed version of
    heketi: VirtualBox! In most cases this is fine, but in rare cases it can
    heketi: prevent things such as shared folders from working properly. If you see
    heketi: shared folder errors, please make sure the guest additions within the
    heketi: virtual machine match the version of VirtualBox you have installed on
    heketi: your host and reload your VM.
    heketi:
    heketi: Guest Additions Version: 5.1.38
    heketi: VirtualBox Version: 6.0
==> heketi: Setting hostname...
==> heketi: Configuring and enabling network interfaces...
==> heketi: Mounting shared folders...
    heketi: /vagrant => C:/y/Vagrant/vagrant-glusterfs
==> heketi: Running provisioner: shell...
    heketi: Running: inline script
==> heketi: Running provisioner: ansible_local...
    heketi: Installing Ansible...
Vagrant has automatically selected the compatibility mode '2.0'
according to the Ansible version installed (2.9.1).

Alternatively, the compatibility mode can be specified in your Vagrantfile:
https://www.vagrantup.com/docs/provisioning/ansible_common.html#compatibility_mode
    heketi: Running ansible-playbook...

PLAY [heketi] ******************************************************************

TASK [Gathering Facts] *********************************************************
ok: [heketi]

TASK [Add GlusterFS Repository] ************************************************
changed: [heketi]

TASK [Ensure PKG are installed.] ***********************************************
changed: [heketi]

TASK [cp id_rsa root] **********************************************************
changed: [heketi]

TASK [cp id_rsa vagrant] *******************************************************
changed: [heketi]

TASK [download] ****************************************************************
changed: [heketi]

TASK [extract tar] *************************************************************
changed: [heketi]

TASK [cp heketi.json] **********************************************************
changed: [heketi]

TASK [cp heketi.service for systemd] *******************************************
changed: [heketi]

TASK [reload systemd service] **************************************************
changed: [heketi]

TASK [Make sure a service is running] ******************************************
changed: [heketi]

PLAY RECAP *********************************************************************
heketi                     : ok=11   changed=10   unreachable=0    failed=0    skipped=0    rescued=0    ignored=0

==> heketi: Running provisioner: ansible_local...
Vagrant has automatically selected the compatibility mode '2.0'
according to the Ansible version installed (2.9.1).

Alternatively, the compatibility mode can be specified in your Vagrantfile:
https://www.vagrantup.com/docs/provisioning/ansible_common.html#compatibility_mode
    heketi: Running ansible-playbook...

PLAY [heketi] ******************************************************************

TASK [Gathering Facts] *********************************************************
ok: [heketi]

TASK [create gluster cluster] **************************************************
changed: [heketi]

TASK [add node] ****************************************************************
changed: [heketi] => (item=172.20.1.21)
changed: [heketi] => (item=172.20.1.22)
changed: [heketi] => (item=172.20.1.23)

TASK [add device 1] ************************************************************
changed: [heketi]

TASK [add device 2] ************************************************************
changed: [heketi]

TASK [add device 3] ************************************************************
changed: [heketi]

PLAY RECAP *********************************************************************
heketi                     : ok=6    changed=5    unreachable=0    failed=0    skipped=0    rescued=0    ignored=0
シングルノード構成での操作例 (minikube)
Static Provisioning
NFSを共有ストレージとして利用してみます。
minikubeから上で作成したNFSを使用する想定です。
共有ストレージの準備

これは、上で作成したNFSをそのまま使います。
NFSサーバー(172.16.20.10)にsshで接続して、NFSとして公開しているファイルシステムの状況を確認してみます。
vagrant@nfsserver:~$ sudo exportfs -v
/export         172.16.20.0/24(rw,async,wdelay,insecure,root_squash,no_subtree_check,fsid=0,sec=sys,rw,root_squash,no_all_squash)
/exportというディレクトリが公開されてる状態です。
busyboxのコンテナを稼働させるPodから、NFSサーバーにpingが通ることを確認しておきます。
vagrant@minikube:~$ kubectl run -it busybox --restart=Never --rm --image=busybox sh
If you don't see a command prompt, try pressing enter.
/ # ifconfig
eth0      Link encap:Ethernet  HWaddr 02:42:AC:11:00:07
          inet addr:172.17.0.7  Bcast:172.17.255.255  Mask:255.255.0.0
          UP BROADCAST RUNNING MULTICAST  MTU:1500  Metric:1
          RX packets:18 errors:0 dropped:0 overruns:0 frame:0
          TX packets:10 errors:0 dropped:0 overruns:0 carrier:0
          collisions:0 txqueuelen:0
          RX bytes:1516 (1.4 KiB)  TX bytes:868 (868.0 B)

lo        Link encap:Local Loopback
          inet addr:127.0.0.1  Mask:255.0.0.0
          UP LOOPBACK RUNNING  MTU:65536  Metric:1
          RX packets:0 errors:0 dropped:0 overruns:0 frame:0
          TX packets:0 errors:0 dropped:0 overruns:0 carrier:0
          collisions:0 txqueuelen:1
          RX bytes:0 (0.0 B)  TX bytes:0 (0.0 B)

/ # ping -c 3 172.16.20.10
PING 172.16.20.10 (172.16.20.10): 56 data bytes
64 bytes from 172.16.20.10: seq=0 ttl=62 time=0.756 ms
64 bytes from 172.16.20.10: seq=1 ttl=62 time=1.010 ms
64 bytes from 172.16.20.10: seq=2 ttl=62 time=1.384 ms

--- 172.16.20.10 ping statistics ---
3 packets transmitted, 3 packets received, 0% packet loss
round-trip min/avg/max = 0.756/1.050/1.384 ms
ping通りましたが、あれ?PodにアサインされるIPアドレスって、クラスター内で閉じてるんじゃなかったっけ???外には出ていけるのか...
/ # ping -c 3 www.google.com
PING www.google.com (172.217.31.132): 56 data bytes
64 bytes from 172.217.31.132: seq=0 ttl=44 time=20.332 ms
64 bytes from 172.217.31.132: seq=1 ttl=44 time=19.837 ms
64 bytes from 172.217.31.132: seq=2 ttl=44 time=19.817 ms

--- www.google.com ping statistics ---
3 packets transmitted, 3 packets received, 0% packet loss
round-trip min/avg/max = 19.817/19.995/20.332 ms
名前解決もできてるな。
ちなみに、NFSサーバー側からこのPodのアドレス(172.17.0.7)にはPingは通らなかった。ま、それはそうだろうな。(でもPodが動いているノード上からはPing通った。)
うーん、ネットワークむつかしね。
とりあえずbusyboxからNFSへのpingが通るので準備としてはOKっぽい。
PersistentVolume(PV)作成

以下のマニフェストをそのまま使います。
https://github.com/takara9/codes_for_lessons/blob/master/step11/nfs/nfs-pv.yml
vagrant@minikube:~/codes_for_lessons/step11/nfs$ kubectl apply -f nfs-pv.yml
persistentvolume/nfs-1 created

vagrant@minikube:~/codes_for_lessons/step11/nfs$ kubectl get pv -o wide
NAME    CAPACITY   ACCESS MODES   RECLAIM POLICY   STATUS      CLAIM   STORAGECLASS   REASON   AGE   VOLUMEMODE
nfs-1   100Mi      RWX            Retain           Available                                   27s   Filesystem
PersistentVolumeClaim(PVC)作成

以下のマニフェストをそのまま使います。
https://github.com/takara9/codes_for_lessons/blob/master/step11/nfs/nfs-pvc.yml
vagrant@minikube:~/codes_for_lessons/step11/nfs$ kubectl apply -f nfs-pvc.yml
persistentvolumeclaim/nfs-1 created

vagrant@minikube:~/codes_for_lessons/step11/nfs$ kubectl get pv,pvc -o wide
NAME                     CAPACITY   ACCESS MODES   RECLAIM POLICY   STATUS   CLAIM           STORAGECLASS   REASON   AGE     VOLUMEMODE
persistentvolume/nfs-1   100Mi      RWX            Retain           Bound    default/nfs-1                           4m34s   Filesystem

NAME                          STATUS   VOLUME   CAPACITY   ACCESS MODES   STORAGECLASS   AGE   VOLUMEMODE
persistentvolumeclaim/nfs-1   Bound    nfs-1    100Mi      RWX                           33s   Filesystem
Podの作成

以下のマニフェストをそのまま使います。
https://github.com/takara9/codes_for_lessons/blob/master/step11/nfs/nfs-client.yml
Pod単体ではなくDeploymentの定義となってるので、Replicasetから複数Podが作成されることになります(replica数:2)。
vagrant@minikube:~/codes_for_lessons/step11/nfs$ kubectl get pv,pvc,pod -o wide
NAME                     CAPACITY   ACCESS MODES   RECLAIM POLICY   STATUS   CLAIM           STORAGECLASS   REASON   AGE   VOLUMEMODE
persistentvolume/nfs-1   100Mi      RWX            Retain           Bound    default/nfs-1                           22m   Filesystem

NAME                          STATUS   VOLUME   CAPACITY   ACCESS MODES   STORAGECLASS   AGE   VOLUMEMODE
persistentvolumeclaim/nfs-1   Bound    nfs-1    100Mi      RWX                           18m   Filesystem

NAME                              READY   STATUS    RESTARTS   AGE   IP           NODE       NOMINATED NODE   READINESS GATES
pod/nfs-client-7c4b8fc57f-nnjzp   1/1     Running   0          27s   172.17.0.8   minikube   <none>           <none>
pod/nfs-client-7c4b8fc57f-p4sn2   1/1     Running   0          27s   172.17.0.7   minikube   <none>           <none>
確認
これで、2つのPodからストレージが共有されているはず。
NFSサーバー側のステータスを見てみると...
vagrant@nfsserver:~$ showmount -a
All mount points on nfsserver:
172.16.20.1:/export
172.16.20.1からマウントしているように見える。このIPアドレスは何者?マルチノード構成だったら、これが複数になる???
1つめのPodに入って、マウント状況確認し、マウントされているディレクトリに適当なファイル作ってみます。
vagrant@minikube:~$ kubectl exec -it nfs-client-7c4b8fc57f-nnjzp bash
root@nfs-client-7c4b8fc57f-nnjzp:/# df -h
Filesystem            Size  Used Avail Use% Mounted on
overlay               9.7G  4.1G  5.6G  43% /
tmpfs                  64M     0   64M   0% /dev
tmpfs                1000M     0 1000M   0% /sys/fs/cgroup
172.16.20.10:/export  9.7G  1.2G  8.5G  12% /mnt
/dev/sda1             9.7G  4.1G  5.6G  43% /etc/hosts
shm                    64M     0   64M   0% /dev/shm
tmpfs                1000M   12K 1000M   1% /run/secrets/kubernetes.io/serviceaccount
tmpfs                1000M     0 1000M   0% /proc/acpi
tmpfs                1000M     0 1000M   0% /proc/scsi
tmpfs                1000M     0 1000M   0% /sys/firmware
root@nfs-client-7c4b8fc57f-nnjzp:/# echo "aaaaa" > /mnt/test.txt
root@nfs-client-7c4b8fc57f-nnjzp:/# ls /mnt/
test.txt
もう1つのPodに入って、マウント状況確認し、マウントされているディレクトリのファイルを確認してみます。
vagrant@minikube:~$ kubectl exec -it nfs-client-7c4b8fc57f-p4sn2 bash
root@nfs-client-7c4b8fc57f-p4sn2:/# df -h
Filesystem            Size  Used Avail Use% Mounted on
overlay               9.7G  4.1G  5.6G  43% /
tmpfs                  64M     0   64M   0% /dev
tmpfs                1000M     0 1000M   0% /sys/fs/cgroup
172.16.20.10:/export  9.7G  1.2G  8.5G  12% /mnt
/dev/sda1             9.7G  4.1G  5.6G  43% /etc/hosts
shm                    64M     0   64M   0% /dev/shm
tmpfs                1000M   12K 1000M   1% /run/secrets/kubernetes.io/serviceaccount
tmpfs                1000M     0 1000M   0% /proc/acpi
tmpfs                1000M     0 1000M   0% /proc/scsi
tmpfs                1000M     0 1000M   0% /sys/firmware
root@nfs-client-7c4b8fc57f-p4sn2:/# ls /mnt
test.txt
root@nfs-client-7c4b8fc57f-p4sn2:/# cat /mnt/test.txt
aaaaa
NFSサーバー上でも、当然同じファイルが確認できます。
vagrant@nfsserver:~$ ls /export/
test.txt
vagrant@nfsserver:~$ cat /export/test.txt
aaaaa
疑問
あれ?そういえば、PVCのマニフェストではstorageでサイズらしきものを設定しているのだが、NFSで公開されたものをマウントする場合、普通、クライアント側でサイズなんて意識しないよなぁ。Static Provisioningの場合はこのサイズは意味無いのかな?
..
  resources:
    requests:
      storage: "100Mi"
...
まとめ
※注意!
Static Provisioninの場合、PVCのstorageClassNameには必ず""(Null)を指定する必要があります。この項目を省略してしまうと、そのK8sクラスターのデフォルトのStorageClassを使用したDynamic Provisioningを行うものと認識されてしまいます。
マルチノード構成での操作例
Dyanamic Provisioning
環境としては、マルチノード構成のK8sクラスターと、上で作成したGlusterFSを使用します。
構成イメージとしては以下の通り。(いずれもWindowsのVirtualBox上のゲストOSとして構成)
共有ストレージの準備

共有ストレージとして、上のGlusterFSを使用します。GlusterFSはheketi経由でコントロールする想定なので、masterノードからheketiにpingが通ることを確認しておきます。
vagrant@master:~$ ping -c 3 172.20.1.20
PING 172.20.1.20 (172.20.1.20) 56(84) bytes of data.
64 bytes from 172.20.1.20: icmp_seq=1 ttl=63 time=0.643 ms
64 bytes from 172.20.1.20: icmp_seq=2 ttl=63 time=0.765 ms
64 bytes from 172.20.1.20: icmp_seq=3 ttl=63 time=0.788 ms

--- 172.20.1.20 ping statistics ---
3 packets transmitted, 3 received, 0% packet loss, time 2006ms
rtt min/avg/max/mdev = 0.643/0.732/0.788/0.063 ms
StorageClass作成

Dynamic Provisioningでは、PV(Persistent Volume)を静的に定義するのではなく、リクエストに応じて動的にプロビジョニングすることになります。その基になるStorage Classというリソースを事前に定義しておきます。
Storage Classを作成するために、以下のYamlをそのまま適用します。
https://github.com/takara9/codes_for_lessons/blob/master/step11/glusterfs/gfs-sc.yml
vagrant@master:~/codes_for_lessons/step11/glusterfs$ kubectl apply -f gfs-sc.yml
storageclass.storage.k8s.io/gluster-heketi created
確認
vagrant@master:~/codes_for_lessons/step11/glusterfs$ kubectl get sc
NAME             PROVISIONER               AGE
gluster-heketi   kubernetes.io/glusterfs   26s

vagrant@master:~/codes_for_lessons/step11/glusterfs$ kubectl describe sc gluster-heketi
Name:            gluster-heketi
IsDefaultClass:  No
Annotations:     kubectl.kubernetes.io/last-applied-configuration={"apiVersion":"storage.k8s.io/v1","kind":"StorageClass","metadata":{"annotations":{},"name":"gluster-heketi"},"parameters":{"resturl":"http://172.20.1.20:8080","restuser":"admin","restuserkey":"admin"},"provisioner":"kubernetes.io/glusterfs"}

Provisioner:           kubernetes.io/glusterfs
Parameters:            resturl=http://172.20.1.20:8080,restuser=admin,restuserkey=admin
AllowVolumeExpansion:  <unset>
MountOptions:          <none>
ReclaimPolicy:         Delete
VolumeBindingMode:     Immediate
Events:                <none>
PersistentVolumeClaim(PVC)作成

上のStorageClassを使用してPVをリクエストするためのPVCを作成します。
以下のYamlをそのまま適用します。
https://github.com/takara9/codes_for_lessons/blob/master/step11/glusterfs/gfs-pvc.yml
vagrant@master:~/codes_for_lessons/step11/glusterfs$ kubectl apply -f gfs-pvc.yml
persistentvolumeclaim/gvol-1 created
確認
vagrant@master:~/codes_for_lessons/step11/glusterfs$ kubectl get pvc
NAME     STATUS   VOLUME                                     CAPACITY   ACCESS MODES   STORAGECLASS     AGE
gvol-1   Bound    pvc-152d576c-2ad9-11ea-8406-022ec1de99b7   10Gi       RWX            gluster-heketi   21s

vagrant@master:~/codes_for_lessons/step11/glusterfs$ kubectl describe pvc gvol-1
Name:          gvol-1
Namespace:     default
StorageClass:  gluster-heketi
Status:        Bound
Volume:        pvc-152d576c-2ad9-11ea-8406-022ec1de99b7
Labels:        <none>
Annotations:   kubectl.kubernetes.io/last-applied-configuration:
                 {"apiVersion":"v1","kind":"PersistentVolumeClaim","metadata":{"annotations":{},"name":"gvol-1","namespace":"default"},"spec":{"accessModes...
               pv.kubernetes.io/bind-completed: yes
               pv.kubernetes.io/bound-by-controller: yes
               volume.beta.kubernetes.io/storage-provisioner: kubernetes.io/glusterfs
Finalizers:    [kubernetes.io/pvc-protection]
Capacity:      10Gi
Access Modes:  RWX
VolumeMode:    Filesystem
Events:
  Type       Reason                 Age   From                         Message
  ----       ------                 ----  ----                         -------
  Normal     ProvisioningSucceeded  43s   persistentvolume-controller  Successfully provisioned volume pvc-152d576c-2ad9-11ea-8406-022ec1de99b7 using kubernetes.io/glusterfs
Mounted By:  <none>
これにより、動的にPVが作成されます。

vagrant@master:~/codes_for_lessons/step11/glusterfs$ kubectl get pv
NAME                                       CAPACITY   ACCESS MODES   RECLAIM POLICY   STATUS   CLAIM            STORAGECLASS     REASON   AGE
pvc-152d576c-2ad9-11ea-8406-022ec1de99b7   10Gi       RWX            Delete           Bound    default/gvol-1   gluster-heketi            4m27s

vagrant@master:~/codes_for_lessons/step11/glusterfs$ kubectl describe pv pvc-152d576c-2ad9-11ea-8406-022ec1de99b7
Name:            pvc-152d576c-2ad9-11ea-8406-022ec1de99b7
Labels:          <none>
Annotations:     Description: Gluster-Internal: Dynamically provisioned PV
                 gluster.kubernetes.io/heketi-volume-id: dfcee042efd048237f65705e680064f6
                 gluster.org/type: file
                 kubernetes.io/createdby: heketi-dynamic-provisioner
                 pv.beta.kubernetes.io/gid: 2000
                 pv.kubernetes.io/bound-by-controller: yes
                 pv.kubernetes.io/provisioned-by: kubernetes.io/glusterfs
Finalizers:      [kubernetes.io/pv-protection]
StorageClass:    gluster-heketi
Status:          Bound
Claim:           default/gvol-1
Reclaim Policy:  Delete
Access Modes:    RWX
VolumeMode:      Filesystem
Capacity:        10Gi
Node Affinity:   <none>
Message:
Source:
    Type:                Glusterfs (a Glusterfs mount on the host that shares a pod's lifetime)
    EndpointsName:       glusterfs-dynamic-152d576c-2ad9-11ea-8406-022ec1de99b7
    EndpointsNamespace:  0xc0006c9190
    Path:                vol_dfcee042efd048237f65705e680064f6
    ReadOnly:            false
Events:                  <none>
Pod作成

上のPVCを利用するPodを作成します。以下のDeployment用のYamlを適用することで、同じファイルを共有するPodのレプリカを2つ作成します。
https://github.com/takara9/codes_for_lessons/blob/master/step11/glusterfs/gfs-client.yml
vagrant@master:~/codes_for_lessons/step11/glusterfs$ kubectl apply -f gfs-client.yml
deployment.apps/gfs-client created
確認
vagrant@master:~/codes_for_lessons/step11/glusterfs$ kubectl get po  -o wide
NAME                          READY   STATUS    RESTARTS   AGE   IP            NODE    NOMINATED NODE   READINESS GATES
gfs-client-6947c4c7fd-5d8fd   1/1     Running   0          27s   10.244.2.26   node2   <none>           <none>
gfs-client-6947c4c7fd-jfnn4   1/1     Running   0          27s   10.244.1.37   node1   <none>           <none>
1つ目のPodに接続して、マウント先にファイルを作成してみます。
vagrant@master:~$ kubectl exec -it gfs-client-6947c4c7fd-5d8fd sh
# df -h
Filesystem                                        Size  Used Avail Use% Mounted on
overlay                                           9.7G  2.5G  7.3G  26% /
tmpfs                                              64M     0   64M   0% /dev
tmpfs                                             497M     0  497M   0% /sys/fs/cgroup
172.20.1.21:vol_dfcee042efd048237f65705e680064f6   10G   66M   10G   1% /mnt
/dev/sda1                                         9.7G  2.5G  7.3G  26% /etc/hosts
shm                                                64M     0   64M   0% /dev/shm
tmpfs                                             497M   12K  497M   1% /run/secrets/kubernetes.io/serviceaccount
tmpfs                                             497M     0  497M   0% /proc/acpi
tmpfs                                             497M     0  497M   0% /proc/scsi
tmpfs                                             497M     0  497M   0% /sys/firmware
# date > /mnt/test.txt
# cat /mnt/test.txt
Mon Dec 30 08:04:38 UTC 2019
もう一つのPodに接続して、マウント先ファイルを確認してみます。
vagrant@master:~$ kubectl exec -it gfs-client-6947c4c7fd-jfnn4 sh
# cat /mnt/test.txt
Mon Dec 30 08:04:38 UTC 2019
同じ内容のファイルが確認できました。意図した通りにファイルが共有できています!
まとめ