この記事は#NervesJP Advent Calendar 2020の17日目です。
16日目は @zacky1972 さんの「NervesでAutoconfを用いてNIFをビルドする方法」でした。
@kentaro さんからの パス(ウェブチカでElixir/Nervesに入門する(2020年12月版)) を受けて、kochi.ex #4でお披露目させてもらった「NervesとPhonenix(Gigalixir)とGCP PubSubを使ってLチカ」した話を当日よりElixir成分多めで今日と明後日の2回に分けて紹介します。
NervesだけでなくPhoenixやGCPの話が入ってくると1回でまとまらないことが多いんですよね。
ということで、2回に分けて投稿することにしました。
- NervesとPhonenix(Gigalixir)とGCP Cloud PubSubを使ってBBG CapeのLEDをチカした話〜Phoenix/GCPでPub編〜(1/2) ←いまここ
- NervesとPhonenix(Gigalixir)とGCP Cloud PubSubを使ってBBG CapeのLEDをチカした話〜NervesでSub編〜(2/2)
ちなみに明日は同じくkochi.exな @32hero さんの「Nerves+Phoenix 003 エムネチカ:分散型DB Mnesiaを使ってオリジナルCapeのLEDをエムネチカ」です。
概要(全体構成)
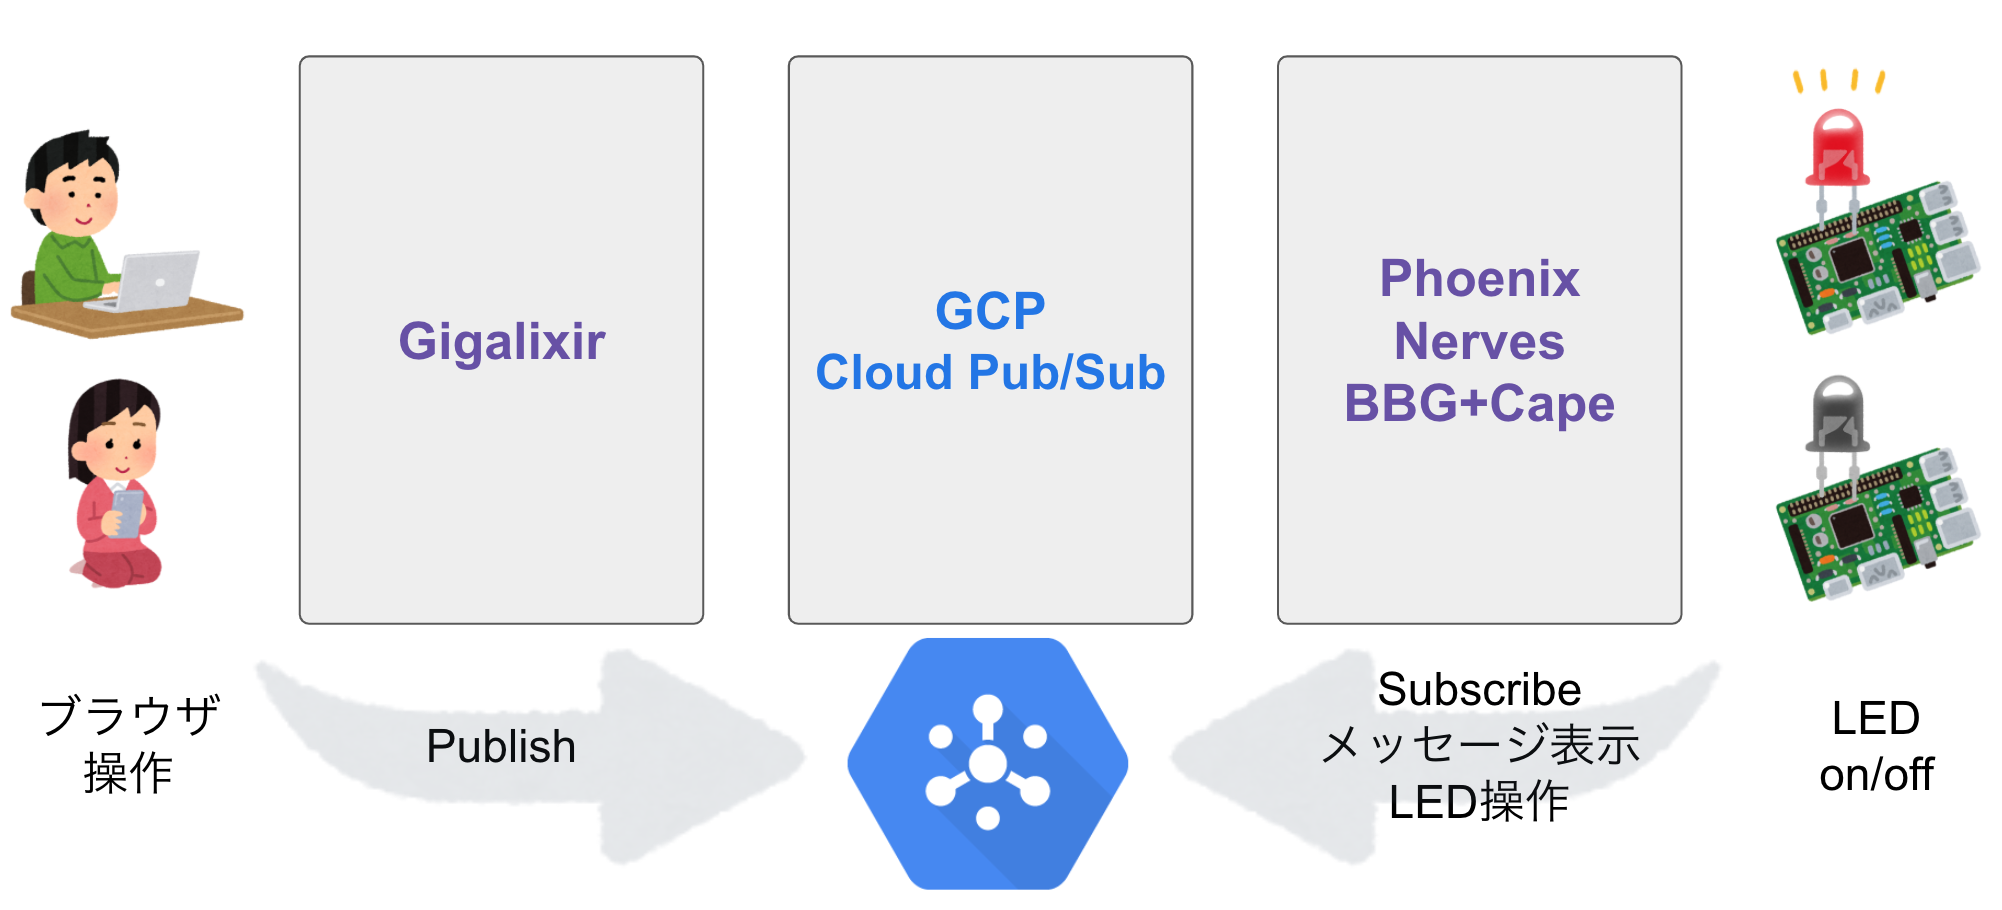
- Elixir/PhoenixのHeroku風PaaSサービスのGigalixirにウェブページを作成し、GCP Cloud Pub/SubにメッセージをPublish
- NervesをインストールしたBeagleBone Green(以下、BBG)でGCP Cloud Pub/Sub経由でSubscribeし、BBGに取り付けているCapeのLEDをON/OFF操作
今回は下の絵の左半分のことを書きます。
GCPの設定
GCPの設定は本質ではないので雑にさっくり飛ばします。
- GCPでプロジェクトを作成
- GCPの「IAMと管理」よりプロジェクトの鍵を作成してダウンロード
ダウンロードした鍵ファイル「project-name-key.json(実際は違う名前)」を保存しておきます。
この鍵ファイルを使ってGCP Cloud PubSubします。本当ならもっときちんと権限の設定等しないといけないと思うんですがお試しってことでこのまま進めます。
Phoenix (Gigalixir)の設定・実装
PhoenixでテキストメッセージをPubするウェブページを作成します。
GigalixirにPhoenixを構築する
Phoenixを無料でホスティングしてくれるGigalixirというサービスを使ってGCPにPubするウェブインタフェースを作成します。
@piacerex さんと @pojiro さんの記事をとてもとても参考にさせていただき、Phoenixのいつもの起動画面が表示されるようにしておきます。Gigalixirは標準でHTTPSになるのできちんと設定しないといけません。
- 【本番構築Gigalixir編①】Elixir/Phoenixの初期PJリリースまでの手順 @piacerex さん
- 【本番構築Gigalixir編②】Elixir/Phoenixで構築したCRUD Webアプリをリリース @piacerex さん
- 使って学ぶgigalixir、DBを使うアプリをデプロイする @pojiro さん
GCPにPubする
ここまでが準備で、ここからがようやくElixir/Phoenixの話になります。
プロジェクト作成(mix phx.new)
Phoenixのプロジェクトを作成します。
今回はデータベースを使わない--no-ecto、LiveViewを利用する--liveのオプションをつけてコマンドを実行します。
❯ mix phx.new gigalixir_gcp_pub --no-ecto --live
依存関係の解消(mix deps.get)
mix.exsに利用するパッケージを追記し、mix deps.getコマンドを実行します。
defp deps() do
  ...
  {:goth, "~> 1.1.0"},                  # Google認証ライブラリ
  {:google_api_pub_sub, "~> 0.28.1"},   # Google PubSubライブラリ
end
❯ mix deps.get
GCP鍵ファイル読み込み設定
config/config.exsにGCPの鍵ファイルを読み込む設定を追記します。
見返してみると、どうして当時はlibディレクトリに置いてしまったのかなぁと ![]()
どこに置いたほうがいいのかなぁなど思ってしまします…。config?
config :goth,
  json: "./lib/gcp/key/project-name-key.json" |> File.read!
LiveView用のスコープを設定(lib/gigalixir_gcp_pub_web/router.ex)
lib/gigalixir_gcp_pub_web/router.exにLiveView用のスコープを追記します。
  scope "/", GigalixirGcpPubWeb do
    pipe_through :browser

    live "/", PageLive, :index
    live "/pub", PubLive    # ←この行を追記
  end
Pubするライブラリを作成(lib/gigalixir_gcp_pub/exineris_gcp_pubsub_publish.ex)
publish関数の引数にはproject_id、topic_name、messageを渡すようにしています。
ほぼGCPのサンプルプログラムのままです… ![]()
defmodule Exineris.GCP.PubSub.Publish do
  require Logger

  def publish(project_id, topic_name, message) do
    # Authenticate
    {:ok, token} = Goth.Token.for_scope("https://www.googleapis.com/auth/cloud-platform")
    conn = GoogleApi.PubSub.V1.Connection.new(token.token)

    # Build the PublishRequest struct
    request = %GoogleApi.PubSub.V1.Model.PublishRequest{
      messages: [
        %GoogleApi.PubSub.V1.Model.PubsubMessage{
          data: Base.encode64(message)
        }
      ]
    }

    # Make the API request.
    {:ok, response} = GoogleApi.PubSub.V1.Api.Projects.pubsub_projects_topics_publish(
      conn,
      project_id,
      topic_name,
      [body: request]
    )

    msgIds = response.messageIds
    |> List.to_string()
    {:ok, msgIds}
  end
end
PubするHTMLを作成(lib/gigalixir_gcp_pub_web/live/pub_live.html.leex)
PubするHTMLを作成します。
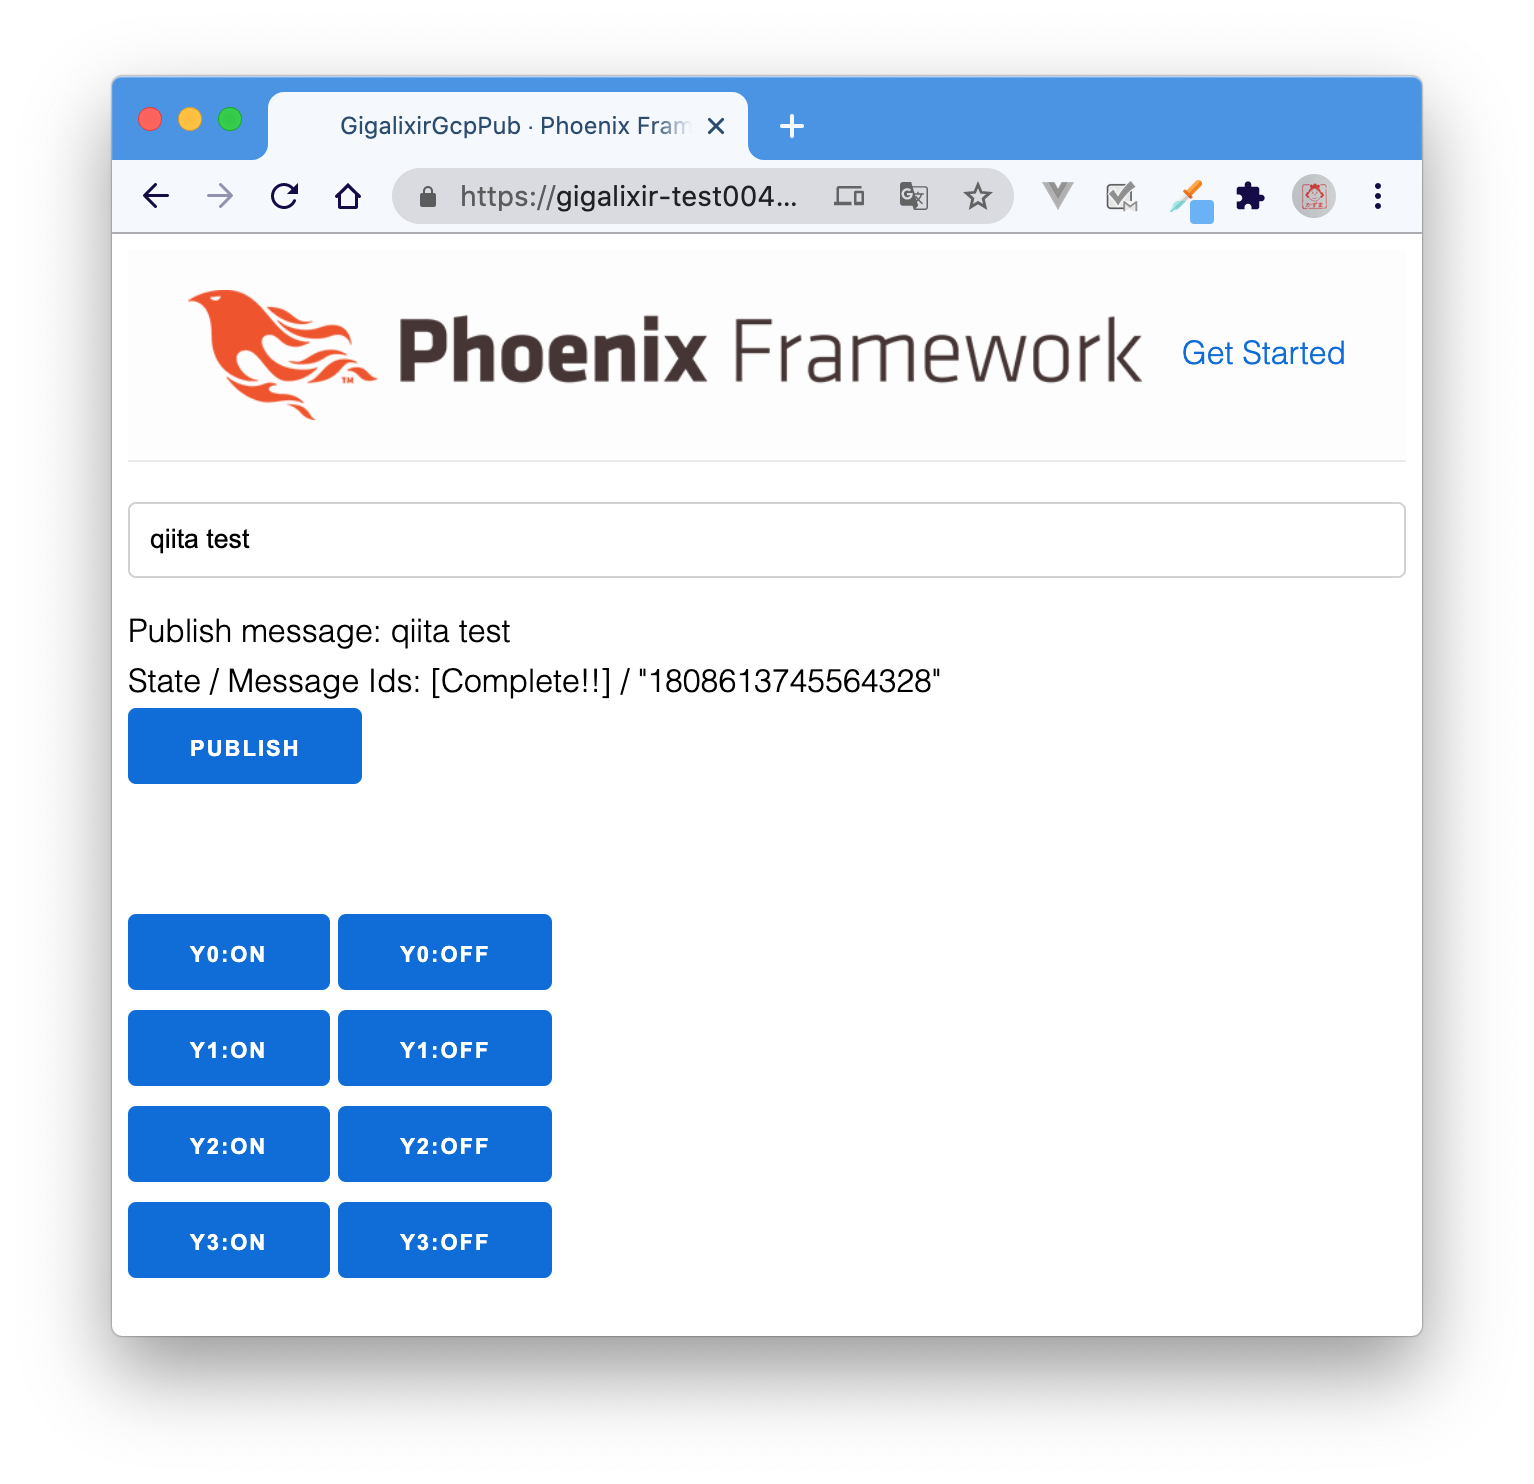
テキストメッセージとY0からY3という名前のLEDをオン・オフするボタンを作成しました。
実際はY2:onやY2:offというテキストメッセージを送っているだけです(^^ゞ
<form phx-submit="submit">
<input type="text" name="pub_message" value="<%= @pub_message %>" placeholder="Enter publish message" <%= if @loading, do: "readonly" %> />
Publish message: <%= @pub_message %><br>
State / Message Ids: <%= @state_message %><br />
<input type="submit" value="publish" onclick="blur()" <%= if @loading, do: "disabled" %> />
</form>
<br />
<button phx-click="pub_click" phx-value-pubmsg="Y0:on">Y0:on</button> <button phx-click="pub_click" phx-value-pubmsg="Y0:off">Y0:off</button><br />
<button phx-click="pub_click" phx-value-pubmsg="Y1:on">Y1:on</button> <button phx-click="pub_click" phx-value-pubmsg="Y1:off">Y1:off</button><br />
<button phx-click="pub_click" phx-value-pubmsg="Y2:on">Y2:on</button> <button phx-click="pub_click" phx-value-pubmsg="Y2:off">Y2:off</button><br />
<button phx-click="pub_click" phx-value-pubmsg="Y3:on">Y3:on</button> <button phx-click="pub_click" phx-value-pubmsg="Y3:off">Y3:off</button><br />
Pubするプログラムを作成(lib/gigalixir_gcp_pub_web/live/pub_live.ex)
HTMLで操作されたイベントを受け取ってGCPにPubする処理を書きます。
ボタンをクリックした場合はdef handle_event("pub_click", ...、
テキストメッセージを入力した場合はdef handle_event("submit", ...の
関数がよばれます。
今見ると変数名がpubmsgだったりpub_messageだったり、ハードコーディングしていたりと直したいところがたくさんありますが、ぐっとこらえて先にすすめます。
-
@project_idGCPのプロジェクトIDを記載 -
@topic_nameGCPのトピック名を記載
defmodule GigalixirGcpPubWeb.PubLive do
  use Phoenix.LiveView
  require Logger

  @project_id "PROJECT_ID"
  @topic_name "yuzu"

  def mount(_param, _session, socket) do
    if connected?(socket) do
      # 初期化したい処理を書く
    end
    {
      :ok,
      assign(
        socket,
        loading: false,
        state_message: "",
        pub_message: ""
      )
    }
  end

  def handle_event("pub_click", %{"pubmsg" => pubmsg}, socket) do
    Logger.debug("#{__MODULE__} handle_event pub_click: #{pubmsg}")
    send(self(), {:submit, pubmsg})
    {:noreply, assign(socket, pub_message: pubmsg, state_message: "[publishing...]", loading: true)}
  end

  def handle_event("submit", %{"pub_message" => pub_message}, socket) do
    Logger.debug("#{__MODULE__} handle_event submit: #{pub_message}")
    send(self(), {:submit, pub_message})
    {:noreply, assign(socket, pub_message: pub_message, state_message: "[publishing...]", loading: true)}
  end

  def handle_info({:submit, pub_message}, socket) when pub_message != "" do
    {:ok, msgIds} = Exineris.GCP.PubSub.Publish.publish(@project_id, @topic_name, pub_message)
    Logger.debug("#{__MODULE__} handle_info submit: #{pub_message}")
    {:noreply, assign(socket, pub_message: pub_message, state_message: "[Complete!!] / #{inspect(msgIds)}", loading: false)}
  end

  def handle_info({:submit, pub_message}, socket) when pub_message == "" do
    msg = "Message is null."
    Logger.debug("#{__MODULE__} handle_info submit: #{pub_message}")
    {:noreply, assign(socket, pub_message: pub_message, state_message: "[Not Complete!!] / #{inspect(msg)}", loading: false)}
  end
end
確認
Gigalixirにデプロイ後、該当のURLにアクセスして確認します。
今のところは、テキストエリアにメッセージを入力してPUBLISHボタンをクリックしたら[COMPLETE!!]と表示されてればOKとします。
明日は同じくkochi.exな @32hero さんの「Nerves+Phoenix 003 エムネチカ:分散型DB Mnesiaを使ってオリジナルCapeのLEDをエムネチカ」です。
その翌日、明後日は今回の投稿の後編となります。
- NervesとPhonenix(Gigalixir)とGCP Cloud PubSubを使ってBBG CapeのLEDをチカした話〜NervesでSub編〜(2/2)

