本記事は「#NervesJP Advent Calendar 2020」の2日目です。
1日目は@takasehidekiさんの「ALGYAN x Seeed x NervesJPハンズオン!に向けた開発環境の準備方法」でした。
はじめに
先日、とあるミートアップで「Nervesで拡張性の高いIoTデバイスを作る」と題したライトニングトークを行いました。「Lチカ」「ウェブチカ」を通してElixir/Nervesに入門しつつ、Elixirの特徴を活用したスケーラブルなIoTデバイスについて考えてみようという内容です。
このスライドでは、「Lチカ」「ウェブチカ」をElixirらしく設計することにフォーカスして説明しています。本記事では、トーク内では十分には話せなかった、コードの詳細について解説していきます。
上掲のスライドに目を通していただけると、なんでこんなことをするのかという背景と目的を説明していますので、まずはそちらを軽くご覧ください。
本記事で達成すること
- 2020年12月現在において最新のElixir/Nervesの開発環境をセットアップする
- Elixir/Nervesを用いて、Raspberry PiでLチカする
- それをWeb API経由でできるよう拡張する(ウェブチカ)
- ウェブチカを、複数デバイス間の通信によって実現する展望を述べる
本記事の解説に用いたコードはkentaro/nerves_webchika: A Nerves Implementation of LED Blinky with a Web Interface.にあります。
環境
- ホスト: macOS Catalina 10.15.7
- デバイス: Raspberry Pi 3B
- 言語・フレームワーク: 以下の通り
$ mix nerves.info

Nerves:           1.7.0
Nerves Bootstrap: 1.10.0
Elixir:           1.11.2
(上記は、mix nerves.infoからの抜粋)
Elixirのセットアップ
「Elixirのバージョン管理環境をasdfを使って作った - Qiita」を参考に、Elixirを使える環境を作っていきます。
まず、バージョン管理ツールのasdfをインストールします。
$ brew install asdf
asdfでErlangとElixirをバージョン管理するためのプラグインを入れます。
$ asdf plugin-add erlang https://github.com/asdf-vm/asdf-erlang.git
$ asdf plugin-add elixir https://github.com/asdf-vm/asdf-elixir.git
ErlangとElixirをインストールします(現時点での最新バージョン)。Erlangのインストールにはだいぶ時間がかかります。
$ asdf install erlang 23.1
$ asdf install elixir 1.11.2-otp-23
インストールしたバージョンを使えるようにします。
$ asdf global erlang 23.1
$ asdf global elixir 1.11.2-otp-23
ちなみに、どのバージョンをインストールできるかは、以下のようにして確認できます。
$ asdf list-all elixir | head
0.12.4
0.12.5
0.13.0
0.13.1
0.13.2
0.13.3
0.14.0
0.14.1
0.14.2
0.14.3
指定したバージョンが使えるようになりました。
$ elixir --version
Erlang/OTP 23 [erts-11.1] [source] [64-bit] [smp:8:8] [ds:8:8:10] [async-threads:1] [hipe]

Elixir 1.11.2 (compiled with Erlang/OTP 23)
Nervesのセットアップ
公式ドキュメントのInstallation - macOSを参考に、セットアップしていきます。
Nervesが依存するOSライブラリをインストールします。
$ brew install fwup squashfs coreutils xz pkg-config
Elixirのライブラリを事前にアップデートしておきます。
$ mix local.hex
$ mix local.rebar
Nervesを入れます。
$ mix archive.install hex nerves_bootstrap
以上で、Elixir/Nervesで開発する準備が整いました。
プロジェクトのセットアップ
nerves_webchika という名前で作っていきます。
$ mkdir nerves_webchika
$ cd nerves_webchika
後にPhoenixを使ったWeb UIも用意するので、上記で作ったディレクトリ内で、NervesによるファームウェアとPhoenixによるWeb APIとをそれぞれ別のディレクトリで開発していくようにします。両者をごっちゃにしてしまうとソースコードの見通しが悪くなるくなるからです。
そのようなディレクトリ構造を、poncho project structureというそうです(nerves/User Interfaces.md at main · nerves-project/nerves)。ディレクトリ構成は、最終的に以下の通りになります。
$ tree -L 1 nerves_webchika
nerves_webchika
├── webchika_api
└── webchika_firmware
まず、Gitリポジトリを初期化して最初のコミットを作っておきます。
$ git init
Initialized empty Git repository in /Users/antipop/src/github.com/kentaro/nerves_webchika/.git/
$ git ci --allow-empty -m 'initial commit'
[master (root-commit) 23ced61] initial commit
ファームウェアの開発
まずは、ファームウェアを作っていきましょう。ここでは、ファームウェアのターゲットはRaspberry Pi 3で作っていくことにします。ファームウェアは、Raspberry Pi 3のGPIOにつないだLEDを光らせたり消したりする役割を担います。いわゆる「Lチカ」ですね(あとで、それをWeb APIから操作できるようにします)。
Nervesプロジェクトのセットアップ
mix nerves.newコマンドで、新規プロジェクトをセットアップします。
$ mix nerves.new webchika_firmware
* creating webchika_firmware/config/config.exs
* creating webchika_firmware/config/target.exs
* creating webchika_firmware/lib/webchika_firmware.ex
* creating webchika_firmware/lib/webchika_firmware/application.ex
* creating webchika_firmware/test/test_helper.exs
* creating webchika_firmware/test/webchika_firmware_test.exs
* creating webchika_firmware/rel/vm.args.eex
* creating webchika_firmware/rootfs_overlay/etc/iex.exs
* creating webchika_firmware/.gitignore
* creating webchika_firmware/.formatter.exs
* creating webchika_firmware/mix.exs
* creating webchika_firmware/README.md

Fetch and install dependencies? [Yn] y
* running mix deps.get
Your Nerves project was created successfully.

You should now pick a target. See https://hexdocs.pm/nerves/targets.html#content
for supported targets. If your target is on the list, set `MIX_TARGET`
to its tag name:

For example, for the Raspberry Pi 3 you can either
  $ export MIX_TARGET=rpi3
Or prefix `mix` commands like the following:
  $ MIX_TARGET=rpi3 mix firmware

If you will be using a custom system, update the `mix.exs`
dependencies to point to desired system's package.

Now download the dependencies and build a firmware archive:
  $ cd webchika_firmware
  $ mix deps.get
  $ mix firmware

If your target boots up using an SDCard (like the Raspberry Pi 3),
then insert an SDCard into a reader on your computer and run:
  $ mix firmware.burn

Plug the SDCard into the target and power it up. See target documentation
above for more information and other targets.
こんな感じのファイルやディレクトリが生成されました。
$ ls -l webchika_firmware/
total 48
-rw-r--r--   1 antipop  2033490572   1229 11 15 21:59 README.md
drwxr-xr-x   3 antipop  2033490572     96 11 15 21:59 _build/
drwxr-xr-x   4 antipop  2033490572    128 11 15 21:59 config/
drwxr-xr-x  38 antipop  2033490572   1216 11 15 21:59 deps/
drwxr-xr-x   4 antipop  2033490572    128 11 15 21:59 lib/
-rw-r--r--   1 antipop  2033490572   2079 11 15 21:59 mix.exs
-rw-r--r--   1 antipop  2033490572  13944 11 15 21:59 mix.lock
drwxr-xr-x   3 antipop  2033490572     96 11 15 21:59 rel/
drwxr-xr-x   3 antipop  2033490572     96 11 15 21:59 rootfs_overlay/
drwxr-xr-x   4 antipop  2033490572    128 11 15 21:59 test/
コミットしておきましょう。
$ git add .
$ git ci -m 'init project with `mix nerves.new webchika_firmware`'
ファームウェアのプロジェクトのディレクトリに移動します。
cd webchika_firmware/
ファームウェアを作成する
さっそく、ファームウェアを作成してみます。
mix nerves.newを実行した際の出力内容に、環境変数MIX_TARGETでターゲットを指定するように指示がありました。設定しておきましょう(以降のコマンドは、この環境変数が設定されていることを前提とします)。
$ export MIX_TARGET=rpi3
mix deps.get で依存ライブラリをインストールし、 mix firmware でファームウェアを作成します。
$ export MIX_TARGET=rpi3
$ mix deps.get
$ mix firmware
これで、_build/rpi3_dev/nerves/images/webchika_firmwareにファームウェアができました。31MBありますね。ファームウェアはLinuxで構成されていることを考えると、だいぶ小さいです。
ls -lh _build/rpi3_dev/nerves/images/webchika_firmware.fw
-rw-r--r--  1 antipop  2033490572    31M 11 15 22:41 _build/rpi3_dev/nerves/images/webchika_firmware.fw
できあがったファームウェアを、SDカードに焼いてみましょう。その前に、SDカードをスロットに差しておくことをお忘れなく。
$ mix burn
==> nerves
==> webchika_firmware

Nerves environment
  MIX_TARGET:   rpi3
  MIX_ENV:      dev

Use 30.01 GiB memory card found at /dev/rdisk2? [Yn] y
100% [====================================] 32.93 MB in / 35.45 MB out
Success!
Elapsed time: 3.614 s
無事にファームウェアをSDカードに焼くことができました(SDカードが本当に/dev/rdisk2にマウントされているか、念のため事前に確認しておきましょう)。
Wi-Fi経由でファームウェアをデプロイできるようにする
コードを編集するたびに、いちいちホストマシンでSDカードにファームウェアを焼いていると面倒です。そこで、開発をする前に、まずはWi-Fi経由でファームウェアをデプロイできるようにしておきましょう。
VintageNet Cookbook — WiFiを参考にconfig/target.exsを編集します。
diff --git a/webchika_firmware/config/target.exs b/webchika_firmware/config/target.exs
index 6f633cc..2b78372 100644
--- a/webchika_firmware/config/target.exs
+++ b/webchika_firmware/config/target.exs
@@ -58,7 +58,19 @@ config :vintage_net,
        type: VintageNetEthernet,
        ipv4: %{method: :dhcp}
      }},
-    {"wlan0", %{type: VintageNetWiFi}}
+    {"wlan0", %{
+        type: VintageNetWiFi,
+        vintage_net_wifi: %{
+            networks: [
+              %{
+                key_mgmt: :wpa_psk,
+                ssid: System.get_env("MY_NETWORK_SSID"),
+                psk: System.get_env("MY_NETWORK_PSK"),
+              }
+            ]
+          },
+          ipv4: %{method: :dhcp}
+    }}
   ]

 config :mdns_lite,
利用しているWi-FiのSSIDとPSK(Pre-Shared Key)を環境変数にセットしておきます。
$ export MY_NETWORK_SSID=************
$ export MY_NETWORK_PSK=*************
準備ができたら、またファームウェアをSDカードに焼き直します。これで、以降の作業はSDカードをデバイスに差したまま、Wi-Fi経由でデプロイできるようになります。ファームウェアを更新するためにいちいちSDカードをMacとデバイスとの間で差し替え直す必要がなくなり、とても楽になります。
ここまででコミットしておきましょう。
$ git add .
$ git ci -m 'add wifi setting'
できあがったSDカードをデバイスの方に差して電源を入れ、起動します。しばらく時間が経ったら(10数秒ほど?)SSHしてみましょう。nerves.localで名前解決できるようになっているはずです(もしできなかったら「ElixirでIoT#4.3:Nervesアプリ開発時のよくあるトラブルをシューティング」を参照してください)。無事にElixirのIExによるREPLが立ち上がったら成功です。
$ ssh nerves.local
Interactive Elixir (1.11.2) - press Ctrl+C to exit (type h() ENTER for help)
Toolshed imported. Run h(Toolshed) for more info.
RingLogger is collecting log messages from Elixir and Linux. To see the
messages, either attach the current IEx session to the logger:

  RingLogger.attach

or print the next messages in the log:

  RingLogger.next

iex(1)>
では、今度はWi-Fi経由でファームウェアをデプロイしてみましょう(以前はmix firmware.gen.scriptで生成したスクリプトを使っていたようですが、最近では mix.uploadでいけるようになったみたいです)。
$ mix upload
==> nerves
==> webchika_firmware

Nerves environment
  MIX_TARGET:   rpi3
  MIX_ENV:      dev

Path: /Users/antipop/src/github.com/kentaro/nerves_webchika/webchika_firmware/_build/rpi3_dev/nerves/images/webchika_firmware.fw

Uploading to nerves.local...

fwup: Upgrading partition B
100% [====================================] 32.95 MB in / 35.08 MB out
Success!
Elapsed time: 44.444 s
これで、コードを書いたらWi-Fi経由でデバイスにデプロイして動作確認できるようになりました。便利。
REPLから手動でLチカする
コードを書く前に、SSHした際に実行されるREPLから、手動でLチカしてみましょう。デバイスの動作確認のためにも、まずはこの作業をやっておくのがよいでしょう。
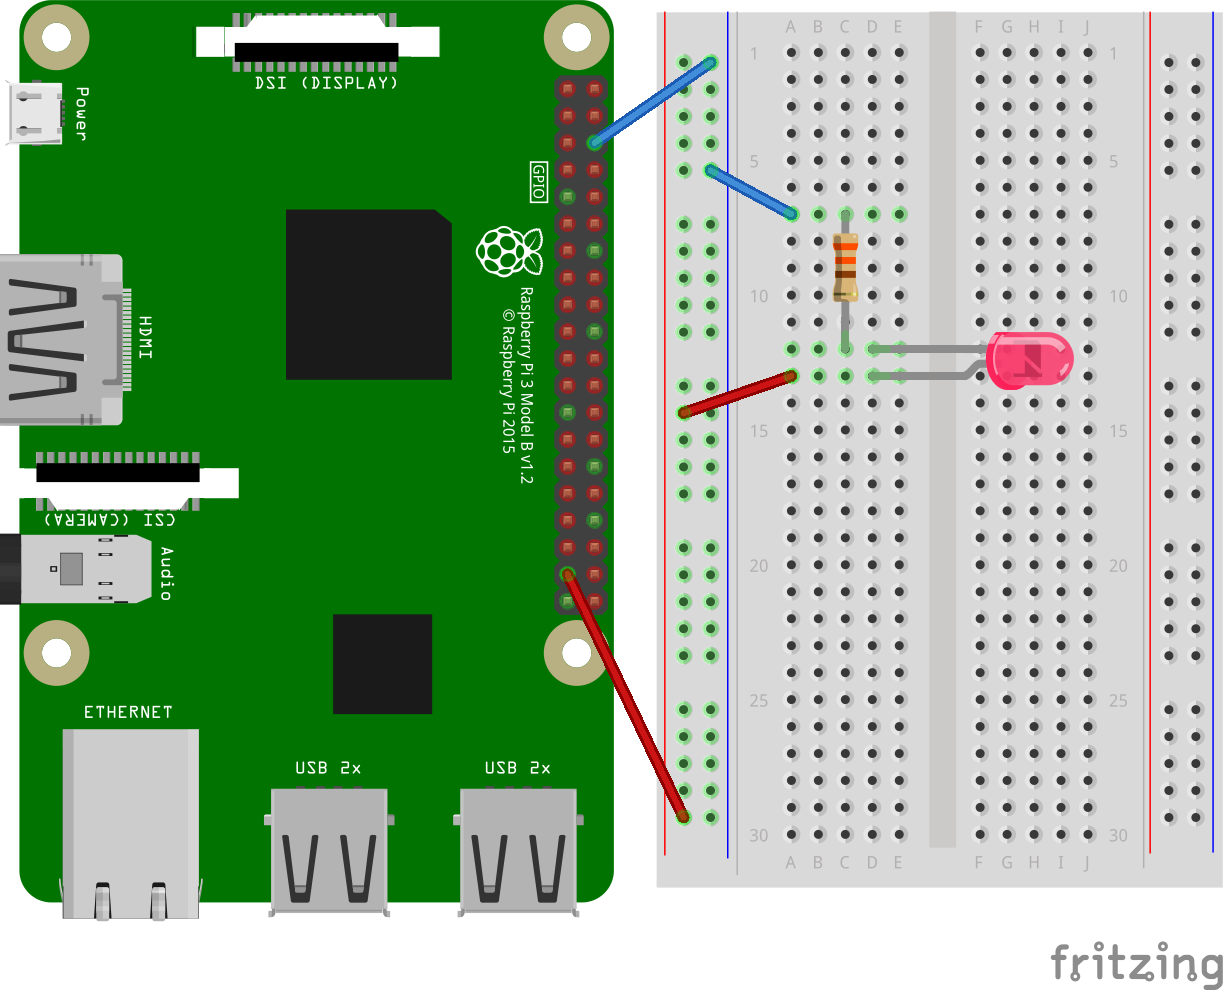
ここでは、プラス極をRaspberry Pi 3の26番のGPIOピンに、マイナス極をGNDに差して、LEDを設置しました。以下の図のような感じです。
まず、GPIOへの操作を提供するライブラリelixir-circuits/circuits_gpioを使えるようにする必要があります。mix.exsに、依存を追加します。
$ git diff
diff --git a/webchika_firmware/mix.exs b/webchika_firmware/mix.exs
index 86d877c..87ddc9f 100644
--- a/webchika_firmware/mix.exs
+++ b/webchika_firmware/mix.exs
@@ -49,7 +49,8 @@ defmodule WebchikaFirmware.MixProject do
       {:nerves_system_rpi4, "~> 1.13", runtime: false, targets: :rpi4},
       {:nerves_system_bbb, "~> 2.8", runtime: false, targets: :bbb},
       {:nerves_system_osd32mp1, "~> 0.4", runtime: false, targets: :osd32mp1},
-      {:nerves_system_x86_64, "~> 1.13", runtime: false, targets: :x86_64}
+      {:nerves_system_x86_64, "~> 1.13", runtime: false, targets: :x86_64},
+      {:circuits_gpio, "~> 0.4"}
     ]
   end
追加したら、依存ライブラリをインストールして、ファームウェアを再作成し、デプロイし直します。
$ mix deps.get
$ mix firmware
$ mix upload
デプロイできたら、デバイスへSSHします。前述したREPLのプロンプトが表示されたら、以下のように実行してみましょう(前述の通り、ここではLEDのプラス極を26番のGPIOピンにつないでいます)。
iex(1)> {:ok, gpio} = Circuits.GPIO.open(26, :output)
{:ok, #Reference<0.3257819069.805437456.125991>}
iex(2)> Circuits.GPIO.write(gpio, 1)
:ok
iex(3)> Circuits.GPIO.write(gpio, 0)
:ok
iex(4)> Circuits.GPIO.close(gpio)
:ok
LEDが点いたり消えたりします。もしうまくいかなかったら、配線を見直してみましょう。
ここまでをコミットしておきます。
$ git add .
$ git ci -m 'add dependency to circuits_gpio'
Lチカするためのコードを書いていく
Nerves経由でLEDをオン・オフできることが確認できたので、コードを書いていきます。
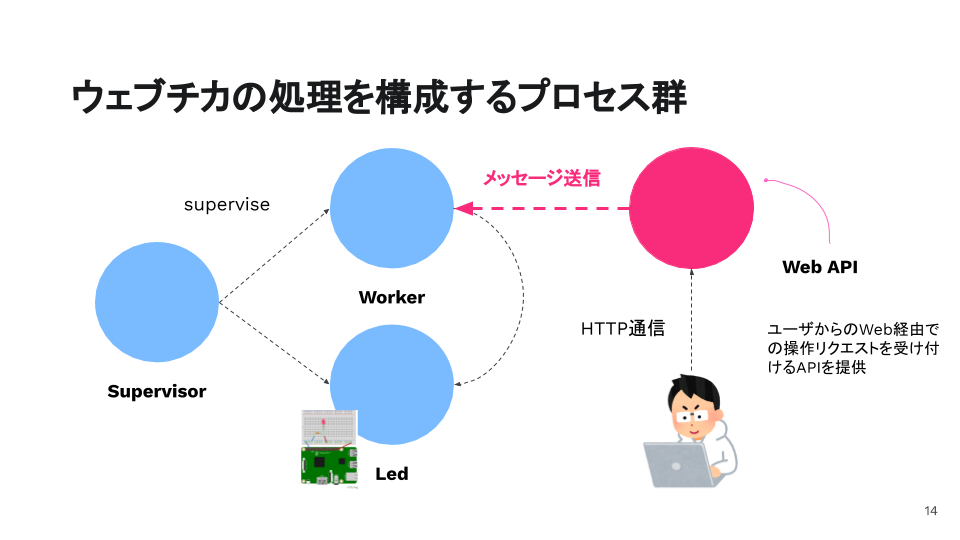
ファームウェアを構成するプロセス群
Elixirは、個々の処理をプロセスとして構成し、プロセス間のメッセージパッシングによってアプリケーションの処理を組み上げていくことを言語としてサポートしていることが、その特徴のひとつにあります。せっかくElixirで書くので、我々のLチカもそれっぽい感じにしてみたいところです。
そこで、Lチカするためのファームウェアを構成するプロセス群を、以下のように設計してみました(mix nerves.newで生成されるファイル群は、こういう構成にすることを前提としているようです)。

プロセスは、GenServerという、一般的なサーバプロセスを抽象化したビヘイビア(Javaのインタフェイスみたいなもの)を実装する形で記述します。GenServerを用いると、同期・非同期なメッセージのやり取りがシンプルに記述できて便利です。
WebchikaFirmware.Worker
まずはWorkerから。このプロセスは、LEDを点滅させるループ処理を担います。また、REPLやWeb APIからのLEDへの処理の依頼についても、入り口を担います。
このプロセスに対してGenServer.cast(WebchikaFirmware.Worker, :start_blinking)としてメッセージを投げると、LEDを点滅させます。
defmodule WebchikaFirmware.Worker do
  use GenServer
  require Logger

  @duration 500

  def start_link(state \\ %{}) do
    GenServer.start_link(__MODULE__, state, name: __MODULE__)
  end

  def init(state) do
    {:ok, state}
  end

  def handle_cast(:start_blinking, state) do
    Logger.debug("Starting blinking")
    spawn_link(fn -> blinking() end) # kill the spawned process when this process is killed
    {:noreply, state}
  end

  def handle_cast(:stop_blinking, state) do
    Logger.debug("Stopping blinking")
    Process.exit(__MODULE__, :kill) # restart the process
    {:noreply, state}
  end

  def handle_cast(:turn_on, state) do
    GenServer.cast(WebchikaFirmware.Led, :turn_on)
    {:noreply, state}
  end

  def handle_cast(:turn_off, state) do
    GenServer.cast(WebchikaFirmware.Led, :turn_off)
    {:noreply, state}
  end

  defp blinking() do
    GenServer.cast(WebchikaFirmware.Led, :turn_on)
    Process.sleep(@duration)
    GenServer.cast(WebchikaFirmware.Led, :turn_off)
    Process.sleep(@duration)
    blinking()
  end
end
WebchikaFirmware.Led
LEDを操作するモジュールを書く前に、LEDがつながっているGPIOピンを環境変数から指定できるよう、設定しておきましょう。config/config.exsを変更します。
$ diff --git a/webchika_firmware/config/config.exs b/webchika_firmware/config/config.exs
index baa7daf..a96ffc9 100644
--- a/webchika_firmware/config/config.exs
+++ b/webchika_firmware/config/config.exs
@@ -8,7 +8,9 @@ import Config
 # Enable the Nerves integration with Mix
 Application.start(:nerves_bootstrap)

-config :webchika_firmware, target: Mix.target()
+config :webchika_firmware,
+  target: Mix.target(),
+  led_pin: String.to_integer(System.get_env("NERVES_WEBCHIKA_GPIO_PIN"))

 # Customize non-Elixir parts of the firmware. See
 # https://hexdocs.pm/nerves/advanced-configuration.html for details.
環境変数を設定しておきましょう。
export NERVES_WEBCHIKA_GPIO_PIN=26
次に、LEDへの処理を担うプロセスです。このプロセスは、LEDをオン・オフする処理を担います。見ての通りですね。
defmodule WebchikaFirmware.Led do
  use GenServer
  require Logger
  alias Circuits.GPIO

  @led_pin Application.get_env(:webchika_firmware, :led_pin)

  def start_link(state \\ %{led: nil}) do
    GenServer.start_link(__MODULE__, state, name: __MODULE__)
  end

  def init(state) do
    Logger.debug("Starting pin #{@led_pin} as output")
    {:ok, led} = GPIO.open(@led_pin, :output)
    {:ok, %{state | led: led}}
  end

  def handle_cast(:turn_on, state) do
    Logger.debug("Turning LED at #{@led_pin} ON")
    GPIO.write(state.led, 1)
    {:noreply, state}
  end

  def handle_cast(:turn_off, state) do
    Logger.debug("Turning LED at #{@led_pin} OFF")
    GPIO.write(state.led, 0)
    {:noreply, state}
  end
end
WebchikaFirmware.Application
ElixirのApplicationを表し、上記のプロセス群をsuperviseするプロセスです。このモジュールが含まれるファイルは、既に作成されています。そのため、以下のようにしてWorkerとLedプロセスとをsupervise対象に追加します。
diff --git a/webchika_firmware/lib/webchika_firmware/application.ex b/webchika_firmware/lib/webchika_firmware/application.ex
index cdb457f..5449494 100644
--- a/webchika_firmware/lib/webchika_firmware/application.ex
+++ b/webchika_firmware/lib/webchika_firmware/application.ex
@@ -34,6 +34,8 @@ defmodule WebchikaFirmware.Application do
       # Children for all targets except host
       # Starts a worker by calling: WebchikaFirmware.Worker.start_link(arg)
       # {WebchikaFirmware.Worker, arg},
+      {WebchikaFirmware.Worker, %{}},
+      {WebchikaFirmware.Led, %{led: nil}}
     ]
   end
では、ファームウェアをデプロイしましょう。
$ mix firmware
$ mix upload
デプロイできたら、デバイスにSSHして動作させてみます。
その前に、ログを表示させる設定をしましょう。以下に表示されている通り、設定を特にいじっていない限り、LoggerはRingLoggerというメモリにログを吐き出すバックエンドを使っているため、ログがコンソールに吐き出されません。開発時のバグ取りのためにも、指示の通りRingLogger.attachしておくとよいでしょう。
$ ssh nerves.local
Interactive Elixir (1.11.2) - press Ctrl+C to exit (type h() ENTER for help)
Toolshed imported. Run h(Toolshed) for more info.
RingLogger is collecting log messages from Elixir and Linux. To see the
messages, either attach the current IEx session to the logger:

  RingLogger.attach

or print the next messages in the log:

  RingLogger.next

iex(1)>
Workerプロセスに対して、メッセージを投げてみましょう。
iex(1)> RingLogger.attach
:ok
iex(2)> GenServer.cast(WebchikaFirmware.Worker, :start_blinking)
:ok

15:42:29.588 [debug] Starting blinking

15:42:29.588 [debug] Turning LED at 26 ON

15:42:30.089 [debug] Turning LED at 26 OFF

15:42:30.590 [debug] Turning LED at 26 ON

15:42:31.091 [debug] Turning LED at 26 OFF

iex(3)> GenServer.cast(WebchikaFirmware.Worker, :stop_blinking)
LEDがチカチカし始めました!(が、目が痛くなるのですぐにとめちゃいました)。
ここまでをコミットします。
$ git add .
$ git ci -m 'add processes'
Web API経由でLチカできるようにする
Lチカを、Web経由でできるようにすることを「ウェブチカ」と呼ぶそうです。「Elixir_Nerves入門!堅牢なIoT Edgeデバイスプログラミングをお手軽に〜Nervesでつくるウェブチカ〜 #ALGYAN」が発祥でしょうか?
前述まででREPLからLチカできるようになったのですが、せっかくなのでWeb API経由でも操作できるようにしてみます。その際、Web API側ではハードウェアへの処理に依存することなく、メッセージパッシングで実現します。図で表すと以下のような感じです。
それでは、さっそくやっていきましょう。
Phoenixをセットアップする
Elixirでよく使われているWebアプリケーションフレームワークのPhoenixをいれて、Web APIを構成します(ごく簡単なものなので、機能を使いこなせるようなものではないですが)。
まずは、Phoenixによるプロジェクトのテンプレートを生成するmixタスクを入れます。
$ mix archive.install hex phx_new
Resolving Hex dependencies...
Dependency resolution completed:
New:
  phx_new 1.5.6
* Getting phx_new (Hex package)
All dependencies are up to date
Compiling 10 files (.ex)
Generated phx_new app
Generated archive "phx_new-1.5.6.ez" with MIX_ENV=prod
Are you sure you want to install "phx_new-1.5.6.ez"? [Yn] y
* creating /Users/antipop/.asdf/installs/elixir/1.11.2-otp-23/.mix/archives/phx_new-1.5.6
これでmix phx.newとしてテンプレートを生成できるようになったので、Phoenixによるプロジェクトをセットアップします。その際、ファームウェアに関するコードのディレクトリwebchika_firmwareと並ぶ構成になるよう、nerves_webchikaディレクトリで以下のコマンドを実行します。
$ mix phx.new webchika_api --no-webpack --no-ecto --no-html --no-gettext --no-dashboard
* creating webchika_api/config/config.exs
* creating webchika_api/config/dev.exs
* creating webchika_api/config/prod.exs
* creating webchika_api/config/prod.secret.exs
* creating webchika_api/config/test.exs
* creating webchika_api/lib/webchika_api/application.ex
* creating webchika_api/lib/webchika_api.ex
* creating webchika_api/lib/webchika_api_web/channels/user_socket.ex
* creating webchika_api/lib/webchika_api_web/views/error_helpers.ex
* creating webchika_api/lib/webchika_api_web/views/error_view.ex
* creating webchika_api/lib/webchika_api_web/endpoint.ex
* creating webchika_api/lib/webchika_api_web/router.ex
* creating webchika_api/lib/webchika_api_web/telemetry.ex
* creating webchika_api/lib/webchika_api_web.ex
* creating webchika_api/mix.exs
* creating webchika_api/README.md
* creating webchika_api/.formatter.exs
* creating webchika_api/.gitignore
* creating webchika_api/test/support/channel_case.ex
* creating webchika_api/test/support/conn_case.ex
* creating webchika_api/test/test_helper.exs
* creating webchika_api/test/webchika_api_web/views/error_view_test.exs

Fetch and install dependencies? [Yn] y
* running mix deps.get
* running mix deps.compile

We are almost there! The following steps are missing:

    $ cd webchika_api

Start your Phoenix app with:

    $ mix phx.server

You can also run your app inside IEx (Interactive Elixir) as:

    $ iex -S mix phx.server
ファイルが生成されました。上記で指示が表示された通り、動作確認してみます。
$ cd webchika_api
$ mix phx.server
Compiling 9 files (.ex)
Generated webchika_api app
[info] Running WebchikaApiWeb.Endpoint with cowboy 2.8.0 at 0.0.0.0:4000 (http)
[info] Access WebchikaApiWeb.Endpoint at http://localhost:4000
ちゃんと起動できました。ここまでをコミットしておきます。
$ git add .
$ git ci -m 'added phoenix files'
ファームウェア側にWeb APIを組み込む
コードを書いていく前に、まずは上記で作成したPhoenixプロジェクトを、ファームウェアの方に組み込みます。nerves/User Interfaces.md at main · nerves-project/nervesを参考に、設定していきます。
Web APIの方のプロジェクトを、ファームウェアの方の依存として追加します。
$ git diff
diff --git a/webchika_firmware/mix.exs b/webchika_firmware/mix.exs
index 87ddc9f..330a3f8 100644
--- a/webchika_firmware/mix.exs
+++ b/webchika_firmware/mix.exs
@@ -31,6 +31,7 @@ defmodule WebchikaFirmware.MixProject do
   defp deps do
     [
       # Dependencies for all targets
+      {:webchika_api, path: "../webchika_api"},
       {:nerves, "~> 1.7.0", runtime: false},
       {:shoehorn, "~> 0.7.0"},
       {:ring_logger, "~> 0.8.1"},
上記で設定したWeb API側の依存も含めるよう、ファームウェア側の依存をアップデートします。
$ mix deps.get
今度は、Web APIに関する設定を、ファームウェア側のconfig.exsで行います。
$ git diff config/config.exs
diff --git a/webchika_firmware/config/config.exs b/webchika_firmware/config/config.exs
index 9389a02..02111b0 100644
--- a/webchika_firmware/config/config.exs
+++ b/webchika_firmware/config/config.exs
@@ -12,6 +12,21 @@ config :webchika_firmware,
   target: Mix.target(),
   led_pin: String.to_integer(System.get_env("NERVES_WEBCHIKA_GPIO_PIN"))

+# Configurations for WebchikaApi
+# When we deploy to a device, we use the "prod" configuration:
+import_config "../../webchika_api/config/config.exs"
+import_config "../../webchika_api/config/prod.exs"
+
+config :webchika_api, WebchikaApiWeb.Endpoint,
+  # Nerves root filesystem is read-only, so disable the code reloader
+  code_reloader: false,
+  http: [port: 80],
+  # Use compile-time Mix config instead of runtime environment variables
+  load_from_system_env: false,
+  # Start the server since we're running in a release instead of through `mix`
+  server: true,
+  url: [host: "nerves.local", port: 80]
+
 # Customize non-Elixir parts of the firmware. See
 # https://hexdocs.pm/nerves/advanced-configuration.html for details.
この時点でファームウェアをビルドしてみようとすると、以下のようなエラーが発生しました。環境変数SECRET_KEY_BASEがないということです。
$ mix firmware
** (RuntimeError) environment variable SECRET_KEY_BASE is missing.
You can generate one by calling: mix phx.gen.secret

    (stdlib 3.13.2) erl_eval.erl:680: :erl_eval.do_apply/6
    (stdlib 3.13.2) erl_eval.erl:449: :erl_eval.expr/5
    (elixir 1.11.2) lib/code.ex:341: Code.eval_string_with_error_handling/3
    (mix 1.11.2) lib/mix/config.ex:161: anonymous fn/2 in Mix.Config.__import__!/2
    (elixir 1.11.2) lib/enum.ex:2181: Enum."-reduce/3-lists^foldl/2-0-"/3
    (mix 1.11.2) lib/mix/config.ex:160: Mix.Config.__import__!/2
SECRET_KEY_BASEというのは、PhoenixアプリでCookieとかを暗号化するのに用いるものみたいですね。指示に従って生成します。
まずは、Web API側のディレクトリに移動してから、mix phx.gen.secretで生成した値を設定します。
$ cd ../webchika_api
$ export SECRET_KEY_BASE=$(mix phx.gen.secret)
また、もとのファームウェアのディレクトリに戻り、ファームウェアをビルドしてデバイスへアップロードします。
$ cd ../webchika_firmware
$ mix firmware
$ mix upload
しばらく待ったのちに、HTTPでアクセスしてみましょう。
$ curl -I nerves.local
HTTP/1.1 404 Not Found
cache-control: max-age=0, private, must-revalidate
content-length: 44370
content-type: text/html; charset=utf-8
date: Mon, 16 Nov 2020 09:26:11 GMT
server: Cowboy
ちゃんとHTTPレスポンスが返ってきました。デバイス上でWebアプリケーションが動作しているようです(404なのはmix phx.new時に--no-htmlというオプションをわたしたせいだろうので、ここでは気にしない)。
ここまでをコミットしておきます。
$ git add .
$ git ci -m 'add webchika_api to webchika_firmware'
Web APIを実装する
いよいよWeb APIを作っていきます。以下のようなURLでアクセスすると、それぞれLEDに対する操作を行えるようにしてみましょう。
- nerves.local/led/:action
- controller: RootController
-
:actionパラメタ- turn_on
- turn_off
- start_blinking
- stop_blinking
まずは、以下の通り、router.exにルーティングを追加します。
$ git diff lib/webchika_api_web/router.ex
diff --git a/webchika_api/lib/webchika_api_web/router.ex b/webchika_api/lib/webchika_api_web/router.ex
index ad61cff..99258f4 100644
--- a/webchika_api/lib/webchika_api_web/router.ex
+++ b/webchika_api/lib/webchika_api_web/router.ex
@@ -5,6 +5,10 @@ defmodule WebchikaApiWeb.Router do
     plug :accepts, ["json"]
   end

+  scope "/", WebchikaApiWeb do
+    get "/led/:action", RootController, :led
+  end
+
   scope "/api", WebchikaApiWeb do
     pipe_through :api
   end
次に、コントローラを準備します。上記のルーティングで記述したRootControllerについて、lib/webchika_api_web/controllers/root_controller.exに以下の通り記述します。
defmodule WebchikaApiWeb.RootController do
  use WebchikaApiWeb, :controller

  def led(conn, params) do
    action = params["action"]
    res = GenServer.cast(WebchikaFirmware.Worker, String.to_atom(action))
    text(conn, res)
  end
end
この実装では、URLのパスに含まれる文字列をファームウェア側のWorkerにそのまま投げています(今回は説明の簡単のためにこうしていますが、ちゃんと作る時はバリデーションするようにしましょう)。
ちなみに、上記のようにGenServerを通じてメッセージを送るだけでWeb APIから操作できるように実装できたというのは、ファームウェア側のLチカをGenServerを使って実装したことのメリットですね。
ファームウェアを更新し、デバイスへデプロイします。
$ mix firmware
$ mix upload
さて、さっそくWeb APIにアクセスしてみましょう。
$ curl nerves.local/led/start_blinking
ok
$ curl nerves.local/led/stop_blinking
ok
$ curl nerves.local/led/turn_on
ok
$ curl nerves.local/led/turn_off
ok
端末をもうひとつたちあげてSSHしておくと、リクエストがやってくる様子がログに吐き出されるのを確認できます。デバイスにつながっているLEDも、操作に応じて点いたり消えたりしました。ウェブチカ成功!
iex(1)> RingLogger.attach
:ok

10:38:18.527 [info]  GET /led/start_blinking

10:38:18.528 [info]  Sent 200 in 824µs

10:38:29.165 [info]  GET /led/stop_blinking

10:38:29.165 [info]  Sent 200 in 750µs

10:38:41.122 [info]  GET /led/turn_on

10:38:41.123 [info]  Sent 200 in 809µs

10:38:50.670 [info]  GET /led/turn_off

10:38:50.671 [info]  Sent 200 in 768µs
iex(2)>
Lチカ・ウェブチカをさらにスケールする
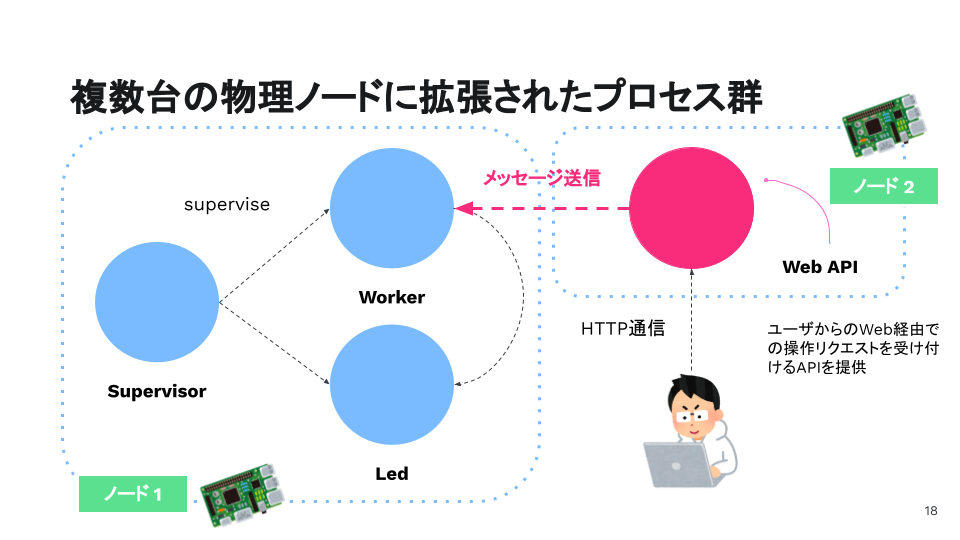
今回は1台のRaspberry Pi上で、Web APIを含む全てのプロセスを実行しました。これを、さらに複数台にもスケールアウトできるとよさそうです。たとえば、計算リソースを大量に消費したり、I/Oの数が多かったりするようなデバイスを作る場合に必須になるだろうと思います。
まず、今回作ったのを2台の物理ノードに拡張したイメージが以下の図です。@kikuyutaさんの記事「はじめてNerves(8) 単一ホストで動くシステムを複数ホストに分散する」を参考にすると、シュッと実現できるはず。
また、今回はWeb APIからメッセージを単に送りつけるだけでしたが、さらなるスケーリングにためには、メッセージをPub/Subでやりとりするとより疎結合になっていい感じでしょう(そのへんは、@nishiuchikazumaさんが書いてくださるかも?)。
おわりに
僕はほんの2週間前にNervesを知って触り始めたのですが、知った瞬間「これだ!」と衝撃を受け、めちゃくちゃハマっているところです。Erlang/Elixir/Nervesの力に、日々おどろきを覚えています。
本記事では、知っているひとにとっては冗長だろうほどに、あれこれ詳しく書いてみました。本記事を読んで、少しでもElixir/Nervesに取り組んでみる方が増えるとうれしいです。
3日目は、@torifukukaiouさんによる「Nervesで湯婆婆を実装してみる」です。続けてお楽しみください。