作ったログイン画面(シングルペイン)からメイン画面(ツーペイン)への遷移をつくる回。図にするとよくある以下のような感じ。
今回はあくまで画面遷移の方法の話なので、認証されているかどうかを判定する処理などはたぶんまた今度書く
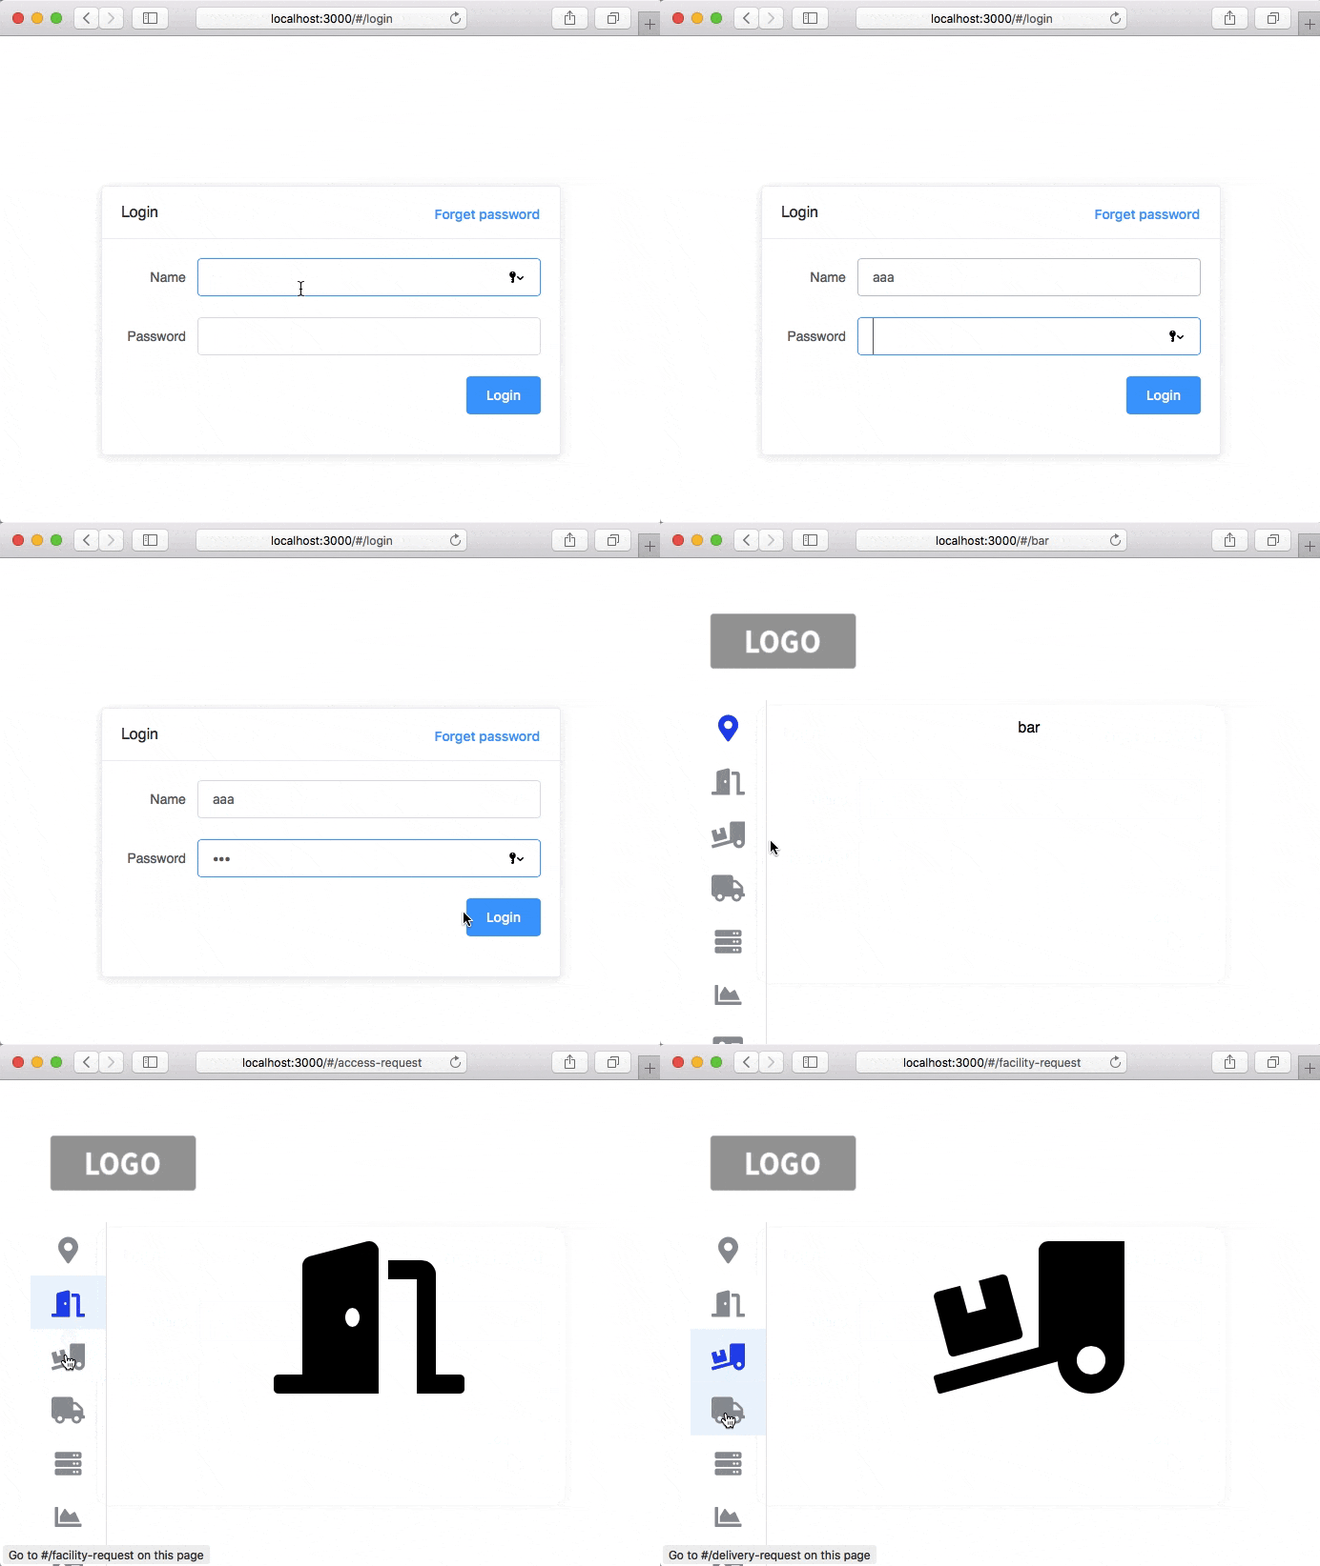
スクリーンショット
以下のコードのそのままではないけど、こんな雰囲気の画面遷移ができた
画面遷移
    ログイン画面 (Single pane)                メイン画面 (two pane)
 +-------------------------------+      +-------------------------------+
 |         +-----------+         |      | Logo                          |
 |    Name |           |         |      +-------------------------------+
 |         +-----------+         |      |            |                  |
 |                               |      | Navigation |    Main-pane     |
 |         +-----------+         | >>>> | Pane       |                  |
 |    Pass |           |         |      |            |                  |
 |         +-----------+         |      |            |                  |
 |                   +--------+  |      |            |                  |
 |                   | Login  |  |      |            |                  |
 |                   +--------+  |      |            |                  |
 +-------------------------------+      +-------------------------------+
Vue らしいやりかた?
やりかたはいくつかある。今回は、ネスとされたルートというのを使って実装。公式にあるんだから、多分これが Vue らしいやりかたなんだろう
ネストされていないルート(これまで)
これまではログイン画面がなくて、メイン画面しか作ってなかった。そのメイン画面では、vue-routerをつかって Navigation Pane のアイテムをクリックしたらそれに応じて Main Pane のコンポーネント(コンテンツ)が変わるというのをやっていた。Main Pane のところを <router-view></router-view> としておいてそこのコンポーネント(コンテンツ)を切り替えるイメージ
<router-view></router-view> はひとつだけ
+------------------ main.html ------------------+
| Logo                                          |
+------------+----------------------------------+
|            |                                  |
| Navigation |    Main Pane                     |
| Pane       |  <router-view></router-view>     |
|            |  component Foo か Bar を切り替え   |
|            |                                  |
+-----------------------------------------------+
<el-container>
  <el-header>
    <img src="img/logo.png" height="60" align="left">
  </el-header>
  <el-container>
    <el-aside width="80px">
      <el-col>
        <el-menu default-active="1" class="el-menu-vertical">
          <el-menu-item index="1">
            <router-link to="/foo"><i class="fas fa-map-marker-alt fa-2x"></i></router-link>
          </el-menu-item>
          <el-menu-item index="2">
            <router-link to="/bar"><i class="fas fa-door-open fa-2x"></i></router-link>
          </el-menu-item>
        </el-menu>
      </el-col>
    </el-aside>

    <el-main>
      <!-- router-viewはひとつだけ -->
      <router-view></router-view>
    </el-main>
  </el-container>
</el-container>
const Foo = { template: '<div>FOO</div>' }
const Bar = { template: '<div>BAR</div>' }

const routes = [
  { path: '/foo', component: Foo },
  { path: '/bar', component: Bar }
]

const router = new VueRouter({
  routes
})

var vm = new Vue({
  router,
  el: '#app'
})
ネストされたルート(今回)
今回やりたいことのためにネストされたルートを使う場合、以下のように <router-view></router-view> をネストする。
(1) でログイン画面とメイン画面を切り替えつつ、(2) でメイン画面の中のコンポーネントを切り替えればいい
+-------------- index.html -------------------------+
|  <router-view></router-view> (1)                  |
|  component Login か TwoPane を切り替え              |
| +------------ three-pane.html ------------------+ |
| | Logo                                          | |
| +------------+----------------------------------+ |
| |            |                                  | |
| | Navigation |    Main Pane                     | |
| | Pane       |  <router-view></router-view> (2) | |
| |            |  component Foo か Bar を切り替え   | |
| |            |                                  | |
| +-----------------------------------------------+ |
+---------------------------------------------------+
<div id="app">
  <!-- (1) ネストの外側のrouter-view -->
  <router-view></router-view>
</div>
const Login = { template: '<login></login>' }
const TwoPane = { template: '<two-pane></two-pane>' }
const Foo = { template: '<div>FOO</div>' }
const Bar = { template: '<div>BAR</div>' }

const routes = [
  { path: '/', component: TwoPane,
    // ネストされたルートは children として定義
    children: [
      {
        path: 'foo',
        component:Foo
      },
      {
        path: 'bar',
        component: Bar
      }
    ]
  },
  { path: '/login', component: Login }
]

const router = new VueRouter({
  routes
})

var vm = new Vue({
  router,
  el: '#app'
})
コンポーネント TwoPane ここに二つ目、ネストの内側の <router-view></router-view> を書いている
Vue.component('two-pane', {
  template: `
    <el-container>
      <el-header>
        <img src="img/logo.png" height="60" align="left">
      </el-header>
    <el-container>
      <el-aside width="80px">
        <el-col>
          <el-menu default-active="1" class="el-menu-vertical">
            <el-menu-item index="1">
              <el-tooltip class="item" effect="dark" content="Data centers" placement="right">
                <router-link to="/foo"><i class="fas fa-map-marker-alt fa-2x"></i></router-link>
              </el-tooltip>
            </el-menu-item>
            <el-menu-item index="2">
              <router-link to="/bar"><i class="fas fa-door-open fa-2x"></i></router-link>
            </el-menu-item>
          </el-menu>
        </el-col>
      </el-aside>

      <el-main>
        <!-- (2) ネストの内側のrouter-view -->
        <router-view></router-view>
      </el-main>
    </el-container>
  </el-container>
  `
})
Vue.component('two-pane', {
  methods: {
    onSubmit() {
      router.push('url-to-go-after-login')
    }
  },
  template: `
    <!-- なんらかのログイン画面のHTML -->
  `
})
これで / にいくとメイン画面で、 /login にいくとログイン画面がでる
次回
ログイン時に認証されているかどうを判定して...とかそのへん
シリーズ
- Vue.jsでSPA - [1] Element UIでベースの画面をつくる
- Vue.jsでSPA - [2] Element UIで各ペインの画面をつくる
- Vue.jsでSPA - [3] vue-routerでルーティング
- Vue.jsでSPA - [4] コンポーネントにしてみる
- Vue.jsでSPA - [5] リアクティブになってる?
- Vue.jsでSPA - [6] サーバからのデータ取得
- Vue.jsでSPA - [7] Vueからサーバデータ取得
- Vue.jsでSPA - [8] バックエンドとうまくやっていこうとして試したこと
- Vue.jsでSPA - [9] 今更ながらCORSとそのエラーの回避方法
- Vue.jsでSPA - [10] Safari..お前か...3rd party cookie
- Vue.jsでSPA - [11] Element UIでログイン画面
- Vue.jsでSPA - [12] ログイン:シングルペインからツーペインへ画面遷移
- Vue.jsでSPA - [13] モバイル向けに OnsenUI に手をだす
- Vue.jsでSPA - [14] Vue.jsとOnsenUIを使ったオレオレなショッピングカートチュートリアル
- Vue.jsでSPA - [15] 世界中の人とミーティング時間を決める時に便利なやつ
- Vue.jsでSPA - [16] へー、FirebaseでWebアプリのログインってこうやるのか
