はじめに
毎回毎回手順を忘れるのと、何を入れるのかを忘れるので自分用のメモ
初期化とアップデート
- OSが最新かAppstoreを見た
最新だったのでOK
Dockを整える
私は左に小さめに表示させるのが好き
不可視ファイルを見れるように
defaults write com.apple.finder AppleShowAllFiles TRUE
Homebrewの設定
macのパッケージマネージャーを入れる
HomeBrew
/usr/bin/ruby -e "$(curl -fsSL https://raw.githubusercontent.com/Homebrew/install/master/install)"
$ brew doctor
Your system is ready to brew.
$ brew update
Already up-to-date.
Gitを入れる
$ brew install git
==> Installing git
==> Downloading https://homebrew.bintray.com/bottles/git-2.21.0.mojave.bottle.ta
==> Downloading from https://akamai.bintray.com/75/7583e18dc171e1ff205b640456f4b
######################################################################## 100.0%
==> Pouring git-2.21.0.mojave.bottle.tar.gz
==> Caveats
Bash completion has been installed to:
  /usr/local/etc/bash_completion.d

zsh completions and functions have been installed to:
  /usr/local/share/zsh/site-functions

Emacs Lisp files have been installed to:
  /usr/local/share/emacs/site-lisp/git
==> Summary
🍺  /usr/local/Cellar/git/2.21.0: 1,530 files, 42MB
==> `brew cleanup` has not been run in 30 days, running now...
==> Caveats
==> gettext
gettext is keg-only, which means it was not symlinked into /usr/local,
because macOS provides the BSD gettext library & some software gets confused if both are in the library path.

If you need to have gettext first in your PATH run:
  echo 'export PATH="/usr/local/opt/gettext/bin:$PATH"' >> ~/.bash_profile

For compilers to find gettext you may need to set:
  export LDFLAGS="-L/usr/local/opt/gettext/lib"
  export CPPFLAGS="-I/usr/local/opt/gettext/include"

==> git
Bash completion has been installed to:
  /usr/local/etc/bash_completion.d

zsh completions and functions have been installed to:
  /usr/local/share/zsh/site-functions

Emacs Lisp files have been installed to:
  /usr/local/share/emacs/site-lisp/git
気になることが書いてあるのでパスを通した。
If you need to have gettext first in your PATH run:
  echo 'export PATH="/usr/local/opt/gettext/bin:$PATH"' >> ~/.bash_profile
gitのバージョンが最新になったのを確認
$ git --version
git version 2.21.0
$ ls -a
.			.bash_sessions		Library
..			Applications		Movies
.CFUserTextEncoding	Desktop			Music
.DS_Store		Documents		Pictures
.Trash			Downloads		Public
$ echo 'export PATH="/usr/local/opt/gettext/bin:$PATH"' >> ~/.bash_profile
.bash_profileが作られている
$ ls -a
.			.bash_sessions		Movies
..			Applications		Music
.CFUserTextEncoding	Desktop			Pictures
.DS_Store		Documents		Public
.Trash			Downloads
.bash_profile		Library
.bash_profileの中身を一応確認
$vi .bash_profile
export PATH="/usr/local/opt/gettext/bin:$PATH"
参考文献
macOS Mojave で Git を Homebrew 管理下に変更したときの顛末
pecoとtigをいれておく
$ brew install peco
$ brew install tig
シェルの設定
いままでzshを使っていたので今回はfishに挑戦することにした
導入
Homebrewを使っているのでこれではいる
$ brew install fish
Updating Homebrew...
==> Auto-updated Homebrew!
Updated 1 tap (homebrew/core).
==> Updated Formulae
asciidoctor         gitlab-runner       newsboat            ruby-build
erlang              glooctl             purescript

==> Downloading https://homebrew.bintray.com/bottles/fish-3.0.2.mojave.bottle.ta
==> Downloading from https://akamai.bintray.com/0d/0dda76c64b0e2b4f1bfe48b816346
######################################################################## 100.0%
==> Pouring fish-3.0.2.mojave.bottle.tar.gz
==> Caveats
You will need to add:
  /usr/local/bin/fish
to /etc/shells.

Then run:
  chsh -s /usr/local/bin/fish
to make fish your default shell.
==> Summary
🍺  /usr/local/Cellar/fish/3.0.2: 953 files, 8.3MB
$ fish -v
fish, version 3.0.2
oh-my-fishのインストール
すぐにお魚がでてきた
とてもかわいい
$ curl -L https://get.oh-my.fish | fish
 % Total    % Received % Xferd  Average Speed   Time    Time     Time  Current
                                 Dload  Upload   Total   Spent    Left  Speed
100   194  100   194    0     0     59      0  0:00:03  0:00:03 --:--:--    59
100 19042  100 19042    0     0   3962      0  0:00:04  0:00:04 --:--:-- 12237
Checking for a sane environment...
Installing Oh My Fish to /Users/{ユーザ名}/.local/share/omf...
Using release channel "stable".
Cloning master from https://github.com/oh-my-fish/oh-my-fish.git...
Writing bootstrap to /Users/{ユーザ名}/.config/fish/conf.d/omf.fish...
Setting up Oh My Fish configuration...
Updating https://github.com/oh-my-fish/packages-main master... Done!
Installing package default
✔ default successfully installed.
Installation successful!
Welcome to fish, the friendly interactive shell
⋊> ~/Project
PATHについて
oh-my-fishをいれた時点でPATHは自動的にどれくらい通っているのか気になったので一応調べてみる
$ echo $PATH
/usr/local/bin /usr/bin /bin /usr/sbin /sbin
PATHの入れ方に関しては公式で紹介されている。わかりやすいのはここだったfish shellのPATH設定
fishのコンフィグファイルは ~/.config/fish/config.fish
$ vi ~/.config/fish/conf.d/omf.fish
omf.fishのなかみ
# Path to Oh My Fish install.
set -q XDG_DATA_HOME
  and set -gx OMF_PATH "$XDG_DATA_HOME/omf"
  or set -gx OMF_PATH "$HOME/.local/share/omf"

# Load Oh My Fish configuration.
source $OMF_PATH/init.fish
oh-my-fishの削除
oh-my-fishが嫌だったらこれで消せる
omf destroy
やっぱりFisherにきりかえた
Oh My FishよりもFisherのほうが良さそうなのでFisherに切り替えた
$curl https://git.io/fisher --create-dirs -sLo ~/.config/fish/functions/fisher.fish
はいったことを確認した
$fisher -v
fisher version 3.2.9 ~/.config/fish/functions/fisher.fish
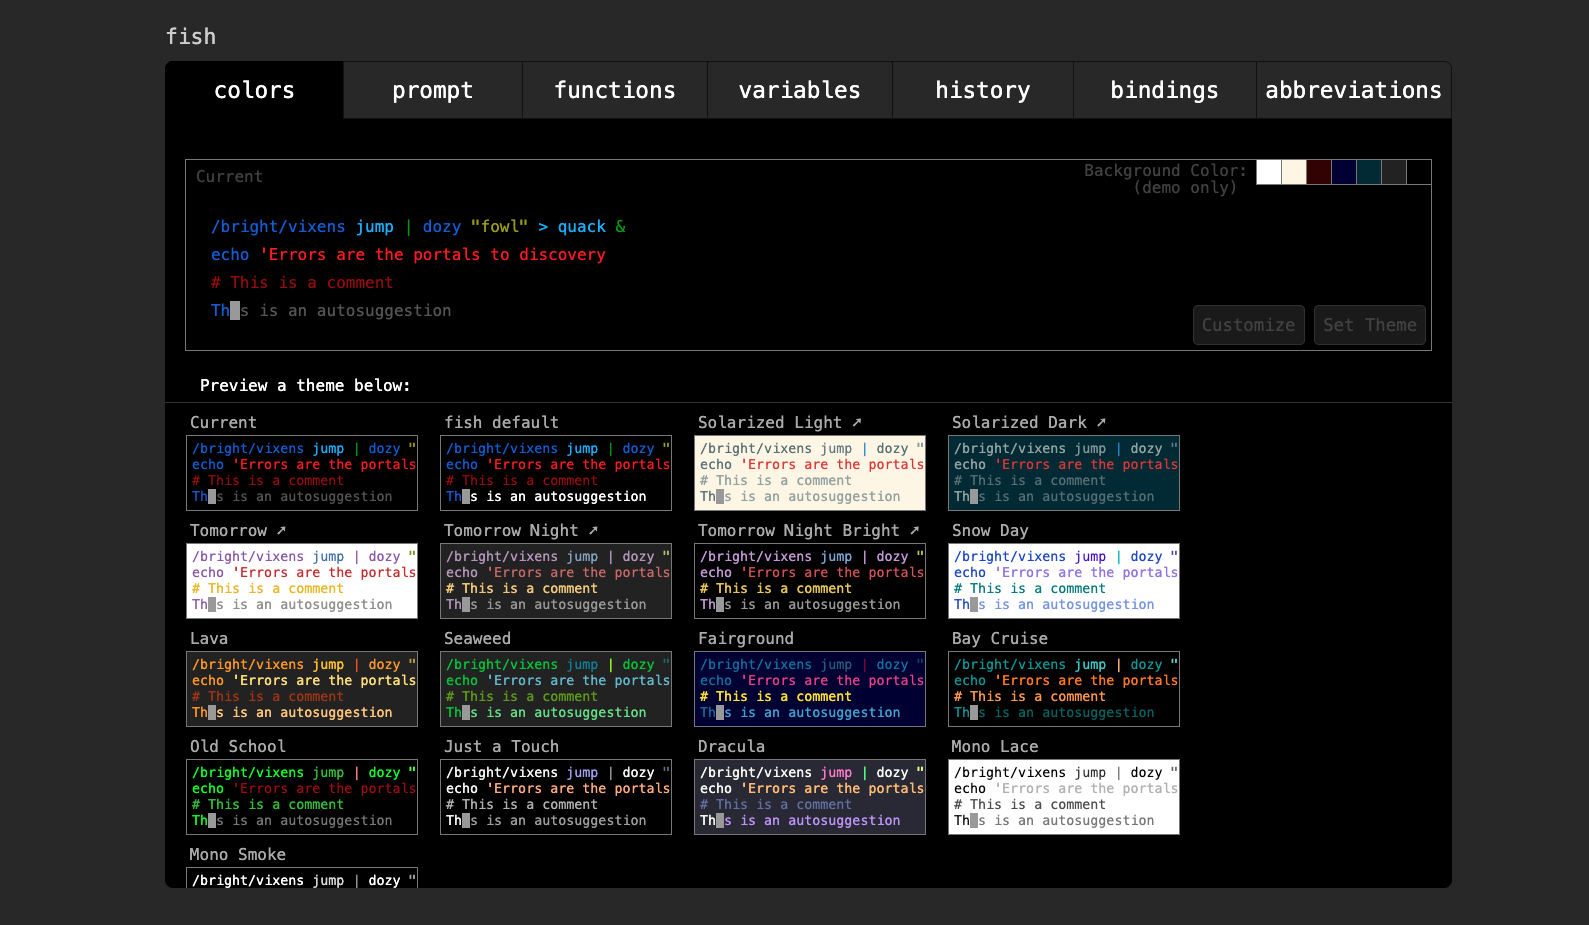
GUIでいじれる
下記コマンドを打つと自動でブラウザが立ち上がりすきなようにきめれるようになる
$ fish_config
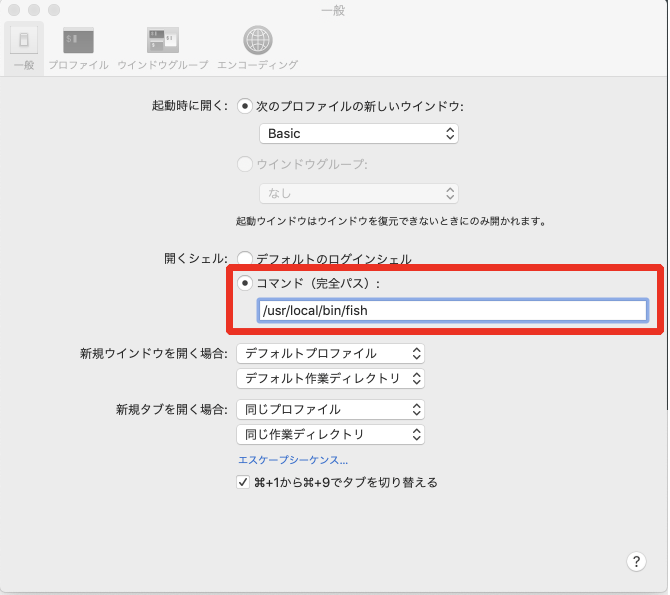
デフォルトシェルをfishに変更した
# 末尾に /usr/local/bin/fish を追加
$ sudo vi /etc/shells
完成形はこんなかんじで末尾に加えておく
# List of acceptable shells for chpass(1).
# Ftpd will not allow users to connect who are not using
# one of these shells.

/bin/bash
/bin/csh
/bin/ksh
/bin/sh
/bin/tcsh
/bin/zsh
/usr/local/bin/fish
# デフォルトシェルを fish に変更
$ chsh -s /usr/local/bin/fish
Ctrl + Rで履歴検索できるようにする
fzf補間をいれる
$ brew install fzf
==> Downloading https://homebrew.bintray.com/bottles/fzf-0.18.0.mojave.bottle.ta
==> Downloading from https://akamai.bintray.com/0f/0f77b9b22f32f76493cdac585106b
######################################################################## 100.0%
==> Pouring fzf-0.18.0.mojave.bottle.tar.gz
==> Caveats
To install useful keybindings and fuzzy completion:
  /usr/local/opt/fzf/install

To use fzf in Vim, add the following line to your .vimrc:
  set rtp+=/usr/local/opt/fzf
==> Summary
🍺  /usr/local/Cellar/fzf/0.18.0: 17 files, 3.6MB
fisherでプラグインをいれる
$ fisher add jethrokuan/fzf
Ctrl + Rで履歴検索してみる
おぉ・・・・すごいぞ・・・

ブランチ名をシェルに表示させたい
ここを見て設定した
fishのプロンプトの右側をカスタマイズして、gitのブランチとstatusを表示させる
functions/fish_prompt.fish
function fish_prompt
        test $SSH_TTY
    and printf (set_color red)$USER(set_color brwhite)'@'(set_color yellow)(prompt_hostname)' '
    test "$USER" = 'root'
    and echo (set_color red)"#"

    # Main
    echo -n (set_color cyan)(prompt_pwd) (set_color red)'❯'(set_color yellow)'❯'(set_color green)'❯ '

    # Git
    set last_status $status
    printf '%s ' (__fish_git_prompt)
    set_color normal
end
/Users/{ユーザー名}/.config/fish/config.fishの中身
# rbenvのPATH
set -x PATH $HOME/.rbenv/shims $PATHi


# Fish git prompt
set __fish_git_prompt_showdirtystate 'yes'
set __fish_git_prompt_showstashstate 'yes'
set __fish_git_prompt_showuntrackedfiles 'yes'
set __fish_git_prompt_showupstream 'yes'
set __fish_git_prompt_color_branch yellow
set __fish_git_prompt_color_upstream_ahead green
set __fish_git_prompt_color_upstream_behind red

# Status Chars
set __fish_git_prompt_char_dirtystate '⚡'
set __fish_git_prompt_char_stagedstate '→'
set __fish_git_prompt_char_untrackedfiles '☡'
set __fish_git_prompt_char_stashstate '↩'
set __fish_git_prompt_char_upstream_ahead '+'
set __fish_git_prompt_char_upstream_behind '-'
Node.js / npm環境をいれる
Node.js / npm をインストール (Mac環境)を参考にした
$ brew install nodebrew
パスを通す
config.fishファイルに
set -x PATH $HOME/.nodebrew/node/v12.2.0/bin $PATHを追加
# rbenvのPATH
set -x PATH $HOME/.rbenv/shims $PATH
set -x PATH $HOME/.nodebrew/node/v12.2.0/bin $PATH


# Fish git prompt
set __fish_git_prompt_showdirtystate 'yes'
set __fish_git_prompt_showstashstate 'yes'
set __fish_git_prompt_showuntrackedfiles 'yes'
set __fish_git_prompt_showupstream 'yes'
set __fish_git_prompt_color_branch yellow
set __fish_git_prompt_color_upstream_ahead green
set __fish_git_prompt_color_upstream_behind red

# Status Chars
set __fish_git_prompt_char_dirtystate '⚡'
set __fish_git_prompt_char_stagedstate '→'
set __fish_git_prompt_char_untrackedfiles '☡'
set __fish_git_prompt_char_stashstate '↩'
set __fish_git_prompt_char_upstream_ahead '+'
set __fish_git_prompt_char_upstream_behind '-'
参考資料
zshからfishに乗り換えた
fishのプロンプトの右側をカスタマイズして、gitのブランチとstatusを表示させる
iOSアプリ開発系で必要なもの
rbenvをいれる
ruby管理のためにいれる
環境構築前の状態チェック
$ ruby -v
ruby 2.3.7p456 (2018-03-28 revision 63024) [universal.x86_64-darwin18]
rbenvをいれる
$ brew install rbenv
Updating Homebrew...
==> Auto-updated Homebrew!
Updated 1 tap (homebrew/core).
==> Updated Formulae
azure-cli    dartsim      lz4          platformio   serverless   varnish
cogl         git-lfs      pijul        restic       terrahub     vim

==> Installing dependencies for rbenv: autoconf, openssl, pkg-config and ruby-build
==> Installing rbenv dependency: autoconf
==> Downloading https://homebrew.bintray.com/bottles/autoconf-2.69.mojave.bottle
==> Downloading from https://akamai.bintray.com/97/9724736d34773b6e41e2434ffa28f
######################################################################## 100.0%
==> Pouring autoconf-2.69.mojave.bottle.4.tar.gz
==> Caveats
Emacs Lisp files have been installed to:
  /usr/local/share/emacs/site-lisp/autoconf
==> Summary
🍺  /usr/local/Cellar/autoconf/2.69: 71 files, 3.0MB
==> Installing rbenv dependency: openssl
==> Downloading https://homebrew.bintray.com/bottles/openssl-1.0.2r.mojave.bottl
==> Downloading from https://akamai.bintray.com/c1/c1f8c06740398325c7028213b20b1
######################################################################## 100.0%
==> Pouring openssl-1.0.2r.mojave.bottle.tar.gz
==> Caveats
A CA file has been bootstrapped using certificates from the SystemRoots
keychain. To add additional certificates (e.g. the certificates added in
the System keychain), place .pem files in
  /usr/local/etc/openssl/certs

and run
  /usr/local/opt/openssl/bin/c_rehash

openssl is keg-only, which means it was not symlinked into /usr/local,
because Apple has deprecated use of OpenSSL in favor of its own TLS and crypto libraries.

If you need to have openssl first in your PATH run:
  echo 'set -g fish_user_paths "/usr/local/opt/openssl/bin" $fish_user_paths' >> ~/.config/fish/config.fish

For compilers to find openssl you may need to set:
  set -gx LDFLAGS "-L/usr/local/opt/openssl/lib"
  set -gx CPPFLAGS "-I/usr/local/opt/openssl/include"

==> Summary
🍺  /usr/local/Cellar/openssl/1.0.2r: 1,795 files, 12.1MB
==> Installing rbenv dependency: pkg-config
==> Downloading https://homebrew.bintray.com/bottles/pkg-config-0.29.2.mojave.bo
==> Downloading from https://akamai.bintray.com/85/85e5bbffb3424f22cd1bf54b69161
######################################################################## 100.0%
==> Pouring pkg-config-0.29.2.mojave.bottle.tar.gz
🍺  /usr/local/Cellar/pkg-config/0.29.2: 11 files, 627.2KB
==> Installing rbenv dependency: ruby-build
==> Downloading https://github.com/rbenv/ruby-build/archive/v20190423.tar.gz
==> Downloading from https://codeload.github.com/rbenv/ruby-build/tar.gz/v201904
######################################################################## 100.0%
==> ./install.sh
🍺  /usr/local/Cellar/ruby-build/20190423: 446 files, 223.5KB, built in 5 seconds
==> Installing rbenv
==> Downloading https://homebrew.bintray.com/bottles/rbenv-1.1.2.mojave.bottle.t
######################################################################## 100.0%
==> Pouring rbenv-1.1.2.mojave.bottle.tar.gz
🍺  /usr/local/Cellar/rbenv/1.1.2: 36 files, 65KB
==> Caveats
==> autoconf
Emacs Lisp files have been installed to:
  /usr/local/share/emacs/site-lisp/autoconf
==> openssl
A CA file has been bootstrapped using certificates from the SystemRoots
keychain. To add additional certificates (e.g. the certificates added in
the System keychain), place .pem files in
  /usr/local/etc/openssl/certs

and run
  /usr/local/opt/openssl/bin/c_rehash

openssl is keg-only, which means it was not symlinked into /usr/local,
because Apple has deprecated use of OpenSSL in favor of its own TLS and crypto libraries.

If you need to have openssl first in your PATH run:
  echo 'set -g fish_user_paths "/usr/local/opt/openssl/bin" $fish_user_paths' >> ~/.config/fish/config.fish

For compilers to find openssl you may need to set:
  set -gx LDFLAGS "-L/usr/local/opt/openssl/lib"
  set -gx CPPFLAGS "-I/usr/local/opt/openssl/include"

For pkg-config to find openssl you may need to set:
  set -gx PKG_CONFIG_PATH "/usr/local/opt/openssl/lib/pkgconfig"
$ rbenv -v
rbenv 1.1.2
システムのrubyを指しているので、導入したrubyに正しいPATHを通す
$ which ruby
/usr/bin/ruby
設定してないので環境変数$fish_user_pathsにはなにもはいっていない
$ echo $fish_user_paths
(なんもない あたりまえ)
環境変数をチェックする
$ echo $PATH
/usr/local/bin /usr/bin /bin /usr/sbin /sbin
/Users/{ユーザー名}/.config/fishにconfig.fishというファイルを作り下記を記載する
set -x PATH $HOME/.rbenv/shims $PATH
するとPATHをみてみるとちゃんと通ったことがわかる(ターミナルは再起動したほうがいい)
$ echo $PATH
/Users/{ユーザー名}/.rbenv/shims /usr/local/bin /usr/bin /bin /usr/sbin /sbin
きちんと導入したrubyにパスが通った
$which gem
/Users/{ユーザー名}/.rbenv/shims/gem

$which ruby
/Users/{ユーザー名}/.rbenv/shims/ruby
一応bashに戻したときもパスが通るようにしておく
PATHの状態チェック
$echo $PATH
/usr/local/bin /usr/bin /bin /usr/sbin /sbin
.bash_profileの設定を変える
$ vi .bash_profile
.bash_profileのなかみはこんなかんじにしておく
# rbenv PATH
export PATH="$HOME/.rbenv/bin:$PATH"
.bash_profile再更新
$ source .bash_profile
PATHのチェック
ちゃんと/Users/{ユーザー名}/.rbenv/binが追加されていますね
echo $PATH
/Users/{ユーザー名}/.rbenv/bin /usr/local/bin /usr/bin /bin /usr/sbin /sbin
rbenv/rbenv
【2018年版】macにrbenvを入れてrubyを管理できるようにしちゃう
rubyの指定のバージョンを入れる
現在使われているrubyバージョンのチェック
$rbenv versions
* system (set by /Users/{ユーザ名}/.rbenv/version)
指定のrubyのバージョンを入れる
$rbenv install 2.3.1
ruby-build: use openssl from homebrew
Downloading ruby-2.3.1.tar.bz2...
-> https://cache.ruby-lang.org/pub/ruby/2.3/ruby-2.3.1.tar.bz2
Installing ruby-2.3.1...
Installed ruby-2.3.1 to /Users/{ユーザ名}/.rbenv/versions/2.3.1
Carthageがなんかうまく行かない
前書いたやつを参照した。うまくいった。
Hyperを入れた
iTerm2よりも良さそうとのことなので入れてみた
プラグイン入れた
# マテリアルテーマ
hyper i hyper-material-theme
# 背景透過
hyper i hyper-opacity
# キー押したときにかっこいくなる
hyper i hyperpower
# フッターにステータス表示
hyper i hyper-statusline
# タブにアイコン表示
hyper i hyper-tab-icons-plus
MacBook に Docker と Hyper-Term と Fish-Shell を入れて開発環境を整える
node.jsとmpnをいれる
goを入れる
$brew install go
モジュール問題を解決するために入れた
$ export GO111MODULE=on
参考文献
fish 公式
fish tutorial
全訳!fishシェル普及計画
fish shellのPATH設定
詳解 fishでモダンなシェル環境の構築(fish,tmux,powerline,peco,z,ghq,dracula)
必要なアプリを入れる
開発系
- Xcode
- iTerm
- vscode
- Cloud SDK
ブラウザ
- Google Chrome
pwとか二段階認証
- 1Password
- Authy
その他便利アプリ
- Nimbus
- Slack
- Dash(ライセンス有り)
- Postman
- Charles(ライセンス有り)
画像編集系
- Adobe Creative Cloud(ライセンス有り)
- Sketch(ライセンス有り)
- OutLook
参考資料
Mac 環境設定 2018秋
[【Mac】隠しファイル・隠しフォルダを表示する方法]
(https://qiita.com/TsukasaHasegawa/items/fa8e783a556dc1a08f51)
[zshでログイン・ログアウト時に実行されるファイル]
(https://qiita.com/yuku_t/items/40bcc63bb8ad94f083f1)
macOS Mojave で Git を Homebrew 管理下に変更したときの顛末

