こんな感じのボタンを作りたいとき。
普通に favoriteButton として作成しても良いですが、
「他のボタンにも同じ構成で作れる汎用的なボタンにしたい」
という時に@IBDesignableと@IBInspectableが便利です。
@IBDesignableと@IBInspectableとは
@IBDesignableとは?
@IBInspectableとは?
と聞かれるとなんて答えてよいか難しいのですが、
@IBDesignableと@IBInspectableを使うと、
事前に作成しておいたViewを、Storyboard上で適用できる、カスタマイズできる
ものです。
例を示します。
final class RoundedCornerButton: UIButton {

    @IBInspectable var iconImage: UIImage = UIImage()
}
このようにUIButtonを継承するRoundedCornerButtonクラスを定義して、
Storyboard上に設定したボタンのCustomクラスに、

このようにRoundedCornerButtonを設定すると、

@IBInspectableで設定したiconImageをStoryboard上で設定できる、
というものです。
RoundedCornerButton
細かく書くより、コード全体を載せたいと思います。
こんな感じのボタンを作成します。
RoundedCornerButton:
import UIKit

@IBDesignable
final class RoundedCornerButton: UIButton {

    @IBInspectable var iconImage: UIImage = UIImage()
    @IBInspectable var unselectedText: String = "未選択"
    @IBInspectable var selectedText: String = "選択済み"

    @IBInspectable var unselectedBackgroundColor: UIColor = UIColor.systemTeal
    @IBInspectable var unselectedShadowColor: UIColor =  UIColor.ocean
    @IBInspectable var unselectedBorderColor: UIColor = UIColor.clear
    @IBInspectable var selectedBackgroundColor: UIColor = UIColor.baseGray
    @IBInspectable var selectedShadowColor: UIColor = UIColor.gray
    @IBInspectable var selectedBorderColor: UIColor = UIColor.clear

    // ボタンがselectされているかどうかの変数
    private(set) var selectedStatus: Bool = false

    // ボタンが凹む前のX座標
    private lazy var originalX: CGFloat = {
        return self.layer.position.x
    }()

    // ボタンが凹む前のY座標
    private lazy var originalY: CGFloat = {
        return self.layer.position.y
    }()

    private lazy var stackView: UIStackView = {
        let stackView = UIStackView(frame: CGRect(x: 0, y: 0, width: frame.width, height: frame.height))
        stackView.translatesAutoresizingMaskIntoConstraints = false // autoLayoutをONに
        stackView.alignment = .center
        stackView.distribution = .fill
        stackView.axis = .horizontal
        stackView.spacing = 4.0
        stackView.backgroundColor = UIColor.clear
        stackView.isUserInteractionEnabled = false // stackView部分をタップしてもボタンが反映するように
        return stackView
    }()

    private lazy var iconImageView: UIImageView = {
        let iconImageView = UIImageView(image: iconImage)
        iconImageView.contentMode = .scaleAspectFit // 画像そのままに縦横比に表示
        iconImageView.widthAnchor.constraint(equalToConstant: 32.0).isActive = true
        return iconImageView
    }()

    private lazy var textLabel: UILabel = {
        let width = stackView.frame.width - iconImageView.frame.width
        let textLabel = UILabel(frame: CGRect(x: 0, y: 0, width: width, height: frame.height))
        textLabel.text = unselectedText
        textLabel.textAlignment = .center
        textLabel.textColor = UIColor(hex: "#4A4A4A")
        textLabel.font = UIFont.boldSystemFont(ofSize: 16.0)
        return textLabel
    }()

    override func awakeFromNib() {
        super.awakeFromNib()
        setupLayer()
        setupViews()
    }

    override func prepareForInterfaceBuilder() {
        super.prepareForInterfaceBuilder()
        setupLayer()
        setupViews()
        setNeedsDisplay()
    }

    // Highlight時にボタンが凹んだように見せるため、layerの位置変更・影なしに
    override var isHighlighted: Bool {
        didSet {
            layer.position = CGPoint(x: originalX, y: isHighlighted ? originalY+2.0 : originalY)
            layer.shadowOffset = isHighlighted ? CGSize(width: 0.0, height: 0.0) : CGSize(width: 0.0, height: 2.0)
        }
    }

    private func setupLayer() {
        setStatus(selectedStatus)
        layer.borderWidth = 1.0 // 枠線の長さを定義
        layer.cornerRadius = 4.0 // 角丸に
        layer.shadowOpacity = 1.0 // 影を表示する
        layer.shadowRadius = 0.0 // ぼやけ影を非表示
    }

    private func setupViews() {
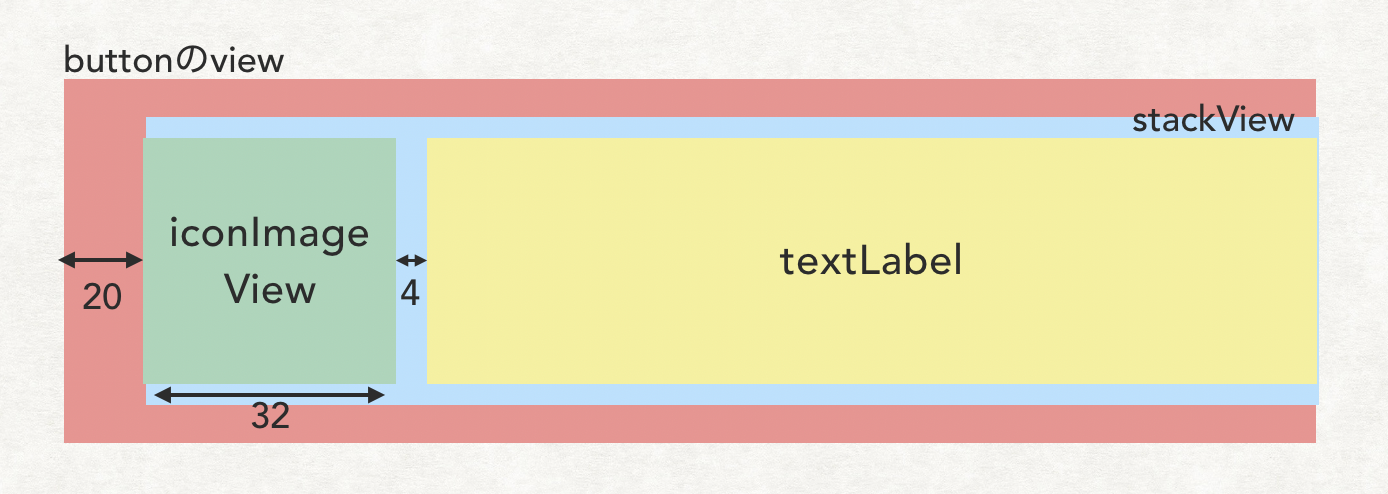
        self.addSubview(stackView) // buttonのviewにstackViewを載せる
        stackView.addArrangedSubview(iconImageView) // iconImageViewをstackViewに載せる
        stackView.addArrangedSubview(textLabel) // textLabelをstackViewに載せる
        stackView.leadingAnchor.constraint(equalTo: self.leadingAnchor, constant: 20.0).isActive = true // stackViewの左端をbuttonのviewの左端から20離す
        stackView.centerYAnchor.constraint(equalTo: self.centerYAnchor).isActive = true
    }
}

// MARK: public
extension RoundedCornerButton {
    func setStatus(_ status: Bool) {
        selectedStatus = status
        layer.backgroundColor = status ? selectedBackgroundColor.cgColor : unselectedBackgroundColor.cgColor
        layer.shadowColor = status ? selectedShadowColor.cgColor : unselectedShadowColor.cgColor
        layer.borderColor = status ? selectedBorderColor.cgColor : unselectedBorderColor.cgColor
        layer.shadowOffset = CGSize(width: 0.0, height: status ? 3.0 : 2.0) // 影の長さ
        textLabel.text = status ? selectedText : unselectedText
    }
}
ポイントは以下。
- レイアウトの配置は、Storyboardでエラーが出ないようにAutoLayout設定する感覚で。
- ボタンの上にViewを載せると、ボタンが押せなくなってしまうので、isUserInteractionEnabledをfalseに。
favoriteButtonにRoundedCornerButtonを適用
StoryboardでfavoriteButtonにRoundedCornerButtonをCustom Classに設定。

@IBInspectableで設けた項目をそれぞれ設定します。

favoriteButtonについて、コードで以下のようにアクションを設定。
@IBOutlet private weak var favoriteButton: RoundedCornerButton!
@IBAction private func clickFavoriteButton(_ sender: Any) {
    favoriteButton.setStatus(!favoriteButton.selectedStatus)
}
以上で完成です。
まとめ
StackViewを用いている@IBDesignableと@IBInspectableの例が
あまりネット記事になかったこともあり、記事として記載してみました。ぜひ参考にしてみてください。
参考
- https://developer.apple.com/library/archive/referencelibrary/GettingStarted/DevelopiOSAppsSwift/ImplementingACustomControl.html
- https://qiita.com/son_s/items/7ca2acf690d10f9fd1b7
- https://qiita.com/tasaiii725/items/c70bf648242b061e0734
- https://qiita.com/dddisk/items/8001598ea7951bcdcc30
- https://qiita.com/yucovin/items/4bebcc7a8b1088b374c9
- https://qiita.com/ladnack/items/149b4ebca7f4f45e5335
- http://kimagureneet.hatenablog.com/entry/2015/11/27/211353
- https://qiita.com/kuninori/items/7c4fbd9840c6dd07fed7
- https://qiita.com/yucovin/items/ff58fcbd60ca81de77cb#stackviewをコードで作る方法
- https://qiita.com/ika_tarou/items/e411c37b064fdd514afb
- https://qiita.com/stastaahaha/items/e45e7559255fb7666fd8

