NSLayoutAnchorで制約(NSLayoutConstraint)を作る
『アプリ道場 Advent Calendar 2015』3日目は「三度の飯よりAuto Layoutが好き」(いや…そこまでは無理か…)な、ゆこびん(@yucovin)です。
そもそもイラストレイター兼デザイナーなので、アプリの開発をしていても、見た目の要素をどうやって作るかが一番の感心どころというか触れずにはいられないというか…。
と、いうことで!iOS 9で追加された、簡潔で読みやすくて間違えづらい新しいAuto Layoutのクラス、NSLayoutAnchorについてまとめます。
※なお、このページはプログラミング初学者にも分かりやすい簡単な説明を心がけているため厳密にはおかしい表現が出てくるかもしれません。ご了承ください。
NSLayoutAnchorの使い方、制約の作り方
Auto Layoutで制約を作るのは、Storyboard(Interface Builder)上で作れば分かりやすいですが、どうしてもコードで作らないといけないこともありますよね。
今までAuto Layoutの制約(NSLayoutConstraint)をコードで作るのって煩雑でした。それがNSLayoutAnchorを使うと簡単に書けるようになります。iOS 9以降で使えます。
例えば、制約をNSLayoutConstraintクラスのメソッドで直接生成するには…↓
NSLayoutConstraint(item: subView,
            attribute: NSLayoutAttribute.Top,
            relatedBy: NSLayoutRelation.Equal,
            toItem: mainView,
            attribute: NSLayoutAttribute.Top,
            multiplier: 1.0,
            constant: 40.0)
これを追加、addConstraint(s)もしくはactive = tureしていたわけです。
(Visual Format Languageで書くやり方もありますけど、ここでは割愛。)
なんですが、NSLayoutAnchorならこんな簡単に書けちゃいます。
subView.topAnchor.constraintEqualToAnchor(mainView.topAnchor, constant: 40.0).active = true
従来の方法(上のswift:constraint1.swift)では、制約によっては必要のない要素も設定しないといけませんでしたが、NSLayoutAnchorはその制約に即したプロパティや値の設定しかでてこないので、簡単にNSLayoutConstraintが作れます。
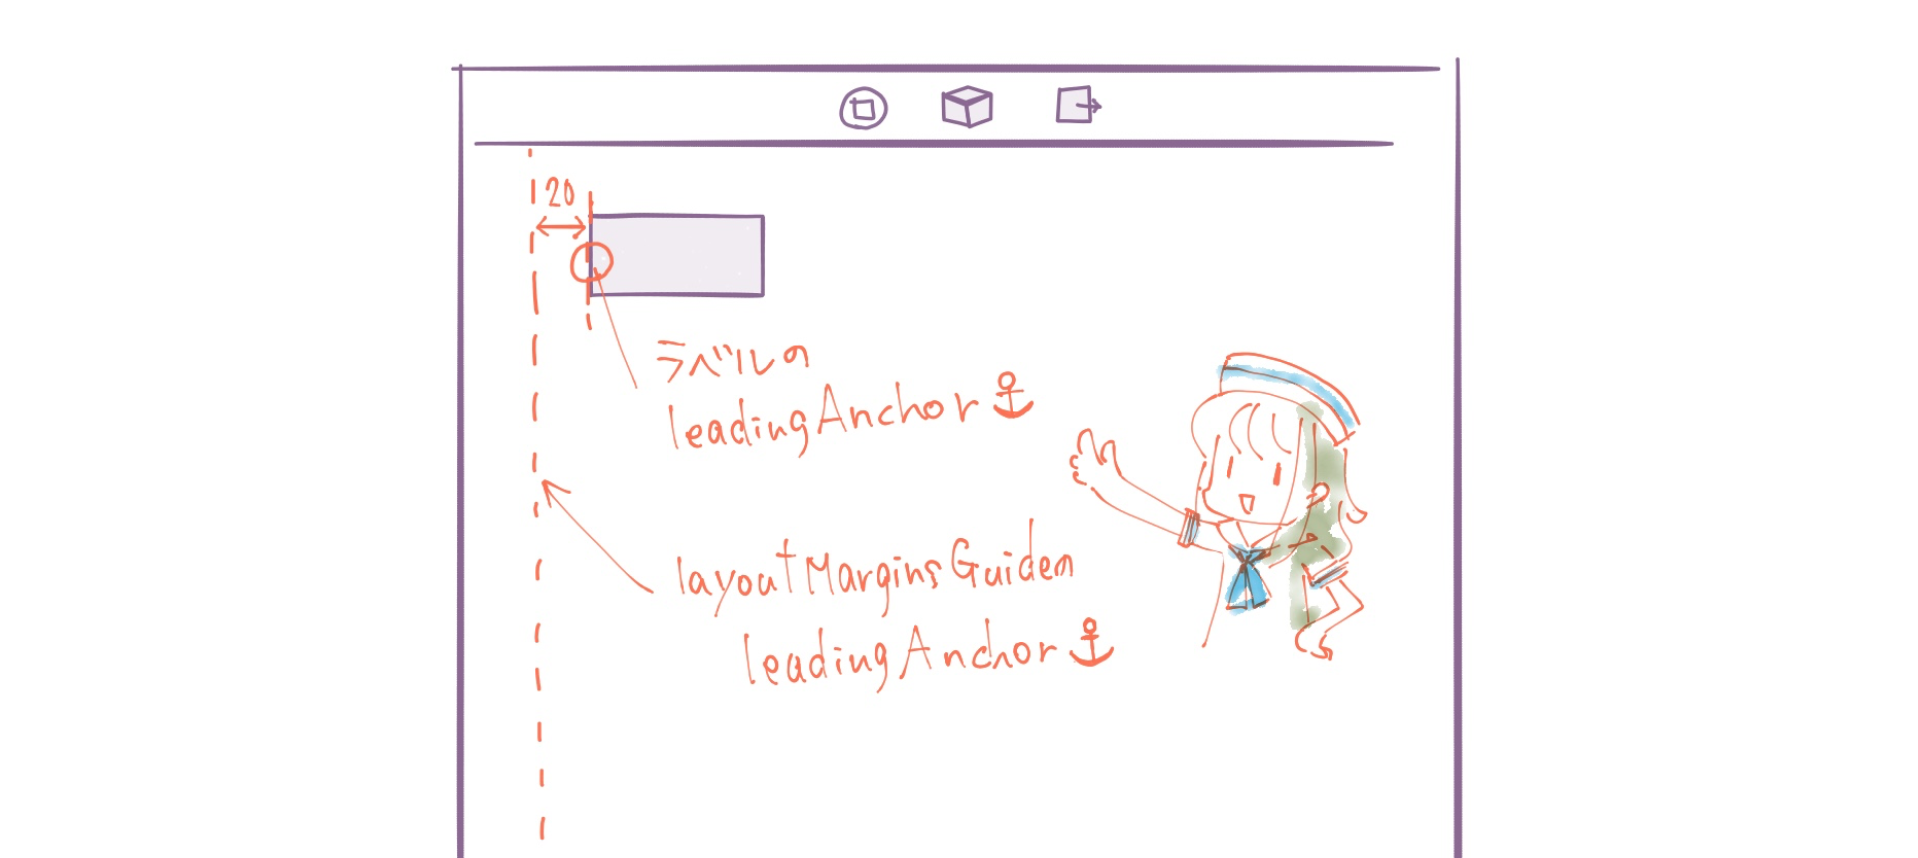
それでは試しにラベルをひとつ、LayoutGuideの左marginから20ptの位置に置く制約をNSLayoutAnchorで作ってみましょう。
label.leadingAnchor.constraintEqualToAnchor(view.layoutMarginsGuide.leadingAnchor, constant: 20.0).active = true
こんなイメージですね。
(実際にはラベルのtopAnchorの制約や場合によってはwidthやheightの制約も必要になってくるでしょう。)
NSLayoutAnchorの特徴
NSLayoutAnchorでの記述が簡単そうなことがわかったところで、NSLayoutAnchorの特徴を挙げてみたいと思います。コチラです。
- 型の安全性、保証◎
- 記述のしやすさ◎
- コードの読みやすさ◎
NSLayoutAnchorの一番優れているところは安全性でしょう。Anchorのプロパティから(かけたい制約に)適切なメソッドを呼び出せば、間違った制約を書いてしまう可能性が低くなります。
従来の直接制約を生成する方法では、意味のない制約や落ちるような制約が簡単にかけてしまうのですが、NSLayoutAnchorでは、幅の制約には倍率を指定することはないのです。もう、multiplierに必要のない値を入れるとか気持ち悪い思いをしなくてすみます。
(Visual Format Languageもありますが、制約を文字列で渡すので、実行してみるまで検証ができないのと、アスペクト比などの制約は作れないので微妙です。)
それに伴って、制約の記述がinit(item:attribute:relatedBy:toItem:attribute:multiplier:constant:)よりもかなり短くなり、書きやすく読みやすくなっています。constraintsWithVisualFormat(_:options:metrics:views:)みたいにビジュアルで作って追加という2段階手順もありませんし。
(記述のしやすさ、読みやすさは慣れの部分もあるかもしれません。私は初めてNSLayoutAnchorで作られた制約を見た時に、説明なしにわかりました。頭から順番に読んでいくだけでいいので、イメージしやすいです。)
一言で言うと「簡潔」! 故に「わかりやすい、書きやすい」です。
Anchorプロパティの種類
さてさて、制約をつくるにはひとつないしふたつの制約をかける対象が必要です。その対象がAnchor(アンカー)です。
NSLayoutAnchorは、AnchorとAnchorの関係性の制約を記述することで制約をつくることができます。
Anchorプロパティを持っているのはUIView, NSView,またはUILayoutGuide。なのでUIViewを継承しているもの、UILabelやUIButtonなんかももちろん使えます。
Anchorの種類は以下の通り
leadingAnchor: NSLayoutXAxisAnchor
trailingAnchor: NSLayoutXAxisAnchor
leftAnchor: NSLayoutXAxisAnchor
rightAnchor: NSLayoutXAxisAnchor
topAnchor: NSLayoutYAxisAnchor
bottomAnchor: NSLayoutYAxisAnchor
widthAnchor: NSLayoutDimension
heightAnchor: NSLayoutDimension
centerXAnchor: NSLayoutXAxisAnchor
centerYAnchor: NSLayoutYAxisAnchor
firstBaselineAnchor: NSLayoutYAxisAnchor //UILayoutGuideにはない
lastBaselineAnchor: NSLayoutYAxisAnchor //UILayoutGuideにはない
Auto Layoutに慣れている人には説明不要かもですね。
leftは部品の左、rightは部品の右、topは部品の上、bottomは部品の底(下)と名前の通りなんですが、少しわかりづらいのは「leadingAnchor」と「trailingAnchor」でしょうか?
leadingは先頭の意味で、trailingは逆、末尾です。言語に即しているので、英語や日本語の横書きではleadingはleftと同じ、trailingはrightと同じになります。アラビア語なんかは逆ですね。Appleとしては制約を作る時はleft/rightでなく、leading/trailingを推奨しています。
まだ見慣れている人が少ないであろうfirstBaselineやlastBaselineは、textの一番上の行のベースライン、一番下の行のベースラインのAnchorです。
NSLayoutAnchorのサブクラス
さて、上のAnchor一覧に型を書いてありますが、NSLayoutAnchorのサブクラスはこちらの3つ。
- NSLayoutXAxisAnchor //水平方向の制約用
- NSLayoutYAxisAnchor //垂直方向の制約用
- NSLayoutDimension // 部品のサイズ、heightやwidthの制約用
まずNSLayoutXAxisAnchorとNSLayoutYAxisAnchorで作れる制約のメソッドを見ていきましょう。
(現在、NSLayoutXAxisAnchorとNSLayoutYAxisAnchorはNSLayoutAnchorをそのまま継承しているだけです)
// thisAnchor = otherAnchor
func constraintEqualToAnchor(anchor: NSLayoutAnchor!) -> NSLayoutConstraint!

// thisAnchor = otherAnchor + constant
func constraintEqualToAnchor(anchor: NSLayoutAnchor!, constant c: CGFloat) -> NSLayoutConstraint!


// thisAnchor ≧ otherAnchor
func constraintGreaterThanOrEqualToAnchor(anchor: NSLayoutAnchor!) -> NSLayoutConstraint!

// thisAnchor ≧ otherAnchor + constant
func constraintGreaterThanOrEqualToAnchor(anchor: NSLayoutAnchor!, constant c: CGFloat) -> NSLayoutConstraint!


// thisAnchor ≦ otherAnchor
func constraintLessThanOrEqualToAnchor(anchor: NSLayoutAnchor!) -> NSLayoutConstraint!

// thisAnchor ≦ otherAnchor + constant
func constraintLessThanOrEqualToAnchor(anchor: NSLayoutAnchor!, constant c: CGFloat) -> NSLayoutConstraint!
2つのAnchorの関係性をコメントを入れてみましたが、メソッドを英語で読んで…字の如くですね。そのまんまです。
注意点として、leading/trailingのAnchorとleft/rightのAnchorで制約はつくらないこと。コンパイルエラーは出ませんが、実行すると落ちます。
例↓
label1.leadingAnchor.constraintEqualToAnchor(label2.leftAnchor, constant: 0).active = true
次にNSLayoutDimensionで作れる制約のメソッドです。
// thisVariable = constant
func constraintEqualToConstant(c: CGFloat) -> NSLayoutConstraint!

// thisVariable ≧ constant
func constraintGreaterThanOrEqualToConstant(c: CGFloat) -> NSLayoutConstraint!

// thisVariable ≦ constant
func constraintLessThanOrEqualToConstant(c: CGFloat) -> NSLayoutConstraint!


// thisAnchor = otherAnchor * multiplier
func constraintEqualToAnchor(anchor: NSLayoutDimension!, multiplier m: CGFloat) -> NSLayoutConstraint!

// thisAnchor = otherAnchor * multiplier + constant
func constraintEqualToAnchor(anchor: NSLayoutDimension!, multiplier m: CGFloat, constant c: CGFloat) -> NSLayoutConstraint!


// thisAnchor ≧ otherAnchor * multiplier
func constraintGreaterThanOrEqualToAnchor(anchor: NSLayoutDimension!, multiplier m: CGFloat) -> NSLayoutConstraint!

// thisAnchor ≧ otherAnchor * multiplier + constant
func constraintGreaterThanOrEqualToAnchor(anchor: NSLayoutDimension!, multiplier m: CGFloat, constant c: CGFloat) -> NSLayoutConstraint!


// thisAnchor ≦ otherAnchor * multiplier
func constraintLessThanOrEqualToAnchor(anchor: NSLayoutDimension!, multiplier m: CGFloat) -> NSLayoutConstraint!

// thisAnchor ≦ otherAnchor * multiplier + constant
func constraintLessThanOrEqualToAnchor(anchor: NSLayoutDimension!, multiplier m: CGFloat, constant c: CGFloat) -> NSLayoutConstraint!
こちらも、メソッドの英語そのままですね。幅や高さの制約が作れるます。上3つは直接値を指定する制約のものなので対象となるAnchorがひとつしか要りません。
簡単な例
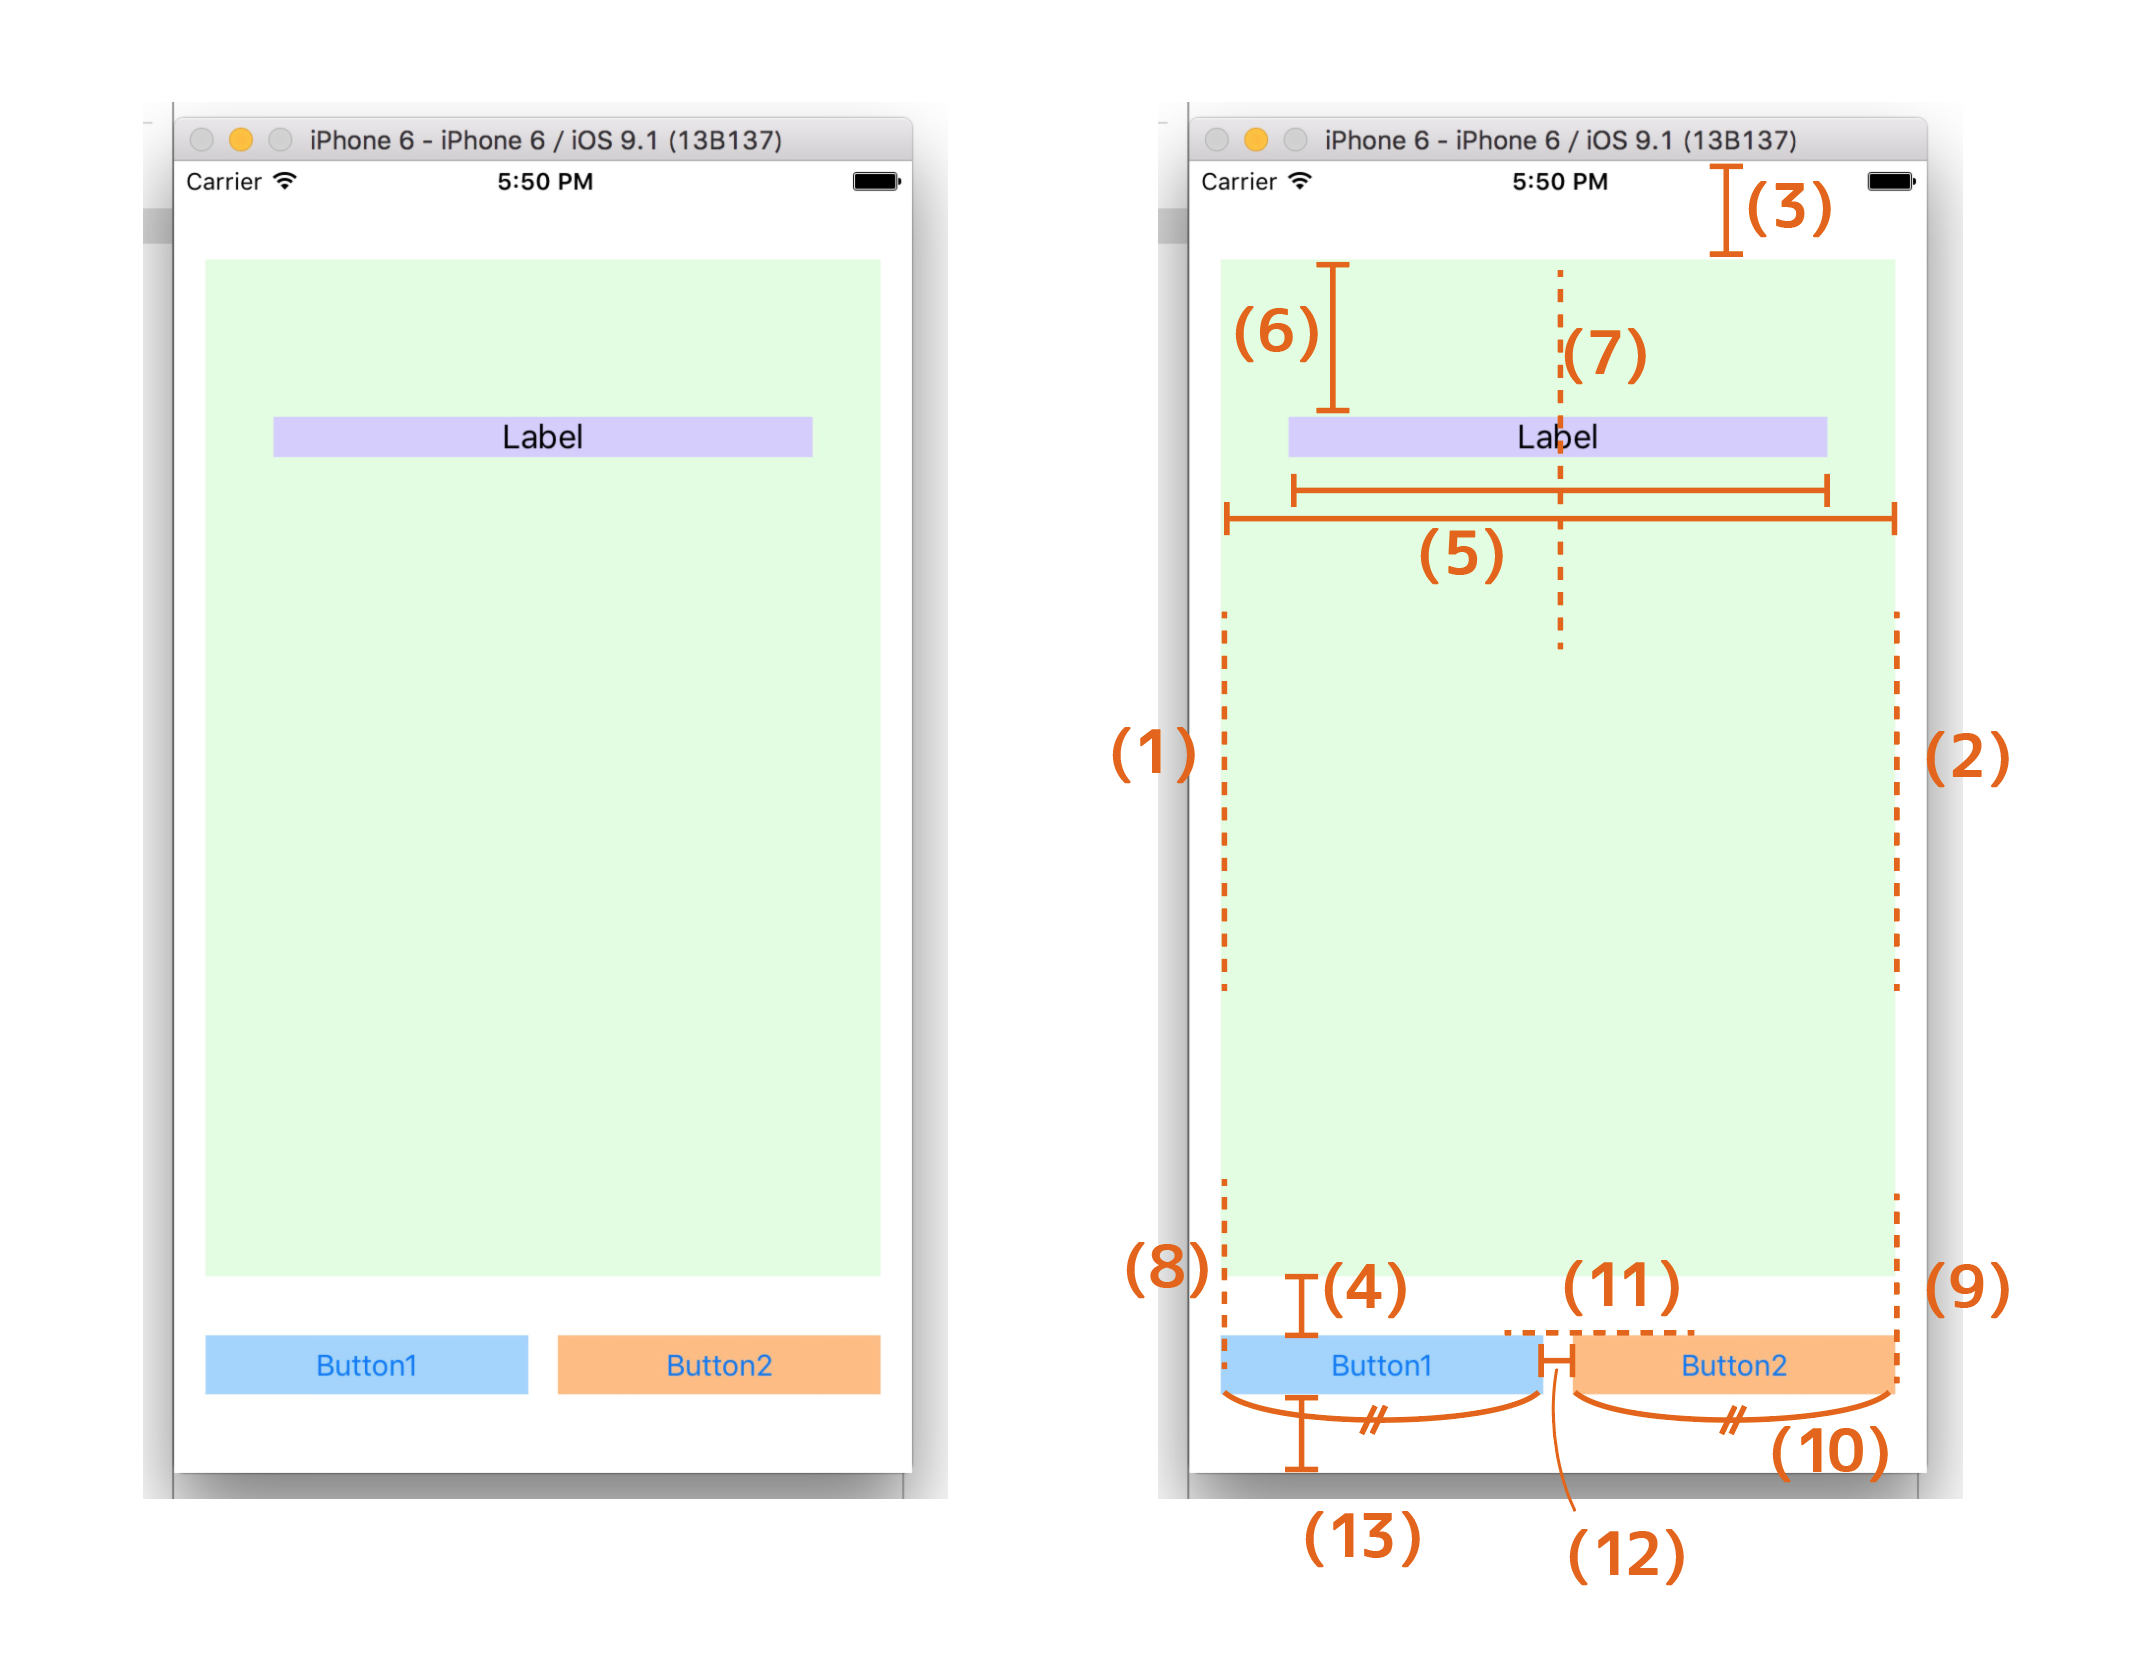
最後に簡単な例をひとつ
コードはこんなカンジですね。
// (1)
greenView.leadingAnchor.constraintEqualToAnchor(view.layoutMarginsGuide.leadingAnchor).active = true
// (2)
greenView.trailingAnchor.constraintEqualToAnchor(view.layoutMarginsGuide.trailingAnchor).active = true
// (3)
greenView.topAnchor.constraintEqualToAnchor(view.topAnchor, constant: 50.0).active = true
// (4)
greenView.bottomAnchor.constraintEqualToAnchor(button1.topAnchor, constant: -30.0).active = true


// (5)
label.widthAnchor.constraintEqualToAnchor(greenView.widthAnchor, multiplier: 0.8).active = true
// (6)
label.topAnchor.constraintEqualToAnchor(greenView.topAnchor, constant: 80.0).active = true
// (7)
label.centerXAnchor.constraintEqualToAnchor(greenView.centerXAnchor).active = true


// (8)
button1.leadingAnchor.constraintEqualToAnchor(greenView.leadingAnchor).active = true
// (9)
button2.trailingAnchor.constraintEqualToAnchor(greenView.trailingAnchor).active = true
// (10)
button1.widthAnchor.constraintEqualToAnchor(button2.widthAnchor).active = true
// (11)
button2.topAnchor.constraintEqualToAnchor(button1.topAnchor).active = true
// (12)
button2.leadingAnchor.constraintEqualToAnchor(button1.trailingAnchor, constant: 15.0).active = true
// (13)
button1.bottomAnchor.constraintEqualToAnchor(view.bottomAnchor, constant: -40.0).active = true
※labelをgreenViewの子要素にした場合、結果が変わります。
同じ(ような)結果になる制約の付け方はこれに限りません。これはあくまでひとつの例です。いろいろためしてみると面白いですね。
まとめ
NSLayoutAnchorが出てきたおかげで、今までよりもコードで制約を書きやすくなりました。
私は「Auto Layoutが好き」などと言っておきながらも、「コードで制約を書くのはイヤだなー、めんどいなー」と思っていたんですが、そんな気持ちがふっとびました。Auto Layoutが苦手な人でもかなりとっつきやすいのではないでしょうか。
NSLayoutAnchorはできたばかりの新しいクラスなので、もっと使いやすいように変更されたり新しいメソッドが加わる可能性もありますね。今後に期待です。
参考
NSLayoutAnchor Class Reference
[Auto Layout Guide]
(https://developer.apple.com/jp/documentation/UserExperience/Conceptual/AutoLayoutGuide/GettingStarted/GettingStarted.html "Auto Layout Guide")

