2022/4/6(水)に行われたAWSセミナー「Pythonの基礎から学ぶ!サーバーレス開発はじめの一歩」で学習した、AWS Cloud9 から Amazon S3 に Pythonでファイルを読み込み・アップロードする部分の復習。
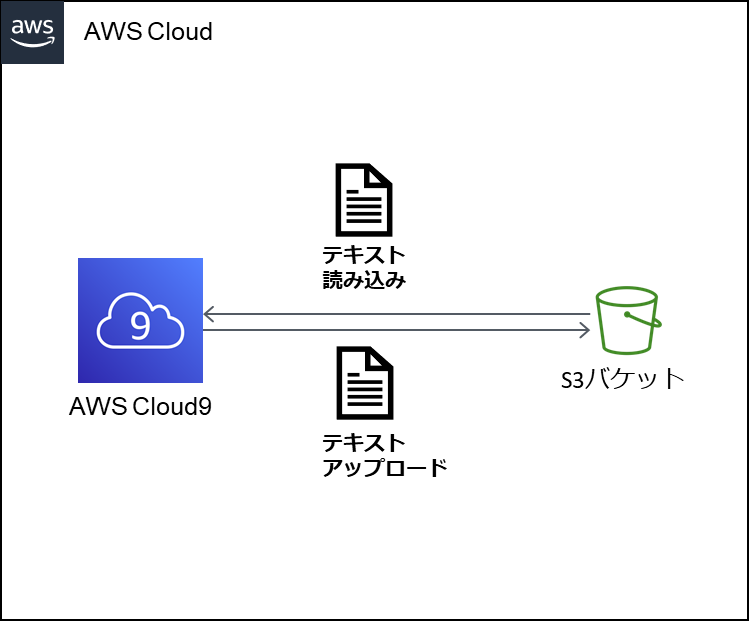
構成図
AWS Cloud9から、 Amazon S3バケット上のテキストを読み込む操作と、テキストをアップロードする操作をPythonで実現する。
1.S3バケットにあるファイルを読み込む
1-1.S3バケットの作成
マネジメントコンソールで S3 画面にいき、「バケットを作成」をクリックする。
バケット名は使用用途がわかる一意の名前を付ける。このバケット名はこの後のPythonコードで使用するため、コピーしてメモしておく。
バケット名以外はデフォルトのまま、「バケットを作成」をクリックする。

1-2.ファイルのアップロード
AWS Cloud9 でサンプルファイルを作成し、S3 バケットにアップロードする。
東京リージョンでAWS Cloud9 の画面を開き、Cloud9には適当に名前を付け、環境はデフォルト値でCloud9を起動する。
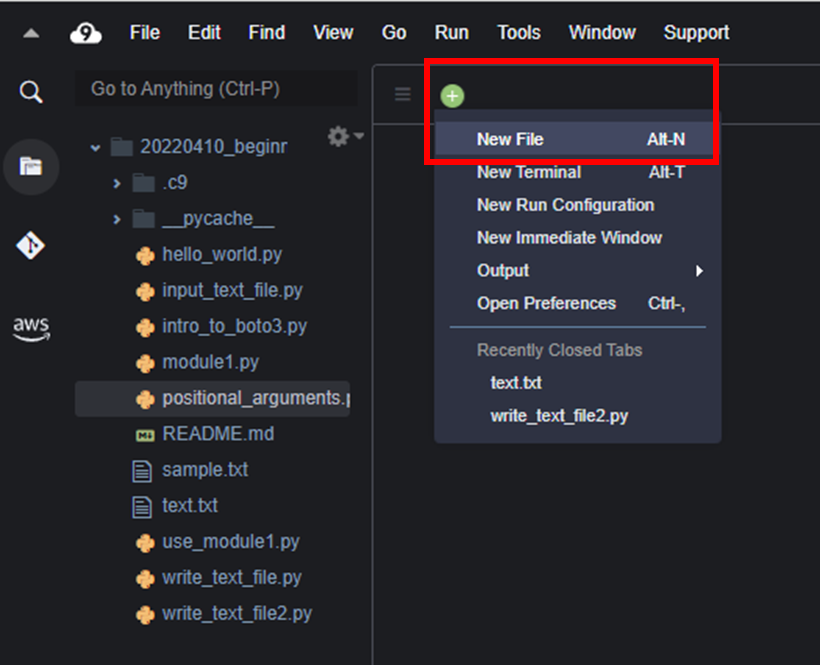
Cloud9 の画面上部で +ボタンを押し、New Fileで新しいテキストファイルを作成する。
テキストファイルには以下を入力する。
I want to be able to use Python!
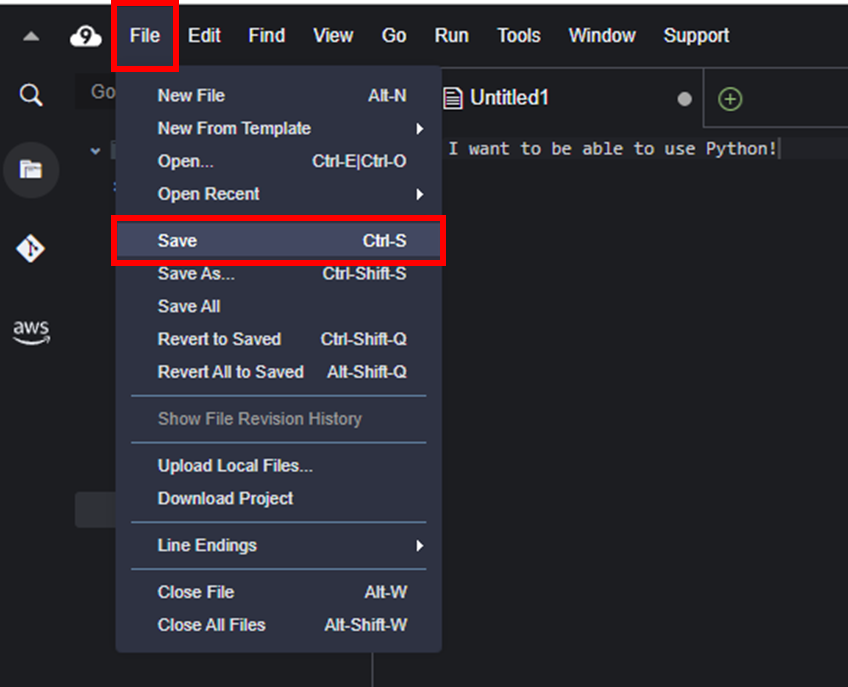
ファイルに名前を付けて保存する。[File]-[Save]から名前を付けて保存する。
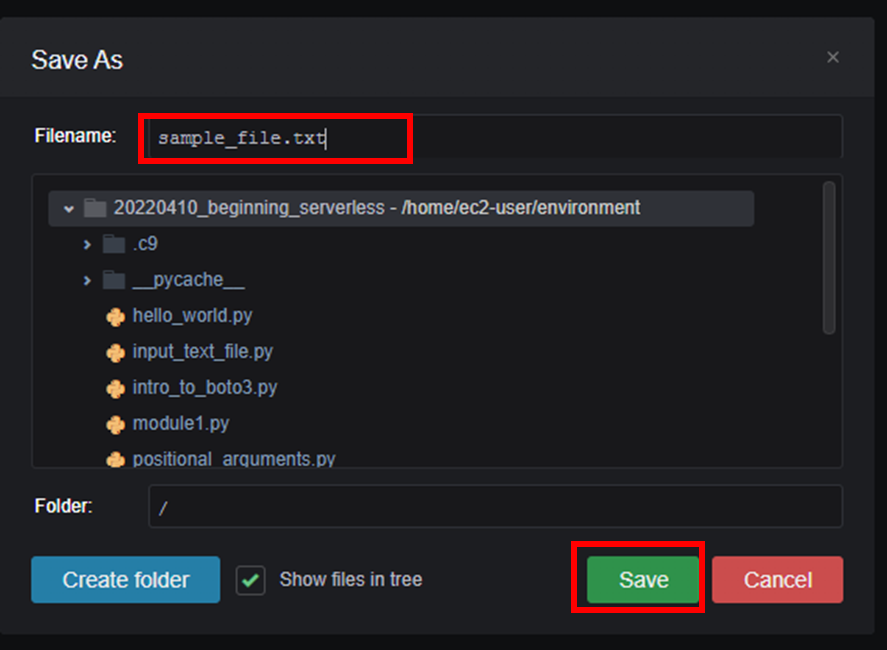
今回は sample_file.txt と名前を付けて保存する。
このファイルをS3 バケットにアップロードする。
今回は Cloud9 で利用できるAWS ツールキットを利用してS3 バケットにファイルをアップロードする。
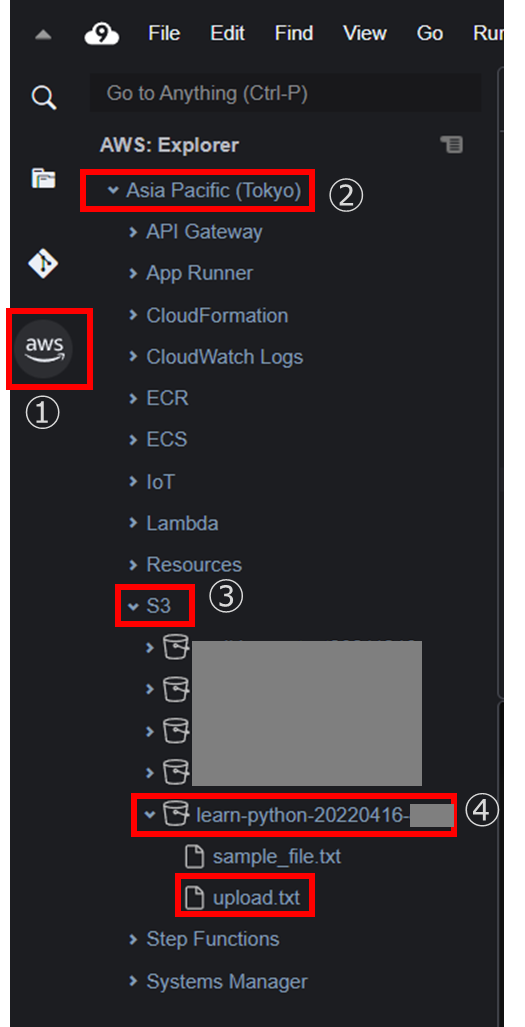
Cloud9 画面左のAWSロゴマークをクリックし、[Asia Pacific(Tokyo)]-[S3]-[<1-1.S3バケットの作成で作成したバケット名>]の順に選択する。
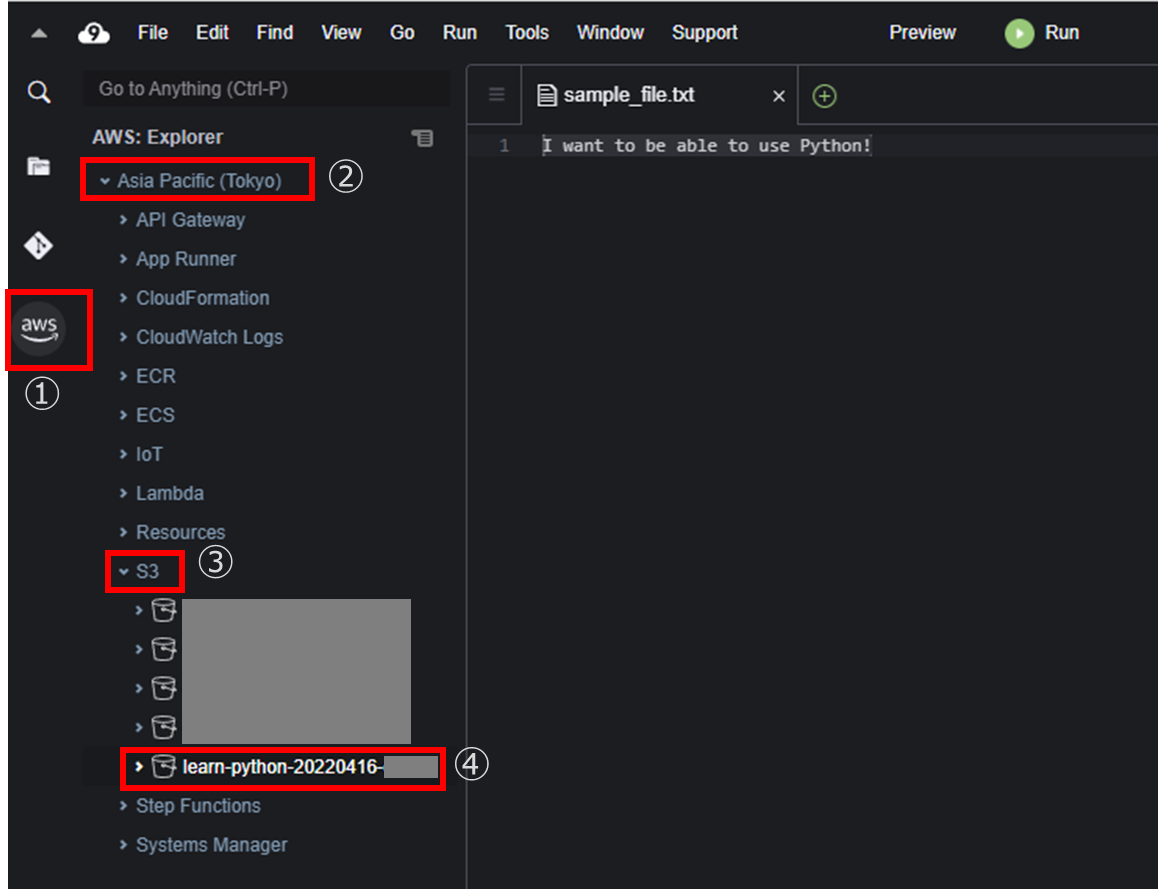
バケット名を右クリックし[Upload Files…]をクリックする。

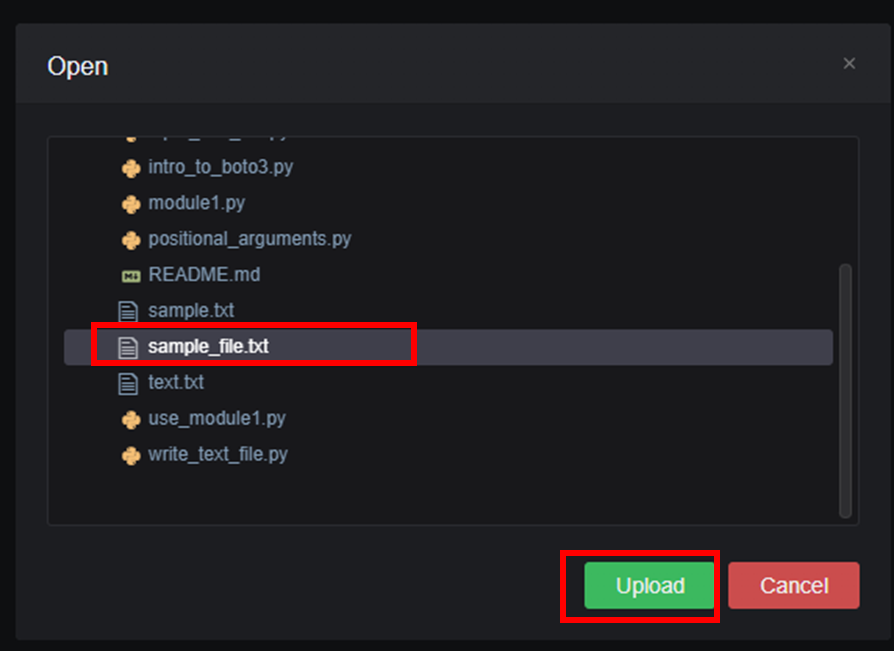
先ほど作成したsample_file.txtを選択し「Upload」する。
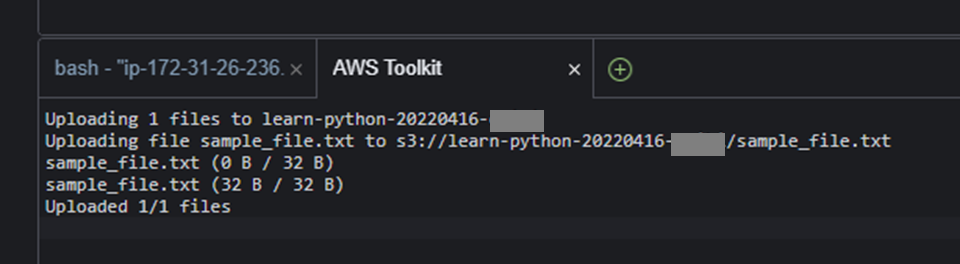
これで作成した S3バケットに sample_file.txt をアップロードできた。
1-3.Boto3を使ってS3のファイルを読み込む
Cloud9 で read_file.py というファイルを作成していく。
Boto3のS3に関するドキュメントを見ると、S3.Clientを使ってclientを定義した後、Client.get_object()を使ってファイルをダウンロードできることがわかる。
Boto3のS3に関するドキュメント↓
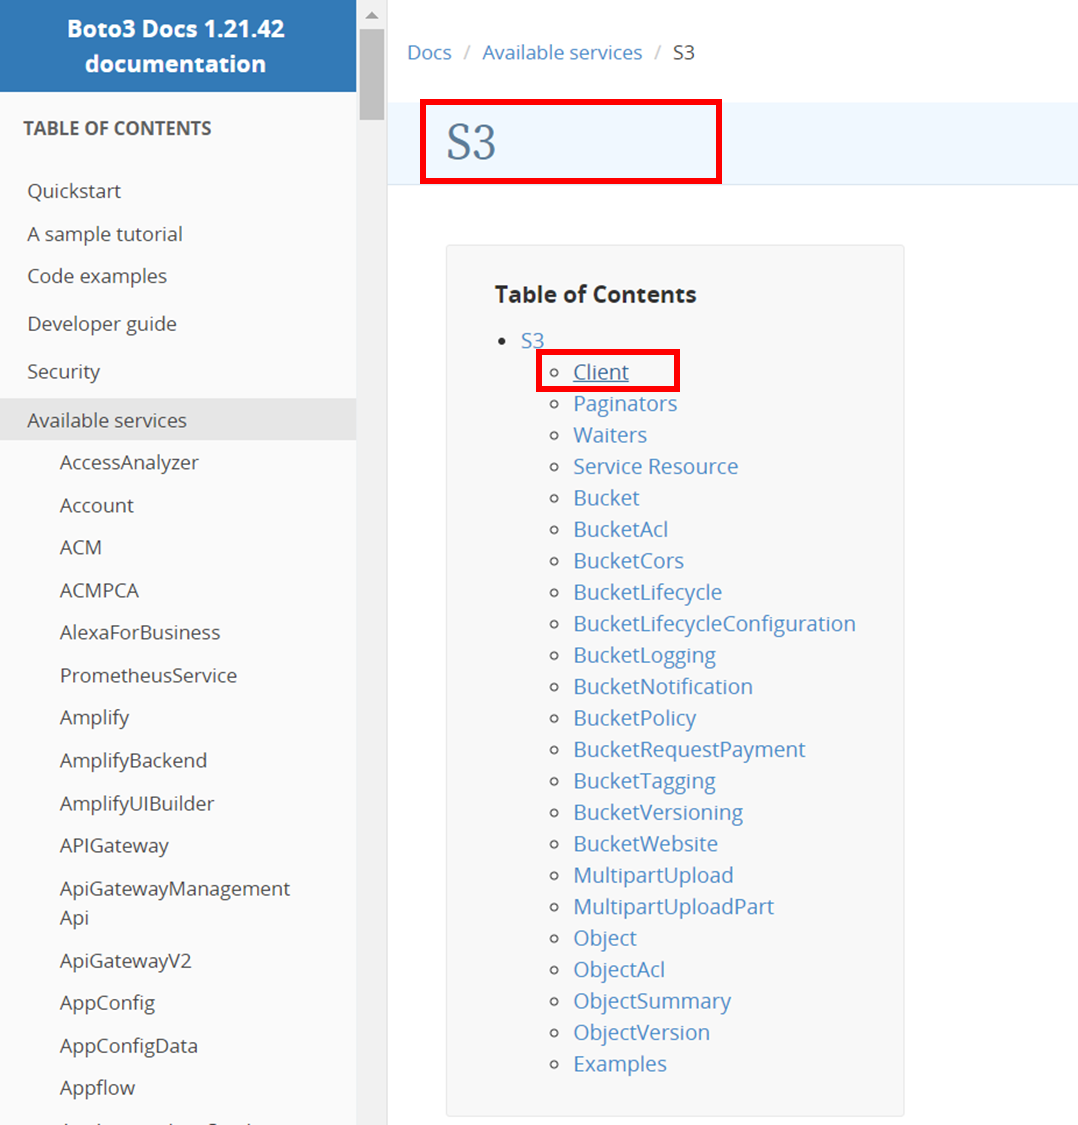
S3.Client↓
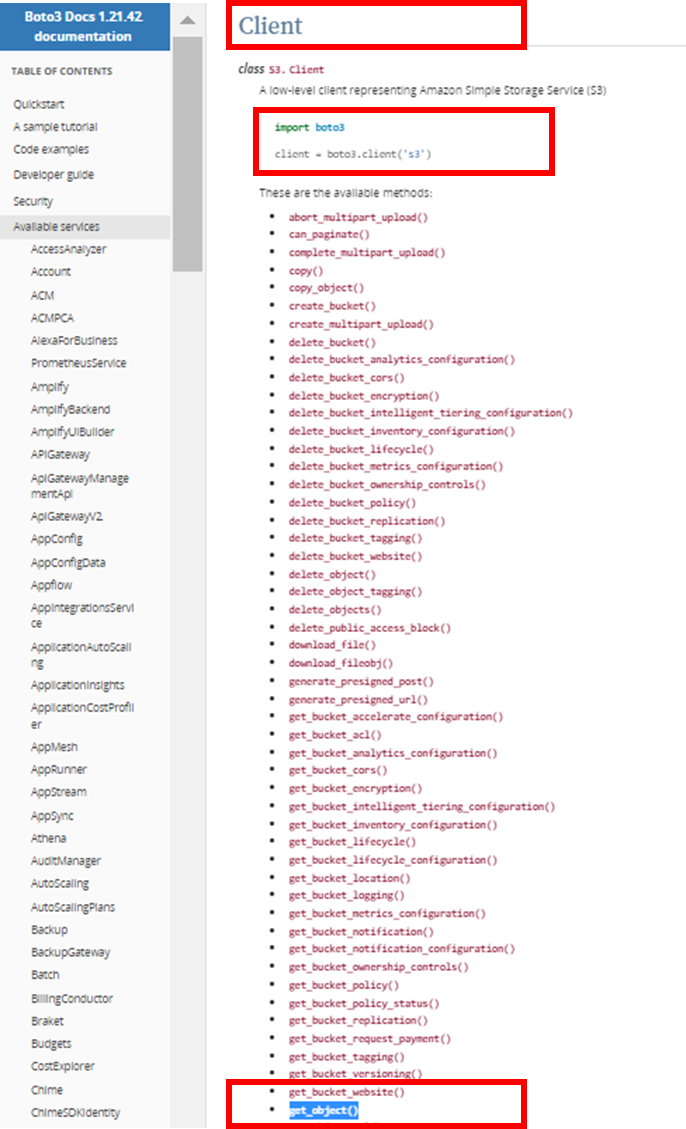
import boto3

client = boto3.client('s3')
Client.get_object()↓
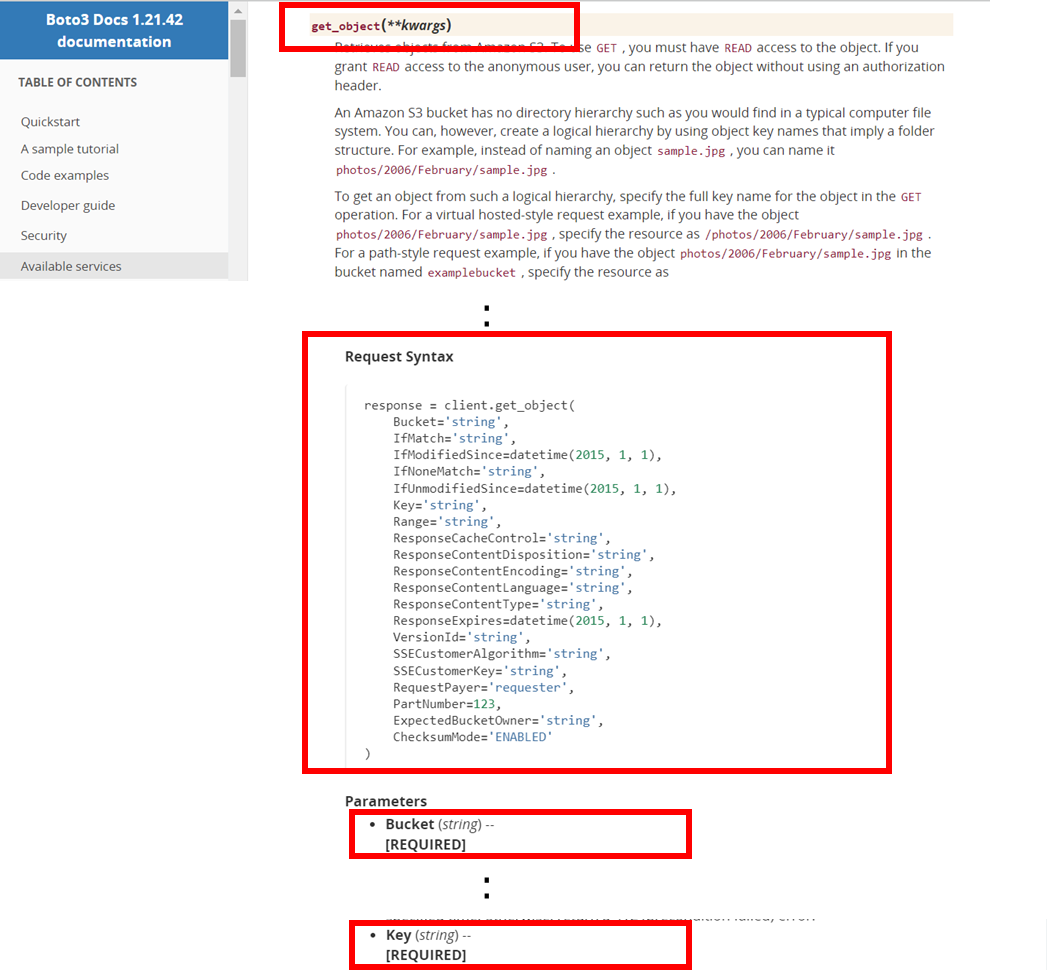
response = client.get_object(
    Bucket='string', # [REQUIRED]
    Key='string', # [REQUIRED]
)
まず、以下のようにread_file.pyを記述して保存する。
import boto3

def read_s3_file():
    s3_client = boto3.client('s3')
    input_object = s3_client.get_object(
    Bucket='<1-1.S3バケットの作成で作成したバケット名>',
    Key='sample_file.txt',
    )

    print('Responce:', input_object)

read_s3_file()
Cloud9 画面下部のTerminalで以下コマンドを実行し、read_file.pyを実行する。
python read_file.py
実行結果
Responce: {'ResponseMetadata': {'RequestId': 'X7R9QCxxxxxxxxxx', 'HostId': 'm/Vl1mnBeyWFDF7xFlk5BPAVkvZA9FqAu0Qh+8sPaQhE9U12pMJqX6i46Ws1fhZ6Iqxxxxxxxxxx', 'HTTPStatusCode': 200, 'HTTPHeaders': {'x-amz-id-2': 'm/Vl1mnBeyWFDF7xFlk5BPAVkvZA9FqAu0Qh+8sPaQhE9U12pMJqX6i46Ws1fhZ6Iqxxxxxxxxxx', 'x-amz-request-id': 'X7R9QCxxxxxxxxxx', 'date': 'Sat, 16 Apr 2022 13:28:31 GMT', 'last-modified': 'Sat, 16 Apr 2022 11:28:58 GMT', 'etag': '"3f7b97331fd7e588ee2e60xxxxxxxxxx"', 'accept-ranges': 'bytes', 'content-type': 'text/plain', 'server': 'AmazonS3', 'content-length': '32'}, 'RetryAttempts': 0}, 'AcceptRanges': 'bytes', 'LastModified': datetime.datetime(2022, 4, 16, 11, 28, 58, tzinfo=tzutc()), 'ContentLength': 32, 'ETag': '"3f7b97331fd7e588ee2e60xxxxxxxxxx"', 'ContentType': 'text/plain', 'Metadata': {}, 'Body': <botocore.response.StreamingBody object at 0x7fxxxxxxxxxx>}
次に、ファイルの中身を取り出す。
以下のようにread_file.pyを変更して保存する。
import boto3

def read_s3_file():
    s3_client = boto3.client('s3')
    input_object = s3_client.get_object(
    Bucket='<1-1.S3バケットの作成で作成したバケット名>',
    Key='sample_file.txt',
    )

    print('Responce:', input_object)
    input_object_byte = input_object['Body'].read()
    print('Byte:', input_object_byte)

read_s3_file()
実行結果
Responce: {'ResponseMetadata': {'RequestId': '1NHTFSxxxxxxxxxx', 'HostId': 'Sdc7A9A7RQzY+Go9UycTCAB6NgP2KpGnnCendmqOnY2H8QlYZmjGRJr5Wa+t2FvA+Txxxxxxxxxx', 'HTTPStatusCode': 200, 'HTTPHeaders': {'x-amz-id-2': 'Sdc7A9A7RQzY+Go9UycTCAB6NgP2KpGnnCendmqOnY2H8QlYZmjGRJr5Wa+t2FvA+Txxxxxxxxxx', 'x-amz-request-id': '1NHTFSxxxxxxxxxx', 'date': 'Sat, 16 Apr 2022 13:34:38 GMT', 'last-modified': 'Sat, 16 Apr 2022 11:28:58 GMT', 'etag': '"3f7b97331fd7e588ee2e60xxxxxxxxxx"', 'accept-ranges': 'bytes', 'content-type': 'text/plain', 'server': 'AmazonS3', 'content-length': '32'}, 'RetryAttempts': 0}, 'AcceptRanges': 'bytes', 'LastModified': datetime.datetime(2022, 4, 16, 11, 28, 58, tzinfo=tzutc()), 'ContentLength': 32, 'ETag': '"3f7b97331fd7e588ee2e60xxxxxxxxxx"', 'ContentType': 'text/plain', 'Metadata': {}, 'Body': <botocore.response.StreamingBody object at 0x7fxxxxxxxxxx>}
Byte: b'I want to be able to use Python!'
input_object_byte = input_object['Body'] で、Bodyを取り出して、botocore.response.StreamingBody.read()を使い、ファイルの中身を取り出した。
botocore.response.StreamingBodyの仕様はドキュメントに記載されている⇒Response Reference
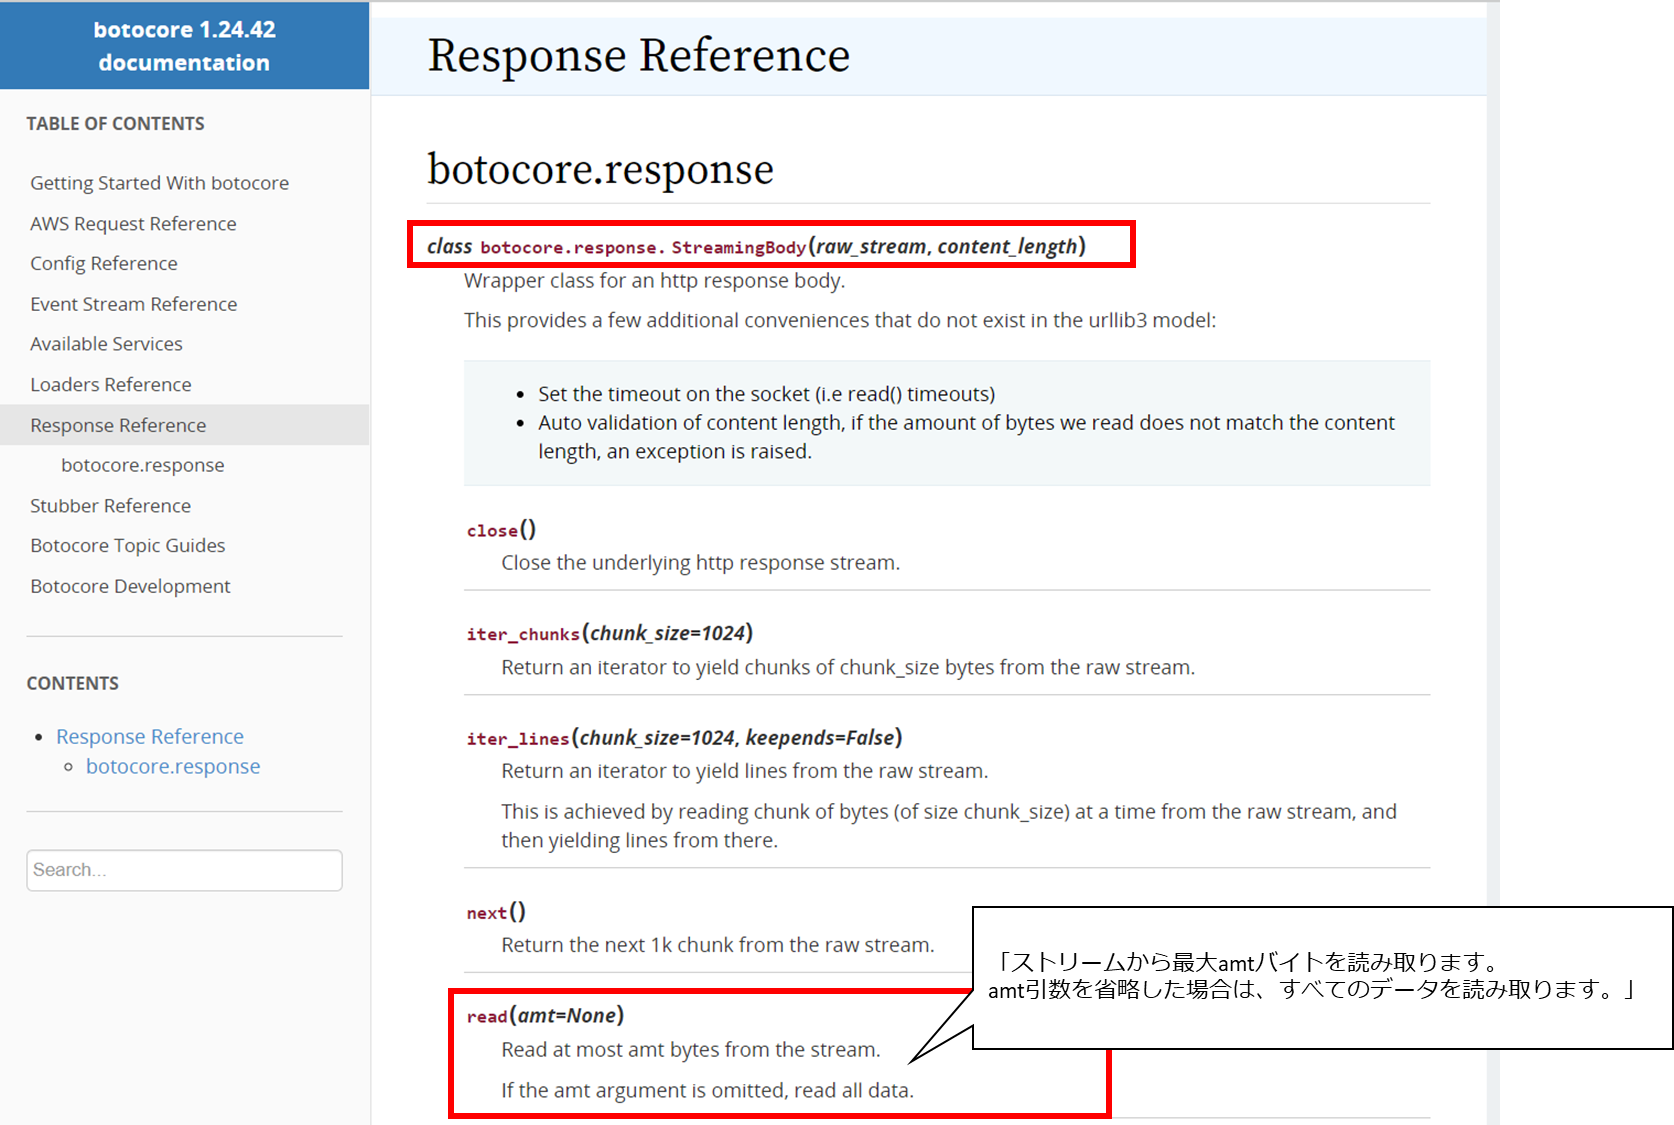
botocore.response.StreamingBody.read()の値は、先ほどの出力のByte:~の後の文字列。
Byte: b'I am learning to code.'
ここで、'I am learning to code.'の前のbは、ここでの出力がバイトオブジェクトであるという意味。
bytes.decode() を使ってstr型に変換できる。
以下のようにread_file.pyを変更して保存する。
import boto3

def read_s3_file():
    s3_client = boto3.client('s3')
    input_object = s3_client.get_object(
    Bucket='<1-1.S3バケットの作成で作成したバケット名>',
    Key='sample_file.txt',
    )

    print('Responce:', input_object)
    input_object_byte = input_object['Body'].read()
    print('Byte:', input_object_byte)
    input_object_text = input_object_byte.decode()
    print('str:', input_object_text)

read_s3_file()
実行結果
Responce: {'ResponseMetadata': {'RequestId': 'HPTKQHxxxxxxxxxx', 'HostId': 'DznSU7HNoWEFokVXHdOGbGKthpmLWLp1kNTV0VUty61N7jrqBBsYt24QtOOGkezUFjxxxxxxxxxx', 'HTTPStatusCode': 200, 'HTTPHeaders': {'x-amz-id-2': 'DznSU7HNoWEFokVXHdOGbGKthpmLWLp1kNTV0VUty61N7jrqBBsYt24QtOOGkezUFjxxxxxxxxxx', 'x-amz-request-id': 'HPTKQHxxxxxxxxxx', 'date': 'Sat, 16 Apr 2022 13:49:07 GMT', 'last-modified': 'Sat, 16 Apr 2022 11:28:58 GMT', 'etag': '"3f7b97331fd7e588ee2e60xxxxxxxxxx"', 'accept-ranges': 'bytes', 'content-type': 'text/plain', 'server': 'AmazonS3', 'content-length': '32'}, 'RetryAttempts': 0}, 'AcceptRanges': 'bytes', 'LastModified': datetime.datetime(2022, 4, 16, 11, 28, 58, tzinfo=tzutc()), 'ContentLength': 32, 'ETag': '"3f7b97331fd7e588ee2e60xxxxxxxxxx"', 'ContentType': 'text/plain', 'Metadata': {}, 'Body': <botocore.response.StreamingBody object at 0x7fxxxxxxxxxx>}
Byte: b'I want to be able to use Python!'
str: I want to be able to use Python!
出力のStr:以降が、S3 バケット内のオブジェクトから読み取ったテキストファイルに記載された文字列であることが確認できる。
2.S3バケットへファイルをアップロードする
2-1.Boto3でS3にファイルを作成する
Cloud9 で write_file.py というファイルを作成していく。
Boto3のS3に関するドキュメントを見ると、S3.Clientを使ってclientを定義した後、Client.put_object() を使ってファイルをダウンロードできることがわかる。
S3.Client↓
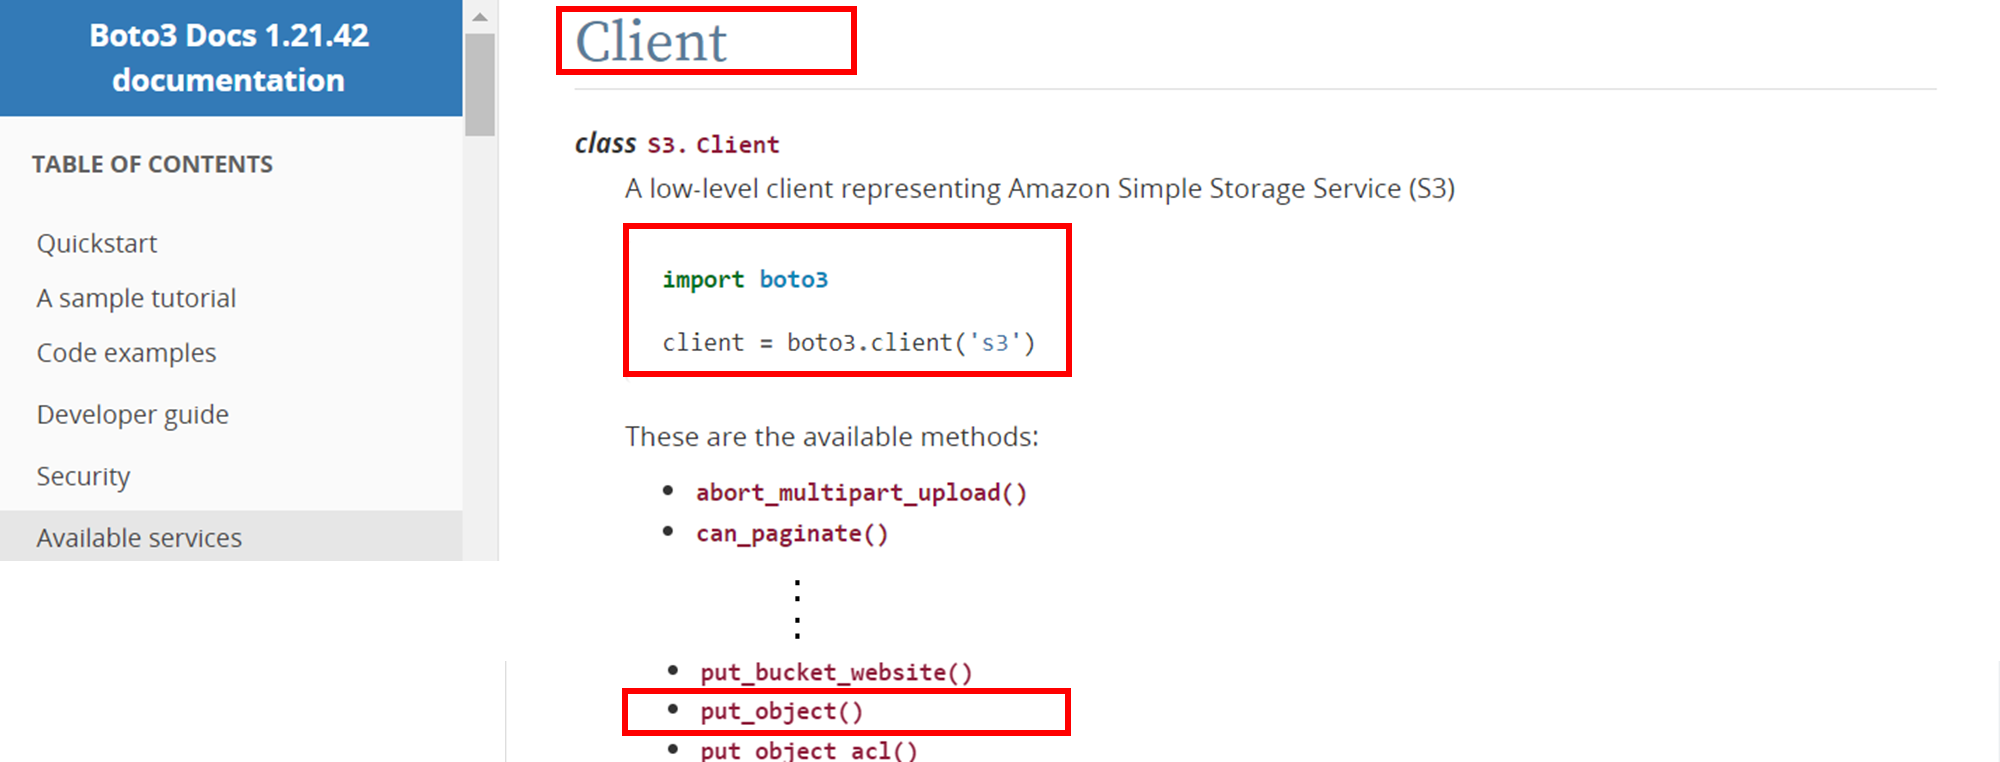
import boto3

client = boto3.client('s3')
Client.put_object()↓
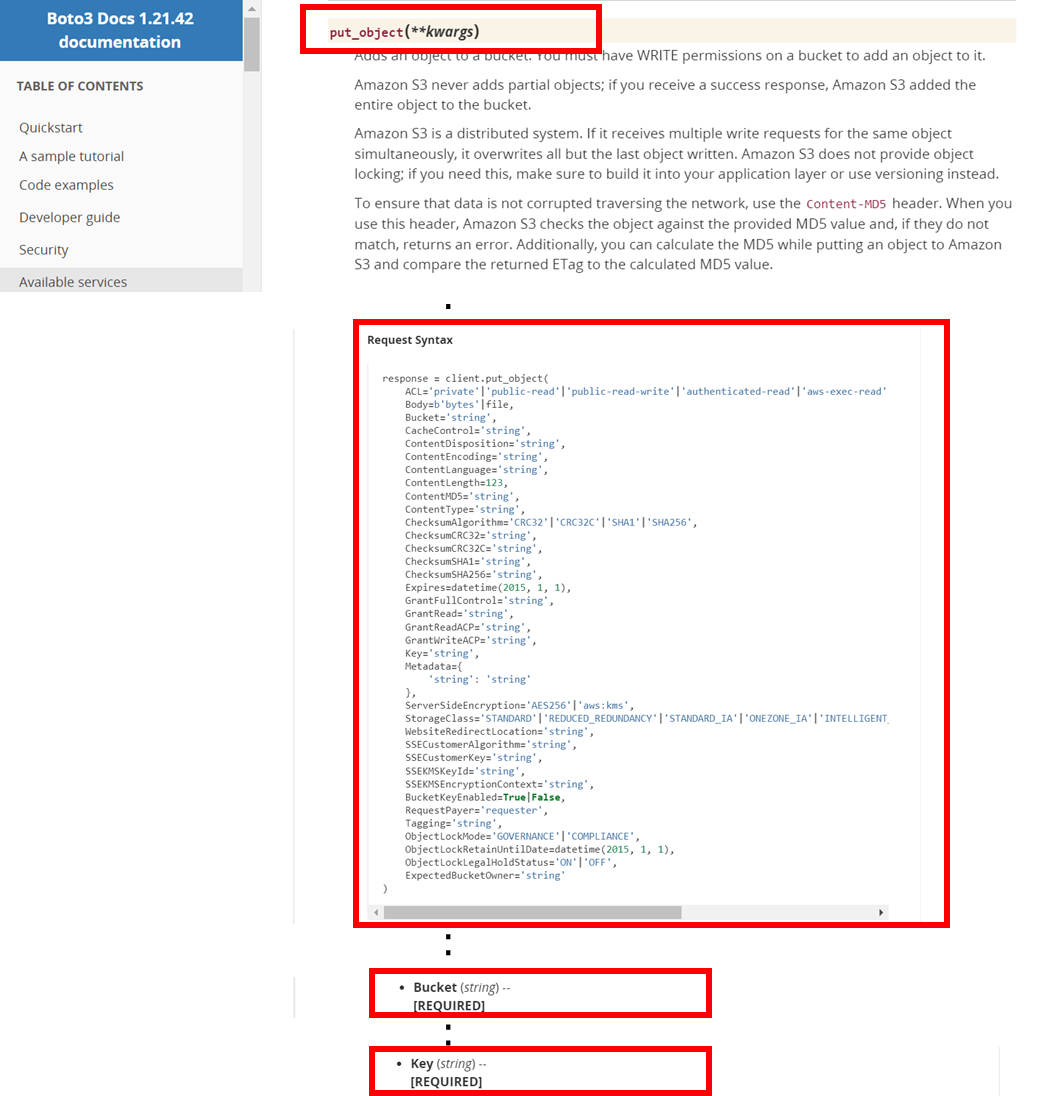
response = client.put_object(
    Bucket='string', # [REQUIRED]
    Key='string', # [REQUIRED]
    Body=b'bytes'|file,
)
以下のようにwrite_file.pyを記述して保存する。
import boto3

def write_s3_file():
    s3_client = boto3.client('s3')

    output_text = 'This is uploaded.'.encode()

    s3_client.put_object(
    Bucket='<1-1.S3バケットの作成で作成したバケット名>',
    Key='upload.txt',
    Body=output_text,
    )

write_s3_file()
output_text = 'This is uploaded.'.encode() 部について補足する。
Client.put_object() のRequest SyntaxのBodyは以下のようになっており、ファイルもしくはバイトオブジェクトを要求している。
Body=b'bytes'|file,
通常の文字列を渡すとエラーになるので、Pythonのstr型が持っている関数encode() を使ってバイトオブジェクトに変換して渡している。
Cloud9 画面下部のTerminalで以下コマンドを実行し、write_file.pyを実行する。
python write_file.py
Terminal上には実行結果は何も表示されない。エラーなく実行できればOK。
Cloud9 で利用できるAWS ツールキットを利用してS3 バケットにファイルがアップロードされたか確認する。
Cloud9 画面左のAWSロゴマークをクリックし、[Asia Pacific(Tokyo)]-[S3]-[<1-1.S3バケットの作成で作成したバケット名>]の順に選択する。upload.txtがアップロードされているのが確認できる。
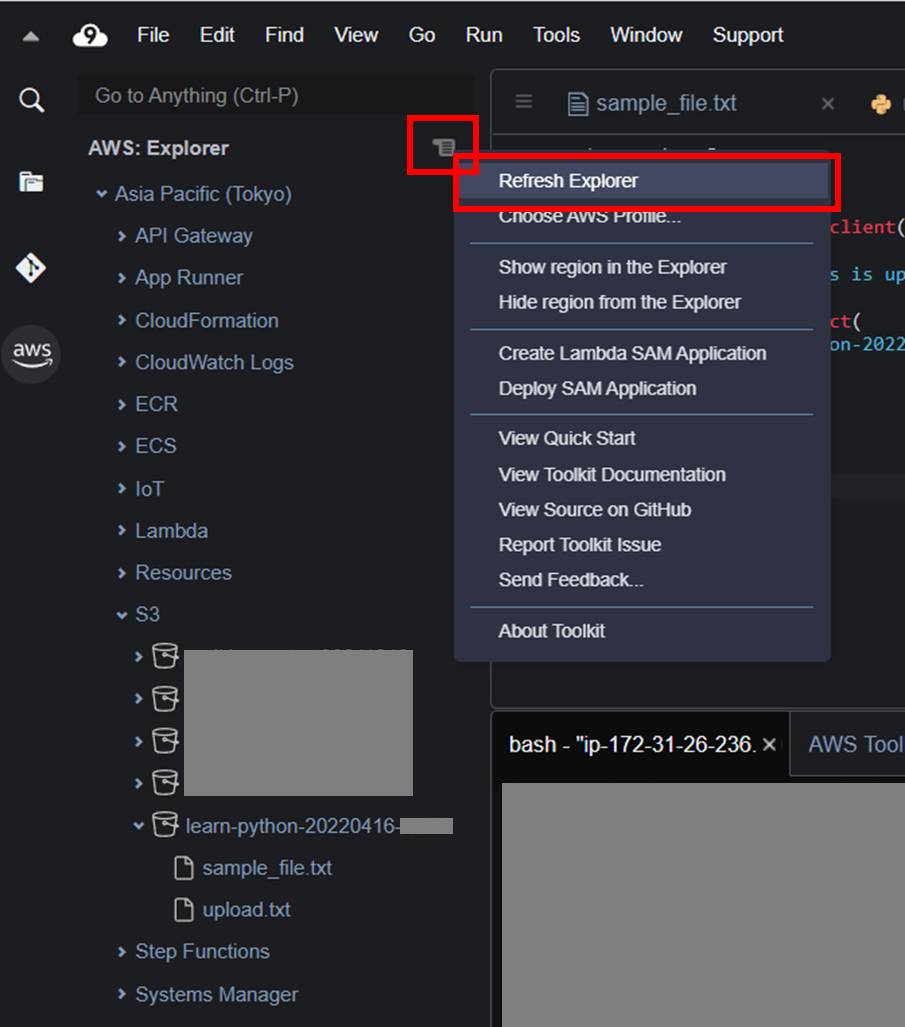
アップロードされているのが確認できなければ、AWS ツールキットメニュー右上のファイルのようなマークを右クリックし、Refresh Explorerをクリックして更新する。
参考
- AWSツールキット
- S3.Client.get_objec
- botocore.response.StreamingBodyの仕様
- バイトオブジェクト
- bytes.decode
- Client.put_object()
AWS Cloud9でPython基礎
AWS Cloud9でPython基礎~ファイルの読み書き
AWS LambdaでPython基礎
AWS Cloud9でPython基礎~Amazon S3を利用する
AWS Cloud9でPython基礎~Amazon S3とAmazon Translateを利用する
AWS LambdaでPython基礎~Amazon S3とAmazon Translateを利用する