2022/4/6(水)に行われたAWSセミナー「Pythonの基礎から学ぶ!サーバーレス開発はじめの一歩」で学んだPython基礎部分の復習。
1.AWS Cloud9セットアップ
Cloud9を起動。適当に名前を付けて他はすべてデフォルト値でCloud9を起動する。
2.Python基礎
Pythonの以下トピックについて学ぶ。
- データ型
- 関数
- モジュール
- 引数とパラメータ
2-1.データ型
データ型は以下4種。
- 文字列型
- 整数型
- 辞書型
- リスト型
Cloud9の画面下部Terminalでpythonを実行できるので、pythonと打ち込んで対話モードにしておく。
$ python
Python 3.7.10 (default, Jun  3 2021, 00:02:01)
[GCC 7.3.1 20180712 (Red Hat 7.3.1-13)] on linux
Type "help", "copyright", "credits" or "license" for more information.
>>>
>>>の先に打ち込んでいく。
2-1-1.文字列型(str)
二重引用符でも一重引用符でも構わない。
- 二重引用符の中で一重引用符を使いたいとき
- 一重引用符の中で二重引用符を使いたいとき
に使用する。
>>>str1 = "It's showtime!!"
>>>str2 = 'str形の中で"二重引用符"が使える。'
>>>print(str1)
It's showtime!!
>>>print(str2)
str形の中で"二重引用符"が使える
変数の中身が文字列型の場合、+でつなげて出力できる。
>>>first_name = "Trou"
>>>last_name = "Tanaka"
>>>print(last_name + first_name)
TanakaTrou
>>>print(last_name + " " + first_name)
Tanaka Trou
2-1-2.整数型(int)
整数型(integer)。
>>>int1 = 50
>>>sentence = "The total comes to:"
print(sentence + str(int1))
文字列型と整数型を同時に出力する場合、上記のように整数型を文字列型に変換する。
2-1-3.辞書型(dict)
辞書型(dictionary)はキー(Key)と値(Value)のペア。
APIからの応答はJSON形式で帰ってくることが多く、辞書型はよく使う。
>>>user1 = {"first_name" : "Jiro"}
>>>print(user1)
{'first_name': 'Jiro'}
値の追加。
>>>print(user1["first_name"])
Jiro
>>>user1["family_name"] = "Suzuki"
>>>print(user1)
{'first_name': 'Jiro', 'family_name': 'Suzuki'}
値の更新。
>>>user1["first_name"] = "Saburo"
>>> print(user1)
{'first_name': 'Saburo', 'family_name': 'Suzuki'}
2-1-4.リスト型
カンマ区切りの値の連続。
>>>num = [0,1,2,3]
>>>fruit = ["apples","oranges","blueberries"]
>>>print(num)
[0, 1, 2, 3]
>>> print(fruit)
['apples', 'oranges', 'blueberries']
>>>print(fruit[1])
oranges
>>>fruit[0] = "bananas"
>>> print(fruit)
['bananas', 'oranges', 'blueberries']
Cloud9でPythonの対話型モードを終了するにはCtr+dを押す。
2-2.関数
関数とは
処理を定義したもの。
引数を受け取って関数で処理し、戻り値を返す。
Pythonには以下関数がある。
- ユーザー定義関数:自分で定義して使う関数
- 組み込み関数:もともと組み込まれていてすでに使える関数(print()など)
2-2-1.Cloud9で関数を作成する
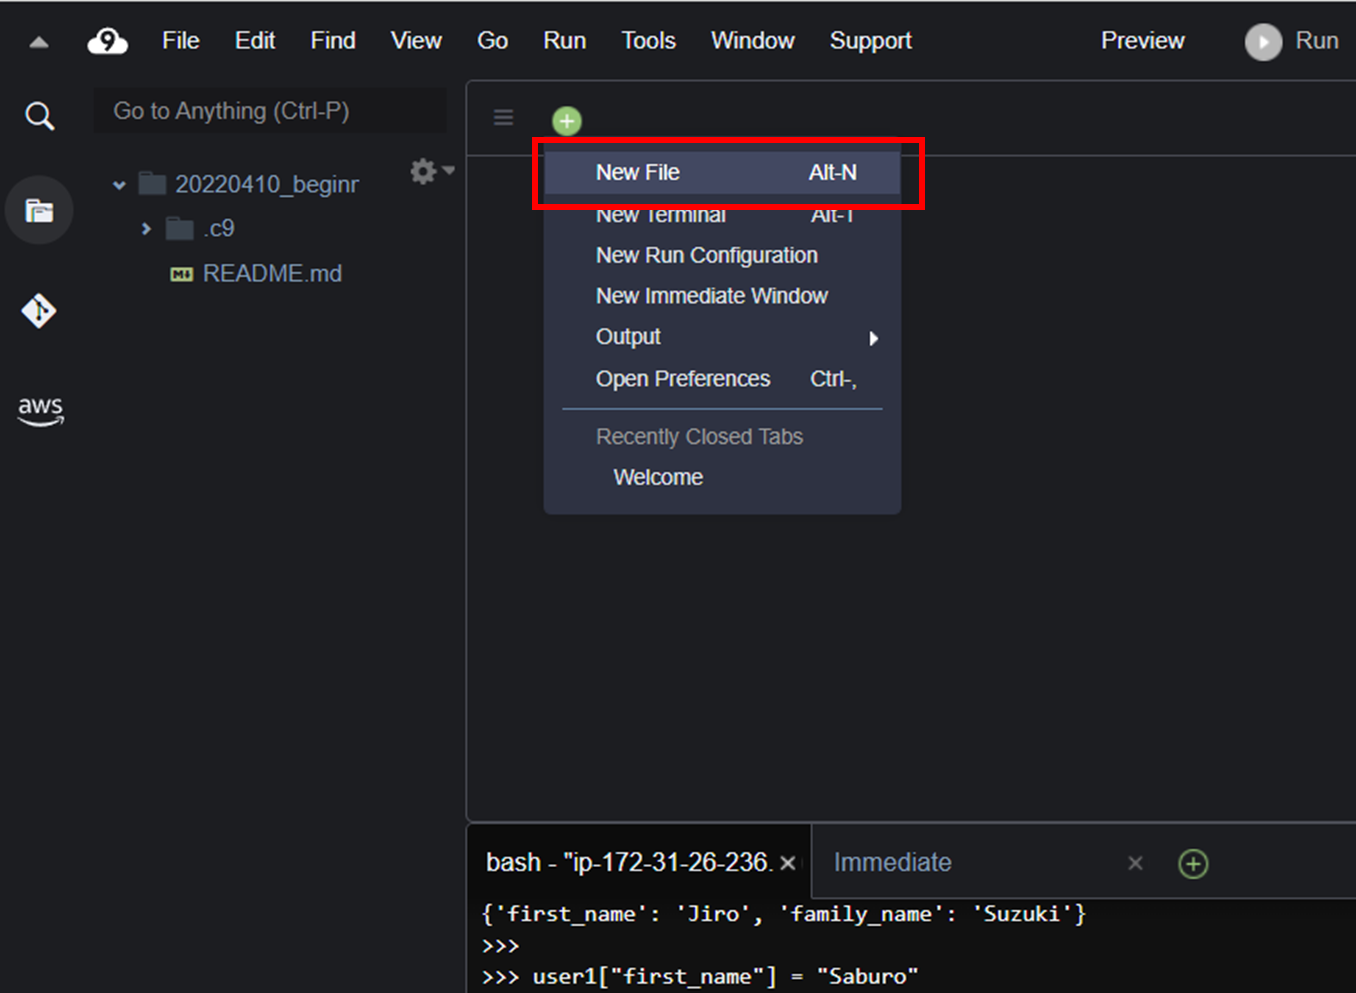
Cloud9画面上部で「New File」をクリックして新しいファイルを開く。
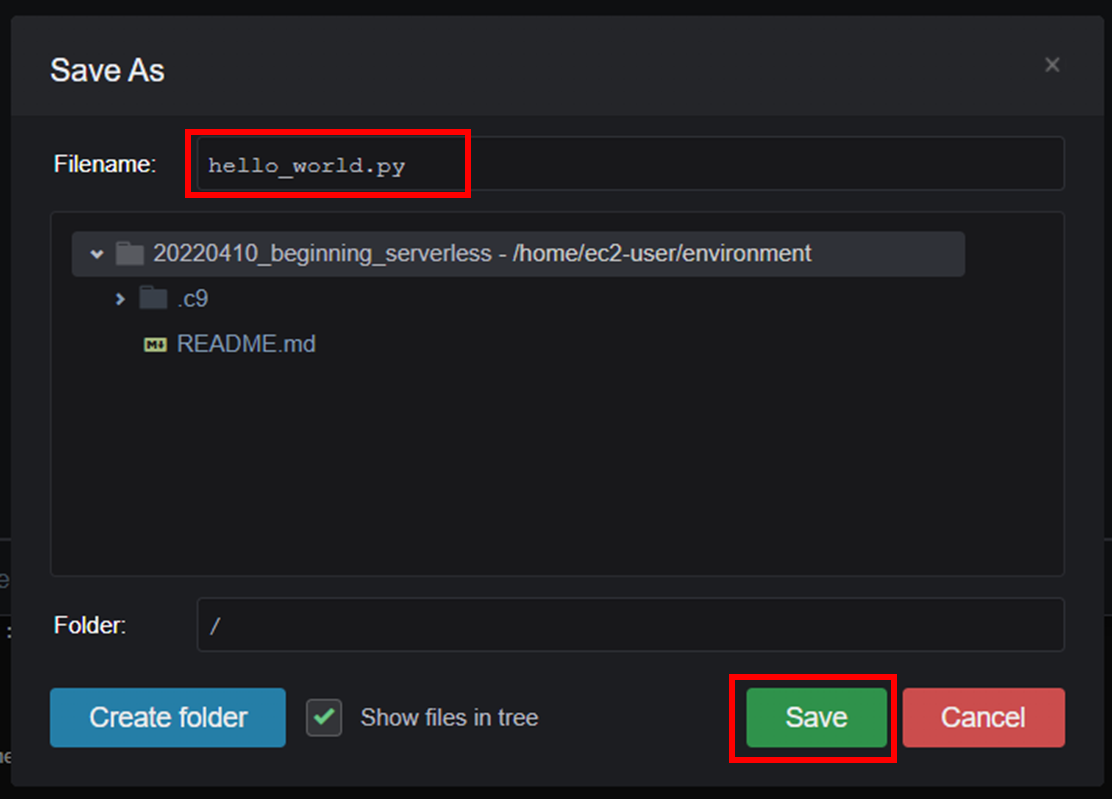
[File]-[Save]をクリックし、「hello_world.py」と名前をつけて保存すると、Python形式でファイルの編集ができるようになる。
以下のようにファイルを編集して保存する。
# Hello World!!を表示する関数
def hello_world():
    print('Hello World!!')

# 関数'hello_world'を呼ぶ
hello_world()
Cloud9画面下部のTerminalでpython hello_world.pyと入力し実行すると、hello_world.pyが実行され、Pythonファイルに書かれたhello_world関数の実行結果が返ってくる。
$ python hello_world.py
Hello World!!
2-2-2.戻り値を持つ関数を作成する
hello_world.pyを以下のように変更し上書き保存する。
# Hello World!!を表示する関数
def hello_world():
    return 'Hello World!!'

# hello_world()関数を変数に代入する
greeting = hello_world()
print(greeting)
再度hello_world.pyを実行すると、変数greetingの値が返ってくる。
2-3.モジュール
Pythonでは、他のファイルに書かれた関数などの定義を読み込むことができる。このファイルをモジュールという。モジュールは以下の種類がある。
- 自作モジュール
- ユーザ自身で作成する
- 標準モジュール
- すでにPythonに同梱されている ⇒Python 標準ライブラリ
- 外部モジュール
- The Python Package Index (PyPI)に登録されているモジュール。
- pipコマンドでインストールできる
2-3-1.自作モジュールを作って呼び出す
以下module1.pyという新しいファイルを作成し保存する。
# こんにちは!を返す関数
def hello_world():
    return 'こんにちは!'
モジュールを読み込んで実行するファイルを作成する。
以下use_module1.pyという新しいファイルを作成し保存する。
import module1

greeting = module1.hello_world()
print(greeting)
Cloud9下部のTerminalでuse_module1.pyを実行する。
$ python use_module1.py
こんにちは!
2-3-2.外部モジュールBoto3を利用する
外部モジュールの一つであるBoto3を利用する。
Boto3をCloud9環境にインストールする。
$ pip install boto3
Successfully installed boto3-x.xx.xx botocore-x.xx.xx s3transfer-x.x.xと表示されたらインストール完了。pipでインストールしたモジュールはローカルに保存される。保存場所はpip show <モジュール名>で確認できる。
$ pip show boto3
Name: boto3
Version: 1.21.37
Summary: The AWS SDK for Python
Home-page: https://github.com/boto/boto3
Author: Amazon Web Services
Author-email: None
License: Apache License 2.0
Location: /home/ec2-user/.local/lib/python3.7/site-packages
Requires: jmespath, s3transfer, botocore
Required-by:
余談:pip freeze
pip freezeコマンドで、環境にインストールされたすべてのパッケージが表示できる。
コードがほかの環境で実行されるとき、同じパッケージがインストールされた環境を整えるために、pip freezeコマンドの実行結果をrequirements.txtに書き出しておく。
$ pip freeze > requirements.txt
他の環境でrequirements.txtに記載されたパッケージをすべてインストールするには以下コマンドを実行すればよい。
pip install -r requirements.txt
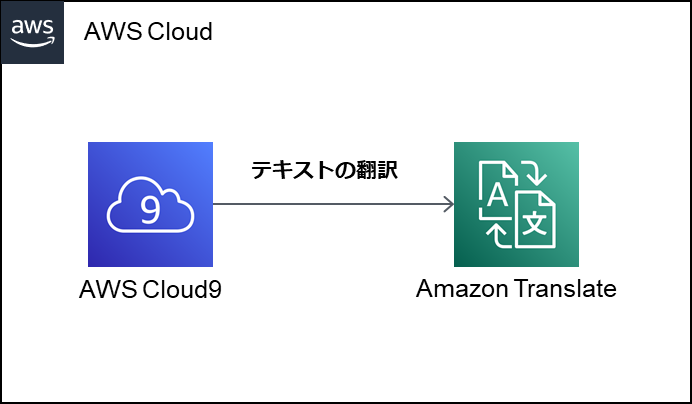
2-3-3.Amazon Translateを使う
Cloud9からPythonでAmazon Translateを使う。
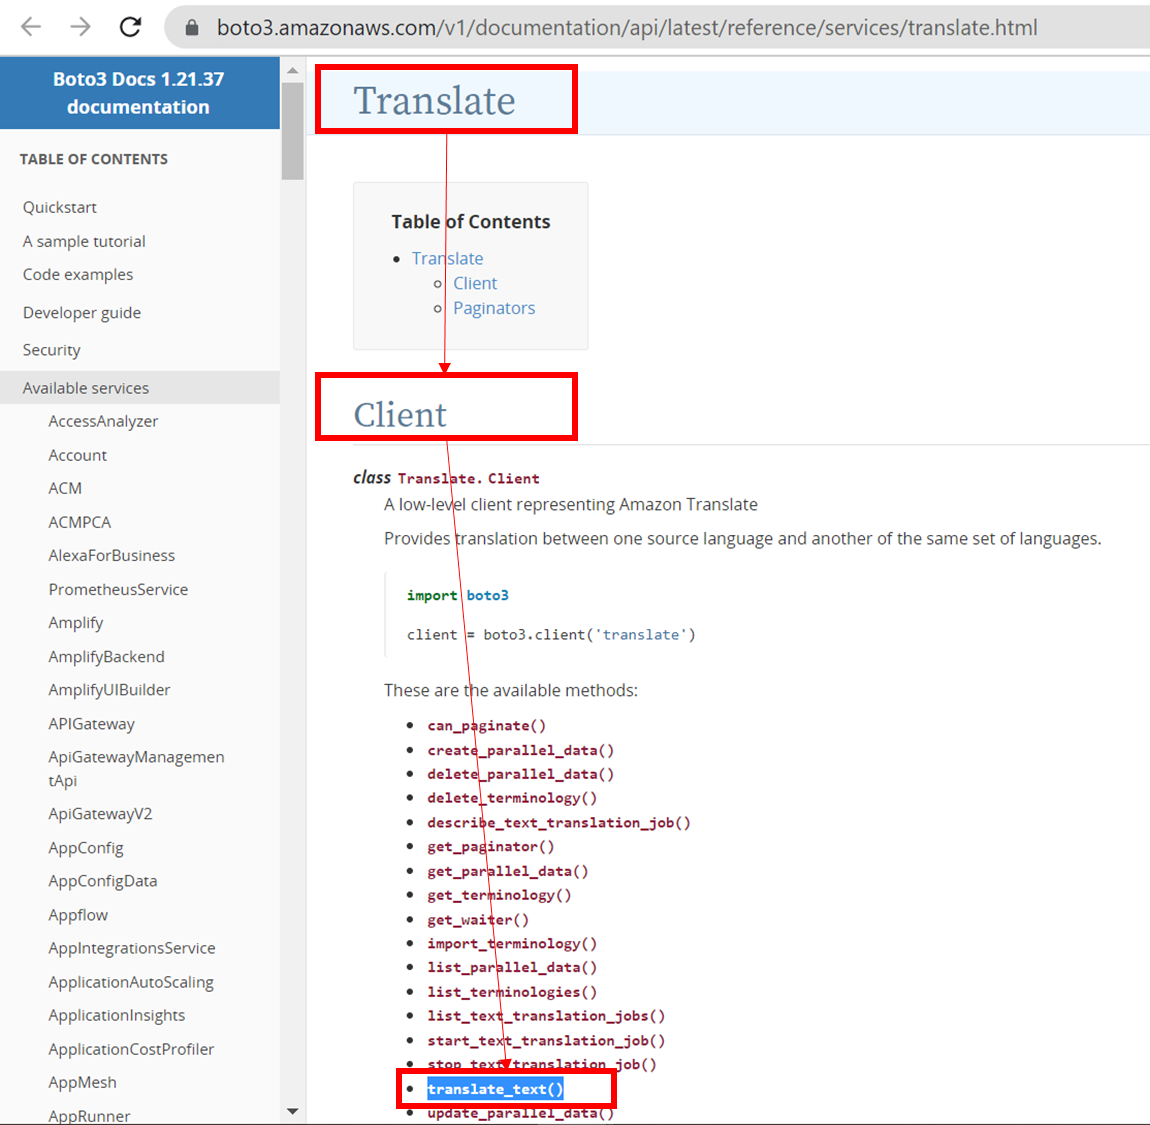
Boto3 Amazon Translateのドキュメントを参照する。boto3パッケージ内の「Translate」サービスを見る。「Client」セクションに、PythonでAmazon Translateを使用する方法が記載されている。今回はtranslate_text()メソッドを使用する。
translate_text()メソッドの項目に飛ぶと、「Request Syntax(リクエスト構文)」という項目がある。translate_text()メソッドはこのような構文で使えることがここからと読み取れる。

「Parameters」セクションを見ると、「[REQUIRED](必須)」パラメータが3つあることが読み取れる。
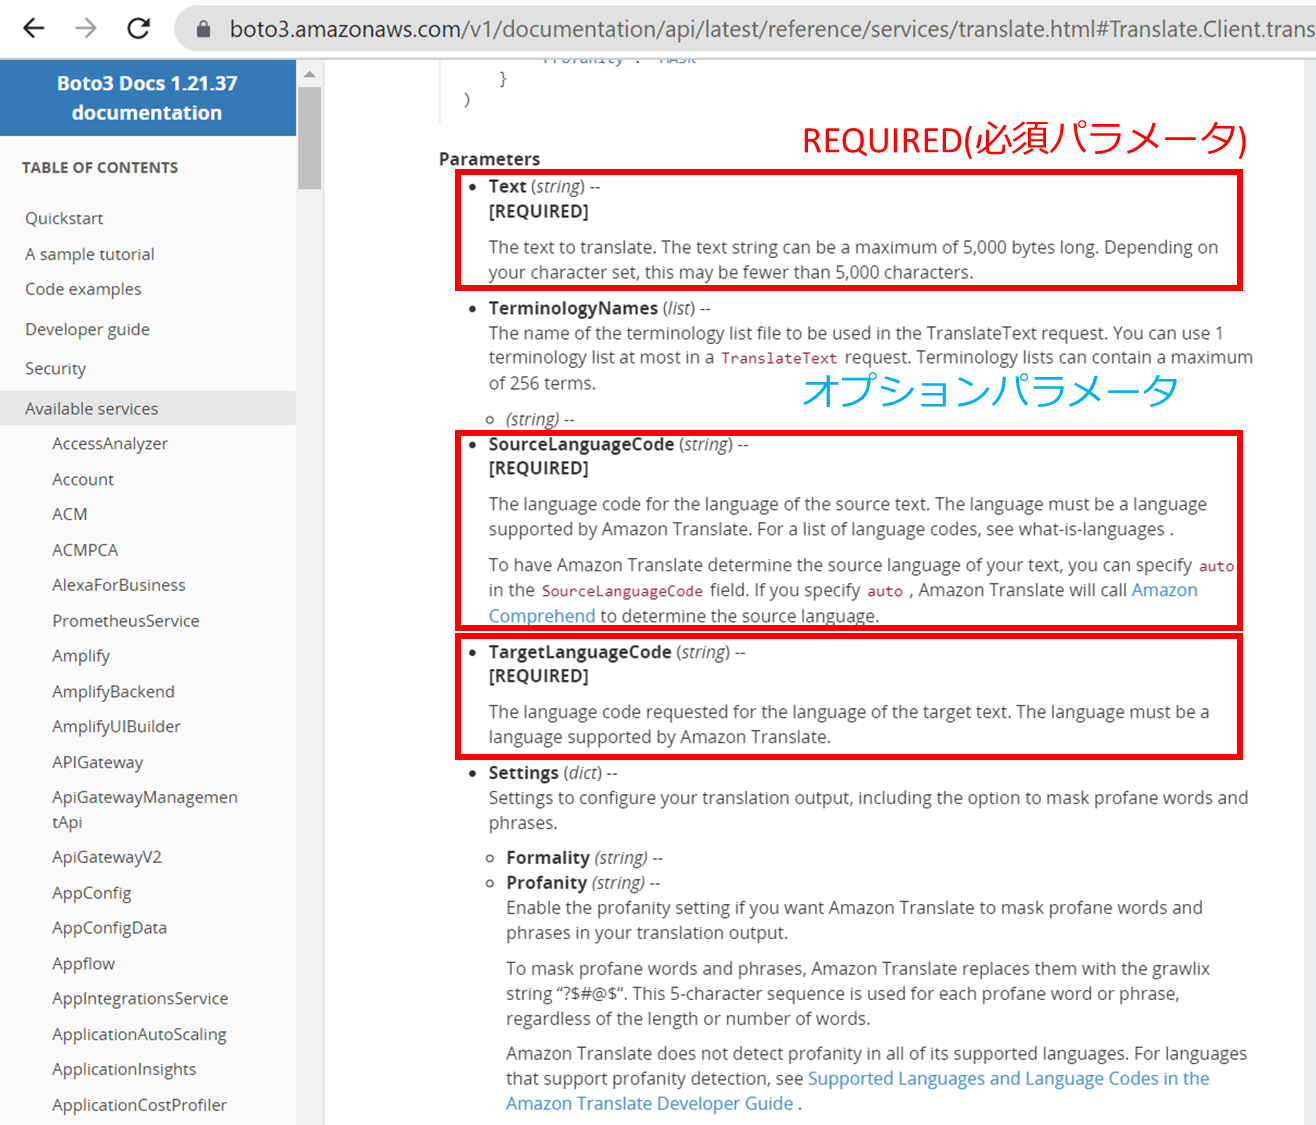
今回は以下パラメータを使う。
- Text (string) --[REQUIRED]
- SourceLanguageCode (string) --[REQUIRED]
- TargetLanguageCode (string) --[REQUIRED]
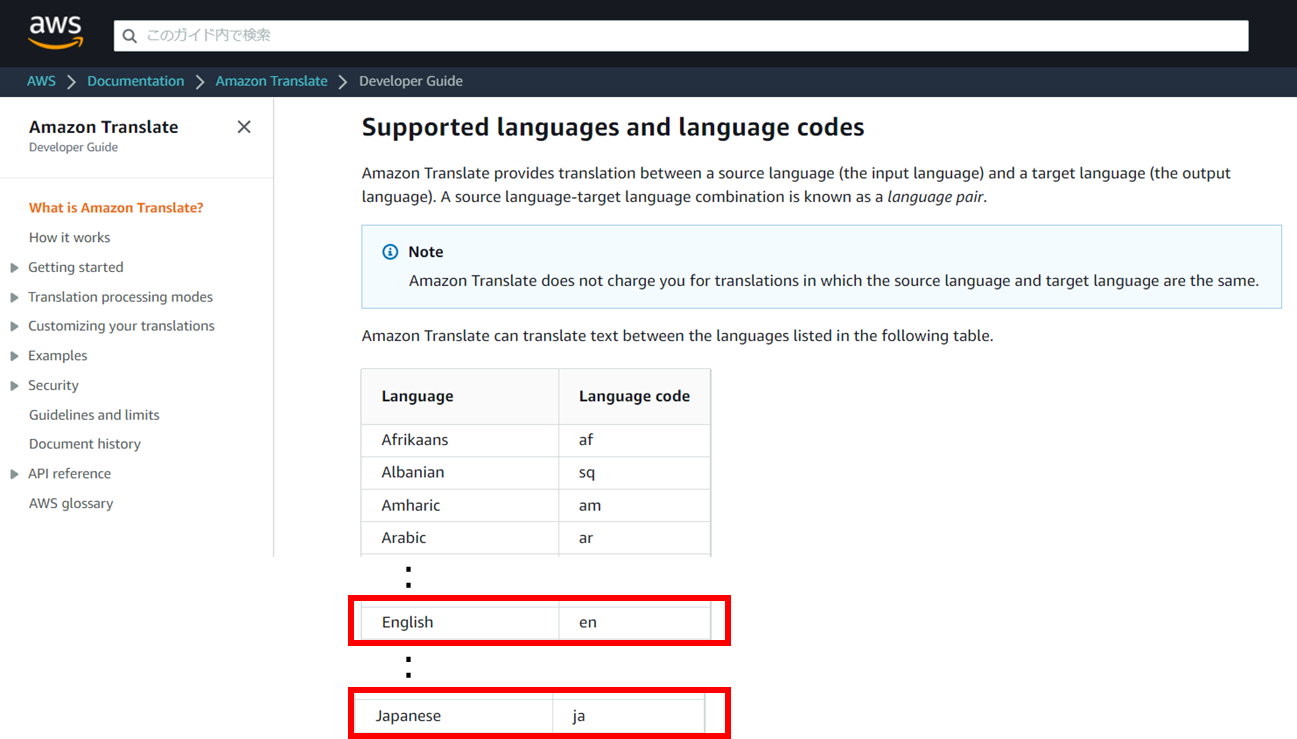
SourceLanguageCode と TargetLanguageCode にどんな値を入れるかはSupported languages and language codes(サポートされている言語とコード)を確認する。
今回は英語(en)⇒日本語(ja)に翻訳する。
新規で以下intro_to_boto3.pyというファイルを作成する。
# boto3パッケージを使うように指定する
import boto3

# boto3パッケージ内のどのサービスを使用するか指定する
client = boto3.client('translate')

# honyaku関数の宣言
def honyaku():

    # translate_text()メソッド項目の「Request Syntax(リクエスト構文)」を参考に、パラメータを指定する
    response = client.translate_text(
        Text='I want to be able to use Python!', # 翻訳したい英文を入力する
        SourceLanguageCode='en', # 元の言語コード
        TargetLanguageCode='ja'  # 翻訳した後の言語コード
        )
    # honyaku()関数はここまで

    # honyaku()関数の中にある変数 response の内容を出力
    print(response)

# honyaku()関数の呼び出し
honyaku()
Cloud9画面下部のTerminalでintro_to_boto3.pyを実行すると、以下出力が得られる。
$ python intro_to_boto3.py
{'TranslatedText': 'Pythonを使えるようになりたい!', 'SourceLanguageCode': 'en', 'TargetLanguageCode': 'ja', 'ResponseMetadata': {'RequestId': '197b19a8-5d4a-4855-9ef6-07933269a686', 'HTTPStatusCode': 200, 'HTTPHeaders': {'x-amzn-requestid': '197b19a8-5d4a-4855-9ef6-07933269a686', 'cache-control': 'no-cache', 'content-type': 'application/x-amz-json-1.1', 'content-length': '115', 'date': 'Sun, 10 Apr 2022 10:35:49 GMT'}, 'RetryAttempts': 0}}
Response Syntax(応答構文)を参照すると、client.translate_text()がdict型(辞書型)でデータを返すことがわかる。
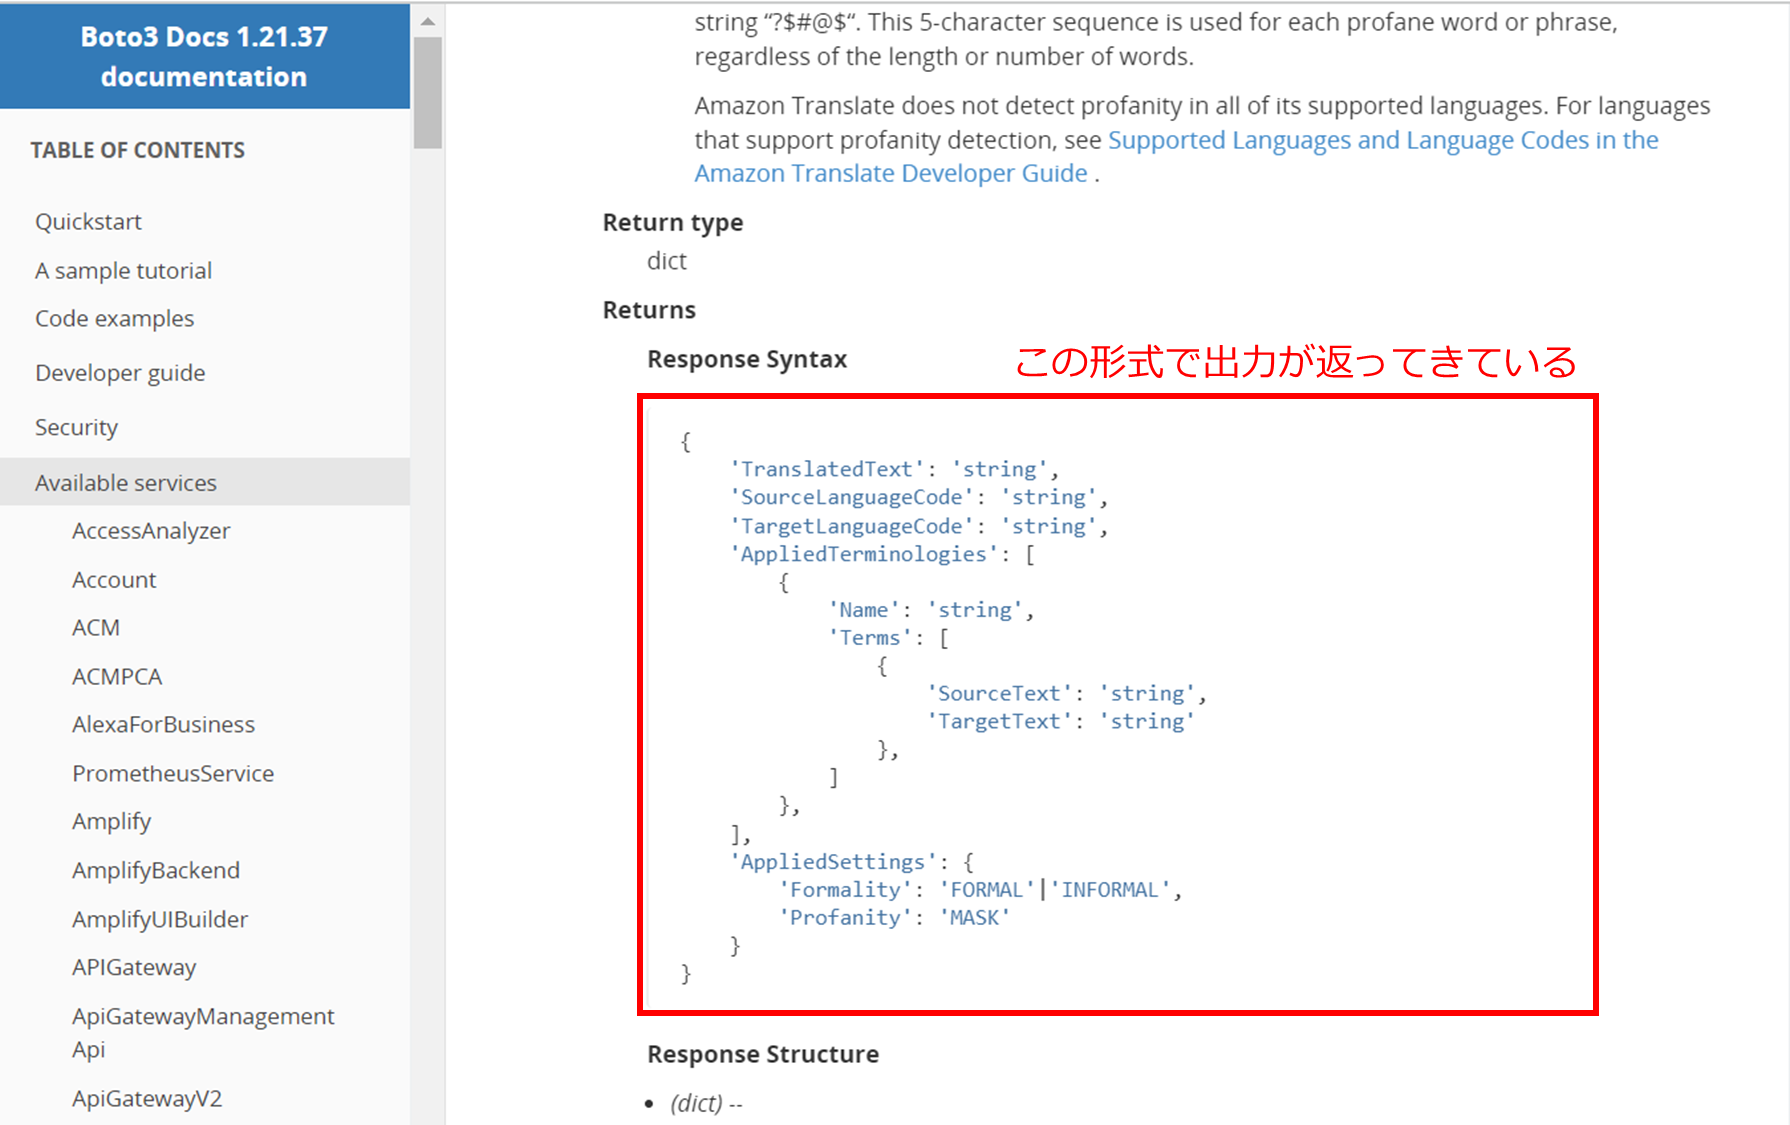
出力の'TranslatedText': 'Pythonを使えるようになりたい!'の部分が、翻訳されて帰ってきた日本語。
2-4.引数とパラメータ
引数・パラメータの定義
関数は以下のように定義されるが、()内で定義された値をパラメータという。
Variableがパラメータにあたる。
def function_name(Variable):
実際に関数に渡す値を引数と呼ぶ。上記関数を呼び出す際function_name(5)などの値で呼び出すが、この5が引数にあたる。
2-4-1.位置引数
Cloud9で以下のpositional_arguments.pyファイルを作成し保存する。
# boto3パッケージを使うように指定する
import boto3

# honyaku関数の宣言
def honyaku(text, source_language_code, target_language_code): #位置引数をここで定義
    # boto3パッケージ内のどのサービスを使用するか指定する
    client = boto3.client('translate') #関数宣言前に書いてもいいし、関数内に書いてもいいらしい
    # translate_text()メソッド項目の「Request Syntax(リクエスト構文)」を参考に、パラメータを指定する
    response = client.translate_text(
        Text=text, # 位置引数text
        SourceLanguageCode=source_language_code, # 位置引数source_language_code
        TargetLanguageCode=target_language_code  # 位置引数target_language_code
        )
    # honyaku()関数はここまで

    # honyaku()関数の中にある変数 response の内容を出力
    print(response)

# honyaku()関数の呼び出し
honyaku('I want to be able to use Python!', 'en', 'ja') # 指定した順序で引数の値を書く
positional_arguments.pyを実行すると、以下結果が得られる。
$ python positional_arguments.py
{'TranslatedText': 'Pythonを使えるようになりたい!', 'SourceLanguageCode': 'en', 'TargetLanguageCode': 'ja', 'ResponseMetadata': {'RequestId': '5aef7251-7242-4675-a52d-6b70ea01053c', 'HTTPStatusCode': 200, 'HTTPHeaders': {'x-amzn-requestid': '5aef7251-7242-4675-a52d-6b70ea01053c', 'cache-control': 'no-cache', 'content-type': 'application/x-amz-json-1.1', 'content-length': '115', 'date': 'Sun, 10 Apr 2022 11:38:33 GMT'}, 'RetryAttempts': 0}}
関数宣言の際、
def honyaku(text, source_language_code, target_language_code):
で定義した順番通りに、最後の関数呼び出しで
honyaku('I want to be able to use Python!', 'en', 'ja')
と指定している。以下のようにパラメータと引数が対応して、翻訳結果が返ってきている。
text='I want to be able to use Python!'source_language_code='en'target_language_code='ja'
2-4-2.キーワード引数
キーワード引数は、関数に渡される名前と値のペアのことを指す。
位置引数で渡された値の順序が間違っているとエラーや予期しない動作が発生してしまうが、キーワード引数は任意の順序で渡すことができる。
positional_arguments.pyを、キーワード引数を使って呼び出す。
positional_arguments.pyを以下のように変更する。
import boto3

def honyaku(text, source_language_code, target_language_code):

    client = boto3.client('translate')

    response = client.translate_text(
        Text=text,
        SourceLanguageCode=source_language_code,
        TargetLanguageCode=target_language_code
        )

    print(response)

# キーワード引数を使ってhonyaku関数を呼び出す
honyaku(text='I want to be able to use Python!', source_language_code='en', target_language_code='ja')
positional_arguments.pyを実行すると、以下結果が得られる。
$ python positional_arguments.py
{'TranslatedText': 'Pythonを使えるようになりたい!', 'SourceLanguageCode': 'en', 'TargetLanguageCode': 'ja', 'ResponseMetadata': {'RequestId': '657ad6d4-1577-44f6-a62c-585df11b391e', 'HTTPStatusCode': 200, 'HTTPHeaders': {'x-amzn-requestid': '657ad6d4-1577-44f6-a62c-585df11b391e', 'cache-control': 'no-cache', 'content-type': 'application/x-amz-json-1.1', 'content-length': '115', 'date': 'Sun, 10 Apr 2022 11:51:10 GMT'}, 'RetryAttempts': 0}}
参考
AWS Cloud9でPython基礎
AWS Cloud9でPython基礎~ファイルの読み書き
AWS LambdaでPython基礎
AWS Cloud9でPython基礎~Amazon S3を利用する
AWS Cloud9でPython基礎~Amazon S3とAmazon Translateを利用する
AWS LambdaでPython基礎~Amazon S3とAmazon Translateを利用する