Azure AI Search のインデクサを学習するためにいくつか記事を書きました。
似た内容があるので、ここで整理をし、Tipsを書いていきます。
今までの記事一覧
| 記事 | 特徴 | 元ファイル | Document Intelligence | 画像処理 |
|---|---|---|---|---|
| Document IntelligenceとOpenAI を使用して画像言語化 | Document Intelligenceを使った画像処理 | 画像切り抜きで使用 | OpenAIで画像をテキスト化してEmbedding | |
| 生成 AI を使用して画像を言語化 | Document Intelligenceを使わない画像処理 | 不使用(#Microsoft.Skills.Util.DocumentExtractionSkill)で画像切り抜き | OpenAIで画像をテキスト化してEmbedding | |
| Document Intelligenceでマークダウン化と画像テキスト化 | マークダウン化+Chunk SizeのChunkingに画像処理を追加 | マークダウン化と画像切り抜きで使用 | OpenAIで画像をテキスト化してEmbedding | |
| Azure AI Search でマルチモーダルインデックスの作成 | マルチモーダルとしてテキストと画像を共通ベクトル空間 | 画像切り抜きで使用 | Azure AI VisionでEmbedding(テキストと同じベクトル空間) | |
| Markdownファイルをインデックス化 | インデクサーのParsingでmarkdownを選択。スキルセットなし。 | Markdown | 不使用 | 処理なし |
| PDFファイルをインデックス化 | Chunk分割してEmbeddingするだけ | 不使用 | 処理なし |
Tips
Skill
肝となるのはスキル。各スキルの内容を見て、オプションを把握する。
Skill例
Microsoft.Skills.Util.DocumentIntelligenceLayoutSkill
inputsとoutputsが大事。今回の例ではOutputがテキストと画像の2つに分割。
{
    "@odata.type": "#Microsoft.Skills.Util.DocumentIntelligenceLayoutSkill",
    "name": "document-layout-skill",
    "description": "Document Intelligence skill for document cracking",
    "context": "/document",
    "outputMode": "oneToMany",
    "outputFormat": "text",
    "extractionOptions": [
        "images",
        "locationMetadata"
    ],
    "chunkingProperties": {
        "unit": "characters",
        "maximumLength": 2000,
        "overlapLength": 200
    },
    "inputs": [
        {
            "name": "file_data",
            "source": "/document/file_data"
        }
    ],
    "outputs": [
        {
            "name": "text_sections",
            "targetName": "text_sections"
        },
        {
            "name": "normalized_images",
            "targetName": "normalized_images"
        }
    ]
},
デバッガセッションでも出力が2つあることが確認できます。
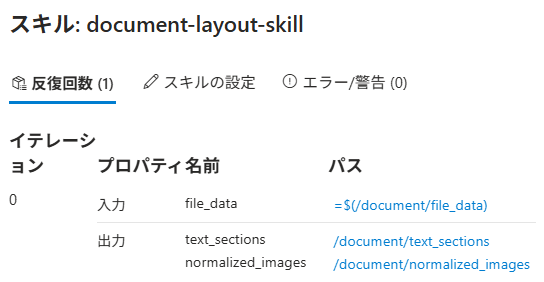
ルートのドキュメントがnormalized_imagesとtext_sectionに分かれているのもデバッガセッションから確認可能。

Microsoft.Skills.Vision.VectorizeSkill
例えば以下の#Microsoft.Skills.Vision.VectorizeSkillを使った場合(以下の記事内容から抜粋)。前処理として#Microsoft.Skills.Util.DocumentIntelligenceLayoutSkillを使って/document/text_sections/にテキスト部分を入れています。
{
    "@odata.type": "#Microsoft.Skills.Vision.VectorizeSkill",
    "name": "text-embedding-skill",
    "description": "Vision Vectorization skill for text",
    "context": "/document/text_sections/*",
    "modelVersion": "2023-04-15",
    "inputs": [
        {
            "name": "text",
            "source": "/document/text_sections/*/content"
        }
    ],
    "outputs": [
        {
            "name": "vector",
            "targetName": "text_vector"
        }
    ]
},
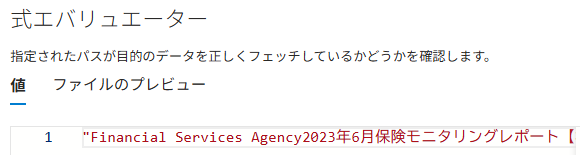
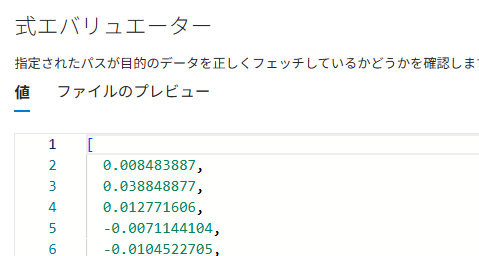
デバッガセッションで見るとこんな入出力
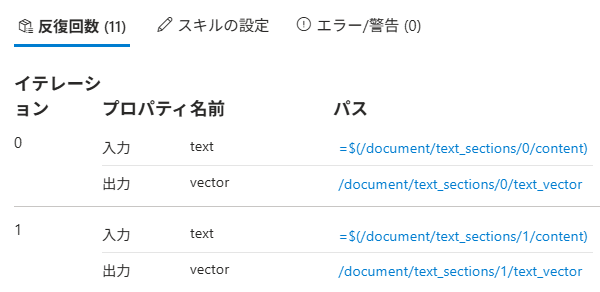
入力のtextや出力のvectorの値を確認可能。
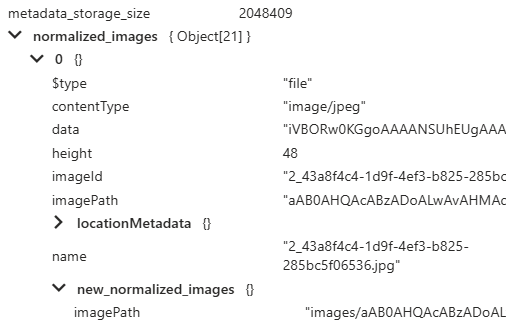
Microsoft.Skills.Util.ShaperSkill
Shaperは、値の編集などに使える少し独特なスキルです。
例えば以下の例だと、画像のパスである/document/normalized_images/*/imagePathの接頭辞にBlobのコンテナ名の変数(ここではimages)を付加した値をimagePathとして、入れ込みます。
{
    "@odata.type": "#Microsoft.Skills.Util.ShaperSkill",
    "name": "shaper-skill",
    "description": "Shaper skill to reshape the data to fit the index schema",
    "context": "/document/normalized_images/*",
    "inputs": [
        {
            "name": "imagePath",
            "source": "='{{imageProjectionContainer}}/'+$(/document/normalized_images/*/imagePath)",
            "inputs": []
        }
    ],
    "outputs": [
        {
            "name": "output",
            "targetName": "new_normalized_images"
        }
    ]
}
インデクサー
スキルだけでなく、インデクサーでfieldMappingsを使って、項目のマッピングもします。
例えば、以下の記事でやっているIndexerのマッピング。スキルセットがなく、マークダウン解析をインデクサーで定義し、その結果をマッピングしています。
"fieldMappings": [
    {
        "sourceFieldName": "/sections/h1",
        "targetFieldName": "title",
        "mappingFunction": null
    },
    {
        "sourceFieldName": "/sections/h2",
        "targetFieldName": "h2_subheader",
        "mappingFunction": null
    },
    {
        "sourceFieldName": "/sections/h3",
        "targetFieldName": "h3_subheader",
        "mappingFunction": null
    }
]
他にもスキルと関係ない項目をインデクサーでfieldMappingsでインデックス項目にマッピングします。
可視化
デバッグセッション以外に、AIに可視化させることも多いです。以下のようなシンプルなプロンプトでマーメイド記法で出力しています(構文エラーが出ることもあり、修正させている)。毎回チェックしていますが、まだ内容間違いは見たことないです(そんなに多くのパターンやっていないので、単純にラッキーだっただけかも)。
以下はAzure AI Searchのskillset定義です。各スキルの項目のフローをマーメイド記法で出力して。
出てきたフローは小さくてVS CodeやQiitaで見えないことも多く、以下のようなエディタを使って拡大しています。
以下は出力例です。