はじめに
初心者対応構成
- Windowsからの導入手順
- スクリプトでの自動設定
-
UCI (ttyd)、Webコンソール (LuCi)、ファイラー (SFTP)にて比較作業がおススメ

デバイスアクセス
PowerShellの開始
- キー入力:
Win+x>a>はい
UCI(SSH)アクセス
ssh -o StrictHostKeyChecking=no root@192.168.1.1
- root@192.168.1.1's password:
初期値:パスワード無し
OpenSSHのインストールが無い場合
- 機能の確認
※Windows 10 Fall Creators Update(1709)以降標準搭載
Get-WindowsCapability -Online | Where-Object Name -like 'OpenSSH*'
- 機能のインストール
Add-WindowsCapability -Online -Name OpenSSH.Server~~~~0.0.1.0
ファームウェアについて
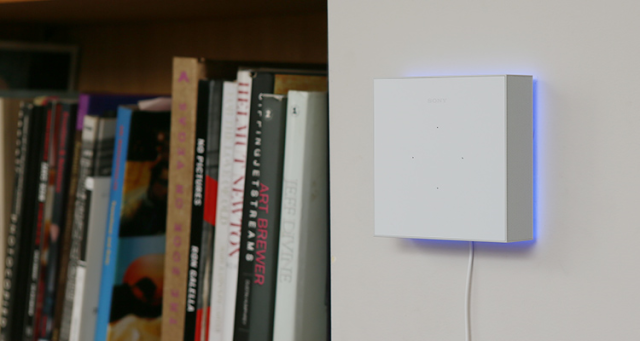
デバイスについて
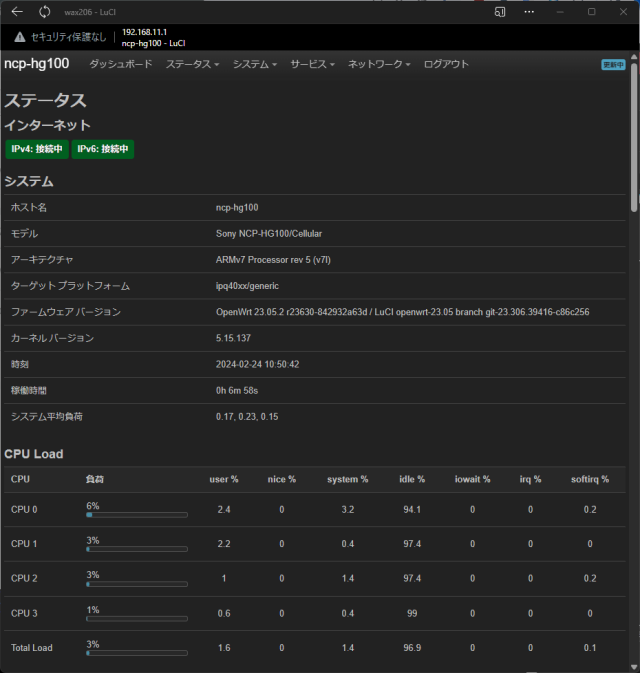
NCP-HG100/Cellular
ハードウェア仕様
- SoC : Qualcomm IPQ4019
- RAM : DDR3 512 MiB (H5TC4G63EFR)
- Flash : eMMC 4 GiB (THGBMNG5D1LBAIT)
- WLAN : 2.4/5 GHz 2T2R (IPQ4019)
- Ethernet : 10/100/1000 Mbps x2
- Transceiver : Qualcomm QCA8072
- WWAN : Telit LN940A9
- Z-Wave : Silicon Labs ZM5101
- Bluetooth : Qualcomm CSR8811
- Audio DAC : Realtek ALC5629
- Audio Amp. : Realtek ALC1304
- Voice Input Processor : Conexant CX20924
- Micro Controller Unit : Nuvoton MINI54FDE
- RGB LED, Fan, Temp. sensors
- Touch Sensor : Cypress CY8C4014LQI
- RGB LED driver : TI LP55231 (2x)
- LEDs/Keys : 11x, 6x
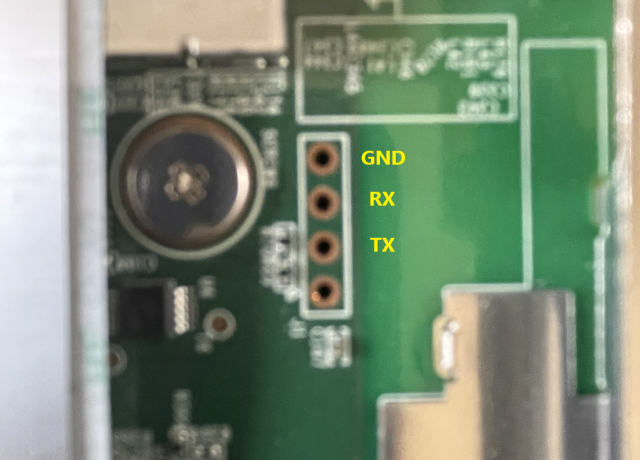
- UART : through-hole on PCB
- J1: 3.3V, TX, RX, GND from tri-angle marking
- 115200n8
- Power : 12 VDC, 2.5 A
OpenWrt化手順
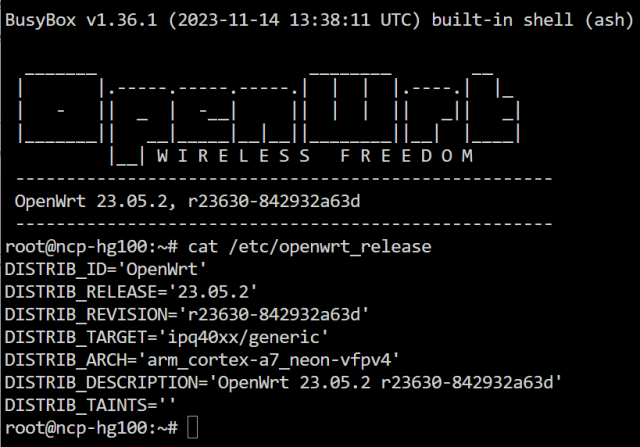
OpenWrt化
クライアントPC(Windows)設定
- デバイスマネージャー > ポート(COMとLPT)
確認 - 有線LAN設定 >
192.168.132.100 - デバイスとクライアントPCに有線LAN接続
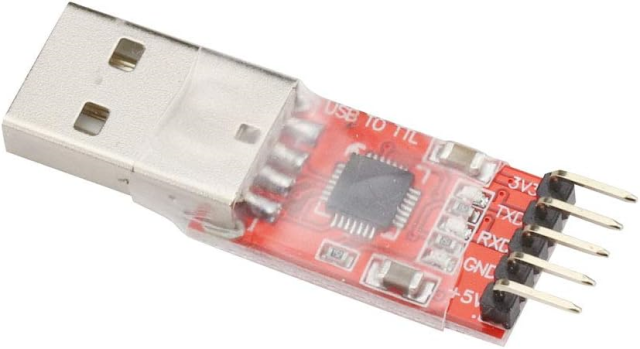
テストワイヤー接続
- 電圧:3.3V
-
GND<- GND -
TX<- RX -
RX<- TX
※RX、TX、クロス接続
※デバイスはまだ通電させない
- デバイスとクライアントPCにシリアル接続
※テストワイヤーは先にデバイスへ挿す事
シリアル設定
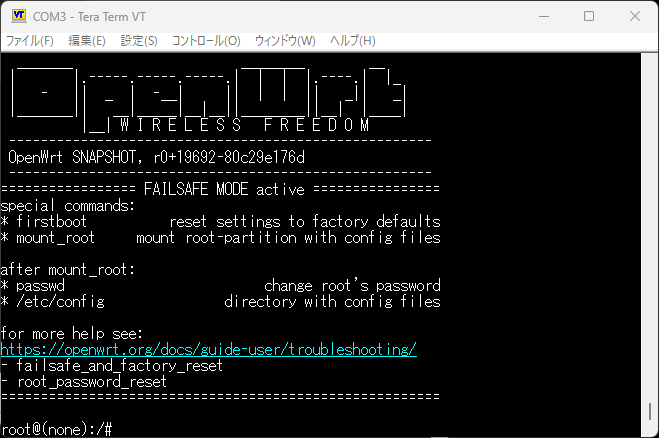
- TeraTerm起動
- COMポート:ポート(COMとLPT)
確認した値 - スピード:
115200
- COMポート:ポート(COMとLPT)
シリアル通信
- デバイス通電(アダプター接続)
- TeraTermでシリアル接続
Hit any key to stop autoboot:何かキーを押しブートを停止させる - ブート変更
setenv bootcmd "mmc read 0x84000000 0x2e22 0x4000 && bootm 0x84000000"
saveenv
KERNELリネーム
- openwrt-ipq40xx-generic-sony_ncp-hg100-cellular-initramfs-fit-uImage.itb >
C0A88401.img
TFTP接続
- Serva64起動 ※7秒待つ
- Serva64設定 ※左上のアイコンをダブルクリック
- TFTPタブ
- TFTPサーバ
チェック - TFTP Server IP address
192.168.132.100 - TFTP Server root directory
C0A88401.imgを格納したディレクトリ
- TFTPサーバ
- TFTPタブ
- Serva64設定 ※左上のアイコンをダブルクリック
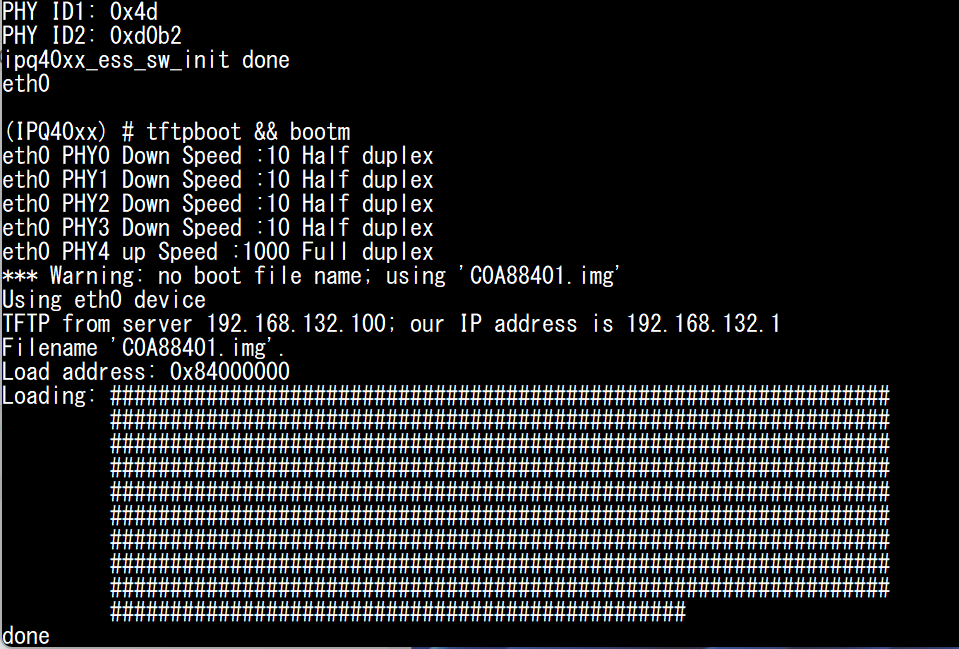
U-Boot
tftpboot && bootm
- 自動でリブート
- Serva64終了
SFTPサーバーにファイルを取りに行かない場合
set ipaddr 192.168.132.1
set serverip 192.168.132.100
set bootfile C0A88401.img
printenv
saveenv
TCP/IP通信
- デバイスをインターネット接続しているルーター等へ接続(WANポート)
- クライアントPCのIPアドレス変更
DHCP - TeraTermをIP接続で新たに起動
- TCP/IP ホスト
192.168.1.1- ユーザー名
root
- ユーザー名
- TCP/IP ホスト
OpenWrtインストール
wget --no-check-certificate -O /tmp/openwrt-ipq40xx-generic-sony_ncp-hg100-cellular-squashfs-sysupgrade.bin https://downloads.openwrt.org/releases/23.05.3/targets/ipq40xx/generic/openwrt-23.05.3-ipq40xx-generic-sony_ncp-hg100-cellular-squashfs-sysupgrade.bin
sysupgrade -n /tmp/openwrt-ipq40xx-generic-sony_ncp-hg100-cellular-squashfs-sysupgrade.bin
-
自動でリブート
-
LuCi:http://openwrt.lan/
ストレージの拡張
設定
opkg update && opkg install cfdisk resize2fs
cfdisk /dev/mmcblk0
/dev/mmcblk0p17
Rsize
New size: 3.4G
Write
Are you sure you want to write the partition table to disk?
yes
Quit
reboot
resize2fs /dev/mmcblk0p17
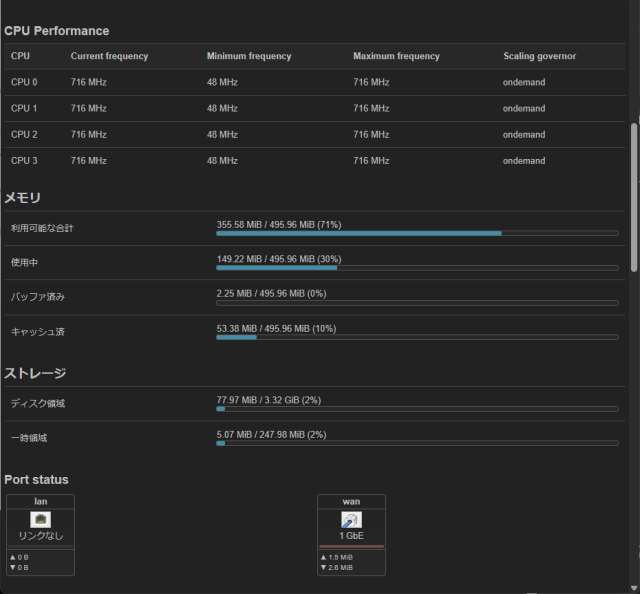
ベンチマーク
設定
CPUパフォーマンス
time sh -c 'dd if=/dev/zero bs=1M count=100 | md5sum'
100+0 records in
100+0 records out
2f282b84e7e608d5852449ed940bfc51 -
real 0m 0.58s
user 0m 0.50s
sys 0m 0.20s
hdparm
opkg update && opkg install hdparm
hdparm -t --direct /dev/mmcblk0p17
フラッシュ&インストールシステム
ランディングページ
キッティングツール
デバイス用のOpenWrtカスタムファームウェアをダウンロード
サンプル
#!/bin/sh
cat > "/tmp/openwrt-network-auto-config.sh" << 'SCRIPT_END'
#!/bin/sh
set -eu
API_RESPONSE="$(wget -qO- https://auto-config.site-u.workers.dev/)"
echo "NOTICE=$(echo "$API_RESPONSE" | jsonfilter -e '@.notice')"
echo "IPV4=$(echo "$API_RESPONSE" | jsonfilter -e '@.ipv4')"
echo "IPV6=$(echo "$API_RESPONSE" | jsonfilter -e '@.ipv6')"
echo "COUNTRY=$(echo "$API_RESPONSE" | jsonfilter -e '@.country')"
echo "TIMEZONE=$(echo "$API_RESPONSE" | jsonfilter -e '@.timezone')"
echo "ZONENAME=$(echo "$API_RESPONSE" | jsonfilter -e '@.zonename')"
echo "ISP=$(echo "$API_RESPONSE" | jsonfilter -e '@.isp')"
echo "AS=$(echo "$API_RESPONSE" | jsonfilter -e '@.as')"
echo "REGION_NAME=$(echo "$API_RESPONSE" | jsonfilter -e '@.regionName')"
echo "REGION_CODE=$(echo "$API_RESPONSE" | jsonfilter -e '@.region')"
echo "AFTR_TYPE=$(echo "$API_RESPONSE" | jsonfilter -e '@.aftr.aftrType')"
echo "AFTR_JURISDICTION=$(echo "$API_RESPONSE" | jsonfilter -e '@.aftr.jurisdiction')"
echo "AFTR_IPV6=$(echo "$API_RESPONSE" | jsonfilter -e '@.aftr.aftrIpv6Address')"
echo "MAPE_BR_IPV6=$(echo "$API_RESPONSE" | jsonfilter -e '@.mape.brIpv6Address')"
echo "MAPE_EA_BITS=$(echo "$API_RESPONSE" | jsonfilter -e '@.mape.eaBitLength')"
echo "MAPE_IPV4_PREFIX=$(echo "$API_RESPONSE" | jsonfilter -e '@.mape.ipv4Prefix')"
echo "MAPE_IPV4_PLEN=$(echo "$API_RESPONSE" | jsonfilter -e '@.mape.ipv4PrefixLength')"
echo "MAPE_IPV6_PREFIX=$(echo "$API_RESPONSE" | jsonfilter -e '@.mape.ipv6Prefix')"
echo "MAPE_IPV6_PLEN=$(echo "$API_RESPONSE" | jsonfilter -e '@.mape.ipv6PrefixLength')"
echo "MAPE_PSID_OFFSET=$(echo "$API_RESPONSE" | jsonfilter -e '@.mape.psIdOffset')"
echo "MAPE_PSIDLEN=$(echo "$API_RESPONSE" | jsonfilter -e '@.mape.psidlen')"
SCRIPT_END
sh "/tmp/openwrt-network-auto-config.sh"
コンソールツール
固有設定
設定
レジスタ
opkg update
opkg install i2c-tools
i2cdetect -l
# i2c-1   i2c             QUP I2C adapter                         I2C adapter
i2cdetect -y 1
# Warning: Can't use SMBus Quick Write command, will skip some addresses
#      0  1  2  3  4  5  6  7  8  9  a  b  c  d  e  f
# 00:
# 10:
# 20:
# 30: -- -- UU UU -- -- -- --
# 40:
# 50: -- -- -- -- -- -- -- -- -- -- -- -- -- -- -- --
# 60:
# 70:
タッチセンサー
i2cset -y 1 0x14 0xf 1
外周LED
# (nop?, 分岐引っ掛かっても無さげ)
i2cset -y 1 0x15 0x00 0x00
# 波: blue+lightblue
i2cset -y 1 0x15 0x00 0x10
# 特殊ワイプ (中): blue->lightblue
i2cset -y 1 0x15 0x00 0x20
# ワイプ (速): blue->lightblue
i2cset -y 1 0x15 0x00 0x30
# 交互 (速): blue->lightblue
i2cset -y 1 0x15 0x00 0x40
# 点灯: yellow->blue
i2cset -y 1 0x15 0x00 0x50
# 点滅: yellow
i2cset -y 1 0x15 0x00 0x60
# 点灯: red
i2cset -y 1 0x15 0x00 0x70
# 点灯: yellow
i2cset -y 1 0x15 0x00 0x80
# 点滅 (遅): blue
i2cset -y 1 0x15 0x00 0x90
# 点灯:blue
i2cset -y 1 0x15 0x00 0xa0
# 消灯
i2cset -y 1 0x15 0x00 0xB0
# 点滅 (速): white
i2cset -y 1 0x15 0x00 0xC0
# 点滅 (速): red
i2cset -y 1 0x15 0x00 0xD0
# 交互: white->lightblue
i2cset -y 1 0x15 0x00 0xE0
# (nop?, 分岐引っ掛かっても無さげ)
i2cset -y 1 0x15 0x00 0xF0
参考設定
外周LED色確認ツール
#! /bin/sh
{
while :
do
    echo -e " \033[1;37mi2cset -y 1 0x15 0x00\033[0;39m"
    echo -e " \033[1;37mLED Register Value --------------------------\033[0;39m"
    echo -e " \033[0;37m[0]\033[0;39m 0xb0 Off"
    echo -e " \033[7;40m[l]\033[0;39m 0xc0 Flash: white"
    echo -e " \033[0;44m[2]\033[0;39m 0xa0 Light:blue"
    echo -e " \033[5;44m[3]\033[0;39m 0x90 Flash: blue"
    echo -e " \033[0;44m[4]\033[0;39m 0x50 Light: yellow->blue"
    echo -e " \033[0;43m[5]\033[0;39m 0x80 Light:yellow"
    echo -e " \033[5;43m[6]\033[0;39m 0x60 Flash: yellow"
    echo -e " \033[0;41m[7]\033[0;39m 0x70 Light: red"
    echo -e " \033[5;41m[8]\033[0;39m 0xd0 Flash: red"
    echo -e " \033[4;46m[9]\033[0;39m 0x20 Special Wipe: blue->lightblue"
    echo -e " \033[7;40m[a]\033[0;39m 0xe0 Alternate: white<>lightblue"
    echo -e " \033[4;46m[b]\033[0;39m 0x10 Wave: lightblue<>blue"
    echo -e " \033[4;46m[c]\033[0;39m 0x30 Wipe: blue<>lightblue"
    echo -e " \033[4;46m[d]\033[0;39m 0x40 Alternate: blue<>lightblue"
    echo -e " \033[7;36m[q]\033[0;39m Quit"
    echo -e " \033[1;37m-----------------------------------------------------\033[0;39m"
  read -p " Please select key: " num
  case "${num}" in
    "0" ) i2cset -y 1 0x15 0x00 0xb0 ;;
    "1" ) i2cset -y 1 0x15 0x00 0xc0 ;;
    "2" ) i2cset -y 1 0x15 0x00 0xa0 ;;
    "3" ) i2cset -y 1 0x15 0x00 0x90 ;;
    "4" ) i2cset -y 1 0x15 0x00 0x50 ;;
    "5" ) i2cset -y 1 0x15 0x00 0x80 ;;
    "6" ) i2cset -y 1 0x15 0x00 0x60 ;;
    "7" ) i2cset -y 1 0x15 0x00 0x70 ;;
    "8" ) i2cset -y 1 0x15 0x00 0xd0 ;;
    "9" ) i2cset -y 1 0x15 0x00 0x20 ;;
    "a" ) i2cset -y 1 0x15 0x00 0xe0 ;;
    "b" ) i2cset -y 1 0x15 0x00 0x10 ;;
    "c" ) i2cset -y 1 0x15 0x00 0x30 ;;
    "d" ) i2cset -y 1 0x15 0x00 0x40 ;;
    "q" ) exit 0 ;;
  esac
 done
}
外周LED時間連動スクリプト
- 外周LEDをスタートアップ及びスケジュールと連動して変更する
※時報機能あり
i2cset -y 1 0x15 0x00 0xb0 off
i2cset -y 1 0x15 0x00 0xc0 flash_white
i2cset -y 1 0x15 0x00 0xa0 blue
i2cset -y 1 0x15 0x00 0x90 flash_blue
i2cset -y 1 0x15 0x00 0x50 yellow_to_blue
i2cset -y 1 0x15 0x00 0x80 yellow
i2cset -y 1 0x15 0x00 0x60 flash_yellow
i2cset -y 1 0x15 0x00 0x70 red
i2cset -y 1 0x15 0x00 0xd0 flash_red
i2cset -y 1 0x15 0x00 0x20 skyblue
i2cset -y 1 0x15 0x00 0xe0 alternate_white_lightblue
i2cset -y 1 0x15 0x00 0x10 wave_lightblue_blue
i2cset -y 1 0x15 0x00 0x30 wipe_blue_lightblue
i2cset -y 1 0x15 0x00 0x40 alternate_blue_lightblue
#!/bin/sh

cat >> /etc/crontabs/root << 'EOF'
0 * * * * /etc/config-software/led_timer.sh # 時報
# 0 0 1 1 * /etc/config-software/led_timer.sh # サンプル
1 0 * * * /etc/config-software/led_color.sh off
1 8 * * * /etc/config-software/led_color.sh blue
1 12 * * * /etc/config-software/led_color.sh skyblue
1 16 * * * /etc/config-software/led_color.sh yellow
1 20 * * * /etc/config-software/led_color.sh red
# 43 21 * * * /etc/config-software/led_color.sh wave_lightblue_blue  # TEST
EOF
/etc/init.d/cron enable
/etc/init.d/cron restart

mkdir -p /etc/config-software

cat > /etc/config-software/led_timer.sh << 'EOF'
#!/bin/sh

i2cset -y 1 0x15 0x00 0xc0  # 例: 白色のフラッシュ
sleep 60
/etc/config-software/led_color.sh
EOF
chmod +x /etc/config-software/led_timer.sh

cat > /etc/config-software/led_color.sh << 'EOF'
#!/bin/sh

/etc/init.d/cron restart

get_color_code() {
    case "$1" in
        "off") echo "0xb0" ;;
        "flash_white") echo "0xc0" ;;
        "blue") echo "0xa0" ;;
        "flash_blue") echo "0x90" ;;
        "yellow_to_blue") echo "0x50" ;;
        "yellow") echo "0x80" ;;
        "flash_yellow") echo "0x60" ;;
        "red") echo "0x70" ;;
        "flash_red") echo "0xd0" ;;
        "skyblue") echo "0x20" ;;
        "alternate_white_lightblue") echo "0xe0" ;;
        "wave_lightblue_blue") echo "0x10" ;;
        "wipe_blue_lightblue") echo "0x30" ;;
        "alternate_blue_lightblue") echo "0x40" ;;
        *) echo "0xb0" ;;
    esac
}

get_crontab_schedule() {
    awk '!/^#/ && /\/etc\/config-software\/led_color.sh/ {print $1,$2,$7}' /etc/crontabs/root
}

current_hour=$(date +'%H' | sed 's/^0//')
current_minute=$(date +'%M' | sed 's/^0//')
current_time=$((current_hour * 60 + current_minute))

schedules=$(get_crontab_schedule)
LED_COLOR="0xb0"

while IFS=' ' read -r minute hour color_name; do
    hour=$(echo "$hour" | sed 's/^0//')
    minute=$(echo "$minute" | sed 's/^0//')
    schedule_time=$((hour * 60 + minute))

    if [ "$current_time" -ge "$schedule_time" ]; then
        color_code=$(get_color_code "$color_name")
        if [ -n "$color_code" ]; then
            LED_COLOR="$color_code"
        fi
    fi
done <<END
$schedules
END

if ! i2cset -y 1 0x15 0x00 "$LED_COLOR"; then
    echo "Failed to set LED color to $LED_COLOR at $(date)" >> /var/log/led_color_errors.log
    i2cset -y 1 0x15 0x00 0xd0  # エラー通知
fi
EOF
chmod +x /etc/config-software/led_color.sh

cat > /etc/init.d/led_outer << 'EOF'
#!/bin/sh /etc/rc.common

START=96
STOP=10

send_led_command() {
    local color=$1
    i2cset -y 1 0x15 0x00 "$color"
    sleep 3
}

start() {
    send_led_command 0x90
    /etc/config-software/led_color.sh
}

restart() {
    send_led_command 0x60
    /etc/config-software/led_color.sh
}

stop() {
    send_led_command 0xd0
    send_led_command 0xb0
}

EOF
chmod +x /etc/init.d/led_outer

/etc/init.d/led_outer enable
/etc/init.d/led_outer start
サービス開始及び停止
# 有効
service led_outer enable
# 開始
service led_outer start
# 停止
service led_outer stop
# 無効
service led_outer disable
スクリプト実行時間計測
time sh /etc/config-software/led_color.sh
削除
service led_outer stop
service led_outer disable
rm -rf /etc/config-software/led_color.sh
rm -rf /etc/config-software/led_timer.sh
rm -rf /var/log/led_color_errors.log
rm -rf /etc/init.d/led_outer
CRONTABテストジョブ
- 1分ごとログ
* * * * * echo "Cron test executed at $(date)" >> /tmp/test_cron.log
- ログ確認
cat /tmp/test_cron.log
ZZDFS
#! /bin/ash

cat << "EOF" > /etc/init.d/zzdfs
#! /bin/sh

cat << "EOF" > /etc/init.d/zzdfs
#!/bin/sh /etc/rc.common

INTERVAL=5    # check interval (min)
FB_BAND=40    # fallback band
FB_CHANNEL=36 # fallback channel

START=99
STOP=01

start() {
    sleep 1m 15s
    mkdir -p /tmp/config-software/
    RADIO=`uci show wireless | grep "band='5g'" | cut -d'.' -f2 | awk '{ print $1 }'`
    CHS=`echo ${RADIO} | wc -w`
    if [ ${CHS} = 2 ];then
        RADIO=`echo ${RADIO}| awk '{print $2}'`
    fi
    CH=`echo ${RADIO} | grep -o "[0-9]*"`
    echo $(iw dev | awk '/Interface/{print $2}' | grep ${CH}) > /tmp/config-software/dev
    echo ${INTERVAL} > /tmp/config-software/interval
    echo ${RADIO} > /tmp/config-software/radio
    echo ${FB_BAND} > /tmp/config-software/fb_band
    echo ${FB_CHANNEL} > /tmp/config-software/fb_channel
    logger "ZZDFS: Start"
    sed -i "/zzdfs.sh/d" /etc/crontabs/root
    echo "*/${INTERVAL} * * * * sh /etc/config-software/zzdfs.sh # ZZDFS" >> /etc/crontabs/root
    service cron restart
    exit 0
}
restart() {
    exit 0
}
stop() {
    logger "ZZDFS: Stop"
    sed -i "/zzdfs.sh/d" /etc/crontabs/root
    service cron restart
    rm -rf /tmp/config-software
    exit 0
}
EOF
chmod +x /etc/init.d/zzdfs


mkdir -p /etc/config-software/
cat << "EOF" > /etc/config-software/zzdfs.sh
#! /bin/sh

read DEV < /tmp/config-software/dev
iwinfo ${DEV} info 2>&1 | grep -q 'No such wireless device'
if [ $? = 0 ]; then
    read RADIO < /tmp/config-software/radio
    WIFI=`uci get wireless.${RADIO}.disabled`
    if [ "${WIFI}" != 1 ]; then
        logger "ZZDFS: ZZDFS_On"
        sed -i "/zzdfs.sh/d" /etc/crontabs/root
        /etc/init.d/cron restart
        read INTERVAL < /tmp/config-software/interval
        read FB_CHANNEL < /tmp/config-software/fb_channel
        read FB_BAND < /tmp/config-software/fb_band
        CHANNEL=$(uci get wireless.${RADIO}.channel | tee /tmp/config-software/channel)
        HTMODE=$(uci get wireless.${RADIO}.htmode | tee /tmp/config-software/htmode)
        MODE=`echo ${HTMODE} | grep -o "[A-Z]*"`
        uci set wireless.${RADIO}.channel=${FB_CHANNEL}
        uci set wireless.${RADIO}.htmode=${MODE}${FB_BAND}
        uci commit wireless
        wifi reload ${RADIO}
        i2cset -y 1 0x15 0x00 0xe0
        sleep 30m
        logger "ZZDFS: ZZDFS_Off"
        uci set wireless.${RADIO}.channel=${CHANNEL}
        uci set wireless.${RADIO}.htmode=${HTMODE}
        uci commit wireless
        wifi reload  ${RADIO}
        sleep 1m 10s
        echo "*/${INTERVAL} * * * * sh /etc/config-software/zzdfs.sh # ZZDFS" >> /etc/crontabs/root
        service cron restart
        service led_p_new start
    else
        logger "ZZDFS: ${RADIO}_Disable"
    fi
fi
EOF


cat <<"EOF" > /usr/bin/zzdfst
#! /bin/sh
read INTERVAL < /tmp/config-software/interval
if [ -n "$1" ]; then
    logger "ZZDFS: Interval_Change"
	description_INTERVAL="$1"
	sed -i -e "s/INTERVAL=${INTERVAL}/INTERVAL=${description_INTERVAL}/g" /etc/init.d/zzdfs
    echo ${description_INTERVAL} > /tmp/config-software/interval
    sed -i "/zzdfs.sh/d" /etc/crontabs/root
    echo "*/${description_INTERVAL} * * * * sh /etc/config-software/zzdfs.sh # DFS ZZDFS" >> /etc/crontabs/root
    service cron restart
    echo " Set time: ${description_INTERVAL} min"
	exit 0
else
	while :
	do
        logger "ZZDFS: Interval_Change"
		echo -e " \033[1;37mInterval time setting\033[0;39m"
        echo -e " \033[1;37mNow Interval: ${INTERVAL} min\033[0;39m"
        read -p " Interval time change (y or q): " input_CHANGE
        if [ "${input_CHANGE}" = "q" ]; then
            exit 0
        fi
		read -p " Interval time (min): " input_INTERVAL
		read -p " Please select key [y or q]: " num
		case "${num}" in
		"y" ) sed -i -e "s/INTERVAL=${INTERVAL}/INTERVAL=${input_INTERVAL}/g" /etc/init.d/zzdfs
              echo ${input_INTERVAL} > /tmp/config-software/interval
              sed -i "/zzdfs.sh/d" /etc/crontabs/root
              echo "*/${input_INTERVAL} * * * * sh /etc/config-software/zzdfs.sh # ZZDFS" >> /etc/crontabs/root
              service cron restart
			  echo " Set time: ${input_INTERVAL} min"
		      exit 0 ;;
	    "q" ) exit 0 ;;
	    esac
    done
fi
EOF
chmod +x /usr/bin/zzdfst


cat <<"EOF" > /usr/bin/zzdfsl
#!/bin/sh
echo -e "\033[1;36mZZDFS\033[0;39m"
echo -e "\033[1;36mLOG ------------------------------------\033[0;39m"
echo -e "\033[1;37mLOG:\033[0;39m"
exec logread | grep "ZZDFS" | awk '{ print $1,$2,$3,$4,$5,$9 }' | tail -n 10
echo -e "\033[1;37mDISABLED:\033[0;39m"
exec logread | grep "DFS->disabled" | awk '{ print $1,$2,$3,$4,$5,$11 }' | tail -n 1
echo -e "\033[1;37mENABLED:\033[0;39m"
exec logread | grep "DFS->ENABLED" | awk '{ print $1,$2,$3,$4,$5,$11 }' | tail -n 1
echo -e "\033[1;36mINFORMATION ----------------------------\033[0;39m"
read INTERVAL < /tmp/config-software/interval
echo -e "\033[1;37mInterval: ${INTERVAL}min\033[0;39m"
read FB_BAND < /tmp/config-software/fb_band
read FB_CHANNEL < /tmp/config-software/fb_channel
read RADIO < /tmp/config-software/radio
HTMODE=$(uci get wireless.${RADIO}.htmode)
MODE=`echo ${HTMODE} | grep -o "[A-Z]*"`
read RADIO < /tmp/config-software/radio
CHANNEL=$(uci get wireless.${RADIO}.channel)
HTMODE=$(uci get wireless.${RADIO}.htmode)
WIFI=`uci get wireless.${RADIO}.disabled` 2>/dev/null
if [ "${WIFI}" != 1 ]; then
    echo -e "\033[1;37mWi-Fi 5G ${RADIO} ENABLE\033[0;39m"
else
    echo -e "\033[1;37mWi-Fi 5G ${RADIO} DISABLE\033[0;39m"
fi
echo -e "\033[1;37mWi-Fi 5G Channel/ Htmode: ${CHANNEL}Ch/ ${HTMODE}\033[0;39m"
echo -e "\033[1;37mFALLBACK Channel/ Htmode: ${FB_CHANNEL}Ch/ ${MODE}${FB_BAND}\033[0;39m"
echo -e "\033[1;36m----------------------------------------\033[0;39m"
EOF
chmod +x /usr/bin/zzdfsl


service zzdfs enable
service zzdfs start

zzdfsl
モデムモジュール
モデム用LuCi
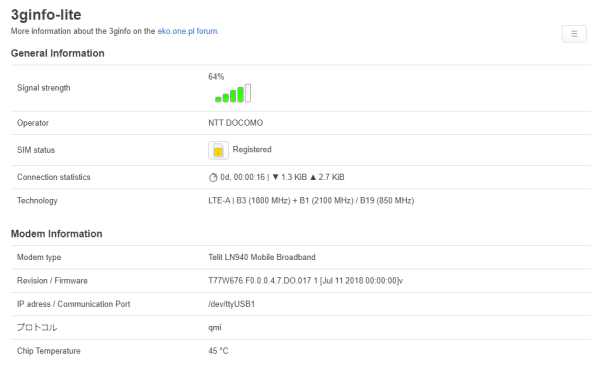
luci-app-3ginfo-lite
luci-app-modemband
uci-app-sms-tool-js
internet-detector-mod-modem-restart
キャリア基地局
キャリアバンド
- NTTドコモ: 1,3,19,21,28
- au (沖縄セルラー、UQ WiMAX含む): 1,11,18,26,28,41
- ソフトバンク (旧ワイモバイル、WCP含む): 1,3,8,41 (※WCP)
キャリア基地局
-
cellmapper
- 左サイドバーを展開 > Providerにjapanと入力 > 該当キャリア選択
モデムモジュール設定
- HP LT4220のSetmode0スタックの解決
- LN940A9シリーズマニュアル
- Telit LN940シリーズセルラーモジュールの初期診断データを収集するにはどうすればよいですか?
- collectd-Telit-LN940-wwan
- Linux で libmbim とドライバー cdc_mbim を使用して、MBIM インターフェイス経由で簡単なデータ接続をセットアップするにはどうすればよいですか?
インストール
#! /bin/sh
grep -q IceG_repo /etc/opkg/customfeeds.conf || echo 'src/gz IceG_repo https://github.com/4IceG/Modem-extras/raw/main/myrepo' >> /etc/opkg/customfeeds.conf
wget https://github.com/4IceG/Modem-extras/raw/main/myrepo/IceG-repo.pub -O /tmp/IceG-repo.pub
opkg-key add /tmp/IceG-repo.pub
opkg update
opkg install kmod-usb-serial
opkg install kmod-usb-serial-option
opkg install kmod-usb-net-cdc-ether
opkg install kmod-usb-net-qmi-wwan
# opkg install kmod-usb-net-cdc-mbim # 排他利用
opkg install usbutils
opkg install qmi-utils
# opkg install mbim-utils
opkg install uqmi
# opkg install umbim
opkg install screen
# opkg install minicom
# opkg install picocom
opkg install modemmanager
opkg install luci-proto-modemmanager
# opkg install luci-proto-qmi
# opkg install luci-proto-mbim
# opkg install usb-modeswitch
opkg install luci-app-3ginfo-lite
opkg install luci-app-modemband
opkg install sms-tool
opkg install luci-app-sms-tool
opkg install luci-app-sms-tool-js
reboot
※luci-app-sms-toolがうまく入らない時はリムーブし再起動後入れなおす
- カスタムフィード
※カスタムフィードに関し、配布元の構成変更が頻繁にある為、インストール出来ない事場合、適弁コマンドを修正下さい
また依頼あれば対応します
#!/bin/sh

# パッケージリストを取得して更新
opkg update

# 作業用ディレクトリ作成
mkdir -p /tmp/config-software

# パッケージリストをダウンロード
wget --no-check-certificate -O /tmp/config-software/package_list https://github.com/gSpotx2f/packages-openwrt/raw/master/current/

# パッケージのURLを抽出
PACKAGE_LIST=$(cat /tmp/config-software/package_list | sed -ne '/ <script type/,/<\/script>/p' | sed -e 's/<[^>]*>//g')

# パッケージ名を抽出する関数
extract_package() {
    local keyword="$1"
    echo ${PACKAGE_LIST} | awk -v keyword="$keyword" '{print substr($0,index($0,keyword),60)}' | awk '{sub(".ipk.*$",""); print $0;}'
}

# 必要なパッケージ名を抽出
INTERNET_DETECTOR=$(extract_package "current/internet-detector_")
INTERNET_DETECTOR_A=$(extract_package "current/luci-app-internet-detector")
INTERNET_DETECTOR_MODEM=$(extract_package "current/internet-detector-mod-modem")
INTERNET_DETECTOR_EMAIL=$(extract_package "current/internet-detector-mod-email")

# パッケージを順にダウンロードしてインストールする関数
download_and_install() {
    local URL="$1"
    local FILE="$2"
    echo "Downloading: $URL"
    wget --no-check-certificate -O /tmp/$FILE $URL
    if [ $? -eq 0 ]; then
        opkg install /tmp/$FILE
        rm /tmp/$FILE
        echo "Installed: $FILE"
    else
        echo "Error downloading $URL"
    fi
}

# /var/lock ディレクトリが存在しない場合、作成する
if [ ! -d /var/lock ]; then
    echo "/var/lock directory not found. Creating it now."
    mkdir -p /var/lock
    chmod 755 /var/lock  # 適切な権限を設定
fi

# パッケージのダウンロードとインストール
download_and_install "https://github.com/gSpotx2f/packages-openwrt/raw/master/${INTERNET_DETECTOR}.ipk" "internet-detector_all.ipk"
download_and_install "https://github.com/gSpotx2f/packages-openwrt/raw/master/${INTERNET_DETECTOR_A}.ipk" "luci-app-internet-detector_all.ipk"
download_and_install "https://github.com/gSpotx2f/packages-openwrt/raw/master/${INTERNET_DETECTOR_MODEM}.ipk" "internet-detector-mod-modem-restart_all.ipk"
download_and_install "https://github.com/gSpotx2f/packages-openwrt/raw/master/${INTERNET_DETECTOR_EMAIL}.ipk" "internet-detector-mod-email_all.ipk"

# サービスの再起動と有効化
/etc/init.d/internet-detector restart
/etc/init.d/internet-detector enable

# クリーンアップ
rm -rf /tmp/config-software
デバイス
- 検出
grep 1bc7 /sys/bus/usb/devices/*/idVendor
echo 1 > /sys/bus/usb/devices/2-1/bConfigurationValue
# echo "1bc7 1901" > /sys/bus/usb-serial/drivers/option1/new_id
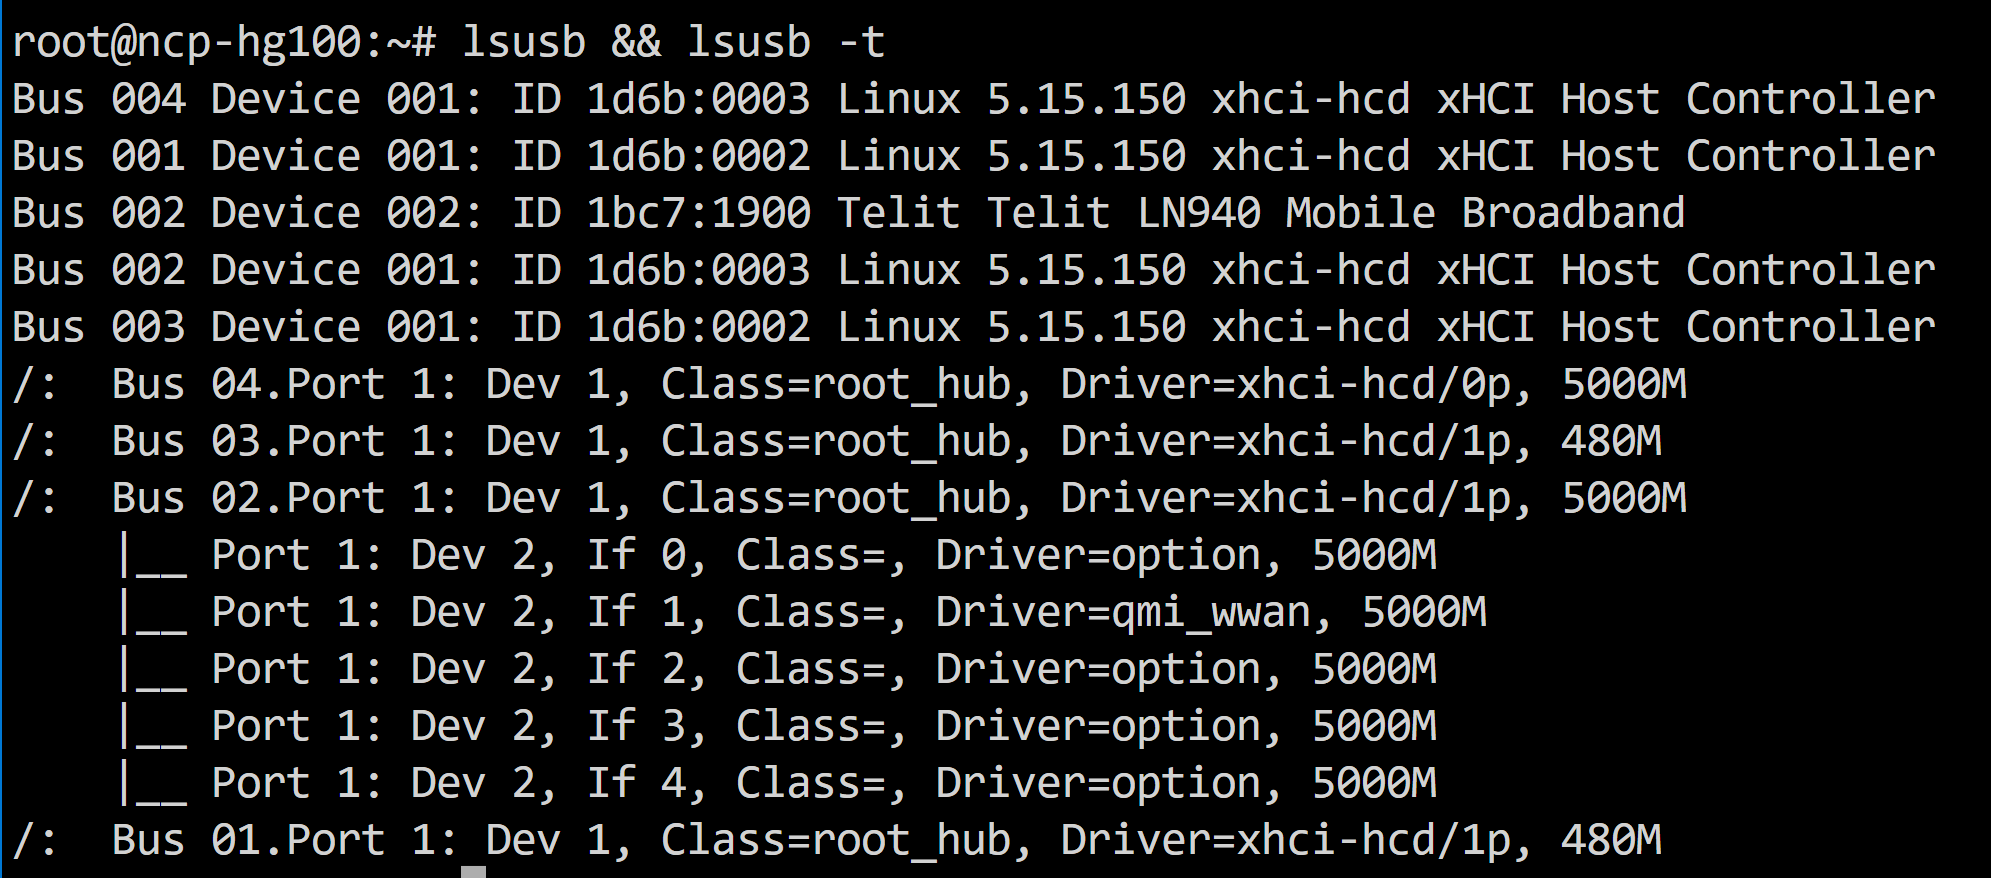
- 確認
lsusb && lsusb -t
ls -l /dev/cdc-wdm0
- リリース
※デバイス検出に失敗した時はリリースしてやり直す
echo -n "2-1" > /sys/bus/usb/drivers/usb/unbind
- ネットワークインターフェイス制御チャンネル確認
qmicli --device=/dev/cdc-wdm0 --device-open-proxy --wda-get-data-format
IPタイプ
- 確認
qmicli --device=/dev/cdc-wdm0 --get-expected-data-format
- IPタイプがRaw-IPではない場合
※Raw-IP を使用するように qmi_wwan ドライバーを変更
# ネットワーク インターフェイスを無効
ip link set dev wwan0 down
sleep 2
# Raw-IP サポートをトリガー
echo Y > /sys/class/net/wwan0/qmi/raw_ip
sleep 2
# ネットワーク インターフェイスを再度有効
ip link set dev wwan0 up
ATコマンド
- 開始
screen /dev/ttyUSB2 115200
screen :
開始: screen /dev/ttyUSB2 115200
終了: Ctrl+a k y
minicom:
開始: minicom -D /dev/ttyUSB2
終了: Ctrl+a q
picocom:
開始: picocom -b 115200 /dev/ttyUSB2
終了: Ctrl+a Ctrl+x
- エコーバック有効化
※大文字入力
ATE1
- 各情報取得
ATI
- バージョン確認
AT^VERSION?
- USBタイプ確認
AT^USBTYPE?
モード
- 確認
AT^SETMODE?
Telit Ln940 (Foxconn T77W676):
Normal Mode=0 (1bc7:1900) MBIM
Extension Mode=1 (1bc7:1901) MBIM + Serial port
Legacy Mode=2 (1bc7:1900) QMI + Serial port
HP Lt4220:
Normal Mode=0 (03f0:0857) MBIM
Extension Mode=1 (03f0:0a57) MBIM + Serial port
Legacy Mode=2 (03f0:0857) QMI + Serial port
- モード2変更 QMI + Serial port
AT^SETMODE= 2
※モード変更した場合、デバイスの電源を入れなおす
- キャリアデータ確認
※10秒以上かかる
AT+COPS=?
- キャリアデータ設定 (docomo)
AT+COPS=0,2,"44010",7
au: AT+COPS=0,2,"44051",7
SoftBank: AT+COPS=0,2,"44020",7
Rakuten: AT+COPS=0,2,"44110",7
UQ: AT+COPS=0,2,"44110",7
- 自局電話番号確認
AT+CNUM
- ATコマンド終了
Ctrl+aky
プロファイル
- 登録キャリアデータ確認
qmicli -d /dev/cdc-wdm0 --pdc-list-configs=software
- 登録キャリアデータ変更 (docomo)
CARRIERDATA='F3D782~'
qmicli -p -d /dev/cdc-wdm0 --pdc-activate-config="software,${CARRIERDATA}"
- 登録プロファイル確認
qmicli -d /dev/cdc-wdm0 --wds-get-profile-list=3gpp
- プロファイル登録 (docomo)
qmicli -d /dev/cdc-wdm0 --wds-modify-profile=3gpp,1,apn=spmode.ne.jp,pdp-type=IPV4V6,auth=CHAP,username=spmode,password=spmode,no-roaming=yes
Rakuten: qmicli -d /dev/cdc-wdm0 --wds-modify-profile=3gpp,1,apn=rakuten.jp,pdp-type=IPV4V6,auth=CHAP,username=,password=,no-roaming=yes
UQ: qmicli -d /dev/cdc-wdm0 --wds-modify-profile=3gpp,1,apn=uqmobile.jp,pdp-type=IP,auth=CHAP,username=uq@uqmobile.jp,password=uq
削除 (リスト1): qmicli -d /dev/cdc-wdm0 --wds-delete-profile=3gpp,1
削除 (リスト2): qmicli -d /dev/cdc-wdm0 --wds-delete-profile=3gpp,2
reboot
インターフェース
参考:docomo
WWAN="lte"
ZOON_NO='1'
uci set network.lte=interface
uci set network.lte.proto='modemmanager'
uci set network.lte.device='/sys/devices/platform/soc/8af8800.usb3/8a00000.dwc3/xhci-uci set hcd.0.auto/usb2/2-1'
uci set network.${wwan}.apn='spmode.ne.jp'
uci set network.${wwan}.auth='chap'
uci set network.${wwan}.allowedmode='4g'
uci set network.${wwan}.username='spmode'
uci set network.${wwan}.password='spmode'
uci set network.${wwan}.iptype='ipv4v6'
uci set network.${wwan}.loglevel='ERR'
uci set network.${wwan}.auto='0' #ブート時に開始されていません
uci set network.lte.defaultroute='0'
uci del_list firewall.@zone[${ZOON_NO}].network='wwan'
uci add_list firewall.@zone[${ZOON_NO}].network='wwan'
uci commit network
uci commit firewall

# 3ginfo
uci set 3ginfo.@3ginfo[0]=3ginfo
uci set 3ginfo.@3ginfo[0].network='wwan'
uci set 3ginfo.@3ginfo[0].device='/dev/ttyUSB2'
uci commit 3ginfo

# modemband
MODEM_ID="1bc7:1900" #モード1の場合: 1bc71901
uci set modemband.@modemband[0]=modemband
uci set modemband.@modemband[0].iface='wwan'
uci set modemband.@modemband[0].modemid=${MODEM_ID} #モデムID
uci set modemband.@modemband[0].set_port='/dev/ttyUSB2'
uci commit modemband

# sms_tool
PNUMBER='81'
uci set sms_tool_js.@sms_tool_js[0]=sms_tool_js
uci set sms_tool_js.@sms_tool_js[0].pnumber=${PNUMBER}
uci set sms_tool_js.@sms_tool_js[0].readport='/dev/ttyUSB2'
uci set sms_tool_js.@sms_tool_js[0].sendport='/dev/ttyUSB2'
uci set sms_tool_js.@sms_tool_js[0].ussdport='/dev/ttyUSB2'
uci set sms_tool_js.@sms_tool_js[0].atport='/dev/ttyUSB2'
uci commit sms_tool_js

 reboot
- 接続確認
ifconfig wwan0
QMI
- Device IDs retrieved
qmicli -d /dev/cdc-wdm0 -p --dms-get-ids
qmicli -d /dev/cdc-wdm0 --nas-get-system-selection-preference
- card status
qmicli -d /dev/cdc-wdm0 --device-open-proxy --uim-get-card-status
qmicli -d /dev/cdc-wdm0 --nas-get-rf-band-info
qmicli -d /dev/cdc-wdm0 --wds-get-current-settings
qmicli -d /dev/cdc-wdm0 --wds-get-packet-statistics
MBIM
- 使用可能なすべてのオプション
mbimcli --help-all
- バージョン確認
mbimcli --version
- デバイスの機能と情報 (ファームウェアと IMEI コードなど)
mbimcli --device=/dev/cdc-wdm0 --device-open-proxy --query-device-caps
- SIM カード情報
mbimcli -d /dev/cdc-wdm0 -p --query-subscriber-ready-status
- ネットワーク登録状態
mbimcli -d /dev/cdc-wdm0 -p --query-registration-state
- 接続 IP 情報
mbimcli -d /dev/cdc-wdm0 -p --query-ip-configuration=0
確認
- SMS
sms_tool -d /dev/ttyUSB2 -j recv
- PING IPV4
ping -4 -I wwan0 one.one.one.one
- PING IPV6
ping -6 -I wwan0 one.one.one.one
トラブル
- 要LTE/ 4G専用アンテナ (強度が低いと認証せず)
- wwanインターフェイスを再作成
- スタートアップモデムリセット
sed -i "/exit 0/d" /etc/rc.local
echo "/sbin/uqmi -d /dev/cdc-wdm0 --set-device-operating-mode offline" >> /etc/rc.local
echo "/sbin/uqmi -d /dev/cdc-wdm0 --set-device-operating-mode reset" >> /etc/rc.local
echo "/bin/sleep 20" >> /etc/rc.local
echo "/sbin/uqmi -d /dev/cdc-wdm0 --set-device-operating-mode online" >> /etc/rc.local
echo "/sbin/uqmi -d /dev/cdc-wdm0 --set-autoconnect enabled" >> /etc/rc.local
echo "/sbin/uqmi -d /dev/cdc-wdm0 --network-register" >> /etc/rc.local
echo "exit 0" >> /etc/rc.local
- opkg updateエラー対策
# wget-nossl削除
opkg remove wget-nossl
デバイス更新
設定
wget /tmp/openwrt-23.05.2-ipq40xx-generic-sony_ncp-hg100-cellular-squashfs-sysupgrade.bin https://downloads.openwrt.org/releases/23.05.2/targets/ipq40xx/generic/openwrt-23.05.2-ipq40xx-generic-sony_ncp-hg100-cellular-squashfs-sysupgrade.bin
sysupgrade -v /tmp/openwrt-23.05.2-ipq40xx-generic-sony_ncp-hg100-cellular-squashfs-sysupgrade.bin
opkg update
luci-app-attendedsysupgrade
リカバリ
設定
#!/bin/sh
echo -en '\x00' | dd of=/dev/mmcblk0p2 bs=1 count=1 seek=28 conv=notrunc
echo -en '\x00' | dd of=/dev/mmcblk0p2 bs=1 count=1 seek=48 conv=notrunc
echo -en '\x00' | dd of=/dev/mmcblk0p2 bs=1 count=1 seek=68 conv=notrunc
echo -en '\x00' | dd of=/dev/mmcblk0p2 bs=1 count=1 seek=88 conv=notrunc
echo -en '\x00' | dd of=/dev/mmcblk0p2 bs=1 count=1 seek=108 conv=notrunc
echo -en '\x00' | dd of=/dev/mmcblk0p7 bs=1 count=1 seek=28 conv=notrunc
echo -en '\x00' | dd of=/dev/mmcblk0p7 bs=1 count=1 seek=48 conv=notrunc
echo -en '\x00' | dd of=/dev/mmcblk0p7 bs=1 count=1 seek=68 conv=notrunc
echo -en '\x00' | dd of=/dev/mmcblk0p7 bs=1 count=1 seek=88 conv=notrunc
echo -en '\x00' | dd of=/dev/mmcblk0p7 bs=1 count=1 seek=108 conv=notrunc
トラブル
詳細
デバイスは OpenWRT を USB から起動しますが、eMMC からは起動しません / ネットワーク インターフェイスが起動しません
dd if=/dev/zero bs=512 seek=7552991 of=/dev/mmcblk0 count=33
dd if=/dev/zero bs=1M of=/dev/mmcblk0
参考
U-BOOT
設定
U-BOOT確認
printenv
初期値
set bootcmd bootipq
set ipaddr 192.168.132.1
set serverip 192.168.132.100
saveenv
消去
setenv bootargs
setenv bootcmd
setenv ipaddr
setenv serverip
setenv bootfile
saveenv
ブートローダー (U-Boot) 仕様
U-BOOTユーザーズマニュアル
U-Boot コマンドの使用
NCP-HG100 調査中
URoad-Home2+にLTEモジュール(T77W676)を搭載してみた
T77W676の流用でこんな面白い事をしている方が居ました
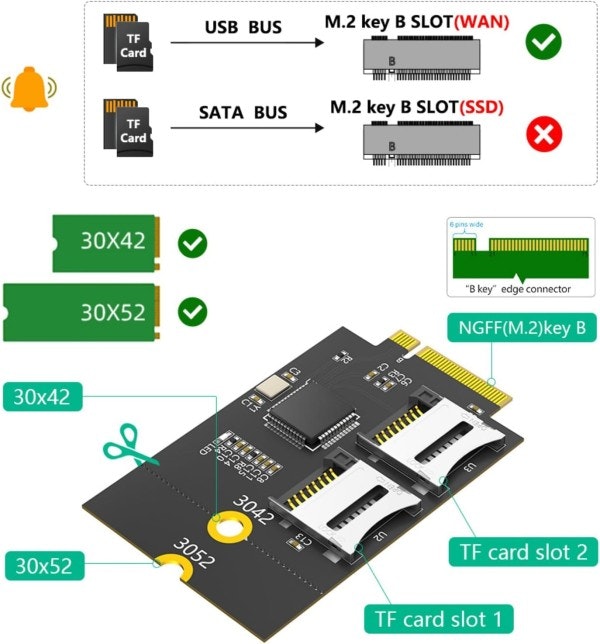
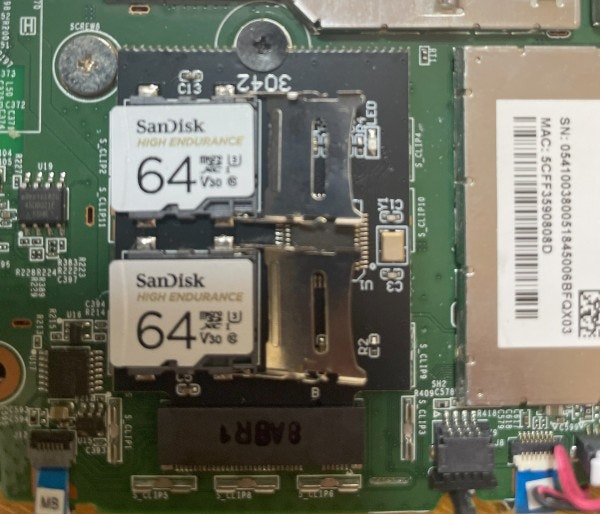
SDカードスロットRAID(モデム排他交換)
設定
- デバイスID: 058f:6465
製造元: Alcor Micro Corp.
USB 2.0接続(多分)
※カードの幅がほんの少しモデムカードより広いので、モデムカバーのガイドレールを引っ剥がす(マイナスドライバーなどでこじると剥がせる)
RAID
opkg update
opkg install kmod-usb-storage
opkg install mount-utils
opkg install kmod-scsi-core
opkg install kmod-scsi-generic
opkg install parted
opkg install e2fsprogs
opkg install kmod-fs-ext4
opkg install mdadm
# opkg install hdparm
ls /dev/sd*
sdaとsdbをフォーマット及びマウント
SD=a
parted /dev/sd${SD}
mklabel gpt
mkpart ext4 0% 100%
set 1 raid on
p
q
md0をRAID1でマウント
mdadm --create /dev/md0 --level=1 --raid-devices=2 /dev/sda1 /dev/sdb1
確認
mdadm --detail /dev/md0
mkfs.ext4 /dev/md0
mount -t ext4 /dev/md0 /mnt/md0
同期確認
cat /proc/mdstat
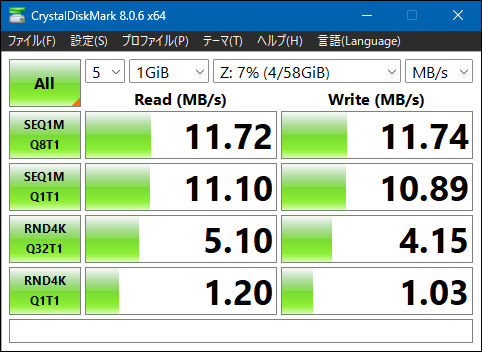
速度測定
hdparm -tT /dev/md0
あとがき
先輩方の記事で十分事足りるので、正直だいぶ手抜きな備忘録となった
未使用品も格安で手に入る
シリアル接続は初心者の方には少し敷居が高いと感じるかもしれませんが、
初めてチャレンジしたが、一度やってみると思った程難しくは無かった
安定稼働中
検証(遊び)でRAIDを組んでみたが、なんか遅い・・・ << 同期中だった


