2025年10月1日に Microsoft Agent Framework が発表されました。「なぜ AutoGen の革新性と Semantic Kernel の信頼性と安定性の両方を 1 つの統合フレームワークで実現できないのか?」という問いかけから開発が始まったとのことで、今回 Microsoft Agent Framework の登場によってチームは実験環境か本番環境かどうかを気にする必要はなく安心して展開できるようになります。
フレームワークの一般的な機能紹介は上記でしてくれていますが、AutoGen の進化の歴史を見てきたアーキテクトの観点から今回の Microsoft Agent Framework の改良点や利点を明らかにしていきたいと思います。特にコンテキストエンジニアリングの観点から、コンテキスト共有の実装については注意深く見ていこうと思います。
Agents Framework Components
- Agents
- Threading ⭐️
- Tools
- Middleware ⭐️
- Memory
- Observability
- Workflow
- DevUI ⭐️
⭐️ は AutoGen には無かった概念・機能の実装。
Install
Python: pip install agent-framework --pre
.NET: dotnet add package Microsoft.Agents.AI
機能比較表
| 機能 | AutoGen | Agent Framework |
|---|---|---|
| プログラミングモデル | 二層(Core/Team) | 統一ワークフロー |
| フロータイプ | 制御フロー | データフロー |
| 型安全性 | 限定的 | 包括的 |
| ノードタイプ | エージェントのみ | エージェント、関数、サブワークフロー |
| Human-in-the-Loop | カスタム実装必要 | ✅ ネイティブサポート |
| チェックポイント | なし | ✅ 自動永続化 |
| ミドルウェア | なし | ✅ 完全サポート |
| ホスト型ツール | 限定的 | ✅ 豊富(コード実行、Web検索等) |
| MCPサポート | 基本的 | ✅ 包括的(Stdio, HTTP, WebSocket) |
| 可観測性 | 対応 | ✅ ゼロコード + プログラマティック |
| 並行実行 | 限定的 | ✅ ネイティブサポート |
| ワークフロー可視化 | 実験的 | ✅ 組み込み(SVG, Mermaid) |
| 状態管理 | 手動 | ✅ 自動(ローカル + 共有) |
Agent Framework で利用可能な Agents
- ChatAgent(標準)
- Azure AI Foundry Agent Serivce
- Azure OpenAI Chat Completion
- Azure OpenAI Responses
- OpenAI Chat Completion
- OpenAI Responses
- OpenAI Assistants
- CopilotStudioAgent
- A2AAgent
- Any other ChatClient
⭐️ AgentThread による会話状態の管理
単一エージェントの対話はステートレスです。ChatAgent との会話を続けるには、 AgentThread を使用して会話履歴を管理できるようになりました。これが最も基本的なコンテキスト共有の仕組みです。
# スレッドなし(2つの独立した呼び出し)
r1 = await agent.run("2+2は?")
print(r1.text)  # e.g., "4"
r2 = await agent.run("その数字に10を掛けるとどうなる?")
print(r2.text)  # コンテキストがなければ曖昧な可能性あり;「40」とは限らない

# スレッドを使用(呼び出し間で共有されるコンテキスト)
thread = agent.get_new_thread()
print((await agent.run("2+2は?", thread=thread)).text)  # "4"
print((await agent.run("その数字に10を掛けるとどうなる?", thread=thread)).text)  # "40
会話状態管理の違い
| 機能 | AutoGen | Agent Framework |
|---|---|---|
| スレッド抽象化 | なし | ✅ AgentThread クラス |
| 会話履歴の管理 |
AssistantAgent 内部で自動 |
明示的なスレッド操作 |
| シリアライズ | 標準機能なし | ✅ thread.serialize()
|
| 復元 | 手動実装が必要 | ✅ シリアライズデータから復元可能 |
| 複数スレッド対応 | 手動実装が必要 | ✅ 複数スレッドの並行管理 |
# メッセージの内容を詳しく見てみる
messages = await thread.message_store.list_messages()
print(f"メッセージ数: {len(messages)}")
print("=" * 50)

for i, msg in enumerate(messages):
    print(f"メッセージ {i + 1}:")
    print(f"  役割: {msg.role}")
    print(f"  テキスト: {msg.text}")
Tool Creation and Integration
ツールはテキスト生成を超えてエージェントの機能を拡張します。フレームワークはツール作成において異なるアプローチを取っており、Agent Framework はより自動化されたスキーマ生成を提供します。
Agent Framework は、エージェントレベルでツールの反復処理を自動で行います。AutoGen のmax_tool_iterations パラメータとは異なり、Agent Framework のエージェントは、無限ループを防ぐための安全機構を組み込んでおり、デフォルトで完了までツールの実行を継続します。
from agent_framework import ai_function
from typing import Annotated
from pydantic import Field

@ai_function
def get_weather(
    location: Annotated[str, Field(description="The location to get weather for")]
) -> str:
    """Get weather for a location."""
    return f"Weather in {location}: sunny"

# Direct use with agent (automatic conversion)
agent = ChatAgent(name="assistant", chat_client=client, tools=[get_weather])
Hosted Tools
Agent Framework は、AutoGen では利用できないホスト ツールを提供します。ホスト型ツールは、それらをサポートするモデル/アカウントでのみ利用できます。これらのツールを有効にする前に、プロバイダーの権限とモデルサポートを確認してください。以下は Azure AI Foundry Agent との連携。
from agent_framework import ChatAgent, HostedCodeInterpreterTool, HostedWebSearchTool
from agent_framework.azure import AzureOpenAIChatClient

# Code execution tool
code_tool = HostedCodeInterpreterTool()

# Web search tool
search_tool = HostedWebSearchTool()

agent = ChatAgent(
    name="researcher",
    chat_client=client,
    tools=[code_tool, search_tool]
)
MCP Server Support
高度なツール統合のため、両フレームワークはモデルコンテキストプロトコル(MCP)をサポートし、エージェントが外部サービスやデータソースと相互作用することを可能にします。Agent Framework はより包括的な組み込みサポートを提供します。
from agent_framework import ChatAgent, MCPStdioTool, MCPStreamableHTTPTool, MCPWebsocketTool
from agent_framework.openai import OpenAIChatClient

# Stdio MCP server
mcp_tool = MCPStdioTool(
    name="filesystem",
    command="uvx mcp-server-filesystem",
    args=["/allowed/directory"]
)

# HTTP streaming MCP
http_mcp = MCPStreamableHTTPTool(
    name="http_mcp",
    url="https://learn.microsoft.com/api/mcp"
)

# WebSocket MCP
ws_mcp = MCPWebsocketTool(
    name="websocket_mcp",
    url="ws://localhost:8000/ws"
)

agent = ChatAgent(name="assistant", chat_client=client, tools=[http_mcp])
⭐️ Agent-as-a-Tool Pattern
新たなマルチエージェントの強力なパターンの一つは、エージェント自体をツールとして使用し、階層的なエージェントアーキテクチャを実現することです。シンプルなマルチエージェントパターンを実装したい場合は、この機能で実現できます。
from agent_framework import ChatAgent

# Assume we have client from previous examples
# Create specialized agent
writer = ChatAgent(
    name="writer",
    chat_client=client,
    instructions="You are a creative writer."
)

# Convert to tool
writer_tool = writer.as_tool(
    name="creative_writer",
    description="Generate creative content",
    arg_name="request",
    arg_description="What to write"
)

# Use in coordinator
coordinator = ChatAgent(
    name="coordinator",
    chat_client=client,
    tools=[writer_tool]
)
⭐️ Middleware
Agent Framework は AutoGen に欠けているミドルウェア機能を導入します。ミドルウェアにより、ロギング、セキュリティ、パフォーマンス監視といった強力な横断的関心事の処理が可能になります。
from agent_framework import ChatAgent, AgentRunContext, FunctionInvocationContext
from typing import Callable, Awaitable

# 以前の例からクライアントがあると仮定する
async def logging_middleware(
    context: AgentRunContext,
    next: Callable[[AgentRunContext], Awaitable[None]]
) -> None:
    print(f"Agent {context.agent.name} starting")
    await next(context)
    print(f"Agent {context.agent.name} completed")

async def security_middleware(
    context: FunctionInvocationContext,
    next: Callable[[FunctionInvocationContext], Awaitable[None]]
) -> None:
    if "password" in str(context.arguments):
        print("機密データを含む関数呼び出しのブロック")
        return  # Don't call next()
    await next(context)

agent = ChatAgent(
    name="secure_agent",
    chat_client=client,
    middleware=[logging_middleware, security_middleware],
    tools=[writer_tool]
)
Memory
エージェントメモリは、エージェントが会話間でコンテキストを維持し、ユーザーの好みを記憶し、パーソナライズされた体験を提供するための重要な機能です。エージェントフレームワークは、単純なインメモリストレージから永続データベース、専用メモリサービスに至るまで、様々なユースケースに対応する複数のメモリ機構を提供します。
Memory の種類
エージェントフレームワークは、短期記憶の一部としてチャット履歴を管理したり、長期記憶を抽出して保存しエージェントに注入するための拡張ポイントを提供したりするなど、様々なユースケースに対応するため、複数のメモリタイプをサポートしています。
- In-Memory Storage (Default): チャットスレッドのこと
- Persistent Message Stores
- Built-in ChatMessageStore
- Redis Message Store
- Custom Message Store
- Context Providers (Dynamic Memory)
- External Memory Services(Mem0)
Persistent Message Stores
セッション間で会話履歴を保持する必要のあるアプリケーションの場合、ChatMessageStore フレームワークは次の実装を提供します。
Redis Message Store
現在は永続ストレージとして Redis が指定できますが、今後は CosmosDB や Azure AI Search が追加されるでしょう。
from agent_framework.redis import RedisChatMessageStore

def create_redis_store():
    return RedisChatMessageStore(
        redis_url="redis://localhost:6379",
        thread_id="user_session_123",
        max_messages=100  # Keep last 100 messages
    )

agent = ChatAgent(
    chat_client=OpenAIChatClient(),
    instructions="You are a helpful assistant.",
    chat_message_store_factory=create_redis_store
)
Context Providers (Dynamic Memory)
コンテキスト プロバイダーは、各エージェントの呼び出しの前に関連するコンテキストを挿入することで、洗練されたメモリ パターンを実現します。メモリ設計については以下のスコープに分類できます。
| スコープ | 説明 | ユースケース |
|---|---|---|
| グローバル | 全スレッドで共有 | ユーザープロファイル、基本設定 |
| スレッド単位 | スレッドごとに独立 | プロジェクト固有の情報 |
| エージェント単位 | エージェントごとに独立 | パーソナル/ビジネス コンテキストの分離 |
Mem0Provider
from agent_framework.mem0 import Mem0Provider

# Using Mem0 for advanced memory capabilities
memory_provider = Mem0Provider(
    api_key="your-mem0-api-key",
    user_id="user_123",
    application_id="my_app"
)

agent = ChatAgent(
    chat_client=OpenAIChatClient(),
    instructions="You are a helpful assistant with memory.",
    context_providers=memory_provider
)
Mem0 についてはすでに Azure AI Search との連携を AutoGen で実現していましたね。メモリ機能についてはさらなる探究が必要です。

Agent Framework がコンテキストエンジニアリングマップをしっかりとカバーしていることは分かりました。
Multi-Agent Orchestration(WorkFlow)
AutoGen のマルチエージェントパターンの移行状況
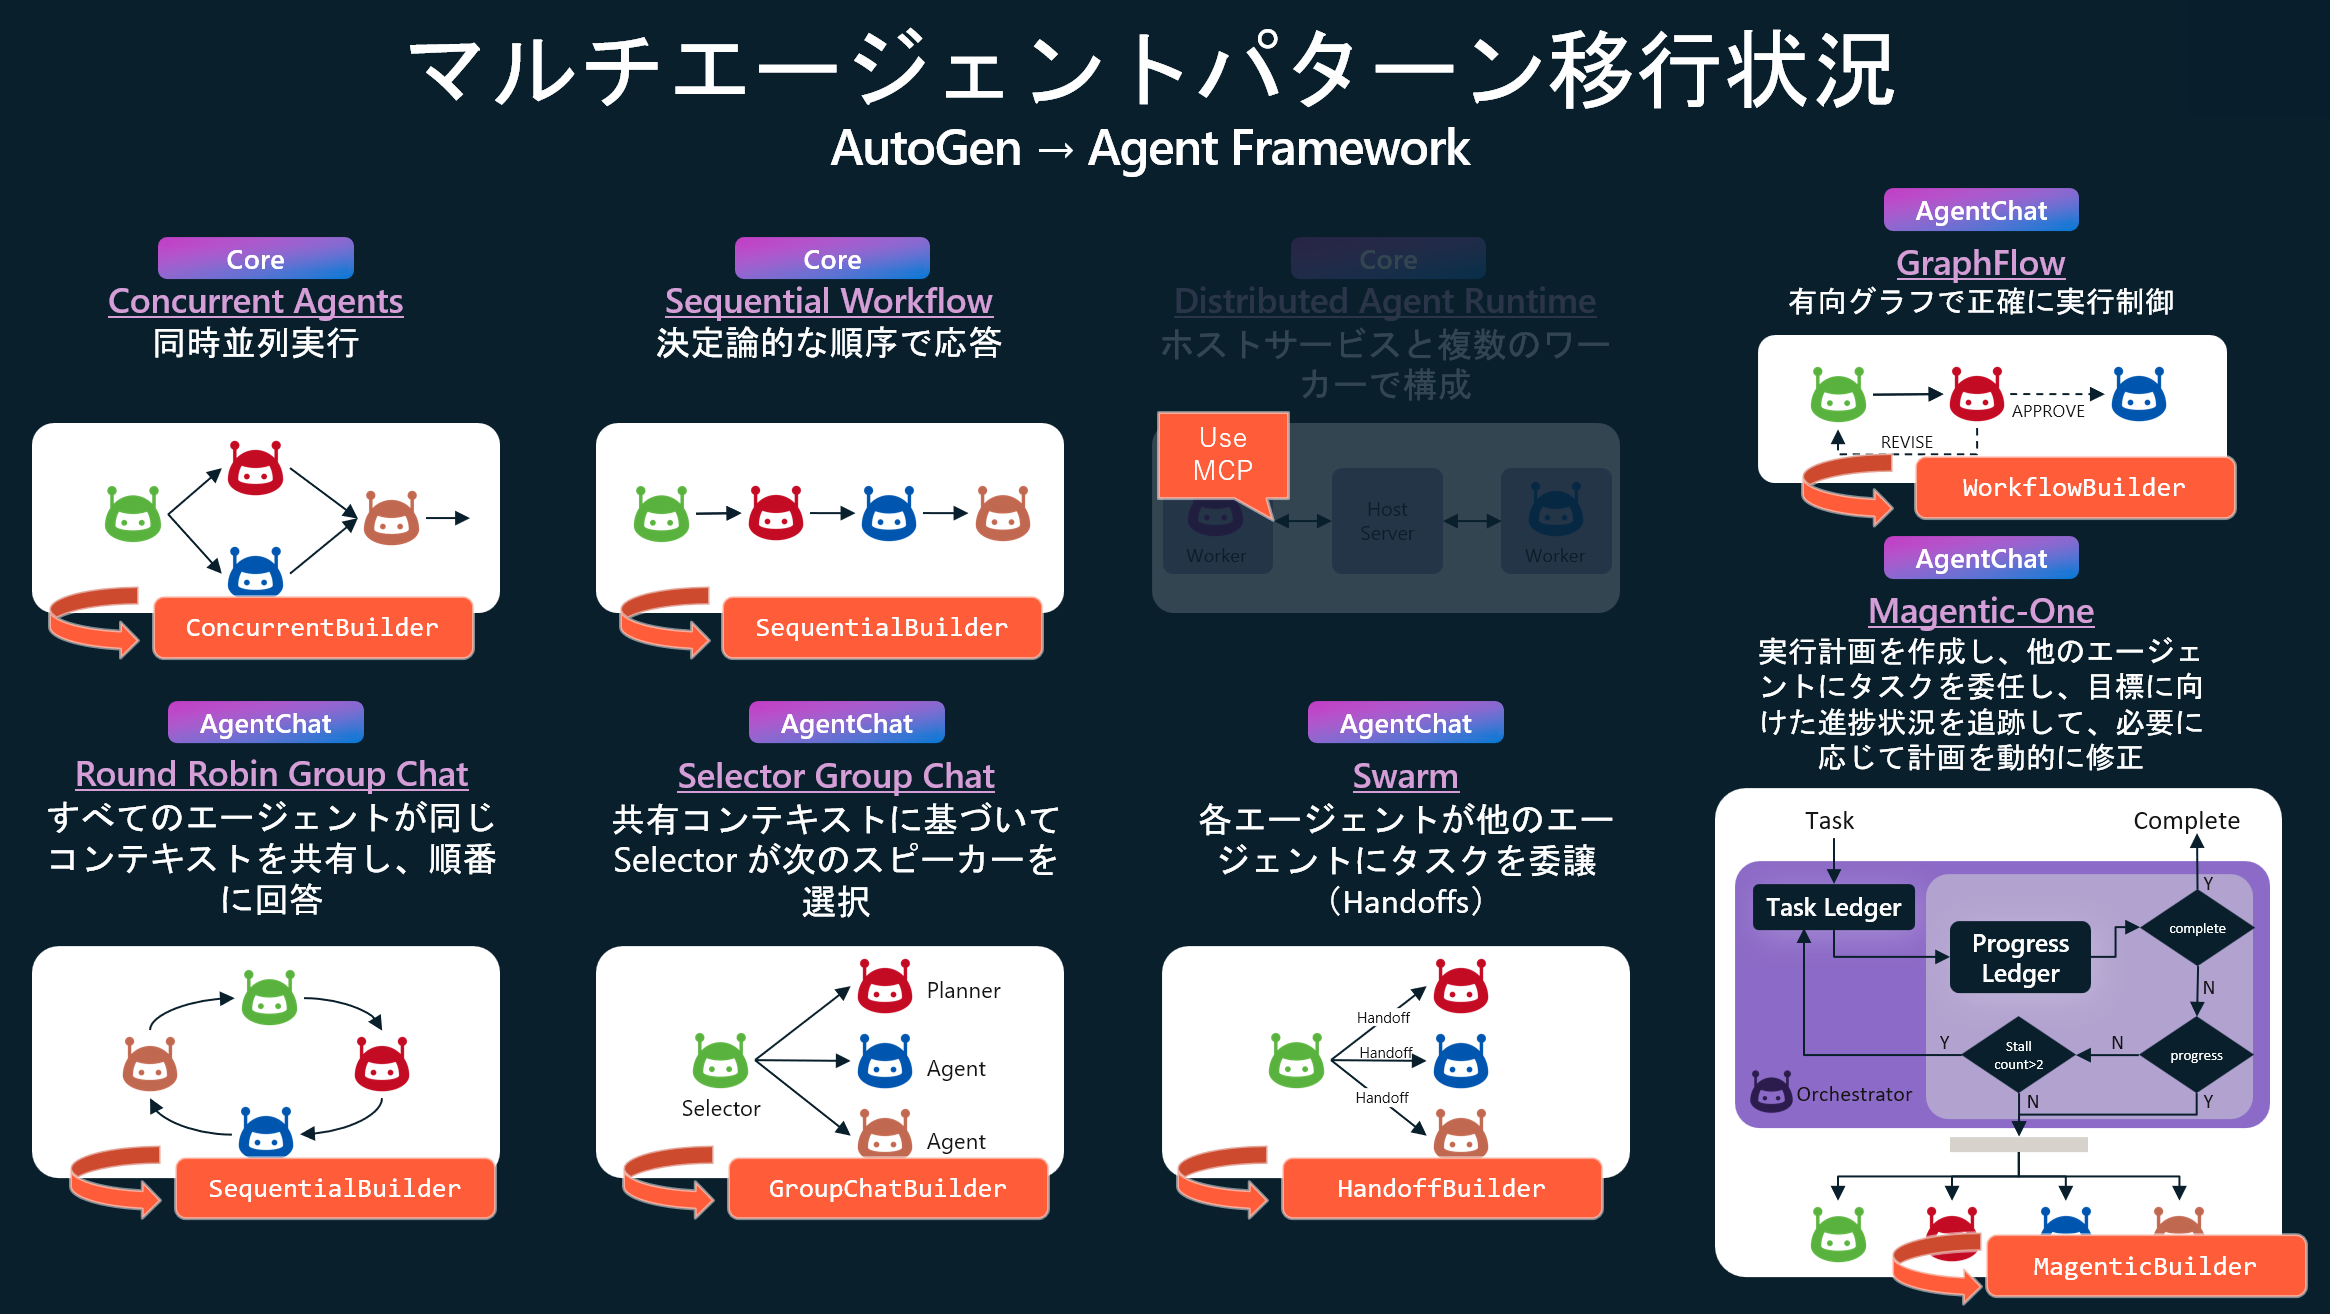
AutoGen の課題:
- 低レベルモデル(Core API)は多くのユーザーにとって複雑すぎる
- 高レベルモデル(AgentChat API)は複雑な動作に対して制約となり得る
- 両モデルの橋渡しは実装の複雑さを増す
Agent Framework は、両方のアプローチの長所を組み合わせた単一のワークフロー抽象化を提供します。
GraphFlow vs WorkFlow
Agent Framework のワークフロー抽象化は AutoGen の実験的機能 GraphFlow に着想を得ていますが、設計思想において重要な進化を遂げています。
- GraphFlow:制御フローベース。エッジは遷移を表し、メッセージは全エージェントにブロードキャストされる。遷移はブロードキャストされたメッセージ内容によって条件付けられる
- WorkFlow:データフローベース。メッセージは特定のエッジを経由してルーティングされ、エッジによって Executor が起動される。並行実行をサポートする。
GraphFlow はエージェントを条件付き遷移とブロードキャストを持つノードとしてモデル化します。ワークフローは型付きエッジで接続された Executor(エージェント、関数、サブワークフロー)をモデル化し、リクエスト/レスポンスによる一時停止やチェックポイント機能もサポートします。
| 観点 | AutoGen | Agent Framework |
|---|---|---|
| 基本パラダイム | 制御フロー(GraphFlow) | データフロー(WorkFlow) |
| 設計思想 | 「誰が次に話すか」を制御 | 「データがどこへ流れるか」を定義 |
| グラフの意味 | 実行順序の可能性を表現 | データの流れを表現 |
| エッジの役割 | 条件付き状態遷移 | 型付きデータパス |
| ノード種別 | エージェントのみ | エージェント + 関数 + サブワークフロー |
| メッセージ配信 | ブロードキャスト (全ノードが全メッセージを受信) |
ポイントツーポイント (エッジで定義されたパスのみ) |
AutoGen の制御フローをデータフローに変えてきたあたり、Microsoft らしいというか・・・Azure ML Pipeline や Prompt flow の系譜を感じざるを得ない。
ワークフロー基礎
WorkflowBuilder
- 汎用的で柔軟なワークフロー構築
- ファンアウト/ファンイン、集約ロジックを明示的に実装
- より細かい制御が可能
Concurrent/Sequential/Magentic Builder
- エージェント専用の簡潔な API
- 内部的にディスパッチャーとアグリゲーターを自動生成
- ボイラープレートコードが不要
1. WorkflowBuilder
1.1. Sequential + Conditional
Agent Framework のワークフローのノード(Executor)はエージェント、純粋関数、またはサブワークフローとなり得ます。注目は add_edge できるのがエージェントに限らないという点ですね。Executor によって任意の関数を噛ませることができるというのと、メッセージの送信をコントロールできるという点が AutoGen と異なります。
# Agent Framework Workflow — 条件付きロジックを備えた順次実行
from agent_framework import WorkflowBuilder, executor, WorkflowContext
from typing_extensions import Never

@executor(id="writer")
async def writer_exec(task: str, ctx: WorkflowContext[str]) -> None:
    await ctx.send_message(f"Draft: {task}")

@executor(id="reviewer")
async def reviewer_exec(draft: str, ctx: WorkflowContext[str]) -> None:
    decision = "approve" if "solar" in draft.lower() else "revise"
    await ctx.send_message(f"{decision}:{draft}")

@executor(id="editor")
async def editor_exec(msg: str, ctx: WorkflowContext[Never, str]) -> None:
    if msg.startswith("approve:"):
        await ctx.yield_output(msg.split(":", 1)[1])
    else:
        await ctx.yield_output("Needs revision")

workflow_seq = (
    WorkflowBuilder()
    .add_edge(writer_exec, reviewer_exec)
    .add_edge(reviewer_exec, editor_exec)
    .set_start_executor(writer_exec)
    .build()
)

注目👀:型安全なメッセージルーティング
- 入力型: ハンドラーの第一引数の型アノテーションから自動検出
- 出力型:
ctx.send_message()で送信するメッセージの型 - ワークフロー出力型:
ctx.yield_output()で返す最終結果の型
1.2. Fan‑out + Fan-in
並行処理パターンにおける Fan-out (ファンアウト) と Fan-in (ファンイン/合流) は、複数のタスクを並列実行し、その結果を統合する際の重要なパターンです。Agent Framework では、add_fan_out_edges と add_fan_in_edges が利用可能です。
@executor(id="dispatcher")
async def dispatcher(task: str, ctx: WorkflowContext[str]) -> None:
    await ctx.send_message(task)  # ← target_id 指定なし

@executor(id="worker1")
async def worker1(text: str, ctx: WorkflowContext[str]) -> None:
    await asyncio.sleep(2)
    await ctx.send_message(f"Worker1 result: {text}")

@executor(id="worker2")
async def worker2(text: str, ctx: WorkflowContext[str]) -> None:
    await asyncio.sleep(5)
    await ctx.send_message(f"Worker2 result: {text}")

@executor(id="aggregator")
async def aggregator(results: list[str], ctx: WorkflowContext[Never, str]) -> None:
    # FanInEdgeGroup が自動的にリストに集約
    await ctx.yield_output("Aggregated: " + " | ".join(results))

# Fan-out と Fan-in の組み合わせ
wf_combined = (
    WorkflowBuilder()
    .add_fan_out_edges(dispatcher, [worker1, worker2])  # dispatcher → [worker1, worker2]
    .add_fan_in_edges([worker1, worker2], aggregator)   # [worker1, worker2] → aggregator
    .set_start_executor(dispatcher)
    .build()
)

注目👀:実行フロー:
-
dispatcherがtaskを1回送信 -
FanOutEdgeGroupが自動的にworker1とworker2に配信 - Sleep 後、両方が完了
-
FanInEdgeGroupが結果を集約してaggregatorを1回実行

1.3. Targeted Routing (no broadcast)
Targeted Routing は、Agent Framework のデータフロー型アーキテクチャにおける中核的な機能で、AutoGen のブロードキャスト方式とは根本的に異なるメッセージング戦略を採用しています。この機能により、メッセージを特定の宛先に直接送信することで、通信効率と予測可能性を大幅に向上させることができます。
from agent_framework import WorkflowBuilder, executor, WorkflowContext
from typing_extensions import Never

@executor(id="ingest")
async def ingest(task: str, ctx: WorkflowContext[str]) -> None:
    # Route selectively using target_id
    if task.startswith("image:"):
        await ctx.send_message(task.removeprefix("image:"), target_id="vision")
    else:
        await ctx.send_message(task, target_id="writer")

@executor(id="writer")
async def write(text: str, ctx: WorkflowContext[Never, str]) -> None:
    await ctx.yield_output(f"Draft: {text}")

@executor(id="vision")
async def caption(image_ref: str, ctx: WorkflowContext[Never, str]) -> None:
    await ctx.yield_output(f"Caption: {image_ref}")

workflow = (
    WorkflowBuilder()
    .add_edge(ingest, write)
    .add_edge(ingest, caption)
    .set_start_executor(ingest)
    .build()
)

# Example usage (async):
await workflow.run("Summarize the benefits of solar power")
await workflow.run("image:https://example.com/panel.jpg")

WorkflowBuilder と Executor を組み合わせることで、これまでに無かった自由度の高さと決定論的データフローを実現しています。
2. ConcurrentBuilder
並列オーケストレーションにより、複数のエージェントが同一タスクを並行して処理できます。各エージェントは入力を独立して処理し、その結果が集約されます。この手法は、ブレインストーミング、アンサンブル推論、投票システムなど、多様な視点や解決策が価値を持つシナリオに最適です。
from agent_framework import ConcurrentBuilder, WorkflowOutputEvent

agent1 = ChatAgent(
    name="writer",
    chat_client=client,
    instructions="You are a creative writer."
)

agent2 = ChatAgent(
    name="reviewer",
    chat_client=client,
    instructions="You are a creative reviewer."
)

agent3 = ChatAgent(
    name="editor",
    chat_client=client,
    instructions="You are a meticulous editor."
)

# Concurrent workflow for parallel processing
workflow = (ConcurrentBuilder()
           .participants([agent1, agent2, agent3])
           .build())

# Example usage (would be in async context)
async def concurrent_example():
    with tracer.start_as_current_span("ConcurrentBuilder1") as rollspan: # ルートスパンを作成
        # All agents process the input concurrently
        async for event in workflow.run_stream("生成AI時代におけるバズる Tech Event とは?"):
            if isinstance(event, WorkflowOutputEvent):
                results = event.data  # Combined results from all agents

                print("=== Concurrent Results ===")
                for i, res in enumerate(results):
                    print(f"Agent {i+1} result: {res.text}")

注目👀:内部で自動生成されるもの:
- ディスパッチャー (入力を各エージェントに配信)
- 各エージェント用のラッパーExecutor
- アグリゲーター (全結果を集約)
- エッジ定義
複数のエージェントに同じ入力を並列処理させたい、全エージェントの結果を単純に集約したい、素早くプロトタイプを作りたい、エージェント専用の並列処理を作りたい場合 ConcurrentBuilder が適しています。
3. SequentialBuilder as Group Chat Patterns
順次オーケストレーションでは、エージェントはパイプラインに組織化されます。各エージェントは順番にタスクを処理し、その出力をシーケンス内の次のエージェントに渡します。これは、文書レビュー、データ処理パイプライン、多段階推論など、各ステップが前のステップを基盤とするワークフローに理想的です。
from agent_framework import SequentialBuilder, WorkflowOutputEvent
from agent_framework import ChatAgent

# 以前の例から、エージェント1、エージェント2、エージェント3があると仮定
# Sequential workflow through participants
workflow = SequentialBuilder().participants([agent1, agent2, agent3]).build()

# Example usage (would be in async context)
async def sequential_example():
    with tracer.start_as_current_span("SequentialBuilder1") as rollspan: # ルートスパンを作成
        # Each agent appends to shared conversation
        async for event in workflow.run_stream("新しい発電方法のアイデアについて議論して"):
            if isinstance(event, WorkflowOutputEvent):
                conversation_history = event.data  # list[ChatMessage]
まぁ Group Chat パターンは Sequential フローですからね。。。この実装になると思います。
4. MagenticBuilder パターン
Magentic オーケストレーションは、AutoGen が開発した Magentic-One システムに基づいて設計されています。これは、動的なコラボレーションを必要とする複雑でオープンエンドなタスク向けに設計された、柔軟で汎用的なマルチエージェントパターンです。このパターンでは、専任の Magentic マネージャーが専門エージェントのチームを調整し、変化するコンテキスト、タスクの進捗状況、エージェントの能力に基づいて、次にどのエージェントが行動すべきかを選択します。

Magentic マネージャーは、共有コンテキストを維持し、進捗状況を追跡し、ワークフローをリアルタイムに適応させます。これにより、システムは複雑な問題を細分化し、サブタスクを委任し、エージェント間の連携を通じてソリューションを反復的に改良することが可能になります。このオーケストレーションは、解決策のパスが事前に不明で、複数回の推論、調査、DeepResearch、計算が必要となるシナリオに特に適しています。
from agent_framework import (
    MagenticBuilder, MagenticCallbackMode, WorkflowOutputEvent,
    MagenticCallbackEvent, MagenticOrchestratorMessageEvent, MagenticAgentDeltaEvent
)

researcher = ChatAgent(
    name="researcher",
    chat_client=client,
    instructions="You are a diligent researcher."
)

coder = ChatAgent(
    name="coder",
    chat_client=client,
    instructions="You are a skilled Python coder."
)

# 研究者、コーダー、およびクライアント調整役
async def on_event(event: MagenticCallbackEvent) -> None:
    if isinstance(event, MagenticOrchestratorMessageEvent):
        print(f"[ORCHESTRATOR]: {event.message.text}")

workflow = (MagenticBuilder()
           .participants(researcher=researcher, coder=coder)
           .on_event(on_event, mode=MagenticCallbackMode.STREAMING)
           .with_standard_manager(
               chat_client=client,
               max_round_count=20,
               max_stall_count=3,
               max_reset_count=2
           )
           .build())

# Example usage (would be in async context)
with tracer.start_as_current_span("MagenticBuilder1") as rollspan: # ルートスパンを作成
    result = await workflow.run(
        "ブラックホールがどのように光を曲げるのかシミュレーションしたい。",
    )

    print("\n=== Magentic Final Result ===")
    print(result)
注目👀:エージェントフレームワークのカスタマイズオプション:
- マネージャー設定: カスタムオーケストレーターモデルとプロンプト
-
ラウンド制限:
max_round_count,max_stall_count,max_reset_count - イベントコールバック:詳細なイベントフィルタリングによるリアルタイムストリーミング
- エージェント特化:エージェントごとのカスタム指示とツール
- コールバックモード:STREAMING(リアルタイム更新用)または BATCH(最終結果用)
- Human-in-the-loop 計画:対話型ワークフロー向けカスタムプランナー機能
🚧 将来のマルチエージェントパターン
実装されました。
-
Swarm: ハンドオフベースのエージェントの調整 →
HandoffBuilder -
SelectorGroupChat: LLM 駆動スピーカーの選択 →
GroupChatBuilder
5. ⭐️ Shared States
Shared State により、ワークフロー内の複数の Executor が共通データにアクセスし、変更できるようになります。この機能は、ワークフローの複数の部分で情報を共有する必要があるものの、直接的なメッセージパッシングが実現不可能または効率的でないシナリオにおいて不可欠です。
from agent_framework import WorkflowBuilder, executor, WorkflowContext
from typing_extensions import Never

# Executor 1: 共有状態にデータを保存
@executor(id="setter")
async def setter_exec(input_data: str, ctx: WorkflowContext[str]) -> None:
    # 共有状態にデータを保存
    await ctx.set_shared_state("user_name", "田中太郎")
    await ctx.set_shared_state("age", 30)
    await ctx.set_shared_state("city", "東京")

    await ctx.send_message(input_data)

# Executor 2: 共有状態からデータを取得
@executor(id="getter")
async def getter_exec(data: str, ctx: WorkflowContext[Never, str]) -> None:
    # 共有状態からデータを取得
    user_name = await ctx.get_shared_state("user_name")
    age = await ctx.get_shared_state("age")
    city = await ctx.get_shared_state("city")

    print("\n 共有状態から取得しました:")
    print(f"  user_name: {user_name}")
    print(f"  age: {age}")
    print(f"  city: {city}")

    result = f"ユーザー情報: {user_name}さん、{age}歳、{city}在住"
    await ctx.yield_output(result)

# ワークフロー構築
workflow_shared_state = (
    WorkflowBuilder()
    .add_edge(setter_exec, getter_exec)
    .set_start_executor(setter_exec)
    .build()
)

# 実行
result = await workflow_shared_state.run("テストデータ")

print("\n" + "="*50)
print("最終結果:")
print(result)
これはわかりやすくて便利。
6. ⭐️ Human-in-the-Loop with Request Response
Agent Framework のワークフローの主な新機能は 、要求と応答の概念です。これにより、ワークフローは実行を一時停止し、外部入力を待ってから続行できます。AutoGen の Team 抽象化は開始されると継続的に実行され、人間の入力の実行を一時停止するための組み込みのメカニズムは提供されませんでした。
from agent_framework import (
    RequestInfoExecutor, RequestInfoEvent, RequestInfoMessage,
    RequestResponse, WorkflowBuilder, WorkflowContext, executor
)
from dataclasses import dataclass
from typing_extensions import Never

agent1 = ChatAgent(
    name="idea_agent",
    chat_client=client,
    instructions="You are a creative idea writer."
)

# agent_executor が別の場所で定義されていると仮定する
# Assume we have agent1 and agent2 from previous examples
@executor(id="agent1")
async def agent_executor(input_msg: str, ctx: WorkflowContext[str]) -> None:
    response = await agent1.run(input_msg)
    await ctx.send_message(response.text)

# Define typed request payload
@dataclass
class ApprovalRequest(RequestInfoMessage):
    """Request human approval for agent output."""
    content: str = ""
    agent_name: str = ""

# 人間の承認を要求するワークフロー Executor
@executor(id="reviewer")
async def approval_executor(
    agent_response: str,
    ctx: WorkflowContext[ApprovalRequest]
) -> None:
    # 構造化されたデータを用いて人間の入力を要求する
    approval_request = ApprovalRequest(
        content=agent_response,
        agent_name="writer_agent"
    )
    await ctx.send_message(approval_request)

# Human feedback handler
@executor(id="processor")
async def process_approval(
    feedback: RequestResponse[ApprovalRequest, str],
    ctx: WorkflowContext[Never, str]
) -> None:
    decision = feedback.data.strip().lower()
    original_content = feedback.original_request.content

    if decision == "approved":
        await ctx.yield_output(f"APPROVED: {original_content}")
    else:
        await ctx.yield_output(f"REVISION NEEDED: {decision}")

# Human-in-the-Loopによるワークフロー構築
hitl_executor = RequestInfoExecutor(id="request_approval")

workflow = (WorkflowBuilder()
           .add_edge(agent_executor, approval_executor)
           .add_edge(approval_executor, hitl_executor)
           .add_edge(hitl_executor, process_approval)
           .set_start_executor(agent_executor)
           .build())

Human-in-the-Loop の重要性については自律性の高い AutoGen において度々言及されてきました。最近だと、Magentic-UI においても基本的要素として導入されています。
7. ⭐️ Checkpoint
AutoGen の Team 抽象化に対する Agent Framework のワークフローのもう 1 つの主な利点は、チェックポイント処理と実行の再開の組み込みサポートです。 これにより、ワークフローをチェックポイントから後で一時停止、永続化、再開できるため、フォールトトレランスが提供され、実行時間の長いワークフローまたは非同期ワークフローが有効になります。AutoGen の Team 抽象化では、組み込みのチェックポイント機能は提供されません。 永続化または回復メカニズムは外部で実装する必要があり、多くの場合、複雑な状態管理とシリアル化ロジックが必要です。
7.1. エージェント フレームワークのチェックポイント処理
Agent Framework では、FileCheckpointStorage と WorkflowBuilder のwith_checkpointing() メソッドを使用した包括的なチェックポイント処理が提供されます。
-
executor_state: 使用する各 Executor のローカル状態ctx.set_state() -
shared_state: 次を使用して実行プログラム間の状態ctx.set_shared_state() - メッセージ キュー: Executor 間の保留中のメッセージ
- ワークフローの位置: 現在の実行の進行状況と次のステップ
from agent_framework import (
    RequestInfoExecutor, FileCheckpointStorage, WorkflowBuilder, WorkflowOutputEvent,
    Executor, WorkflowContext, handler
)
from typing_extensions import Never

class UpperCaseExecutor(Executor):
    @handler
    async def process(self, text: str, ctx: WorkflowContext[str]) -> None:
        result = text.upper()

        # Persist executor-local state
        prev_state = await ctx.get_state() or {}
        count = prev_state.get("count", 0) + 1
        await ctx.set_state({
            "count": count,
            "last_input": text,
            "last_output": result
        })

        # Persist shared state for other executors
        await ctx.set_shared_state("original_input", text)
        await ctx.set_shared_state("processed_output", result)

        await ctx.send_message(result)

class ReverseExecutor(Executor):
    @handler
    async def process(self, text: str, ctx: WorkflowContext[Never, str]) -> None:
        result = text[::-1]
        await ctx.yield_output(result)

def create_workflow(checkpoint_storage: FileCheckpointStorage):
    """Create a workflow with two executors and checkpointing."""
    upper_executor = UpperCaseExecutor(id="upper")
    reverse_executor = ReverseExecutor(id="reverse")

    return (WorkflowBuilder()
           .add_edge(upper_executor, reverse_executor)
           .set_start_executor(upper_executor)
           .with_checkpointing(checkpoint_storage=checkpoint_storage)
           .build())

checkpoint_storage = FileCheckpointStorage(storage_path="./checkpoints")

# 使用例(非同期コンテキスト内での使用例)
async def checkpoint_example():
    workflow = create_workflow(checkpoint_storage)
    async for event in workflow.run_stream("Hello, Agent Framework!"):
        if isinstance(event, WorkflowOutputEvent):
            print(f"Output: {event.data}")
    return workflow
7.2. チェックポイントからの再開
Agent Framework は、特定のチェックポイントを一覧表示、検査、再開するための API を提供します。以下のような 2 つの Executor を順次実行するシンプルなパイプラインを構築して実験してみましょう。
- 入力テキストを大文字化して次の処理へ渡す
- 受け取ったテキストを反転させて、ワークフローを完了させる
# 利用可能なチェックポイントの一覧
checkpoints = await checkpoint_storage.list_checkpoints()

# チェックポイント情報を表示する
for checkpoint in checkpoints:
    summary = RequestInfoExecutor.checkpoint_summary(checkpoint)
    print(f"Checkpoint {summary.checkpoint_id}: iteration={summary.iteration_count}")
    print(f"  Shared state: {checkpoint.shared_state}")
    print(f"  Executor states: {list(checkpoint.executor_states.keys())}")
    print(f"  Messages: {checkpoint.messages}")
async def checkpoint_resume_example():
    # 特定のチェックポイントから再開する
    if checkpoints:
        chosen_checkpoint_id = checkpoints[0].checkpoint_id

        # 新しいワークフローインスタンスを作成し、再開する
        new_workflow = create_workflow(checkpoint_storage)
        async for event in new_workflow.run_stream_from_checkpoint(
            chosen_checkpoint_id,
            checkpoint_storage=checkpoint_storage
        ):
            print(f"Resumed event: {event}")
注目👀ポイント:
-
.with_checkpointing()により、各スーパーステップ終了時に自動的に状態が保存される -
FileCheckpointStorageがチェックポイントを JSON 形式でディスク(./checkpoints)に保存
再開の仕組み:
-
run_stream_from_checkpointが指定されたチェックポイントIDから状態を復元 - 保存されていたメッセージキュー、Executor 状態、イテレーション数がすべて復元される
- 中断した地点から処理が継続される

まず、1 番目のupper Executor を実行し、その状態をチェックポイントとして JSON で保存しておきます。その後、FileCheckpointStorage からロードしたチェックポイントをワークフローにロードして run_stream_from_checkpoint することで 1 番目の実行をスキップして 2番目の reverse から再開することができます。
8. ⭐️ Visualization
WorkflowViz ワークフローの可視化機能は、Workflow オブジェクトでインスタンス化できる WorkflowViz オブジェクトを通じて行われます。WorkflowViz オブジェクトは、Graphviz DOT 形式や Mermaid ダイアグラム形式など、様々な形式で可視化を生成できます。
これは嬉しい!これまでは自分で Graphviz に変換して可視化していましたが、Graphviz が内部に実装されました。
from agent_framework import WorkflowViz
from IPython.display import SVG, display
import os

def visualize_workflow(workflow, filename="workflow_diagram", show_preview=True):
    # WorkflowVizオブジェクトを作成
    viz = WorkflowViz(workflow)

    # SVGファイルとして保存
    try:
        svg_path = viz.export(format="svg", filename=filename)

        # SVGをプレビュー表示
        if show_preview and os.path.exists(svg_path):
            display(SVG(filename=svg_path))

        return svg_path

    except ImportError as e:
        print("❌ エラー: 'graphviz'パッケージがインストールされていません")
        print("インストール方法: pip install agent-framework[viz] --pre")
        print(f"詳細: {e}")
        return None
    except Exception as e:
        print(f"❌ エラーが発生しました: {e}")
        return None
Termination Conditions
自律性の高い AutoGen で極めて重要な要素であった停止条件は、Agent Framework では Workflow の状態管理とミドルウェアの組み合わせで実現することになるかと思います。
-
WorkflowBuilder の
max_iterations- 固定イテレーション制限 - Edge の条件関数 - 動的なフロー制御を実装
-
Middleware の
context.terminate- 高度なカスタム条件を記述
Observability
可観測性は、ワークフロー実行時の内部状態と動作に関する洞察を提供します。これには、ワークフローの監視とデバッグに役立つログ、メトリクス、トレース機能が含まれます。Agent Framework は OpenTelemetry のよりシンプルなゼロコードセットアップオプションを提供します。これによりすでに紹介した Jaeger や Azure AI Foundry との連携による監視がより簡単にできるようになりました。さらにワークフローレベルの観測可能性を含むより広範なカバレッジを提供します。
import _asyncio
from agent_framework.observability import setup_observability, get_tracer, get_meter

setup_observability(
    enable_sensitive_data=True,
    otlp_endpoint="http://localhost:4317",
    # applicationinsights_connection_string="InstrumentationKey=your_key"
)

tracer = get_tracer()
meter = get_meter()
async def sequential_example():
    with tracer.start_as_current_span("SequentialBuilder1") as rollspan:
        async for event in workflow.run_stream("新しい発電方法のアイデアについて議論して"):
            if isinstance(event, WorkflowOutputEvent):
                conversation_history = event.data  # list[ChatMessage]
エージェントのトレースはマルチエージェント開発には必須の機能と言っても過言ではないです。私のワークショップでも最初にトレースの設定を行っています。

DevUI
Agent Framework でエンティティ(エージェント/ワークフロー)を実行するための軽量なスタンドアロンサンプルアプリ。

頼むからこれを Azure AI Foundry に載s(ry
まとめ
全体を見た感じ確かに既存フレームワークの課題に対しての解決案を実装してくれたという印象です。一部についてはまだ開発中の機能がありますが、魅力的な新機能が多数追加されており今後の発展に期待できます。また、正式にエンタープライズ環境でも使用できることを謳っている点も魅力的です。

今後、Microsoft 365 Agents SDKとの統合や、 Azure AI Foundry Agent Service との共有ランタイムなど、Microsoft のエージェント開発スタック全体の統合をさらに進めるとのことで面白くなりそうです。
また、Microsoft Agent Framework は Semantic Kernel や AutoGen に取って代わるものではないとのことなので、今後とも両者ウォッチし続けたいところですが AutoGen からは以下のような発表が GitHub に出ていました。
AutoGen は引き続きメンテナンスされます (安定した API を備え、重大なバグ修正とセキュリティ パッチが引き続き提供されます)。ただし、重要な新機能は追加されません。
実験的な新機能については、agent-framework-lab に追加されていくそうです。
GitHub
一連の機能を全て試せる Jupyter Notebook。
応用記事
参考