はじめに
シリーズの目次
- Part1: ベンチマークツールRallyを使ってみる
- Part2(今回): Amzon EC2にクラスタを構築する
- Part3: ノード数/シャード数による性能比較
- Part4: レプリカ数による性能比較
前回までPart1が終り、今回はPart2の「Amzon EC2にクラスタを構築する」です。
今回は、性能検証のためAmazon EC2にElasticsearchクラスタ環境を構築してみます。
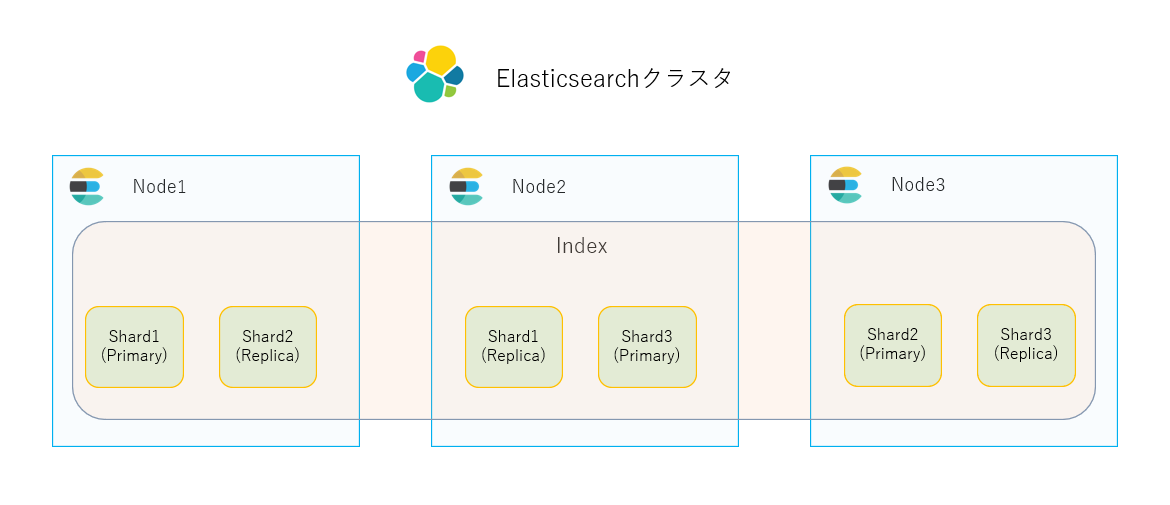
Elasticsearchクラスタ構成のおさらい
検証環境
-
Amazon EC2
- インスタンス数: 2台
- インスタンスタイプ:
t3.medium- CPU: 2コア
- メモリ: 4GB
- ストレージ: 8GiB, gp2
- OSイメージ
- Amazon Linux 2 Kernel 5.10 AMI 2.0.20230119.1 x86_64 HVM gp2
-
Elasticsearchクラスタ
- ノード数: 2
- 今回は性能比較が目的ですので、2ノードクラスタを使用します
- 注意: 2ノードクラスタは耐障害性に乏しく、本番環境で使用すべきではありません
- ノード数: 2
Elasticsearchクラスタの構築手順
node1で、管理者権限で以下実施
ファイアウォール設定
-
firewalldをインストール
$ sudo yum install firewalld
$ sudo systemctl enable firewalld.service
$ sudo systemctl start firewalld.service
- ノード間通信を可能にするため、ポート9200、9300へのアクセス許可
$ sudo firewall-cmd --add-port={9200,9300}/tcp --zone=public --permanent
$ sudo firewall-cmd --reload
$ sudo firewall-cmd --list-port
9200/tcp 9300/tcp
/etc/hostsに2ノードのIPアドレスを追加
172.31.6.170 node1
172.31.1.200 node2
Elasticsearchをインストール
- ElasticsearchリポジトリのGPG keyをインポート
$ sudo rpm --import https://artifacts.elastic.co/GPG-KEY-elasticsearch
- rpm repositoryを登録
/etc/yum.repos.d/elasticsearch.repo
[elasticsearch]
name=Elasticsearch repository for 8.x packages
baseurl=https://artifacts.elastic.co/packages/8.x/yum
gpgcheck=1
gpgkey=https://artifacts.elastic.co/GPG-KEY-elasticsearch
enabled=0
autorefresh=1
type=rpm-md
- RPMパッケージをインストール
$ sudo yum check-update --enablerepo=elasticsearch
$ sudo yum install elasticsearch --enablerepo=elasticsearch -y
Elasticsearchをサービスとして有効化
$ sudo systemctl enable elasticsearch
Created symlink /etc/systemd/system/multi-user.target.wants/elasticsearch.service → /usr/lib/systemd/system/elasticsearch.service.
Elasticsearchの設定ファイルを編集
/etc/elasticsearch/elasticsearch.ymlに、下記項目を設定し保存
- クラスタ名
cluster.name: mycluster
- クラスタ参加ノード
discovery.seed_hosts: ["node1", "node2"]
- Elasticsearchサービスに他のノードからアクセス可能に
network.host: 0.0.0.0
- index自動作成設定を最終行に追加
action.auto_create_index: .monitoring*,.watches,.triggered_watches,.watcher-history*,.ml*
Elasticsearchを起動し、elasticユーザーのパスワードをリセット
- Elasticsearchを起動
$ sudo systemctl start elasticsearch
- elasticユーザーのパスワードをリセット
$ sudo /usr/share/elasticsearch/bin/elasticsearch-reset-password -u elastic -i
This tool will reset the password of the [elastic] user.
You will be prompted to enter the password.
Please confirm that you would like to continue [y/N]y
Enter password for [elastic]:
Re-enter password for [elastic]:
Password for the [elastic] user successfully reset.
- Elasticsearchにhttpsアクセスし、ステータス確認
$ sudo curl -k -u elastic https://localhost:9200
Enter host password for user 'elastic':
{
"name" : "ip-172-31-6-170.ec2.internal",
"cluster_name" : "mycluster",
"cluster_uuid" : "8KWJ-DEsQnyN9ynLU4oZHw",
"version" : {
"number" : "8.6.1",
"build_flavor" : "default",
"build_type" : "rpm",
"build_hash" : "180c9830da956993e59e2cd70eb32b5e383ea42c",
"build_date" : "2023-01-24T21:35:11.506992272Z",
"build_snapshot" : false,
"lucene_version" : "9.4.2",
"minimum_wire_compatibility_version" : "7.17.0",
"minimum_index_compatibility_version" : "7.0.0"
},
"tagline" : "You Know, for Search"
}
node1のみのクラスタに、他のノードを登録するためのトークンを作成
$ sudo /usr/share/elasticsearch/bin/elasticsearch-create-enrollment-token -s node

eyJ2ZXI...(中略)...cifQ==
作成された登録トークンを控える
node2で、管理者権限で以下実施
ファイアウォールを設定
-
firewalldをインストール
$ sudo yum install firewalld
$ sudo systemctl enable firewalld.service
$ sudo systemctl start firewalld.service
- ノード間通信を可能にするため、ポート9200、9300へのアクセス許可
$ sudo firewall-cmd --add-port={9200,9300}/tcp --zone=public --permanent
$ sudo firewall-cmd --reload
$ sudo firewall-cmd --list-port
9200/tcp 9300/tcp
/etc/hostsに2ノードのIPアドレスを追加
172.31.6.170 node1
172.31.1.200 node2
Elasticsearchをインストール
- EslasticsearchリポジトリのGPG keyをインポート
$ sudo rpm --import https://artifacts.elastic.co/GPG-KEY-elasticsearch
- rpm repositoryを登録
/etc/yum.repos.d/elasticsearch.repo
[elasticsearch]
name=Elasticsearch repository for 8.x packages
baseurl=https://artifacts.elastic.co/packages/8.x/yum
gpgcheck=1
gpgkey=https://artifacts.elastic.co/GPG-KEY-elasticsearch
enabled=0
autorefresh=1
type=rpm-md
- RPMパッケージをインストール
$ sudo yum check-update --enablerepo=elasticsearch
$ sudo yum install elasticsearch --enablerepo=elasticsearch -y
Elasticsearchをサービスとして有効化
$ sudo systemctl enable elasticsearch
Created symlink /etc/systemd/system/multi-user.target.wants/elasticsearch.service → /usr/lib/systemd/system/elasticsearch.service.
node1で作成した登録トークンを使用し、node2をクラスタに登録
$ sudo /usr/share/elasticsearch/bin/elasticsearch-reconfigure-node --enrollment-token eyJ2ZXI...(中略)...cifQ==

This node will be reconfigured to join an existing cluster, using the enrollment token that you provided.
This operation will overwrite the existing configuration. Specifically:
  - Security auto configuration will be removed from elasticsearch.yml
  - The [certs] config directory will be removed
  - Security auto configuration related secure settings will be removed from the elasticsearch.keystore
Do you want to continue with the reconfiguration process [y/N]y
Elasticsearchの設定ファイルを編集
/etc/elasticsearch/elasticsearch.ymlに、下記項目を設定し保存
- クラスタ名
cluster.name: mycluster
- Elasticsearchサービスに他のノードからアクセス可能に
network.host: 0.0.0.0
- index自動作成設定を最終行に追加
action.auto_create_index: .monitoring*,.watches,.triggered_watches,.watcher-history*,.ml*
Elasticsearchを起動
$ sudo systemctl start elasticsearch
- Elasticsearchへhttpsアクセスし、ステータス確認
$ curl -k -u elastic https://localhost:9200
Enter host password for user 'elastic':
{
"name" : "ip-172-31-1-200.ec2.internal",
"cluster_name" : "mycluster",
"cluster_uuid" : "8KWJ-DEsQnyN9ynLU4oZHw",
"version" : {
"number" : "8.6.1",
"build_flavor" : "default",
"build_type" : "rpm",
"build_hash" : "180c9830da956993e59e2cd70eb32b5e383ea42c",
"build_date" : "2023-01-24T21:35:11.506992272Z",
"build_snapshot" : false,
"lucene_version" : "9.4.2",
"minimum_wire_compatibility_version" : "7.17.0",
"minimum_index_compatibility_version" : "7.0.0"
},
"tagline" : "You Know, for Search"
}
いずれかのノードで、クラスタのステータスを確認
$ sudo curl -k -u elastic https://localhost:9200/_cat/nodes?v
Enter host password for user 'elastic':
ip           heap.percent ram.percent cpu load_1m load_5m load_15m node.role   master name
172.31.1.200           24          96  21    0.53    0.29     0.12 cdfhilmrstw -      ip-172-31-1-200.ec2.internal
172.31.6.170           51          95   5    0.11    0.11     0.08 cdfhilmrstw *      ip-172-31-6-170.ec2.internal
クラスタにノードが二つ存在し、node1がmasterになっています。
おわりに
性能検証のため、Amzon EC2に2ノードのElasticsearchクラスタを構築しました。
次回は、ベンチマークツールRallyを用いて性能計測を実施します。
お楽しみに。