Unity CatalogのSystem Tableがリリースされた事で、こちらの方法でも確認出来るようになりました。
はじめに
Databricksの利用料金に関する分析は以前「Databricksの利用料金データを使って分析してみた」を書きましたが、毎回 csvデータをダウンロードして、アップロードするという手間が発生していたため、今回はS3に自動保存されるように設定して、Notebookで直接アクセスできるようにしたいと思います。
こうすることで、Databricks SQLを使ったダッシュボードで可視化するなどして、モニタリングできるようになります。
設定に関してはこちらのマニュアルDeliver and access billable usage logsから引用
構成について
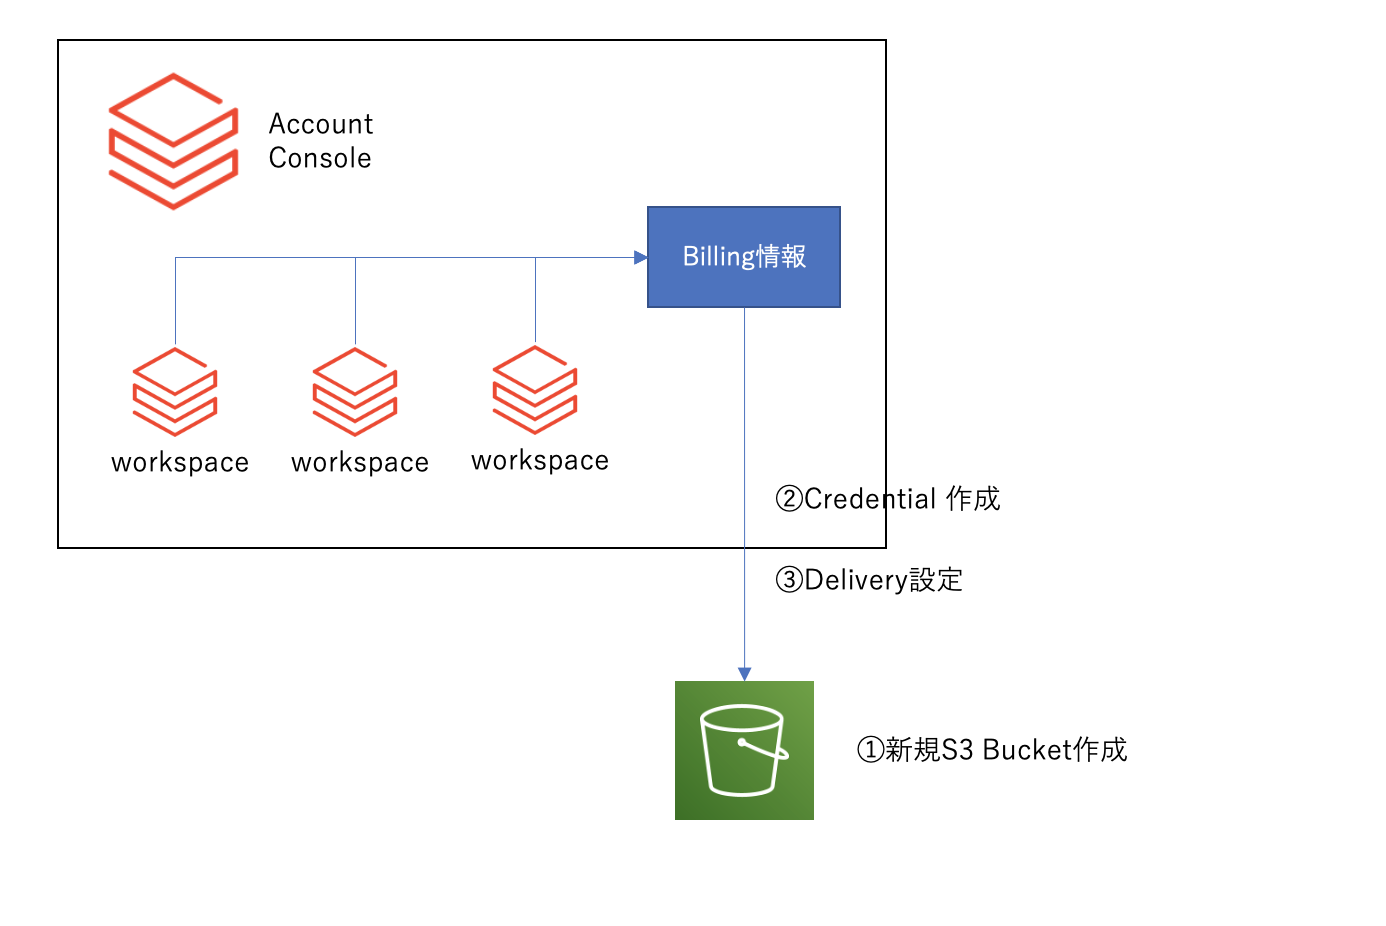
以下の図のように、今回は全てのワークスペースのBilling情報を同じS3 Bucketに保存するようにします。(個別に分ける事もできるようですが、今回はシンプルに同じ設定にします)
Step0. Curl接続テスト
まずは Databricks APIに接続できるか認証テストしてみます。(こちらのマニュアルも参考に)
curl -X GET -u "<username>":"<password>" -H "Content-Type: application/json" \
 'https://accounts.cloud.databricks.com/api/2.0/accounts/<account_id>/workspaces'
- <account_id> は、Account Consoleの左下のユーザー設定メニューで確認できます。
実行すると以下のようなWorkspace情報の結果が返ってくればOKです。
[{"workspace_id":2033070713005632,"workspace_name":"test_billing","aws_region":"ap-northeast-1","creation_time":1648973063275,"deployment_name":"dbc-7b550d2b-b1e8","workspace_status":"RUNNING","account_id":"xxxxxxxxxxxxx","credentials_id":"c5d7e09c-9647-4e71-ab37-xxxxxx","storage_configuration_id":"0063f050-a25e-442d-aa0b-0xxxxxxx","workspace_status_message":"Workspace is running.","pricing_tier":"ENTERPRISE"}]
Step1. Configure Storage
それでは、まずはS3 Bucketの作成とAccount Consoleへの登録を行います。
1) S3 Bucketの作成
こちらのマニュアルに沿ってS3 Bucketを作成します。今回は、db-my-billing-bucket という新規Bucketを作成しました。
もしWorkspaceを作った時の AWS Account以外でS3 Bucketを作成した場合は、Bucket Policyの追加が必要です. See Step 3: Optional cross-account support.
2) S3のAccount Consoleへの登録
Account Console画面からも登録できますが、今回は API経由で登録したいと思います。
- <storage_configuration_name> : 任意のストレージ構成名. (今回は、databricks-workspace-storageconf-v1)
- <root_bucket_info> : S3 Bucket名. (ex. db-my-billing-bucket)
curl -X POST -u "<username>":"<password>" -H "Content-Type: application/json" \
  -n 'https://accounts.cloud.databricks.com/api/2.0/accounts/<account_id>/storage-configurations' \
  -d '{
    "storage_configuration_name": "databricks-workspace-storageconf-v1",
    "root_bucket_info": {
      "bucket_name": "db-my-billing-bucket"
    }
  }'
Account Consoleからも確認できます。

Step2. Credential の作成&登録
1) IAM Roleの作成
こちらのマニュアル にそって、AWS Console上で Roleを作成
今回は、db-billing-role というロールを作成しました。
2) Credentialの作成
- <credentials_name>: 任意のユニークなクレデンシャル名. (今回は databricks-credentials-v1)
- <aws_credentials>: 作成した Role ARNを指定する.
 curl -X POST -u "<username>":"<password>" -H "Content-Type: application/json" \
 -n 'https://accounts.cloud.databricks.com/api/2.0/accounts/<account_id>/credentials' \
 -d '{
   "credentials_name": "databricks-credentials-v1",
   "aws_credentials": {
     "sts_role": {
       "role_arn": "arn:aws:iam::xxxxxxxxx:role/db-billing-role"
     }
   }
 }'
成功すると Account Consoleからも確認できます。

Step3. Log Delivery 設定
それでは準備が整いましたので、S3に出力するように設定したいと思います。
必要な情報
- "storage_configuration_id": Step1での実行結果に IDが出力されてます。,
- "credentials_id": Step2 での実行結果に IDが出力されてます。,
- "delivery_path_prefix": Step2 でAWS Roleを作成した際に、インラインポリシーで設定したストレージ Prefix名, (今回は testとしました)
storage_configuration_id と credentail_id は、curlで実行時のリターンに出力されておりますが、再度確認するには、以下のように可能です。
## storage_configuration_idの確認
curl -X GET -u "<username>":"<password>" -H "Content-Type: application/json" \
 'https://accounts.cloud.databricks.com/api/2.0/accounts/<account_id>/storage-configurations'

## credentials_idの確認
curl -X GET -u "<username>":"<password>" -H "Content-Type: application/json" \
 'https://accounts.cloud.databricks.com/api/2.0/accounts/<account_id>/credentials'
curl -X POST -u "<username>":"<password>" -H "Content-Type: application/json" \
  -n 'https://accounts.cloud.databricks.com/api/2.0/accounts/<account_id>/log-delivery' \
  -d '{
  "log_delivery_configuration": {
    "log_type": "BILLABLE_USAGE",
    "config_name": "billable usage config",
    "output_format": "CSV",
    "credentials_id": "<credentials_id>",
    "storage_configuration_id": "<storage_configuration_id>",
    "delivery_path_prefix": "test",
    "delivery_start_time": "2021-06"
    }
}'
確認
しばらくすると、S3にデータが保存されはじめました。
ディレクトリ構造は以下のようになっております。 prefixで作った test の下に、billable-usage/csv が作成されております。

csvディレクトリの中はこんなかんじです。
workspace&Month 毎にファイルが作成されます。

このS3 Bucketを Databricksでマウントすれば、ダッシュボードなどで監視ができそうです。
今回はここまでにしておきます。需要があれば近いうちに読み取りのサンプルノートブックを公開しようかと思います。