本ブログは、オラクル・クラウドの個人ブログの1つです。
初めに
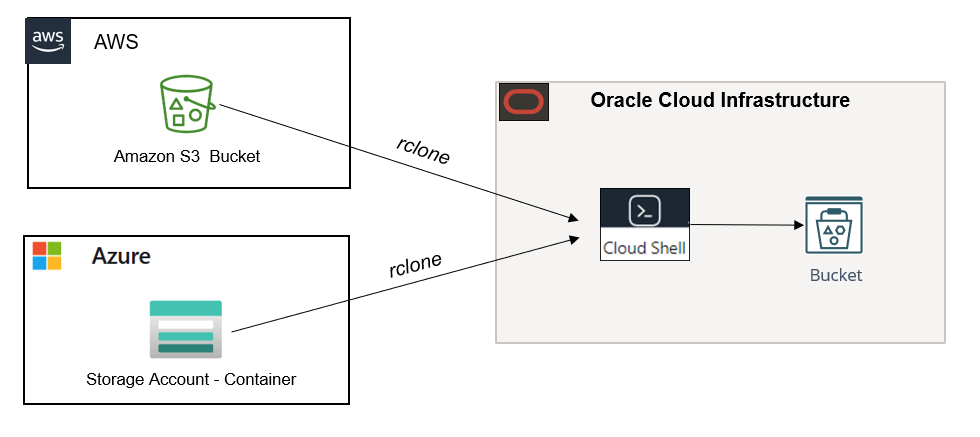
Rcloneは、クラウド・ストレージ上のファイルを管理するコマンドラインプログラムです。マルチクラウドを利用しているユーザーは、簡単にクラウド間でファイルを転送できます。他のクラウドからOCIへファイルを転送する際に、物理サーバーやVMを使用せず、OCI Cloud ShellでRcloneを実行することも可能です。
OCI Cloud Shellにはsudoコマンドがないため、root権限で「/usr/ bin」の下にrcloneをインストールすることはできません。sudoなしでOCI Cloud Shellにrcloneをインストールできますか?答えはYESです。 rcloneはホームディレクトリにインストールすればよいです。動作もOKです。
では、sudoを使用せずOCI Cloud Shellにrcloneをインストールする方法をご紹介します。OCI Cloud Shellの概要を知りたい方は、リンク先の記事をご参照ください。
RcloneでAWS/AzureからOCIへの転送方法を知りたいからは、以下の記事をご参照ください。
RcloneでAWS S3からOCIオブジェクト・ストレージにデータをコピー
RcloneでAzure BlobからOCIオブジェクト・ストレージにデータをコピー
ステップ
1. 「install.sh」の取得
2. 「install.sh」の編集
3. 「install.sh」の実行
4. 「rclone」の実行
1. 「install.sh」の取得
コマンド
wget https://rclone.org/install.sh
liu_wei@cloudshell:~ (ap-tokyo-1)$ pwd
/home/liu_wei
liu_wei@cloudshell:~ (ap-tokyo-1)$ mkdir rclone
liu_wei@cloudshell:~ (ap-tokyo-1)$ cd rclone
liu_wei@cloudshell:rclone (ap-tokyo-1)$ wget https://rclone.org/install.sh
--2021-09-13 03:46:42--  https://rclone.org/install.sh
Resolving rclone.org (rclone.org)... 5.153.250.7, 2a02:24e0:8:61f9::1
Connecting to rclone.org (rclone.org)|5.153.250.7|:443... connected.
HTTP request sent, awaiting response... 200 OK
Length: 4497 (4.4K) [text/x-sh]
Saving to: ‘install.sh’

100%[======================================================================================================================================================================>] 4,497       --.-K/s   in 0s

2021-09-13 03:46:43 (33.8 MB/s) - ‘install.sh’ saved [4497/4497]

liu_wei@cloudshell:rclone (ap-tokyo-1)$
2. 「install.sh」の編集
「install.sh」をバックアップしてから、「linux」セクションの以下の数行を編集します。
文字列"<user_name>"を、OCI Cloud Shellに表示されるユーザー名に置き換えます。
/usr/bin/rclone.new -> /home/<user_name>/bin/rclone.new
chown root:root -> chown <user_name>:oci
/usr/local/share/man/man1 -> /home/<user_name>/local/share/man/man1
mandb -> #mandb
編集前後の差分
liu_wei@cloudshell:rclone (ap-tokyo-1)$ diff install.sh install.sh.old
149,152c149,152
<     cp rclone /home/liu_wei/bin/rclone.new
<     chmod 755 /home/liu_wei/bin/rclone.new
<     chown liu_wei:oci /home/liu_wei/bin/rclone.new
<     mv /home/liu_wei/bin/rclone.new /home/liu_wei/bin/rclone
---
>     cp rclone /usr/bin/rclone.new
>     chmod 755 /usr/bin/rclone.new
>     chown root:root /usr/bin/rclone.new
>     mv /usr/bin/rclone.new /usr/bin/rclone
157,159c157,159
<         mkdir -p /home/liu_wei/local/share/man/man1
<         cp rclone.1 /home/liu_wei/local/share/man/man1/
<         #mandb
---
>         mkdir -p /usr/local/share/man/man1
>         cp rclone.1 /usr/local/share/man/man1/
>         mandb
liu_wei@cloudshell:rclone (ap-tokyo-1)$
編集後
新しい「install.sh」の内容は、以下のようです。
case "$OS" in
  'linux')
    #binary
    cp rclone /home/liu_wei/bin/rclone.new
    chmod 755 /home/liu_wei/bin/rclone.new
    chown liu_wei:oci /home/liu_wei/bin/rclone.new
    mv /home/liu_wei/bin/rclone.new /home/liu_wei/bin/rclone
    #manual
    if ! [ -x "$(command -v mandb)" ]; then
        echo 'mandb not found. The rclone man docs will not be installed.'
    else
        mkdir -p /home/liu_wei/local/share/man/man1
        cp rclone.1 /home/liu_wei/local/share/man/man1/
        #mandb
    fi
    ;;
3. 「install.sh」の実行
実行する前に、BINディレクトリ(/home/<user_name>/bin)を作成する必要があります。
コマンド
mkdir /home/<user_name>/bin
sh ./install.sh
liu_wei@cloudshell:rclone (ap-tokyo-1)$ pwd
/home/liu_wei/rclone
liu_wei@cloudshell:rclone (ap-tokyo-1)$ ll
total 16
-rw-r--r--. 1 liu_wei oci 4563 Sep 13 04:05 install.sh
-rw-r--r--. 1 liu_wei oci 4497 Jul 20 19:24 install.sh.old
liu_wei@cloudshell:rclone (ap-tokyo-1)$ mkdir /home/liu_wei/bin
liu_wei@cloudshell:rclone (ap-tokyo-1)$ sh ./install.sh
Archive:  rclone-current-linux-amd64.zip
   creating: tmp_unzip_dir_for_rclone/rclone-v1.56.0-linux-amd64/
  inflating: tmp_unzip_dir_for_rclone/rclone-v1.56.0-linux-amd64/README.html  [text]
  inflating: tmp_unzip_dir_for_rclone/rclone-v1.56.0-linux-amd64/git-log.txt  [text]
  inflating: tmp_unzip_dir_for_rclone/rclone-v1.56.0-linux-amd64/rclone  [binary]
  inflating: tmp_unzip_dir_for_rclone/rclone-v1.56.0-linux-amd64/README.txt  [text]
  inflating: tmp_unzip_dir_for_rclone/rclone-v1.56.0-linux-amd64/rclone.1  [text]

 has successfully installed.
Now run "rclone config" for setup. Check https://rclone.org/docs/ for more details.

liu_wei@cloudshell:rclone (ap-tokyo-1)$
環境変数の編集
liu_wei@cloudshell:~ (ap-tokyo-1)$ export PATH=$PATH:/home/<user_name>/bin
このexportコマンドを/home/<user_name>/.bashrcの最後に追記すれば、Cloud Shellを再起動しても自動的に反映されます。
4. 「rclone」の実行
Rclone Config
これで、rcloneが正常にインストールされました。その後、通常とおり「rclone config」のコマンドでセットアップを実施します。(セットアップの詳細を省略します。)
liu_wei@cloudshell:~ (ap-tokyo-1)$ rclone config
2021/09/13 05:30:51 NOTICE: Config file "/home/liu_wei/.config/rclone/rclone.conf" not found - using defaults
No remotes found - make a new one
n) New remote
s) Set configuration password
q) Quit config
n/s/q> n
Rclone Copy
AWS S3からOCIオブジェクト・ストレージにデータをコピーします。rcloneの動作はOKです。
liu_wei@cloudshell:~ (ap-tokyo-1)$ rclone --verbose copy aws:mysourcebucket001 oci:Target_Bucket
2021/09/13 05:41:13 INFO  : tmp1.txt: Copied (new)
2021/09/13 05:41:13 INFO  : tmp3.txt: Copied (new)
2021/09/13 05:41:13 INFO  : tmp2.txt: Copied (new)
2021/09/13 05:41:13 INFO  : tmp5.txt: Copied (new)
2021/09/13 05:41:13 INFO  : tmp6.txt: Copied (new)
2021/09/13 05:41:13 INFO  : tmp4.txt: Copied (new)
2021/09/13 05:41:13 INFO  : tmp7.txt: Copied (new)
2021/09/13 05:41:13 INFO  : tmp9.txt: Copied (new)
2021/09/13 05:41:14 INFO  : tmp8.txt: Copied (new)
2021/09/13 05:41:14 INFO  :
Transferred:       20.419Ki / 20.419 KiByte, 100%, 0 Byte/s, ETA -
Transferred:            9 / 9, 100%
Elapsed time:         0.4s

liu_wei@cloudshell:~ (ap-tokyo-1)$
以上
関連記事
オラクル・クラウドの個人ブログ一覧
OCI Cloud Shellの概要
「OCI Cloud Shell」と「AWS CloudShell」の比較
RcloneでAWS S3からOCIオブジェクト・ストレージにデータをコピー
RcloneでAzure BlobからOCIオブジェクト・ストレージにデータをコピー
