AWS S3またはAzure Blobから、Orale Cloudのオブジェクト・ストレージにデータをコピーできますか?答えはできます。このタスクを完了するには多くの方法がありますが、Rcloneを利用すれば、簡単に実現できます。
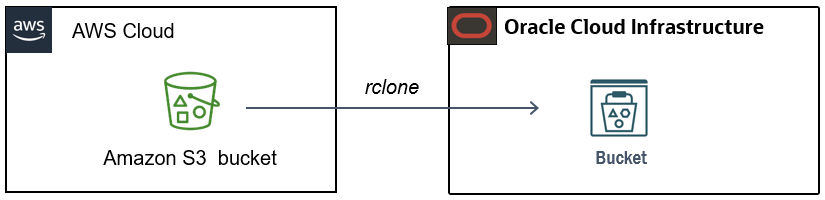
Rclone は、クラウド・ストレージ上のファイルを管理するコマンドライン・プログラムです。OCI Object Storage、AWS S3、Azure Blob、Google Cloud Storageなど、多くのクラウドベンダーがサポートされています。On-Pからクラウドの間、あるいは異なるクラウド・ストレージ間でデータを簡単に転送できます。複数のクラウド・ベンダーを利用している場合、rcloneを利用すれば、データ転送が楽になります。
では、AWS S3からOCIオブジェクト・ストレージにデータをコピーする方法をご紹介します。
ステップ
1. Rcloneのインストール
2. OCI接続用情報の収集 (コピー先)
3. AWS接続用情報の収集 (コピー元)
4. OCI接続の設定 (コピー先)
5. AWS接続の設定 (コピー元)
6. データコピーの実施
追記:OCIへの接続方法のアップデート
事前準備
- OCI(Oracle Cloud Infrastructure)およびAWSのクラウドアカウント。
- Rclone実行用クライアント。 (Linux/Mac/Windowsがサポートされています。ここではLinux7を使用しています。) HTTPSを使用し、クライアントからソース/ターゲット・クラウドに接続できることを確保してください。物理サーバ/VMか、On-P/Cloudか、構いません。(この例は、OCIにあるComputeインスタンスを利用します。)
1. Rcloneのインストール
非常に簡単で、一行のコマンドを実行すればOKです。
詳細なガイドについては、こちらを確認してください。(他のOSにインストールしたい場合。)
コマンド
curl https://rclone.org/install.sh | sudo bash
[opc@linux7 ~]$ curl https://rclone.org/install.sh | sudo bash
  % Total    % Received % Xferd  Average Speed   Time    Time     Time  Current
                                 Dload  Upload   Total   Spent    Left  Speed
100  4497  100  4497    0     0   4794      0 --:--:-- --:--:-- --:--:--  4794
Archive:  rclone-current-linux-amd64.zip
......
rclone v1.56.0 has successfully installed.
Now run "rclone config" for setup. Check https://rclone.org/docs/ for more details.

[opc@linux7 ~]$
2. OCI接続用情報の収集 (コピー先)
接続を構成するには、OCIコンソールから下記の情報を収集する必要があります。
アクセス・キー(Access Key)と秘密キー(Secret Key)
リージョン識別子(Region Identifier)
オブジェクト・ストレージ・ネームスペース(Object Storage Namespace)
APIエンドポイント(API Endpoint)
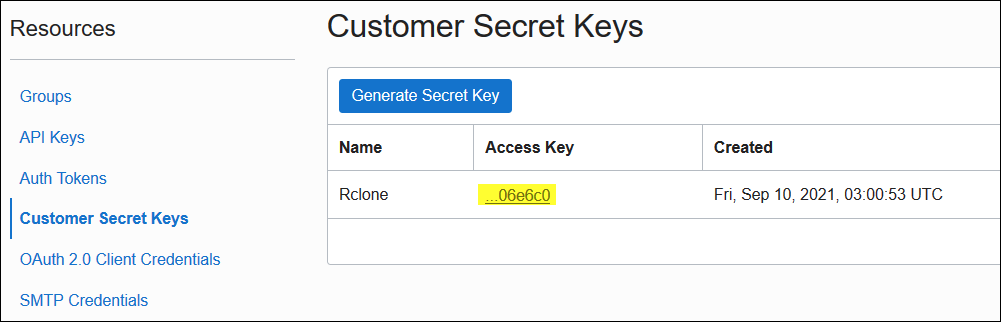
アクセス・キーと秘密キー
OCIから収集方法に関するドキュメント・リンクはこちらです。
MENU->Identity & Secruity->Identity->Users->User Details->Customer Secret Keys
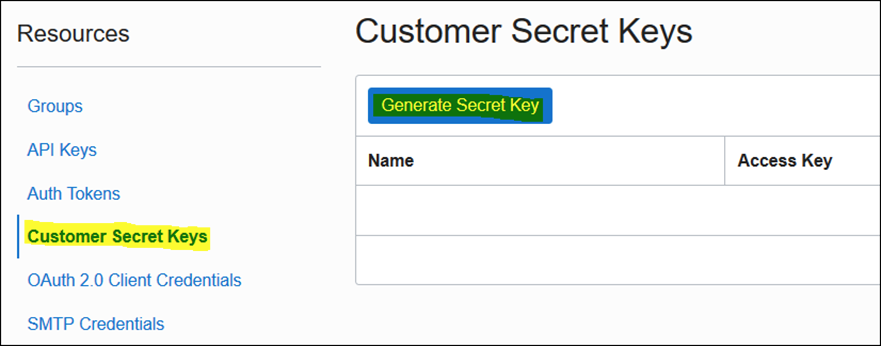
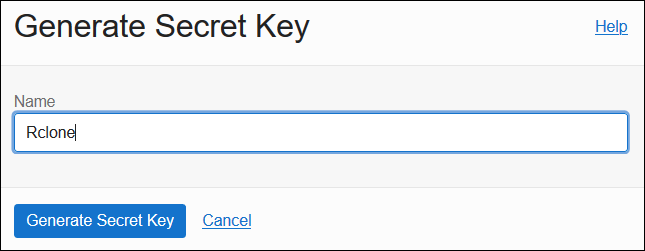
名前を入力し、「秘密キーの作成」ボタンをクリックします。
「コピー」をクリックして保存します。 (秘密キーは二度と表示されないので、ご注意ください。)
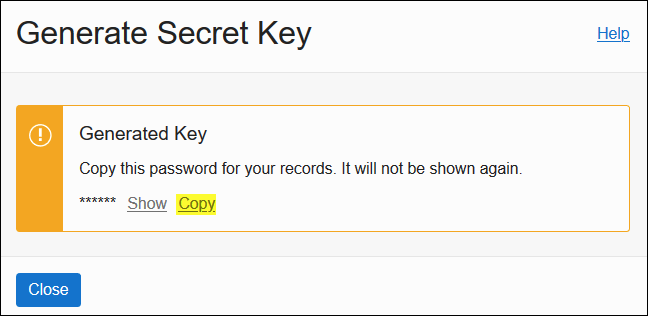
作成後、「アクセス・キー」は以下のように表示され、いつでもコピーできます。
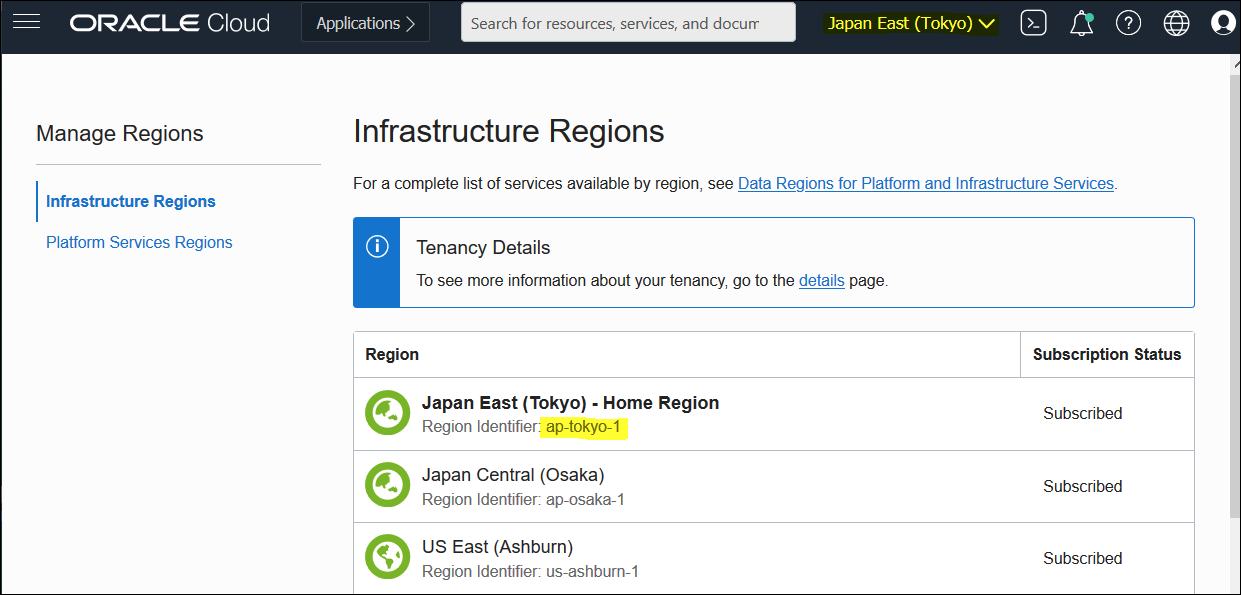
リージョン識別子
メニューバーのリージョン名をクリックし、「リージョンの管理」を選択すると、リージョン識別子が表示されます。この例は東京リージョン(ap-tokyo-1)を使用しています。
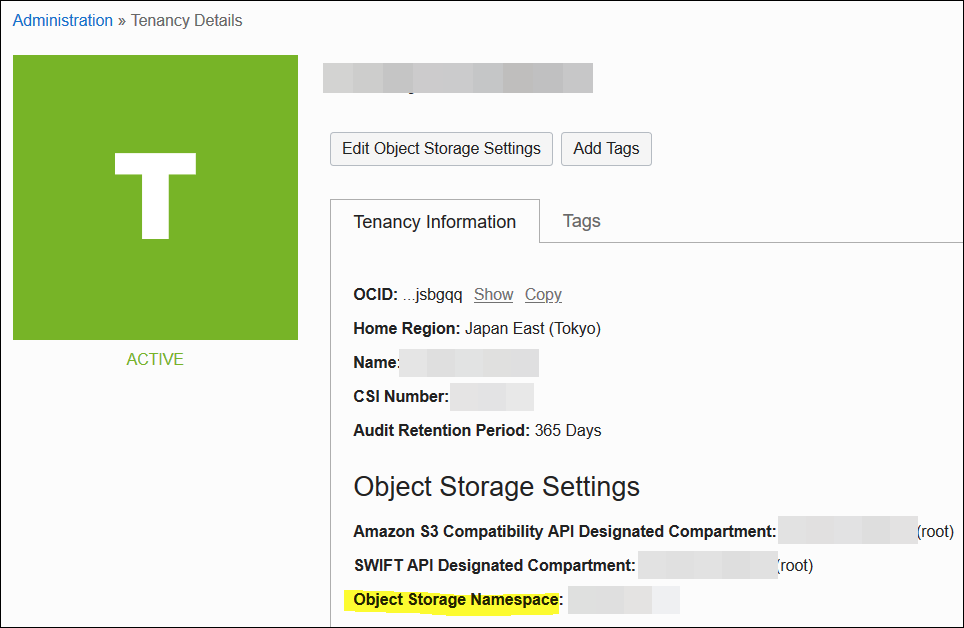
オブジェクト・ストレージ・ネームスペース
AWSは初クラウドの方は、特にこれをご注意ください。なぜかと言いますと、AWS S3のバケット名は、グローバル一意で、ネームスペースという概念がないわけです。
MENU->Governance & Administration->Account Management->Tenancy Details
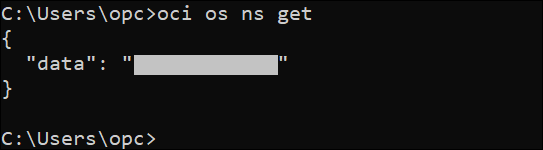
OCI CLIが既にインストールと設定済なら、oci os ns getのコマンドでも簡単にネームスペースを確認できます。
APIエンドポイント
"Object_Storage_Namespace"と"Region_Identifier"の文字列を収集したものに置き換えて、以下のようにAPIエンドポイントの文字列を作成します。
https://<Object_Storage_Namespace>.compat.objectstorage.<Region_Identifier>.oraclecloud.com
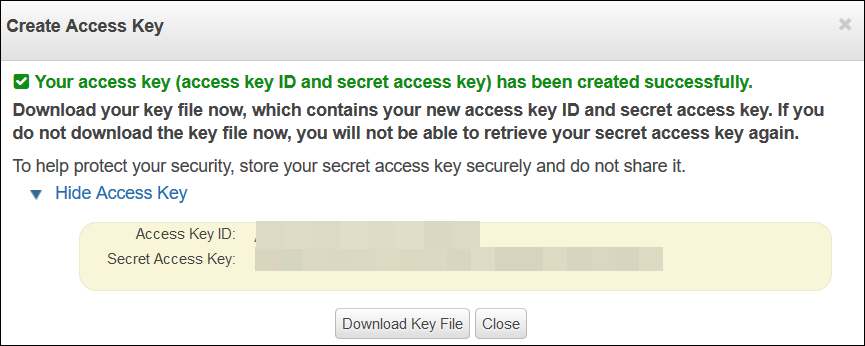
3. AWS接続用情報の収集 (コピー元)
アクセス・キー(Access Key IDとSecret Access Key)
AWSから収集方法に関するドキュメント・リンクはこちらです。
My Security Credentials->Access keys (access key ID and secret access key)->Create New Access Key
作成後、キーをコピーして安全な場所に保管してください。
4. OCI接続の設定 (コピー先)
コマンド: rclone config
以下の情報を入力します。
- 「n」を入力、接続を新規作成します。
- 接続名を入力します。(例:「oci」)
- 「4」を選択します。(S3準拠のストレージ・プロバイダー)
- 「14」を選択します。(他のS3互換プロバイダー)
[opc@linux7 ~]$ rclone config
2021/09/10 12:30:23 NOTICE: Config file "/home/opc/.config/rclone/rclone.conf" not found - using defaults
No remotes found - make a new one
n) New remote
s) Set configuration password
q) Quit config
n/s/q> n
name> oci
Type of storage to configure.
Enter a string value. Press Enter for the default ("").
Choose a number from below, or type in your own value
......
 4 / Amazon S3 Compliant Storage Providers including AWS, Alibaba, Ceph, Digital Ocean, Dreamhost, IBM COS, Minio, SeaweedFS, and Tencent COS
   \ "s3"
......
Storage> 4
Choose your S3 provider.
Enter a string value. Press Enter for the default ("").
Choose a number from below, or type in your own value
......
14 / Any other S3 compatible provider
   \ "Other"
provider> 14
以下の情報を入力します。
5. 「1」を入力します(次のステップでクレデンシャルを入力することを意味します)。
6. 「アクセス・キー」を入力します(OCIコンソールから作成された)。
7. 「秘密キー」を入力します(OCIコンソールから作成された)。
8. リージョン識別子を入力します。(例:「ap-tokyo-1」)
9. 「APIエンドポイント」を入力します。
Get AWS credentials from runtime (environment variables or EC2/ECS meta data if no env vars).
Only applies if access_key_id and secret_access_key is blank.
Enter a boolean value (true or false). Press Enter for the default ("false").
Choose a number from below, or type in your own value
 1 / Enter AWS credentials in the next step
   \ "false"
 2 / Get AWS credentials from the environment (env vars or IAM)
   \ "true"
env_auth> 1
AWS Access Key ID.
Leave blank for anonymous access or runtime credentials.
Enter a string value. Press Enter for the default ("").
access_key_id> Your_Access_Key
AWS Secret Access Key (password)
Leave blank for anonymous access or runtime credentials.
Enter a string value. Press Enter for the default ("").
secret_access_key> Your_Secret_Key
Region to connect to.
Leave blank if you are using an S3 clone and you don't have a region.
Enter a string value. Press Enter for the default ("").
Choose a number from below, or type in your own value
 1 / Use this if unsure. Will use v4 signatures and an empty region.
   \ ""
 2 / Use this only if v4 signatures don't work, e.g. pre Jewel/v10 CEPH.
   \ "other-v2-signature"
region> ap-tokyo-1
Endpoint for S3 API.
Required when using an S3 clone.
Enter a string value. Press Enter for the default ("").
endpoint> https://your_namespace.compat.objectstorage.ap-tokyo-1.oraclecloud.com
以下の情報を入力し、設定を完了します。
10. 「location_constraint」のプロンプトが表示されたら、Enterキーを押します。 (デフォルト)
11. ACLに「1」(プライベート)を入力します。(デフォルト)
12. もっと詳細な設定が必要ない場合は、「n」を入力します。(デフォルト)
13. 「y」を入力して確認します。(デフォルト)
Location constraint - must be set to match the Region.
Leave blank if not sure. Used when creating buckets only.
Enter a string value. Press Enter for the default ("").
location_constraint>
Canned ACL used when creating buckets and storing or copying objects.
......
Enter a string value. Press Enter for the default ("").
Choose a number from below, or type in your own value
 1 / Owner gets FULL_CONTROL. No one else has access rights (default).
   \ "private"
......
acl> 1
Edit advanced config?
y) Yes
n) No (default)
y/n> n
--------------------
[oci]
type = s3
provider = Other
access_key_id = Your_Access_Key
secret_access_key = Your_Secret_Key
region = ap-tokyo-1
endpoint = https://your_namespace.compat.objectstorage.ap-tokyo-1.oraclecloud.com
acl = private
--------------------
y) Yes this is OK (default)
e) Edit this remote
d) Delete this remote
y/e/d> y
Current remotes:

Name                 Type
====                 ====
oci                  s3
ここまで、OCI接続の設定は完了です。接続可否を確認します。
OCI接続の確認
すべてのバケットを一覧表示します。
コマンド: rclone lsd <remote:>
リモート名の末尾に":"があることに注意してください。
[opc@linux7 ~]$ rclone lsd oci:
          -1 2021-09-10 14:47:45        -1 Target_Bucket
[opc@linux7 ~]$
5. AWS接続の設定 (コピー元)
コマンド: rclone config
以下の情報を入力します。
- 「n」を入力、接続を新規作成します。
- 接続名を入力します。(例:「aws」)
- 「4」を選択します。(S3準拠のストレージ・プロバイダー)
- 「1」を選択します。(AWS S3)
[opc@linux7 ~]$ rclone config
Current remotes:

Name                 Type
====                 ====
oci                  s3

e) Edit existing remote
n) New remote
d) Delete remote
r) Rename remote
c) Copy remote
s) Set configuration password
q) Quit config
e/n/d/r/c/s/q> n
name> aws
Type of storage to configure.
Enter a string value. Press Enter for the default ("").
Choose a number from below, or type in your own value
......
 4 / Amazon S3 Compliant Storage Providers including AWS, Alibaba, Ceph, Digital Ocean, Dreamhost, IBM COS, Minio, SeaweedFS, and Tencent COS
   \ "s3"
......
Storage> 4
Choose your S3 provider.
Enter a string value. Press Enter for the default ("").
Choose a number from below, or type in your own value
 1 / Amazon Web Services (AWS) S3
   \ "AWS"
......
provider> 1
以下の情報を入力します。
5. 「1」を入力します(次のステップでクレデンシャルを入力することを意味します)。
6. 「アクセス・キー」を入力します(AWSコンソールから作成された)。
7. 「秘密キー」を入力します(AWSコンソールから作成された)。
8. リージョンを選択します。(東京リージョンの場合、「ap-northeast-1」となります。)
Get AWS credentials from runtime (environment variables or EC2/ECS meta data if no env vars).
Only applies if access_key_id and secret_access_key is blank.
Enter a boolean value (true or false). Press Enter for the default ("false").
Choose a number from below, or type in your own value
 1 / Enter AWS credentials in the next step
   \ "false"
 2 / Get AWS credentials from the environment (env vars or IAM)
   \ "true"
env_auth> 1
AWS Access Key ID.
Leave blank for anonymous access or runtime credentials.
Enter a string value. Press Enter for the default ("").
access_key_id> Your_Access_Key
AWS Secret Access Key (password)
Leave blank for anonymous access or runtime credentials.
Enter a string value. Press Enter for the default ("").
secret_access_key> Your_Secret_Key
Region to connect to.
Enter a string value. Press Enter for the default ("").
Choose a number from below, or type in your own value
......
   / Asia Pacific (Tokyo) Region
14 | Needs location constraint ap-northeast-1.
   \ "ap-northeast-1"
......
region> ap-northeast-1
他の設定にはデフォルトのオプション(Enterキーを押す)を使用しますが、ここでは省略します。
設定の最後は、次のようになります。
Edit advanced config?
y) Yes
n) No (default)
y/n> n
--------------------
[aws]
type = s3
provider = AWS
access_key_id = Your_Access_Key
secret_access_key = Your_Secret_Key
region = ap-northeast-1
--------------------
y) Yes this is OK (default)
e) Edit this remote
d) Delete this remote
y/e/d> y
Current remotes:

Name                 Type
====                 ====
aws                  s3
oci                  s3
これで、ソース/ターゲット・クラウドへの接続が正常に構成されました。以下のコマンドで接続を確認できます。
AWS接続の確認
Command:
rclone listremotes - 設定ファイルから利用可能なすべてのリモートを一覧表示します。
rclone lsd <remote:> - バケット一覧を表示します。 (":"を忘れずに)
rclone ls <remote:path> - 指定されたバケット内のすべてのオブジェクトを一覧表示します。
[opc@linux7 ~]$ rclone listremotes
aws:
oci:
[opc@linux7 ~]$ rclone lsd aws:
          -1 2021-09-10 15:02:49        -1 mysourcebucket001
[opc@linux7 ~]$ rclone ls aws:mysourcebucket001
      747 tmp1.txt
      257 tmp2.txt
     3346 tmp3.txt
    10509 tmp4.txt
     1572 tmp5.txt
      933 tmp6.txt
     1080 tmp7.txt
     1232 tmp8.txt
     1233 tmp9.txt
[opc@linux7 ~]$
接続情報は、rclone.confという設定ファイルに保存されます。
rclone.confの格納先
Windowsの場合:%APPDATA%/rclone/rclone.conf
その以外:~/.config/rclone/rclone.conf
6. データコピーの実施
コピー前:
現在、ターゲットバケットには何もない状態です。
[opc@linux7 ~]$ rclone ls oci:Target_Bucket
[opc@linux7 ~]$
コピー用コマンド:
rclone copy source:sourcepath dest:destpath
必要に応じてフラグ(オプション)を追加できます。
--verbose - 出力結果に多くのメッセージを出すように。
--dry-run - 何もコピーせずにテストだけをする。
-P/--progress - リアルタイムの転送統計を表示するフラグ。
--max-age 24h - 最近変更された(24時間)すべてのファイルをコピーする
"rclone copy"コマンドの詳細を知りたい方は、こちらのマニュアル をご確認ください。
コマンドの出力結果:
[opc@linux7 ~]$ rclone --verbose copy aws:mysourcebucket001 oci:Target_Bucket
2021/09/12 12:51:09 INFO  : tmp2.txt: Copied (new)
2021/09/12 12:51:09 INFO  : tmp1.txt: Copied (new)
2021/09/12 12:51:09 INFO  : tmp6.txt: Copied (new)
2021/09/12 12:51:09 INFO  : tmp4.txt: Copied (new)
2021/09/12 12:51:09 INFO  : tmp5.txt: Copied (new)
2021/09/12 12:51:09 INFO  : tmp3.txt: Copied (new)
2021/09/12 12:51:09 INFO  : tmp7.txt: Copied (new)
2021/09/12 12:51:09 INFO  : tmp8.txt: Copied (new)
2021/09/12 12:51:09 INFO  : tmp9.txt: Copied (new)
2021/09/12 12:51:09 INFO  :
Transferred:       20.419Ki / 20.419 KiByte, 100%, 0 Byte/s, ETA -
Transferred:            9 / 9, 100%
Elapsed time:         0.4s

[opc@linux7 ~]$
コピー後:
これで、ソースバケットのデータがコピーされました。
[opc@linux7 ~]$ rclone ls oci:Target_Bucket
      747 tmp1.txt
      257 tmp2.txt
     3346 tmp3.txt
    10509 tmp4.txt
     1572 tmp5.txt
      933 tmp6.txt
     1080 tmp7.txt
     1232 tmp8.txt
     1233 tmp9.txt
[opc@linux7 ~]$
以上です。
追記:OCIへの接続方法のアップデート
追記日: 2023/4/21
OCIへの接続を立てる時、従来の「S3準拠のストレージ・プロバイダー」以外、OCI Nativeの設定方法も可能になりました。
ストレージのタイプを選択する時、次のように、「34」(OCI Object Storage)を指定してください。
[opc@linux8 ~]$ rclone config
2023/04/21 13:49:27 NOTICE: Config file "/home/opc/.config/rclone/rclone.conf" not found - using defaults
No remotes found, make a new one?
n) New remote
s) Set configuration password
q) Quit config
n/s/q> n

Enter name for new remote.
name> oci

Option Storage.
Type of storage to configure.
Choose a number from below, or type in your own value.
......
34 / Oracle Cloud Infrastructure Object Storage
   \ (oracleobjectstorage)
......
Storage> 34
認証方法は、次のようにいくつかを指定できます。今回は「2」(configファイルを利用)を例にして説明します(このconfigファイルは、OCI CLIにも利用できます)。
Option provider.
Choose your Auth Provider
Choose a number from below, or type in your own string value.
Press Enter for the default (env_auth).
 1 / automatically pickup the credentials from runtime(env), first one to provide auth wins
   \ (env_auth)
   / use an OCI user and an API key for authentication.
 2 | you'll need to put in a config file your tenancy OCID, user OCID, region, the path, fingerprint to an API key.
   | https://docs.oracle.com/en-us/iaas/Content/API/Concepts/sdkconfig.htm
   \ (user_principal_auth)
   / use instance principals to authorize an instance to make API calls.
 3 | each instance has its own identity, and authenticates using the certificates that are read from instance metadata.
   | https://docs.oracle.com/en-us/iaas/Content/Identity/Tasks/callingservicesfrominstances.htm
   \ (instance_principal_auth)
 4 / use resource principals to make API calls
   \ (resource_principal_auth)
 5 / no credentials needed, this is typically for reading public buckets
   \ (no_auth)
provider> 2
必要な情報を入力します。
- オブジェクト・ストレージ・ネームスペース:STEP-2で取得したもの
- Compartment OCID: バケットの置き場所
- リージョン識別子:STEP-2で取得したもの
- APIエンドポイント:デフォルトでよい
- configファイルの場所:デフォルトでよい (~/.oci/config)
- プロファイル:デフォルトでよい
Option namespace.
Object storage namespace
Enter a value.
namespace> <Your_Object_Storage_Namespace>

Option compartment.
Object storage compartment OCID
Enter a value.
compartment> <Your_CompartmentOcid>

Option region.
Object storage Region
Enter a value.
region> <Your_Region_ID>

Option endpoint.
Endpoint for Object storage API.
Leave blank to use the default endpoint for the region.
Enter a value. Press Enter to leave empty.
endpoint>

Option config_file.
Path to OCI config file
Choose a number from below, or type in your own string value.
Press Enter for the default (~/.oci/config).
 1 / oci configuration file location
   \ (~/.oci/config)
config_file>

Option config_profile.
Profile name inside the oci config file
Choose a number from below, or type in your own string value.
Press Enter for the default (Default).
 1 / Use the default profile
   \ (Default)
config_profile>

Edit advanced config?
y) Yes
n) No (default)
y/n> n
設定内容を確認した上、保存します。
Configuration complete.
Options:
- type: oracleobjectstorage
- provider: user_principal_auth
- namespace: <Your_Object_Storage_Namespace>
- compartment: <Your_CompartmentOcid>
- region: <Your_Region_ID>
Keep this "oci" remote?
y) Yes this is OK (default)
e) Edit this remote
d) Delete this remote
y/e/d> y
OCI構成ファイル
configファイルを用意して、~/.oci/configに保存します。
ファイル作成方法の詳細は、次の記事をご参照ください。
「OCIカスタム・メトリックでディスク使用率を監視」の事前準備
OCI接続の確認
すべてのバケットを一覧表示します。
コマンド: rclone lsd <remote:>
[opc@linux8 ~]$ rclone lsd oci:
          -1 2021-09-10 14:47:45        -1 Target_Bucket
[opc@linux8 ~]$
改訂歴
2021年9月:初版作成
2023年4月:OCIへの接続方法のアップデート
関連記事
クラウド技術ブログ一覧
AWS S3からOracle DBにデータを導入する
RcloneでAzure BlobからOCIオブジェクト・ストレージにデータをコピー
OCI Cloud Shellにrcloneをインストールする