はじめに
DeepLearningの手始めとして、TensorFlowでMNISTの学習をしてみました。
いろんなサイトのコードを参考にさせていただきながら、組み上げました。
今回は以下も目的にコーディングしてみました。
- 学習モデルをクラス化する
- 学習結果を保存して後で使えるようにする
- TensorBoardに表示する学習経過を保存する
学習モデル
class CNN:
    """ 予測モデルを作成する関数
    引数:
      images_placeholder: 画像のplaceholder
      keep_prob: dropout率のplaceholder
      image_size: 画像サイズ
      num_clesses:識別数
    返り値:
      y_conv: 各クラスの確率の配列 ([tensorflow.python.framework.ops.Tensor]型)
    """
    def makeMnistCNN(imegs_placeholder, keep_prob , image_size , num_clesses):
        # 重みを初期化
        def weight_variable(shape):
            # 重みを標準偏差0.1の正規分布で初期化
            inital = tf.truncated_normal(shape, stddev=0.1)
            return tf.Variable(inital)

        # バイアスを初期化
        def bias_variable(shape):
            # 定数0.0で初期化
            inital = tf.constant(0.0, shape=shape)
            return tf.Variable(inital)

        # 畳み込み層
        def conv2d(x, W):
            return tf.nn.conv2d(x, W, strides=[1,1,1,1], padding="SAME")

        # プーリング層
        def max_pool_2x2(x):
            return tf.nn.max_pool(x, ksize=[1,2,2,1], strides=[1,2,2,1], padding="SAME")


        # 入力層を28*28*1に変形
        x_image = tf.reshape(imegs_placeholder, [-1, image_size, image_size, 1])

        # 畳み込み層1の作成
        with tf.name_scope("conv1") as scope:
            W_conv1 = weight_variable([3,3,1,16])
            b_conv1 = bias_variable([16])
            h_conv1 = tf.nn.relu(conv2d(x_image, W_conv1) + b_conv1)

        # プーリング層1の作成
        with tf.name_scope("pool1") as scope:
            h_pool1 = max_pool_2x2(h_conv1)

        # 畳み込み層2の作成
        with tf.name_scope("conv2") as scope:
            W_conv2 = weight_variable([3,3,16,32])
            b_conv2 = bias_variable([32])
            h_conv2 = tf.nn.relu(conv2d(h_pool1, W_conv2) + b_conv2)

        # プーリング層2の作成
        with tf.name_scope("pool2") as scope:
            h_pool2 = max_pool_2x2(h_conv2)

        # 畳み込み層3の作成
        with tf.name_scope("conv3") as scope:
            W_conv3 = weight_variable([3,3,32,32])
            b_conv3 = bias_variable([32])
            h_conv3 = tf.nn.relu(conv2d(h_pool2, W_conv3) + b_conv3)

        # 畳み込み層4の作成
        with tf.name_scope("conv4") as scope:
            W_conv4 = weight_variable([3,3,32,32])
            b_conv4 = bias_variable([32])
            h_conv4 = tf.nn.relu(conv2d(h_conv3, W_conv4) + b_conv4)

        # 結合層1の作成
        with tf.name_scope("fc1") as scope:
            # 1次元に変形
            h_flat = tf.reshape(h_conv4, [-1, 7*7*32])
            W_fc1 = weight_variable([7*7*32, 512])
            b_fc1 = bias_variable([512])
            h_fc1 = tf.nn.relu(tf.matmul(h_flat, W_fc1) + b_fc1)

            # dropout1の設定
            h_fc_1_drop = tf.nn.dropout(h_fc1, keep_prob)

        # 結合層2の作成
        with tf.name_scope("fc2") as scope:
            W_fc2 = weight_variable([512, num_clesses])
            b_fc2 = bias_variable([num_clesses])

        # ソフトマックス関数による正規化
        with tf.name_scope("softmax") as scope:
            y_conv = tf.nn.softmax(tf.matmul(h_fc_1_drop, W_fc2) + b_fc2)

        return y_conv
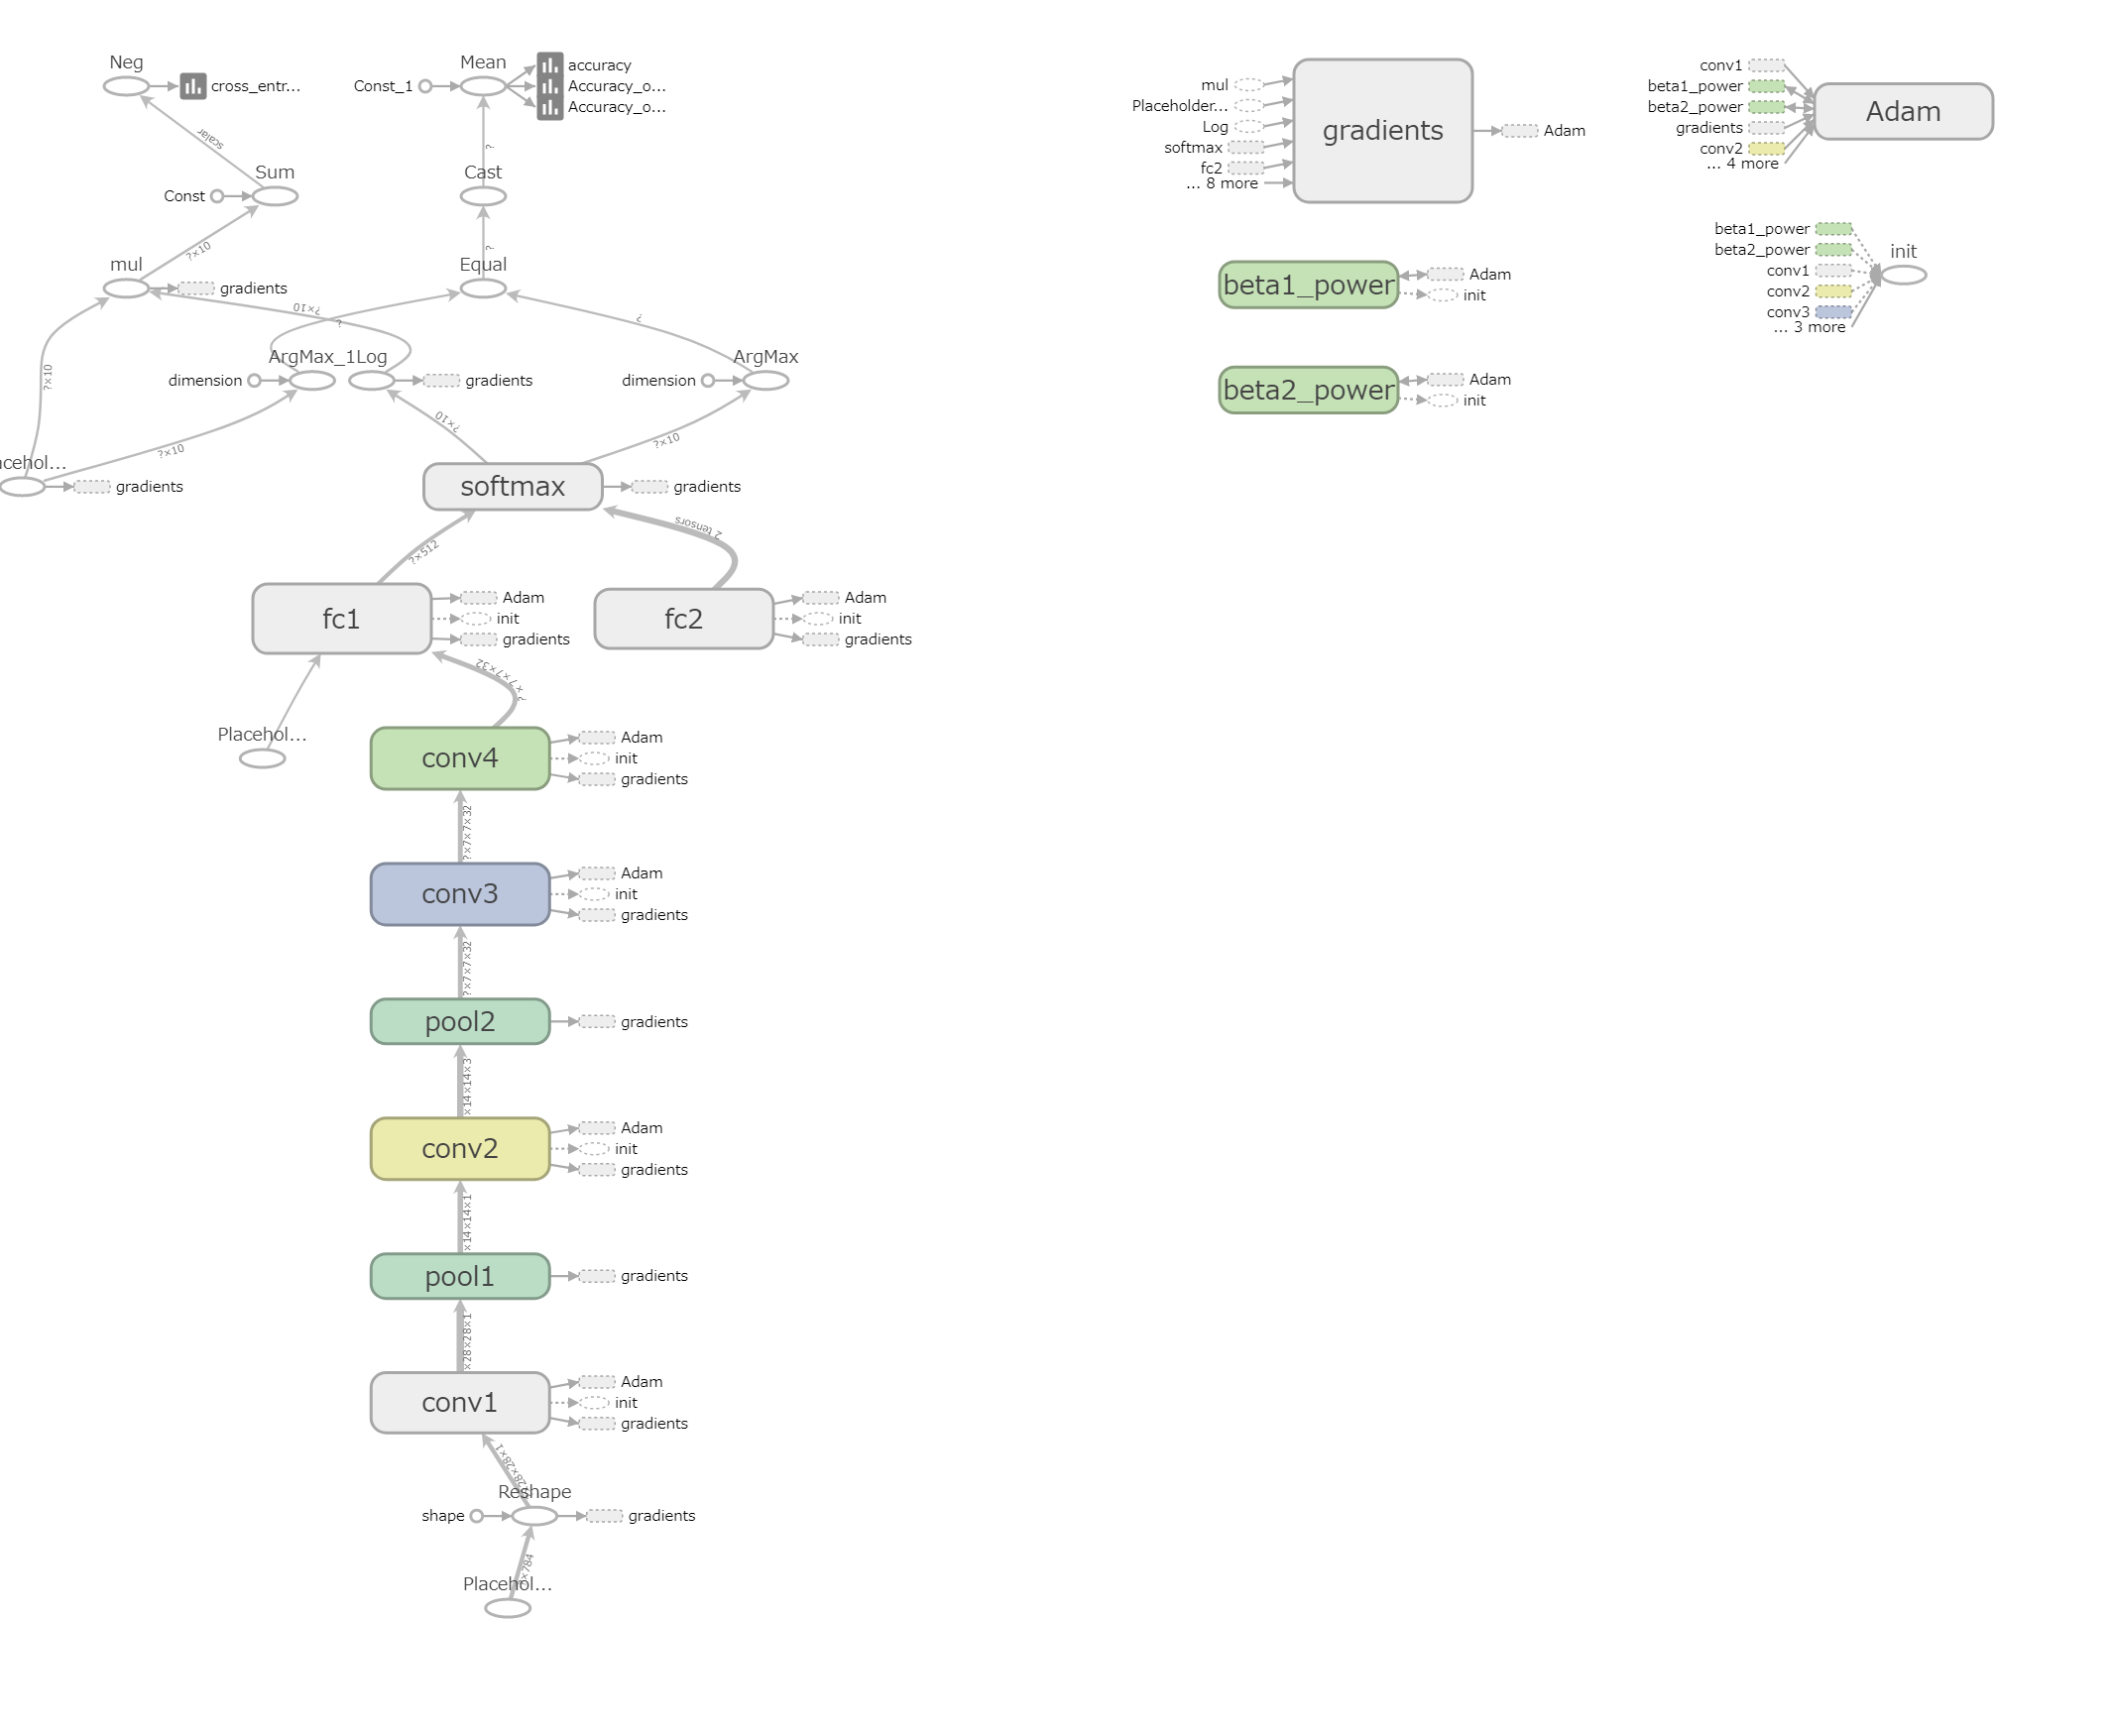
tf.name_scope()で名前空間を設定すると、TensorBoardのグラフにその名前が使用されます。
TensorBoardで表示されるグラフではこんな感じになります。
学習コード
print('mnist_train.py START')

import tensorflow as tf
from tensorflow.examples.tutorials.mnist import input_data
import datetime

import DeepConvNet as CNN

IMAGE_SIZE  = 28    # 画像サイズ
NUM_CLASSES = 10    # 識別数

print('MNIST Download Start')
# MNISTデータのダウンロード
mnist = input_data.read_data_sets("MNIST_data", one_hot=True)
print('MNIST Download End')

""" 損失関数
    引数:
      logits: ロジットのtensor, float - [batch_size, NUM_CLASSES]
      labels: ラベルのtensor, int32 - [batch_size, NUM_CLASSES]
    返り値:
      cross_entropy: 交差エントロピーのtensor, float
"""
def loss(logits, labels):
    cross_entropy = -tf.reduce_sum(labels*tf.log(logits))
    return cross_entropy

""" 訓練のopを定義する関数
    引数:
      loss: 損失のtensor, loss()の結果
      learning_rate: 学習係数
    返り値:
      train_step: 訓練のop
"""
def training(loss, learning_rate):
    # 勾配降下法(Adam)
    train_step = tf.train.AdamOptimizer(learning_rate).minimize(loss)
    return train_step

"""正解率(accuracy)を計算する関数
    引数:
        logits: ロジットのtensor, float - [batch_size, NUM_CLASSES]
        labels: ラベルのtensor, int32 - [batch_size, NUM_CLASSES]
    返り値:
        accuracy: 正解率(float)
"""
def accuracy(logits, labels):
    correct_prediction = tf.equal(tf.argmax(logits, 1), tf.arg_max(labels, 1))
    accuracy = tf.reduce_mean(tf.cast(correct_prediction, "float"))
    return accuracy

if __name__=="__main__":
    with tf.Graph().as_default():
        print('設定 START')
        x_image = tf.placeholder("float", shape=[None, IMAGE_SIZE * IMAGE_SIZE])    # 入力
        y_label = tf.placeholder("float", shape=[None, NUM_CLASSES]) # 出力
        keep_prob = tf.placeholder("float")    #ドロップアウト

        # モデルを作成
        logits = CNN.CNN.makeMnistCNN(x_image, keep_prob , IMAGE_SIZE , NUM_CLASSES)

        # opを定義
        loss_value = loss(logits, y_label)
        train_op = training(loss_value,1e-4)
        accur = accuracy(logits, y_label)

        sess = tf.Session()
        sess.run(tf.global_variables_initializer())

        #TensorBoardで追跡する変数を定義
        accuracy_op_train = tf.summary.scalar("Accuracy on Train", accur)
        accuracy_op_test = tf.summary.scalar("Accuracy on Test", accur)
        summary_op_train = tf.summary.merge([accuracy_op_train])
        summary_op_test = tf.summary.merge([accuracy_op_test])
        summary_writer = tf.summary.FileWriter("./TensorBoard", graph=sess.graph)

        # 訓練したモデルを保存
        # (tf.train.Saver()が呼ばれる前までに呼ばれた引数が対象になる)
        saver = tf.train.Saver()
        print('設定 END')

        print('学習 START : ' + str(datetime.datetime.now()))
        #学習の実行
        for epoch in range(5000):
            #訓練データセットから 50 のランダムなデータの “バッチ” を取得 [0]に画像の配列、[1]に結果の配列
            batch = mnist.train.next_batch(50)

            # 学習の途中経過の表示・TensorBoard書き込み
            if epoch % 100 == 0:
                train_accury = sess.run(accur, feed_dict={x_image: batch[0], y_label: batch[1], keep_prob: 1.0})

                # テストデータ(検証データ)で評価
                test_batch = mnist.validation.next_batch(500, shuffle=False)
                test_accury = sess.run(accur, feed_dict={x_image: test_batch[0], y_label: test_batch[1], keep_prob: 1.0})
                # ↓ Jupiterで実行するとコンソールが落ちる (メモリ不足?)
                #test_accury = sess.run(accur, feed_dict={x_image: mnist.validation.images, y_label: mnist.validation.labels, keep_prob: 1.0})
                print("epoch:%d, train_accury : %g  test_accury : %g"%(epoch, train_accury , test_accury))

                summary_str_train = sess.run(summary_op_train, feed_dict={x_image: batch[0], y_label: batch[1], keep_prob: 1.0})
                summary_writer.add_summary(summary_str_train, epoch)

                summary_str_test = sess.run(summary_op_test, feed_dict={x_image: test_batch[0], y_label: test_batch[1], keep_prob: 1.0})
                #summary_str = sess.run(summary_op_test, feed_dict={x_image: mnist.validation.images, y_label: mnist.validation.labels, keep_prob: 1.0})
                summary_writer.add_summary(summary_str_test, epoch)
                summary_writer.flush()

            # 学習
            sess.run(train_op, feed_dict={x_image: batch[0], y_label: batch[1], keep_prob:0.5})

        print('学習 END : ' + str(datetime.datetime.now()))

        #結果表示 (テストデータで評価)
        test_batch = mnist.test.next_batch(500, shuffle=False)
        print("test accuracy : %g" %sess.run(accur, feed_dict={x_image: test_batch[0], y_label: test_batch[1], keep_prob: 1.0}))
        #print("test accuracy : %g" %sess.run(accur, feed_dict={x_image: mnist.test.images, y_label: mnist.test.labels, keep_prob: 1.0}))

        save_path = saver.save(sess, "./ckpt/model.ckpt") # 変数データ保存
        print('Save END : ' + save_path )

        summary_writer.close()
        sess.close()

        print('mnist_train.py END')
TensorBoard用のコード
今回は訓練データを用いたときの認識精度と、テストデータを用いた認識精度をグラフ表示させました。
        #TensorBoardで追跡する変数を定義
        accuracy_op_train = tf.summary.scalar("Accuracy on Train", accur)
        accuracy_op_test = tf.summary.scalar("Accuracy on Test", accur)
        summary_op_train = tf.summary.merge([accuracy_op_train])
        summary_op_test = tf.summary.merge([accuracy_op_test])
        summary_writer = tf.summary.FileWriter("./TensorBoard", graph=sess.graph)
スカラー値のグラフを作りたいときは、tf.summary.scalar()を使用して、第1引数に名称、第2引数にスカラー値を設定します。Summary出力用のopが出力されます。
tf.summary.merge()で出力対象のopをマージします。今回は1個ずつなので、マージはなくても大丈夫です。
tf.summary.FileWriter()で出力先を指定します。
                summary_str_train = sess.run(summary_op_train, feed_dict={x_image: batch[0], y_label: batch[1], keep_prob: 1.0})
                summary_writer.add_summary(summary_str_train, epoch)

                test_batch = mnist.validation.next_batch(500, shuffle=False)
                summary_str_test = sess.run(summary_op_test, feed_dict={x_image: test_batch[0], y_label: test_batch[1], keep_prob: 1.0})
                summary_writer.add_summary(summary_str_test, epoch)
                summary_writer.flush()
sess.run()で、訓練データとテストデータのそれぞれで、認識精度を求め、TensorBoard用の文字列が出力します。
summary_writer.add_summary()でファイルに書き込みます。第2引数が横軸になります。
※なお、テストデータすべてを使用すると、SpyderのIPythonコンソールが落ちてしまったので、テストデータ数を少なくしています。Colaboratoryではすべて使用しても問題なく動作しました。
この結果をTensorBordで表示させた結果が以下になります。
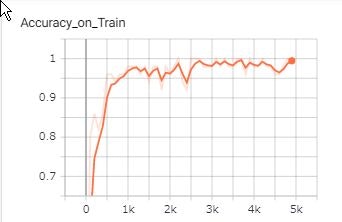
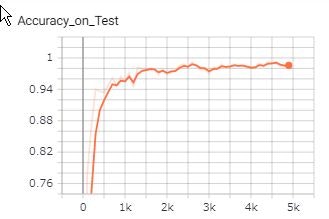
認識精度が同じように上昇していて、過学習が発生していないことが分かります。
学習は以上になります。
テストコード
学習結果を使って、手書き文字の判定を行います。
print('mnist_test.py START')

import tensorflow as tf
import cv2
import numpy as np

import DeepConvNet as CNN

IMAGE_SIZE  = 28    # 画像サイズ
NUM_CLASSES = 10    # 識別数

if __name__ == "__main__":
    # https://www.tensorflow.org/api_docs/python/tf/reset_default_graph
    tf.reset_default_graph()

    print('設定 START')
    x_image = tf.placeholder("float", shape=[None, IMAGE_SIZE * IMAGE_SIZE])    # 入力
    y_label = tf.placeholder("float", shape=[None, NUM_CLASSES]) # 出力
    keep_prob = tf.placeholder("float")


    # モデルを作成
    logits = CNN.CNN.makeMnistCNN(x_image, keep_prob , IMAGE_SIZE , NUM_CLASSES)

    sess = tf.InteractiveSession()

    saver = tf.train.Saver()
    #変数を初期化して実行
    sess.run(tf.global_variables_initializer())
    print('設定 END')

    print('Restore Param Start')
    ckpt = tf.train.get_checkpoint_state('./ckpt')
    if ckpt: # checkpointがある場合
        last_model = ckpt.model_checkpoint_path # 最後に保存したmodelへのパス
        print ("Restore load:" + last_model)
        saver.restore(sess, last_model) # 変数データの読み込み
    else:
        print('Restore Failed')
    print('Restore Param End')


    # 画像読み込み
    inputNum = input("判定したい回数を入力してください >")
    for count in range(int(inputNum)):
        fileName = input("画像パスを入力してください >")
        fileName = 'test_data/' + fileName
        print('fileName:' + fileName)

        ximage = []

        # 画像読み込み
        image = cv2.imread(fileName, cv2.IMREAD_GRAYSCALE)
        if not image is None:
            # 28*28にリサイズ
            image = cv2.resize(image, (IMAGE_SIZE, IMAGE_SIZE))
            ximage = image.flatten().astype(np.float32)/255.0
        else:
            print('Error:File Read Failed !!')

        if len(ximage)!=0:
            pred = np.argmax(logits.eval(feed_dict={x_image: [ximage], keep_prob: 1.0})[0])

            print("result:" + str(pred))

    sess.close()
    print('mnist_test.py END')
学習結果のリストアに関して
tf.reset_default_graph()がないと、SpyderやColaboratoryでのmnist_test.pyの1回目の実行はうまくいきますが、2回目以降で以下のようなエラーがでました。
NotFoundError (see above for traceback): Restoring from checkpoint failed. This is most likely due to a Variable name or other graph key that is missing from the checkpoint. Please ensure that you have not altered the graph expected based on the checkpoint. Original error:

Key conv1_1/Variable not found in checkpoint
	 [[node save_1/RestoreV2 (defined at C:/Users/takayuki/Python/TensorFlow/input_mnist.py:133) ]]
以下を参考にして解決しました。SpyderやColaboratoryも高速化のために、余計なことをしてくれてそうです。3パターンくらい解決方法がありそうですが、とりあえず一番手っ取り早そうなのでを選びました。
Tensorflow + Jupyterのsave & restore時のトラブルとその回避方法
おわりに
2019.06.15時点でColaboratory上のTensorBoardでデータの読み込みの失敗で、グラフの表示ができませんした。前はできていたんですが。。。原因不明です。
No dashboards are active for the current data set.
学習時間に関して
ローカル環境(Spyder)とColaboratoryで5000 epochの学習時間の計測を行いました。GPUの速さが際立ってますね!!
| 環境 | 時間 |
|---|---|
| Spyder (intel Core i5 2.5GHz*2) | 06分00秒 |
| Colaboratory(CPU) | 4分20秒 |
| Colaboratory(GPU) | 15秒 |
| ※2019.06.15時点での時間です。 |
参考にしたサイト
TensorFlowのMNISTチュートリアルを画像入力に対応させた
TensorflowでCNNを作る際に使いそうな関数を列挙してみた
TensorFlowを遊び倒す! 2-1. MNIST For Experts
TensorBoard
TensorFlowを使ってみる 〜その3〜 TensorBoard
TensorBoardとは? スカラー値やデータフローグラフの可視化