はじめに
この記事は 2020 年の RevComm アドベントカレンダー 23 日目の記事です。
日目は @mpayu2 さんの「 【入門・React・TypeScript・Enzyme】Create React AppからEnzyme導入まで 」でした。
こんにちは。株式会社RevCommで社内向けシステム開発・運用を担当している @zoetaka38 です。
みなさん、サーバレスシステムでサービスを開発されることはありますか?
私は今社内システムを担当しているのですが、社内システムは様々な機能が求められますが、一方で低コストで、高可用なシステムを求められることが多いです。そして、24時間ずっと使われるわけでもないことも多々あります。
そういった背景から、社内関係のシステムをサーバレスで作成しちゃうことが多いです。
しかし、サーバレスでAPIを作成していくと、DBとの接続にコネクションプール気をつけないといけないとか、ドキュメントたくさん作らないといけなくてめんどくさいとか、色々問題が出てきます。
そこで、Serverless Frameworkと、Flaskを使って、サーバレスで、DBコネクションプールを気にしないですみ、かつドキュメントも勝手にできてくれるようなフレームワークを紹介したいと思います。
前提
以下のクラウド環境やモジュールバージョンで動作することは確認済みです。
- 開発環境はおそらくなんでも大丈夫ですが、macOS Big Sur と Ubuntu 20.04 desktopで動くことは確認しました
- Serverless Framework 2.11.1
- Python3.8
- インフラはAWSを使うことを前提としています。
やってみる
それでは、早速作っていきます。
環境の構築
pipenv派なので、pipenvで環境作っていきます。
$ pip install pipenv
$ pipenv --python 3.8
$ pipenv install flask
ローカルで開発するときは、Dockerでやりたいので、Dockerfileとdocker-compose.ymlを用意しておきましょう。
Dockerfileは、Pythonが実行できて、Pipfileからパッケージインストールされるようなものを使ってます。
FROM python:3.8.0

# set working directory
RUN mkdir -p /usr/src/app
WORKDIR /usr/src/app

# install environment dependencies
RUN apt-get update -yqq \
  && apt-get install -yqq --no-install-recommends \
    openssl \
  && apt-get -q clean

# add requirements (to leverage Docker cache)
COPY Pipfile ./
COPY Pipfile.lock ./

# install requirements
RUN pip install -U --no-cache-dir pipenv
RUN pipenv install

COPY ./api/ /usr/src/app

CMD pipenv run python -B -u app.py run -h 0.0.0.0
内部で開発するときにAWSのクレデンシャルが共有されるようにすることと、環境変数を./envsフォルダ以下の.env.{環境名}ファイルから読み込むようにしていることが、工夫点です。
version: '3.4'

services:
  restapi:
    build: .
    volumes:
      - './:/usr/src/app'
      - $HOME/.aws/credentials:/root/.aws/credentials:ro
      - $HOME/.aws/config:/root/.aws/config:ro
    ports:
      - "5000:5000"
    env_file:
      - ./envs/.env.${STAGE}
    environment:
      - FLASK_DEBUG=1
      - TZ=Asia/Tokyo
      - LC_CTYPE=C.UTF-8
      - PYTHONDONTWRITEBYTECODE=1
    command: pipenv run python -B -u /usr/src/app/api/app.py run -h 0.0.0.0
次に、Flaskの開発ファイルと、環境変数ファイルを作成します。
# 環境変数ファイルを作成
$ mkdir ./envs
$ touch ./envs/.env.dev
# Flask用のファイルを作成
$ mkdir ./api
$ touch ./api/app.py
ここまでで、以下のようなフォルダ構造になっていると思います。
$ tree . -a
.
├── Dockerfile
├── Pipfile
├── Pipfile.lock
├── api
│   └── app.py
├── docker-compose.yml
└── envs
    └── .env.dev
FlaskでREST APIを開発することができて、Swaggerのドキュメントを自動生成してくれるツールとして、今回はFlask-RESTXを使うことにしました。
ですので、これをインストールしておきます。
また、Flask-CORSも、CORS対策が必要なAPIとして、入れておきます。
$ pipenv install flask-restx
$ pipenv install flask_cors
一度ここまでで、Flaskを実行してみます。
以下のように、./api/app.pyを編集します。
import os

from flask import Flask, make_response, jsonify
from flask_cors import CORS
from flask_restx import Api, Resource

app = Flask(__name__)
api = Api(app)
CORS(app, resources={r'/*': {'origins': '*'}})

ns = api.namespace("api/v1", description="Flask Test")

@ns.route('/hello')
class Hello(Resource):

    def get(self):
        resp = {
            'status': 'ok',
            'response': "hello"
        }
        return make_response(jsonify(resp))

if __name__ == "__main__":
    app.run(host='0.0.0.0', debug=True)
そして、Docker Composeで、コンテナを立ち上げます。
# 頭のSTAGE変数で、環境変数ファイルを切り替えます。
STAGE=dev docker-compose up
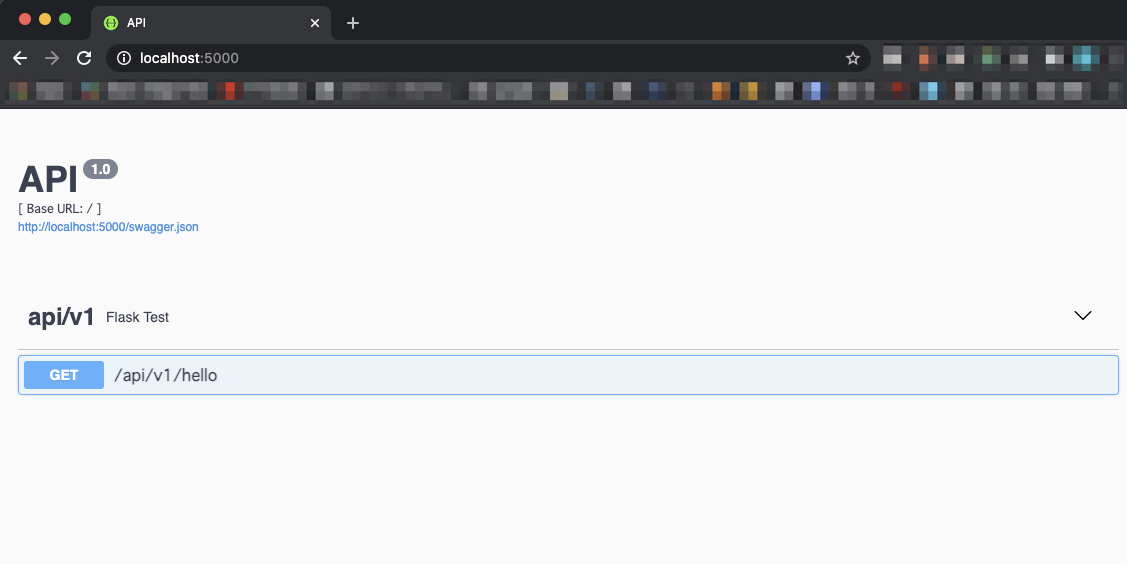
そうすると、 http://localhost:5000/ にアクセスしてSwaggerドキュメントが自動生成されているのが確認できると思います。

あとは、Serverless Flameworkを導入して、APIを開発していけば良さそうです。
セキュリティ面を考えたときの壁
セキュリティ面を考えると、APIに対してはAPIキーにて、認証をかけることができるとはいえ、Swaggerドキュメントにも認証をかけたいです。
よく使われるのが、Basic認証であり、調べるとAPI Gatewayに認証をかける記事がいくつか見つかります。
これは、外部のLambdaをAPI呼び出しのときに実行するという方法ですが、本体のAPIとしては、APIキーでの認証が基本となるのでBasic認証は不要です。呼び出されたLambda側でAPIキーがある場合は無視するということも考えられますが、不要な呼び出しは実行したくありません。
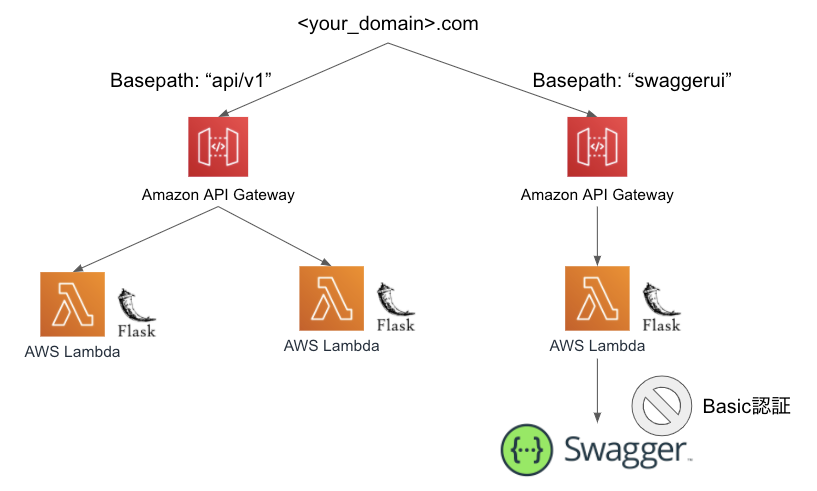
そうなると、ドメインか、API Gatewayで本体のAPIとSwaggerドキュメントを分けてあげる必要があります。ドメインは分けたくないので、API Gatewayレベルで分けてあげるのが良さそうです。
API Gatewayレベルで切り分けるには、Serverless Frameworkのファイルを2つ作成して、API Gatewayのベースパスマッピングを分けてあげるといけそうです。※参考
しかし、ここで1つの問題に直面しました。
なんと、Flask-RESTXには、Swaggerドキュメントを吐き出すパスを修正することができないのです!
ここで、絶対パスで指定されており、 http://localhost:5000/swagger.json となっているのを、http://localhost:5000/swaggerui/swagger.json と変更することができません。
こうなると、API Gatewayでベースパスマッピングを変えても、Swaggerドキュメントの表示ができません。。。
そこで、無理やり変えてしまえばいいんじゃないか、ということで、上書きしちゃうことにしました。同じような話は、ここでもずっと議論されているみたいです。
放置されているようですし、修正の期待もなかなかできないので、なおさら無理やり変えるしかなさそうです。
以下のようにFlaskのファイルを書き換えてあげると、 http://localhost:5000/swaggerui/apidocs/ からSwaggerファイルが出力されるようになります。
import os

from flask import Flask, make_response, jsonify
from flask_cors import CORS
from flask_restx import Api, Resource
from flask_restx.api import SwaggerView
from flask_restx.apidoc import url_for

class Custom_API(Api):
    def _register_specs(self, app_or_blueprint):
        if self._add_specs:
            endpoint = str("specs")
            self._register_view(app_or_blueprint,SwaggerView,
                self.default_namespace,"/swaggerui/swagger.json",
                endpoint=endpoint,resource_class_args=(self,),
            )
            self.endpoints.add(endpoint)

app = Flask(__name__)
api = Custom_API(app, doc='/swaggerui/apidocs/', )
app.config.from_object(__name__)
CORS(app, resources={r'/*': {'origins': '*'}})

ns = api.namespace("api/v1", description="Flask Test")

@ns.route('/hello')
class Hello(Resource):

    def get(self):
        resp = {
            'status': 'ok',
            'response': "hello"
        }
        return make_response(jsonify(resp))

if __name__ == "__main__":
    app.run(host='0.0.0.0', debug=True)
Basic認証用のLambdaを用意しておく
Serverless Flameworkに進む前に、Basic認証用のLambdaを準備しておきます。Swaggerドキュメント用のAPI Gatewayからは、このLambdaを呼び出して、Basic認証をかけます。
これは、普通にAWSのコンソールからLambdaを作成して、直接コードを編集しちゃっていいと思います。
import json
import base64

accounts = [
    # dict形式のリストで複数のUser,Passwordを設定できます。
    {
        "user": "basic-user",
        "pass": "basic-path"
    }
]

def lambda_handler(event, context):

    print(event)

    authorization_header = event['headers']['authorization']

    if check_authorization_header(authorization_header):
        return {
            'principalId': 'user',
            'policyDocument': {
                'Version': '2012-10-17',
                'Statement': [
                    {
                        'Action': 'execute-api:Invoke',
                        'Effect': 'Allow',
                        'Resource': event['methodArn']
                    }
                ]
            }
        }
    else:
        raise ValueError('Unauthorized')

def check_authorization_header(authorization_header: str) -> bool:
    if not authorization_header:
        return False

    for account in accounts:
        encoded_value = base64.b64encode(f"{account['user']}:{account['pass']}").encode('utf-8'))
        check_value = "Basic {}".format(encoded_value.decode(encoding='utf-8'))

        if authorization_header == check_value:
            return True

    return False
Serverless Frameworkの導入
ここまでできたら、API本体をデプロイするためのserverless.ymlと、Swaggerドキュメントをデプロイするようのserverless-swagger.ymlを作成して、実際にデプロイしてみるのみです。
本体API用のymlです。FlaskをAPI Gateway+Lambdaで提供するための、serverless-python-requirements、serverless-wsgiが入ってます。
また、serverless-domain-managerはドメインをServerless Frameworkで準備するために、serverless-add-api-keyはAPIキー認証を入れるためです。
serverless-dotenv-pluginは、Dockerで開発するときにも使っていた、環境変数ファイルをAWS上でも反映するために使っています。
APIのエンドポイントを増やしたら、functions > application > events配下のエンドポイントを増やします。関数そのものを分けたい場合は、functions配下のapplicationの部分から別名で分けて作成します。
service: flask-serverless-api-template

plugins:
  - serverless-python-requirements
  - serverless-wsgi
  - serverless-domain-manager
  - serverless-add-api-key
  - serverless-dotenv-plugin

custom:
  stage: ${opt:stage, self:provider.stage}
  domains:
    dev: flask-serverless-api.test.com
    prod: flask-serverless-api.test.com
  pythonRequirements:
    dockerizePip: non-linux
  apiKeys:
    dev:
      - name: FlaskServerlessApiKey
        value: hogehoge
    prod:
      - name: FlaskServerlessApiKey
        value: fugafuga
  wsgi:
    app: api.app.app
    packRequirements: false
  customDomain:
    domainName: ${self:custom.domains.${self:custom.stage}}
    certificateName: ${self:custom.domains.${self:custom.stage}}
    basePath: "api"
    endpointType: regional
    stage: ${self:provider.stage}
    createRoute53Record: true
  dotenv:
    basePath: envs/

provider:
  name: aws
  runtime: python3.8
  region: ap-northeast-1
  stage: ${opt:stage, 'dev'}
  timeout: 60

package:
  exclude:
    - .vscode/**
    - envs/**
    - node_modules/**
    - notebooks/**
    - Dockerfile
    - docker-compose.yml
    - terraform/**


functions:
  application:
    handler: wsgi_handler.handler
    events:
      - http:
          path: /v1/hello
          method: get
          cors: true
次に、Swaggerドキュメント用のものも作成します。これはエンドポイント増やしても、中身を変える必要はありません。apidocsの認証部分に、先程作成したBasic認証用のLambdaを指定して、Basic認証を実現します。
service: flask-serverless-api-template-swagger

plugins:
  - serverless-python-requirements
  - serverless-wsgi
  - serverless-domain-manager
  - serverless-dotenv-plugin

custom:
  pythonRequirements:
    dockerizePip: non-linux
  wsgi:
    app: api.app.app
    packRequirements: false
  customDomain:
    domainName: "flask-serverless-api.test.com"
    certificateName: "flask-serverless-api.test.com"
    basePath: "swaggerui"
    endpointType: "regional"
    stage: ${self:provider.stage}
    createRoute53Record: false
  dotenv:
    basePath: envs/

provider:
  name: aws
  runtime: python3.8
  region: ap-northeast-1


package:
  exclude:
    - .vscode/**
    - envs/**
    - node_modules/**
    - notebooks/**
    - Dockerfile
    - docker-compose.yml
    - terraform/**


functions:
  openapidoc:
    handler: wsgi_handler.handler
    events:
      - http:
          path: /apidocs
          method: get
          authorizer:
            name: basic-authentication
            arn: arn:aws:lambda:ap-northeast-1:000000000000:function:serverless-basic-authorizer
            type: request
      - http:
          path: /swagger.json
          method: get


resources:
  Resources:
    GatewayResponse:
      Type: 'AWS::ApiGateway::GatewayResponse'
      Properties:
        ResponseParameters:
          gatewayresponse.header.WWW-Authenticate: "'Basic realm=\"Enter username and password.\"'"
        ResponseType: UNAUTHORIZED
        RestApiId:
          Ref: 'ApiGatewayRestApi'
        StatusCode: '401'
最終的なファイルやフォルダの構成は以下です。
$ tree . -a
.
├── Dockerfile
├── Pipfile
├── Pipfile.lock
├── api
│   └── app.py
├── docker-compose.yml
├── serverless.yml
├── serverless-swagger.yml
└── envs
    └── .env.dev
ここまでできたら、Serverless Frameworkの各コマンドを実行して、ドメインの作成〜Flaskのデプロイを実施します!
$ sls create_domain --stage dev --aws-profile flask-serverless
$ sls deploy --config serverless.yml --stage dev --aws-profile flask-serverless
$ sls deploy --config serverless-swagger.yml --stage dev --aws-profile flask-serverless
これで、自身のカスタムドメイン配下で、APIの実行と、Swaggerドキュメントの確認ができればOKです!
- API本体 -> https://xxxx.xxxx.xxxx/api/vi/
- Swagger -> https://xxxx.xxxx.xxxx/swaggerui/apidocs
最後に
いかがでしたでしょうか?APIドキュメントをマニュアルで作成するのは非常に手間なので、自動でドキュメント生成ができると嬉しいなということで、以上のようなものを考えました。
DB周りはここには書いてませんが、PartiQLでDynamoDBを使ったり、RDS Proxyなどを使うと、Serverless Flameworkでも、安心してDB接続ができるAPI開発ができると思いますので、是非チャレンジしてみてください。
明日は @qii-purine さんの記事「 python でのアーキテクチャを考える 」です。お楽しみに!
