サーバーレスアプリケーションをデプロイする際に、色々とハマッたのでメモ。
前回、フロントのデプロイについてのメモを書きましたが、今回はバックエンド編です。
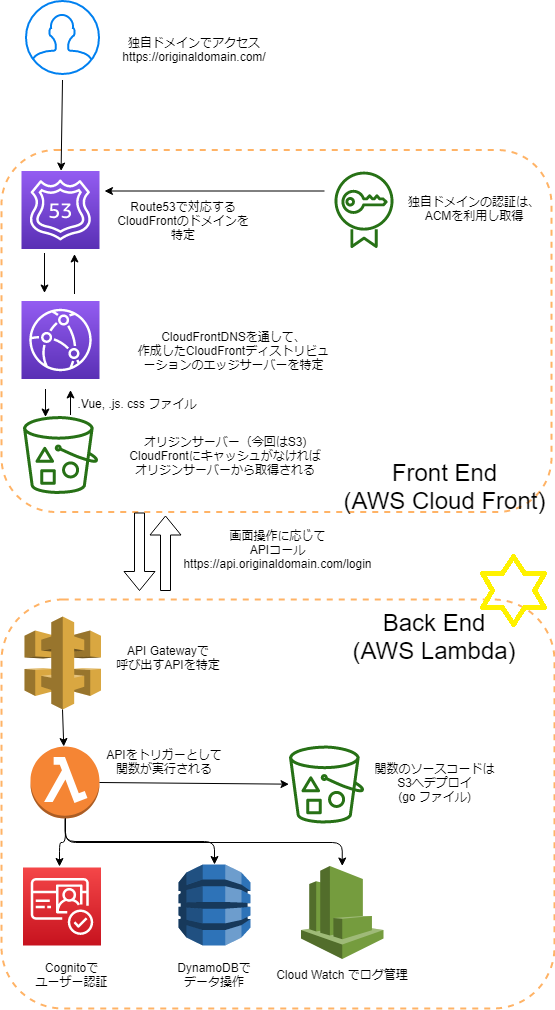
やりたいこと(最終的な構成)
以下のようにラムダで動くアプリケーションをAWS上にデプロイするために、
必要な設定ファイルを作成する。
前提
・独自ドメインとその証明書が取得済みである
・node.js及びServerless Frameworkがインストール済みである
手順
大まかな手順は以下の通り。
-Serverless.ymlの設定
1.APIベースパスマッピング
2.Functionと対応するAPIの記述
3.DynamoDBの指定
4.Cognitoの指定
-初回デプロイ前に必要な作業
1.AWSのアカウント認証
2.create_domain
もう少し詳しく書いていきます。
serverless.ymlの設定
1.APIベースパスマッピング(custom:エリア)
以下のように、custom:エリアに必要な情報を記載する。
basePathにAPIコールする際のベースとなるドメインを記載。
(APIはhttps://[api.domain.name]/[bathPath]/***の形でコールされる)
service: [service-name]

provider:
  name: aws
  runtime: go1.x
  stage: ${opt:stage, env:STAGE, 'dev'}
  region: ${opt:region, env:REGION, '[region]'}

plugins:
  - serverless-domain-manager

custom:
  customDomain:
    domainName: [api.domain.name]
    stage: ${self:provider.stage}
    basePath: '[basePath_name]'
    certificateName: '[*.api.domain.name]'
    createRoute53Record: true
2.Functionと対応するAPIの記述(functions:エリア)
以下のように対応するFunctionを記述していく。
(APIはhttps://[api.domain.name]/[bathPath]/[api_name]の形でコールされる)
service: [service-name]

functions:
  Function_name:
    handler: bin/[Functionのmain.goが配置されたフォルダ名]
    events:
      - http:
          path: /[api_name]
          method: post
          cors: true
3.DynamoDBの指定(environment:エリア)
APIコールをトリガーとしてS3やDynamoDBに接続したい場合、environmentにS3bucketNameやDynamoDBの名前を記載する。
接続先がCloudFormationを利用して作られている場合、"cf:"をつけて指定するだけでよい。
参考:Serverless FrameworkからCloudFormationの出力値(Outputs)を参照する
service: [service-name]

provider:
  name: aws
  runtime: go1.x
  stage: ${opt:stage, env:STAGE, 'dev'}
  region: ${opt:region, env:REGION, '[region]'}
  environment:
    STAGE: ${self:provider.stage}
    REGION: ${self:provider.region}
    TABLE_NAME: ${cf:[スタック名].[テーブル名]}
4.ユーザー認証の記述(custom:エリア、functions:エリア)
今回はAWS Cognitoを使ってユーザー認証を行うので、その際はauthorizer欄に
arn: COGNITO_USER_POOL_ARNを指定する。
CloudFormtaionを使ってUserPoolを作成している場合は以下のように書く。
service: [service-name]

custom:
  authorizer:
    arn: arn:aws:cognito-idp:${self:provider.region}:99999999999:userpool/${cf:[スタック名].[UserPool名]}
    identitySource: method.request.header.Authorization
  customDomain:
    domainName: [api.domain.name]
    stage: ${self:provider.stage}
    basePath: '[basePath_name]'
    certificateName: '[*.api.domain.name]'
    createRoute53Record: true

functions:
  Function_name:
    handler: bin/[Functionのmain.goが配置されたフォルダ名]
    events:
      - http:
          path: /[api_name]
          method: post
          cors: true
          authorizer: ${self:custom.authorizer}
初回デプロイ前に必要な作業
1.AWSアカウント認証
まずServerless用のIAMユーザーを作成する。
・Policyは「AdministratorAccess」
・アクセスの種類は、「プログラムによるアクセス」のみチェック。
作成後に表示されるアクセスキーIDとシークレットアクセスキーを利用し、以下のコマンドを実行する。
serverless config credentials --provider aws --profile serverless --key [アクセスキーID] --secret [シークレットアクセスキー]
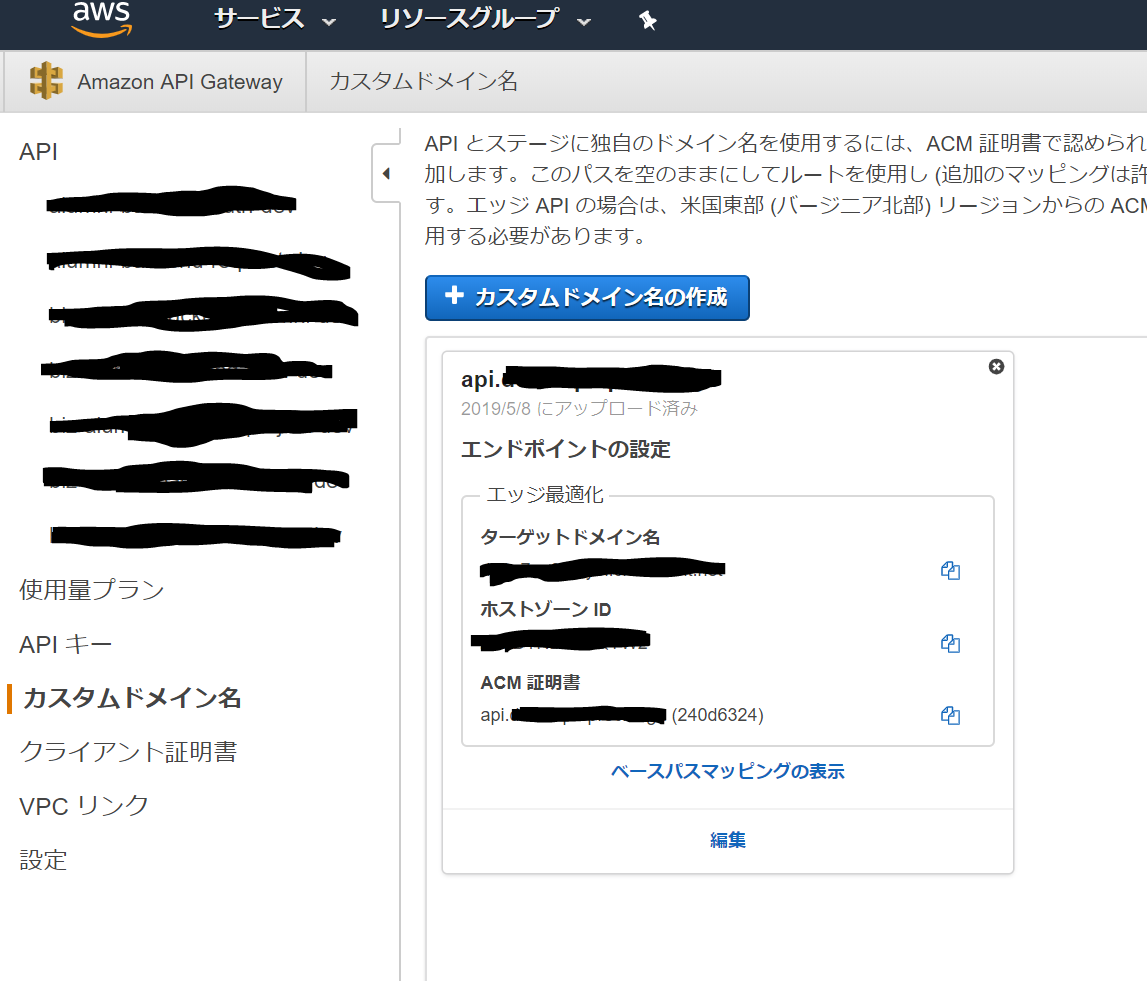
create_domain
以下の記事を参考に、create_domainコマンドを実行。
Serverless(node.js)で独自ドメインSSLの適用方法
実行に成功すると、カスタムドメイン名が登録されているのが確認できます。
以上!
sls deployをすればデプロイされます。
参考
デプロイ成功後に、以下のCORSエラーが出て、なぜ???と思っていたのですが、
指定するUserPoolが間違っていたためでした。
全然関係ないHTTPヘッダーのセット箇所とか見てしまっていて解決に時間かかりました…。
Access to XMLHttpRequest at 'https://api.domain.name/bath-path/function' from origin 'https://reqested.url' has been blocked by CORS policy: Response to preflight request doesn't pass access control check: No 'Access-Control-Allow-Origin' header is present on the requested resource.