0
0

Delete article

Deleted articles cannot be recovered.

Draft of this article would be also deleted.

Are you sure you want to delete this article?

More than 3 years have passed since last update.

インストール直後のRedmineに最低限の初期設定とテストプロジェクト作成をしようジャマイカ

Last updated at Posted at 2020-11-21

#バージョン
CentOS Linux release 8.2.2004 (Core)
Redmine 4.0.6

#前の記事
CentOS8にプロジェクト管理ツール『Redmine』をインストール(データベースはPostgreね)

#管理者パスワード変更
インストール直後は管理者ID=admin 管理者パスワード=adminという(ノ∀`)アチャーな状態なので変更。
image.png
(ノ∀`)アチャーなIDとパスワードでログイン!そして変更!
image.png
image.png

#言語設定
image.png
image.png

#ホスト名設定
メール内リンクが『localhost……』になっていると不便なので設定するっす。
image.png
image.png

#ユーザー追加
ユーザー管理ページへ行って…
image.png
新しいユーザーをクリック。
image.png
同じメールアドレスを持つユーザーを複数登録はできないっす。
image.png

#テストプロジェクト作成
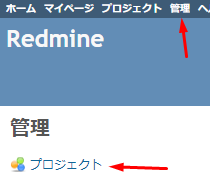
プロジェクト管理ページへ行って…
image.png
新しいプロジェクトをクリック。
image.png
とりあえず作成な!
image.png

#作ったテストプロジェクトにメンバーを追加
プロジェクト管理ページへ行って…
image.png
対象プロジェクトの管理ページへ…
image.png
メンバータブの新しいメンバーをクリック。
image.png
役割にチェックを入れたりして追加。
image.png

#公式ドキュメント
Redmineの初期設定について、この記事には書いてないトラッカーなんかについても書いてあります。
https://redmine.jp/tech_note/first-step/admin/

#蛇足
自分一人しか使わない場合でも、最初から管理者と開発者はユーザーとロール(役割)を分けておいた方がいいかも。
あとになって『管理者と開発者で表示や機能を分けたい』ってなった時に困らないように。

#次の記事
Redmineにサブプロジェクトを作成

0
0
0

Register as a new user and use Qiita more conveniently

  1. You get articles that match your needs
  2. You can efficiently read back useful information
  3. You can use dark theme
What you can do with signing up
0
0

Delete article

Deleted articles cannot be recovered.

Draft of this article would be also deleted.

Are you sure you want to delete this article?