本記事はPostgreSQL on Kubernetes Advent Calendar 2018の18日目です。
昨日は「PostgreSQL on k8s - Deploymentではどうなる?」ということで、StatefulSetではなくDeploymentでPostgreSQLを動かしてみました。
今日はPostgreSQL on Kubernetesの監視のために、PrometheusとGrafanaをセットアップをしていきます。
TL;DR
- Helmを使ったみたけど予想以上に苦戦したよ。
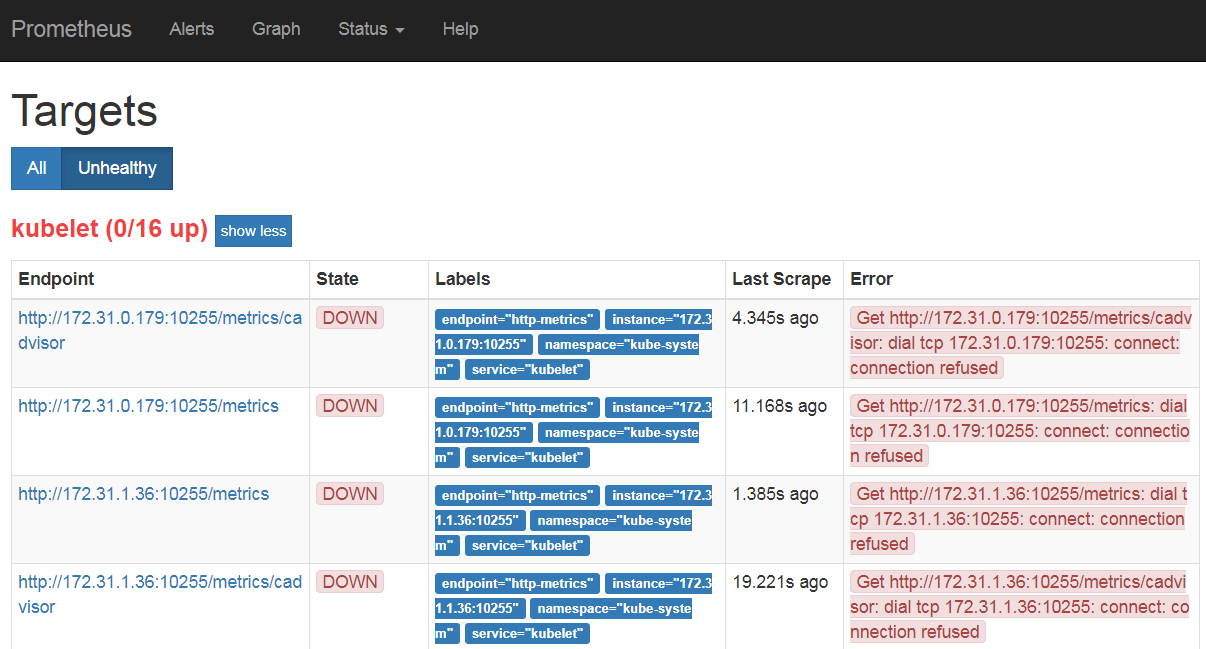
- PrometheusとGrafanaは動いたけど、Kubeletのモニタリングでエラーが出たよ。
PrometheusとGrafanaのインストール
前提条件
これまでのPostgreSQL on Kubernetesの構成に、PrometheusやGrafanaを動かすためにノードを追加しています。今回使うYAML等では以下を前提にしています。
- ラベルとしてtype=node.mon.proが付けられたノード、HDDは60Gを準備
参考にしたブログ
こちらの記事を参考にさせて頂きました。色々とPrometheusの導入事例はあったのですが、今回はHelmでやってみました。
Helmの準備
今回の環境構築にはRancher2.0を利用しています。そのため、GUIでもHelmからのデプロイは出来るのですが、コマンドラインの環境準備から始めています。
$ curl https://raw.githubusercontent.com/helm/helm/master/scripts/get > get_helm.sh
  % Total    % Received % Xferd  Average Speed   Time    Time     Time  Current
                                 Dload  Upload   Total   Spent    Left  Speed
100  7236  100  7236    0     0  33044      0 --:--:-- --:--:-- --:--:-- 33192

$ chmod +x get_helm.sh
$ ./get_helm.sh
Downloading https://kubernetes-helm.storage.googleapis.com/helm-v2.12.0-linux-amd64.tar.gz
Preparing to install helm and tiller into /usr/local/bin
helm installed into /usr/local/bin/helm
tiller installed into /usr/local/bin/tiller

$ helm init
次にServiceAccountを作成し、helmのupgradeを行います。必要なファイルはgitから取得しています。※ここは順序の入替え可能です。
$ git clone https://github.com/tzkoba/postgres-on-k8s.git
$ cd ./postgres-on-k8s/monitoring/rbac/

$ kubectl apply -f tiller-rbac.yaml
serviceaccount/tiller created
clusterrolebinding.rbac.authorization.k8s.io/tiller created

$ helm init  --upgrade --service-account tiller
$HELM_HOME has been configured at /home/ec2-user/.helm.

Tiller (the Helm server-side component) has been upgraded to the current version.
Happy Helming!
さらに必要なリポジトリを追加しておきます。
$ helm repo update
$ helm repo add coreos https://s3-eu-west-1.amazonaws.com/coreos-charts/stable/
Prometheus Operatorのインストール
ここまで準備したHelmを使って、Prometheus Operatorをインストールしていきます。以下では記していませんが、事前にNamespaceとしてmonitoringを準備しておきましょう。
今回、オペレータの配置先を指定するためにprometheus-operator-value.yamlを作っていますので、そちらを-fオプションで渡して、helm installを実行します。
$ cd ../prometheus/
$ helm install coreos/prometheus-operator --name pg-op --namespace monitoring -f prometheus-operator-value.yaml

# operatorが起動している
$ kubectl get pods --namespace monitoring
NAME                                        READY     STATUS    RESTARTS   AGE
pg-op-prometheus-operator-d8dfc7974-298q9   1/1       Running   0          1m
Prometheus、Grafanaのインストール
まず、Prometheus・Grafanaで利用する永続化ボリュームの準備をします。参考にしたブログではAzureのDiskを使っていましたが、今回はRookのブロックデバイスを流用します。
※こちらの記事を参考にLocal Volumeも試したのですが上手くいかず。。。
$ kubectl apply -f sc-rook-prometheus.yaml
cephblockpool.ceph.rook.io/replicapool2 created
storageclass.storage.k8s.io/rook-ceph-prometheus created
このStorageClassを使って、PrometheusとGrafanaをインストールします。kube-prometheus-value.yamlの詳細はこちらをご覧下さい。
$ helm install coreos/kube-prometheus --name pg --namespace monitoring -f kube-prometheus-value.yaml
外部からのアクセス用にサービスを追加し、ポートを確認しておきます。
$ kubectl apply -f svc-prometheus.yaml
service/prometheus-svc created
$ kubectl apply -f svc-grafana.yaml
service/grafana-svc created

$ kubectl get svc -n monitoring
NAME                     TYPE        CLUSTER-IP      EXTERNAL-IP   PORT(S)             AGE
alertmanager-operated    ClusterIP   None            <none>        9093/TCP,6783/TCP   1h
grafana-svc              NodePort    10.43.114.173   <none>        3000:30760/TCP      11m
pg-alertmanager          ClusterIP   10.43.163.126   <none>        9093/TCP            13m
pg-exporter-kube-state   ClusterIP   10.43.246.137   <none>        80/TCP              13m
pg-exporter-node         ClusterIP   10.43.98.242    <none>        9100/TCP            13m
pg-grafana               ClusterIP   10.43.254.234   <none>        80/TCP              13m
pg-prometheus            ClusterIP   10.43.245.185   <none>        9090/TCP            13m
prometheus-operated      ClusterIP   None            <none>        9090/TCP            1h
prometheus-svc           NodePort    10.43.113.233   <none>        9090:32229/TCP      11m
上記のポートをもとにグローバルIPでPrometheusとGrafanaにアクセス可能です。
問題点
上記で追加したPrometheusではターゲットのうち、Kubeletでエラーが出てしまっています。こちらを参考に、kubelet exporterが利用するportをhttpsからhttpに変更してみたのですが、以下のようなエラーになってしまっています。
ここはもう少し調査をしたいと思います。
追加したいもの
明日以降の記事で試していきますが、PostgreSQLもRookもPrometheusでモニタリングを行うことが出来ます。本日構築したものにエクスポータの追加をしていく予定です。
まとめ
本日はKubernetesではモニタリングのデファクトであるPrometheusとGrafanaを構築してみました。が、Helmを使ったこともあってか、かなり苦戦してしまいました。ただ、そのおかげでHelmで利用するvalue.yamlのカスタマイズの仕方が少しづつ分かってきました。
明日以降もエクスポータの追加が上手くいくかは神のみぞ知るところですが、もう少し続けていきたいと思います。
よろしくお願いします。
