はじめに
- ElixirのWebフレームワークであるPhoenixを使ってつくったプロジェクトをGigalixirにデプロイしてみます
- カスタムドメインをつけてみます
- 以下をとても参考にしています(ありがとうございます)
- 2020/09/19(土)に行われたkokura.ex#13:Elixirもくもく会~入門もあるよでの成果です
- @im_miolab さん、ありがとうございます!
Elixir 1.10.4-otp-23Phoenix v1.5.4
0. 準備
- Phoenixを利用してプロジェクトをつくります
- ここでは手前味噌のLiveViewでinfinite scroll (Elixir/Phoenix)を使います
1. Gitリポジトリの初期化
- ここからは以下のドキュメントの内容に従って進めていきます
- Getting Started Guide: Gigalixirのドキュメント
- Deploying on Gigalixir: Phoenixのガイド
- 私は、Deploying on Gigalixirに従って進めてみました
- まだプロジェクトを管理していない場合には以下のような感じで初期化をします
$ git init
$ git add .
$ git commit -m "Initial commit"
2. Gigalixir CLIコマンドのインストール
- Install the Command-Line Interface をご参照ください
3. Gigalixirのサインアップ
- 私はここから作りました
4. Gigalixirにlogin
-
1. Gitリポジトリの初期化からそうですけど、カレントディレクトリはPhoenixプロジェクトのルートで作業します
$ gigalixir login
Email: torifuku.kaiou@gmail.com
Password:
Would you like us to save your api key to your ~/.netrc file? [Y/n]: Y
Logged in as torifuku.kaiou@gmail.com.
- verify
$ gigalixir account
5. Gigalixirアプリケーションの作成
$ gigalixir create
$ gigalixir apps
- verify
$ git remote -v
gigalixir	https://git.gigalixir.com/hoge.git/ (fetch)
gigalixir	https://git.gigalixir.com/hoge.git/ (push)
6. バージョン指定
$ asdf current
elixir          1.10.4-otp-23
erlang          23.0.1

$ node -v
v12.18.3
$ echo "elixir_version=1.10.4" > elixir_buildpack.config
$ echo "erlang_version=23.0.1" >> elixir_buildpack.config
$ echo "node_version=12.18.3" > phoenix_static_buildpack.config
-
elixir_buildpack.configとphoenix_static_buildpack.configができておりますので、忘れずにgitの管理対象に含めます
$ git add elixir_buildpack.config phoenix_static_buildpack.config
$ git commit -m "set elixir, erlang, and node version"
7. SSLの設定
- あとでカスタムドメインに変えますが、一旦デフォルトでついているドメインで設定しておきます
$ gigalixir apps
[
  {
    "cloud": "gcp",
    "region": "v2018-us-central1",
    "replicas": 0,
    "size": 0.3,
    "stack": "gigalixir-18",
    "unique_name": "your_unique_name",
    "version": 2
  }
]
config/prod.exs
 config :hello_gigalixir, HelloGigalixirWeb.Endpoint,
-  url: [host: "example.com", port: 80],
+  url: [host: "your_unique_name.gigalixirapp.com", port: 443],
   cache_static_manifest: "priv/static/cache_manifest.json"
-
your_unique_nameは、gigalixir appsの結果に従ってください -
@mnishiguchi さんがコメントしてくださった https://qiita.com/torifukukaiou/items/d2d0e9f56ffe3bb8eda1#comment-268260110134882e938e に従ったほうがよさそうです
-
データベース接続もSSLを使うことにしましょう
config/prod.secret.exs
 config :hello_gigalixir, HelloGigalixir.Repo,
-  # ssl: true,
+  ssl: true,
   url: database_url,
   pool_size: String.to_integer(System.get_env("POOL_SIZE") || "10")
- 忘れずにコミットしておきましょう
$ git add .
$ git commit -m 'ssl'
8. データベースの準備
$ gigalixir pg:create --free
- Verify
$ gigalixir pg
$ gigalixir config
9. お待ちかね、デプロイの時間ですよ!
$ git push gigalixir master
- 少し待ちます(ソースコードがPushされて各種インストールなどなどが行われます)
- 続いてデータベースのマイグレーションを行います
$ gigalixir run mix ecto.migrate
- 続いてseedデータの投入を行います
- How to run seeds?
$ gigalixir run -- mix run priv/repo/seeds.exs
- ここまで順調にきていれば
$ gigalixir open
![]()
![]()
![]()
いつものアレが表示されるでしょう!
もしうまくいかないところがありましたらgigalixir logsやgigalixir psの内容をみてください(とのことです。私はつまるところがなかったのでこれらのコマンドのお世話になることはありませんでした![]() )。
)。
10. カスタムドメインの設定
$ gigalixir domains:add hello-gigalixir.torifuku-kaiou.app
Added hello-gigalixir.torifuku-kaiou.app.
Create a CNAME record with your DNS provider pointing to hello-gigalixir.torifuku-kaiou.app.gigalixirdns.com.
Please give us a few minutes to set up a new TLS certificate.
- 実行結果に従ってDNSの設定をします
- 以下、Google Domainsでの設定例です
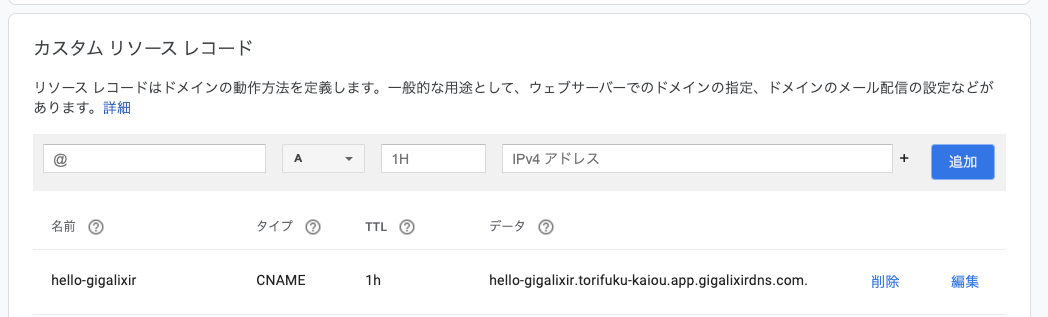
- たとえば
nslookup hello-gigalixir.torifuku-kaiou.app等で設定が反映されていることを確認できるまで待ちます
config/prod.exs
 config :hello_gigalixir, HelloGigalixirWeb.Endpoint,
-  url: [host: "your_unique_name.gigalixirapp.com", port: 443],
+  force_ssl: [rewrite_on: [:x_forwarded_proto]],
+  url: [host: "hello-gigalixir.torifuku-kaiou.app", port: 443],
   cache_static_manifest: "priv/static/cache_manifest.json"
- 忘れずにコミットしておきます
$ git add .
$ git commit -m 'Custom Domain'
- デプロイします
$ git push gigalixir master
https://hello-gigalixir.torifuku-kaiou.app
へアクセス ![]()
![]()
![]()
最初のうちはリダイレクトループに似たような現象が起きるかもしれません。
実際にはPhoenixアプリケーションのほうでエラーが発生していてプロセス再起動を繰り返しています。
gigalixir logsをみると以下のようなログがでているとおもいます。
Origin of the request: https://hello-gigalixir.torifuku-kaiou.app

This happens when you are attempting a socket connection to
a different host than the one configured in your config/
files. For example, in development the host is configured
to "localhost" but you may be trying to access it from
"127.0.0.1". To fix this issue, you may either:

  1. update [url: [host: ...]] to your actual host in the
     config file for your current environment (recommended)
10分か20分くらい待ちます。
(それか、関係あったのかどうかわかりませんが私は待ちきれずにgigalixir ps:restartコマンドとGigalixirの管理コンソールでRestartボタンを押したことをつけくわえておきます)
