追記: 2019-12-24
kintone-cliを使った開発環境のセットアップ情報を追記しました。
追記: 2019-12-21
JBUG静岡 #0の為にシステム構成図などを追記しました。
kintoneアドベントカレンダーで書いた記事の続きです。
一旦やりたい事は出来たので終わりにしたいと思います。
概要
kintoneからBacklogの「ユーザーの最近の活動の取得」APIを使って、データを取得して、それを別の集計用のkintoneアプリにレコードを登録します。
できる事
普段Backlogとkintoneを使っている方なら、Backlogの活動履歴(例えば、課題を作成したとか、GitにPushしたとか、Wikiを更新したなどなど)をkintoneに渡して、kintoneの機能を使ってグラフ集計したり出来ます。
用途
会議でエンジニアがどのくらい作業をしているかの一つの指標として、アウトプットをどれくらいしているかがあると思っています。
それをある程度見える化出来ます。
Backlogを更新してなくても、仕事はちゃんとやっているという方もいるかと思いますが、自分の作業を見えるようにアウトプットする事は大事だと思います。
環境
- macOS 10.14.6
- kintone-cli 0.1.0
その他は設定ファイル等をご確認ください。
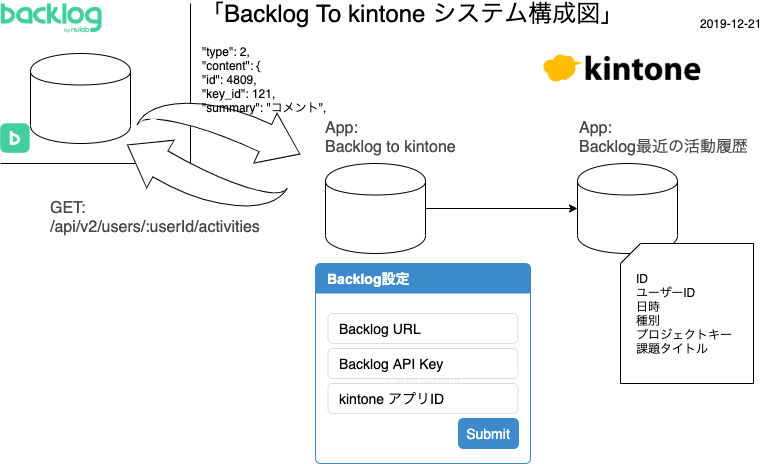
システム構成図
管理画面

シンプルにデータを取得する先のBacklogの情報を入力するフィールドと取得したデータを登録する先のkintoneアプリIDを入力するフィールドがあるだけです。
以下に貼り付けるコードでは、新規に登録するだけなので、再度登録する時にはレコードを削除してから登録するなどしてください。
あと、エラーチェックとかバリデーションなどはほぼやっておりませんのでご注意ください。
コード
カスタマイズビューのHTML
<div id="backlog"></div>
index.jsx
カスタマイズビューにフォームを描画する処理です。
import * as React from 'react';
import * as ReactDOM from 'react-dom';
import * as App from './js/App';
import * as Common from './js/common';

(() => {
  kintone.events.on('app.record.index.show', event => {
    if (Common.getViewId(event) !== Common.VIEW_ID) {
      return;
    }
    ReactDOM.render(
      <App.App />,
      document.getElementById('backlog')
    );
    return event;
  });
})();
App.js
フォームの共通コンポーネントの作成とデータ取得・登録する処理です。
import * as React from 'react';
import { Text, Button } from '@kintone/kintone-ui-component';
import * as Common from './common';
import '../css/index.css';
import 'bulma/css/bulma.css'

export class App extends React.Component {
  constructor (props) {
    super(props)
    // 親コンポーネントstate
    this.state = {
      account: '',
      apikey: '',
      appid: ''
    }
  }
  accountChange(value) {
    console.log(value)
    this.setState({account: value})
  }
  apikeyChange(value) {
    console.log(value)
    this.setState({apikey: value})
  }
  appidChange(value) {
    console.log(value)
    this.setState({appid: value})
  }
  clickSubmit() {
    console.log(`Account: ${this.state.account} APIKey: ${this.state.apikey} AppId: ${this.state.appid}`)
    getBacklogMyActivities(this.state.account, this.state.apikey, this.state.appid)
  }
  render () {
    return (
        <div className="container">
          <div className="notification">
            <h1 className="title">
              Backlog設定
            </h1>
            <div className="field is-horizontal">
              <div className="field-label is-normal">
                <label className="label">Backlog URL</label>
              </div>
              <div className="field-body">
                <div className="field">
                  <p className="control is-expanded">
                    <UIText
                      onChange={(value) => this.accountChange(value)}
                    />
                  </p>
                </div>
              </div>
            </div>
            <div className="field is-horizontal">
              <div className="field-label is-normal">
                    <label className="label">Backlog API Key</label>
              </div>
              <div className="field-body">
                <div className="field">
                  <p className="control is-expanded">
                    <UIText
                      onChange={(value) => this.apikeyChange(value)}
                    />
                  </p>
                </div>
              </div>
            </div>
            <div className="field is-horizontal">
              <div className="field-label is-normal">
                    <label className="label">kintoneアプリID</label>
              </div>
              <div className="field-body">
                <div className="field">
                  <p className="control is-expanded">
                    <UIText
                      onChange={(value) => this.appidChange(value)}
                    />
                  </p>
                </div>
              </div>
            </div>
            <div className="field is-horizontal">
              <div className="field-label is-normal">
                    <label className="label"></label>
              </div>
              <div className="field-body">
                <div className="field">
                  <p className="control is-expanded">
                    <UIButton
                      onClickSubmit={(event) => this.clickSubmit(event)}
                    />
                  </p>
                </div>
              </div>
            </div>
          </div>
        </div>
      )
  }
}


// Textコンポーネント
export class UIText extends React.Component {
  constructor(props) {
      super(props);
      this.state = {
          value: '',
      }
  }
  render() {
      return (
          <Text
            value={this.state.value}
            onChange={this.onChange.bind(this)}
          />
      );
  };
  onChange = (value) => {
      this.setState({value});
      this.props.onChange(value);
  }
};

// Submitボタンコンポーネント
export class UIButton extends React.Component {
    constructor(props) {
        super(props);
    }
    render() {
        return (
            <Button text='Submit' type='submit' isDisabled={false} isVisible={true} onClick={this.handleButtonClick} />
        );
    }
    handleButtonClick = (event) => {
        this.props.onClickSubmit(event)
    }
}

// Backlog API を叩く
const getBacklogMyActivities = (url, apikey, appid) => {
  const BACKLOG_URL = url; // https://<My Backlog Account>.backlog.jp or backlog.com
  const APIKEY = apikey;
  const APPID = appid;
  // debug用
  console.log(`URL=>${url}, APIKey=>${apikey}, AppId=>${appid}`);

  kintone.proxy('https://' + BACKLOG_URL + '/api/v2/users/myself?apiKey=' + APIKEY, 'GET', {}, {})
  .then(function(resp)
  {
    const body = JSON.parse(resp[0]);
    kintone.proxy('https://' + BACKLOG_URL + '/api/v2/users/' + body.id + '/activities?apiKey=' + APIKEY, 'GET', {}, {})
    .then(function(resp)
    {
      const body = JSON.parse(resp[0]);
      const records = [];
      body.map( value => {
        records.push(Common.preparePostData(value));
        console.log(
          `${value.id},${value.createdUser.id},${value.createdUser.name},${value.created},${value.type},${value.project.projectKey}`,
          Common.isInclude(value.type, [5, 6, 7]) ? `${value.content.name},` : `${value.content.summary},`
        );
      });
      const post_body = {"app": APPID, "records": records};
      console.log(post_body);
      kintone.api(kintone.api.url('/k/v1/records', true), 'POST', post_body)
      .then(function(resp){
        console.log(resp);
      });
    })
  }).catch(function(error) {
    console.log(error);
  });
}
common.js
共通の関数をまとめてあります。
export const VIEW_ID = 5737650;
export const getViewId = (kintone_event) => {
  return kintone_event.viewId;
};
export function isInclude(type, arrayType) {
  if (arrayType.includes(type)) {
    return true;
  }
  return false;
}
export function preparePostData(resp) {
  const ret = {
    "activities_id": {"value": resp.id},
    "user_id": {"value": resp.createdUser.id},
    "datetime": {"value": resp.created},
    "type": {"value": resp.type},
    "projectkey": {"value": resp.project.projectKey},
    "ticket_title": {"value": isInclude(resp.type, [5, 6, 7]) ? resp.content.name : resp.content.summary}
  };
  return ret;
}
index.css
これ以外のスタイルはBlumaというCSSフレームワークを使っています。
.App {
    margin: 1rem;
    font-family: Arial, Helvetica, sans-serif;
}
.kuc-input-text {
    display: inline-block;
    width: 30em;
}
設定ファイルなど
基本的には kintone-cli を使ってプロジェクト以下の設定ファイル等を自動で作成しています。
package.json
{
  "name": "b2k01",
  "version": "0.0.1",
  "description": "kintone customization project",
  "author": "K.Y",
  "license": "MIT",
  "dependencies": {
    "@kintone/kintone-js-sdk": "^0.6.2",
    "@kintone/kintone-ui-component": "^0.4.0",
    "bulma": "^0.8.0",
    "bulma-start": "0.0.3",
    "react": "^16.8.6",
    "react-bulma-components": "^3.1.3",
    "react-dom": "^16.7.0"
  },
  "devDependencies": {
    "@babel/cli": "^7.7.4",
    "@babel/core": "^7.3.3",
    "@babel/plugin-proposal-class-properties": "^7.3.3",
    "@babel/plugin-syntax-dynamic-import": "^7.2.0",
    "@babel/plugin-transform-modules-commonjs": "^7.7.4",
    "@babel/polyfill": "^7.7.0",
    "@babel/preset-env": "^7.3.1",
    "@babel/preset-react": "^7.0.0",
    "@cybozu/eslint-config": ">=7.1.0",
    "@kintone/customize-uploader": "^2.0.5",
    "babel-jest": "^24.9.0",
    "babel-loader": "^8.0.5",
    "core-js": "^3.2.1",
    "css-loader": "^2.1.0",
    "eslint": "^6.5.1",
    "jest": "^24.9.0",
    "local-web-server": "^2.6.1",
    "regenerator-runtime": "^0.13.3",
    "style-loader": "^0.23.1",
    "webpack": "^4.30.0",
    "webpack-cli": "^3.2.3"
  },
  "scripts": {
    "dev": "ws",
    "build-backlog2kintone": "webpack --config backlog2kintone/webpack.config.js",
    "lint-all": "eslint . --ext .js,.jsx,.ts,.tsx",
    "lint-all-fix": "eslint . --ext .js,.jsx,.ts,.tsx --fix",
    "lint-backlog2kintone": "eslint backlog2kintone/ --ext .jsx",
    "lint-backlog2kintone-fix": "eslint backlog2kintone/ --ext .jsx --fix",
    "test": "jest --no-chache --watchAll --coverage"
  }
}
webpack.config.js
kintone-cli で設定したままです。
const path = require('path');
const config = {
  entry: path.resolve('backlog2kintone/source/index.jsx'),
  resolve: {
    extensions: ['.ts', '.tsx', '.js']
  },
  output: {
    path: path.resolve('backlog2kintone/dist'),
    filename: 'backlog2kintone.min.js'
  },
  module: {
    rules: [
      {
        test: /.js?$/,
        exclude: /node_modules/,
        use: {
          loader: 'babel-loader'
        }
      },
      {
        test: /.jsx?$/,
        exclude: /node_modules/,
        use: {
          loader: 'babel-loader',
          options: {
            presets: ['@babel/react']
          }
        }
      },
      {
        test: /.css$/,
        use: ['style-loader', 'css-loader']
      }
    ]
  }
};

module.exports = (env, argv) => {
  if (argv.mode === 'development') {
    config.devtool = 'source-map';
  }

  if (argv.mode === 'production') {
    //...
  }
  return [config];
};
kintone-cli で作成されるファイルには、その他に auth.jsonとconfig.jsonがありますがこちらは割愛します。
ユニットテスト
Jestを利用しました。
Jest セットアップ
拙稿を参考に。
テストコード
import * as common from '../source/js/common';

describe('jest 共通関数の実行を確認するテスト', ()=>{
    const typeArray = [5, 6, 7];
    const kintone_record_json = `{
        "activities_id": {
          "value": 3153
        },
        "user_id": {
          "value": 1
        },
        "datetime": {
          "value": "2013-12-27T07:50:44Z"
        },
        "type": {
          "value": 2
        },
        "type_string": {
          "value": "課題の更新"
        },
        "projectkey": {
          "value": "SUB"
        },
        "ticket_title": {
          "value": "コメント"
        }
      }`;
    const backlog_resp_json = `{
        "id": 3153,
        "project": {
          "id": 92,
          "projectKey": "SUB",
          "name": "サブタスク",
          "chartEnabled": true,
          "subtaskingEnabled": true,
          "projectLeaderCanEditProjectLeader": false,
          "textFormattingRule": null,
          "archived": false,
          "displayOrder": 0
        },
        "type": 2,
        "content": {
          "id": 4809,
          "key_id": 121,
          "summary": "コメント",
          "description": "",
          "comment": {
            "id": 7237,
            "content": ""
          },
          "changes": [
            {
              "field": "milestone",
              "new_value": " R2014-07-23",
              "old_value": "",
              "type": "standard"
            },
            {
              "field": "status",
              "new_value": "4",
              "old_value": "1",
              "type": "standard"
            }
          ]
        },
        "notifications": [
          {
            "id": 25,
            "alreadyRead": false,
            "reason": 2,
            "user": {
              "id": 5686,
              "userId": "takada",
              "name": "takada",
              "roleType": 2,
              "lang": "ja",
              "mailAddress": "takada@nulab.example"
            },
            "resourceAlreadyRead": false
          }
        ],
        "createdUser": {
          "id": 1,
          "userId": "admin",
          "name": "admin",
          "roleType": 1,
          "lang": "ja",
          "mailAddress": "eguchi@nulab.example"
        },
        "created": "2013-12-27T07:50:44Z"
      }`;

    beforeAll(() => {
        // return event;
    })
    test('失敗するテスト', ()=>{
        expect(1+1).toBe('2');
    })
    test('成功するテスト', ()=>{
        expect(1+2).toBe(3);
    })
    test('typeを渡すとそれが含まれているかを返すテスト', ()=>{
        expect(common.isInclude(5, typeArray)).toBe(true);
    })
    test('typeを渡すとそれが含まれているかを返すテスト', ()=>{
        expect(common.isInclude(2, typeArray)).toBe(false);
    })
    test('Backlogのデータを渡すとJSONで返すテスト。成功する', ()=>{
        expect(common.preparePostData(JSON.parse(backlog_resp_json))).toEqual(JSON.parse(kintone_record_json));
    })
    test('Backlogのデータを渡すとJSONで返すテスト。成功する。', ()=>{
        expect(common.preparePostData(JSON.parse(backlog_resp_json))).toStrictEqual(JSON.parse(kintone_record_json));
    })
    test('Backlogのデータを渡すとJSONで返すテスト。失敗する。Objectの比較はマッチャーにtoEqualを使う', ()=>{
        expect(common.preparePostData(JSON.parse(backlog_resp_json))).toBe(JSON.parse(kintone_record_json));
    })
    test('Backlogのデータを渡すとJSONで返すテスト。失敗する。JSON.parseして比較しないとエラーになる', ()=>{
        expect(common.preparePostData(backlog_resp_json)).toEqual(kintone_record_json);
    })
    test('種別のTypeを数値で渡すとテキストで返すテスト', ()=>{
      expect(common.fetchActivityTypeToText(1)).toBe('課題の追加');
      expect(common.fetchActivityTypeToText(2)).toBe('課題の更新');
      expect(common.fetchActivityTypeToText(6)).toBe('Wikiを更新');
      expect(common.fetchActivityTypeToText(12)).toBe('GITプッシュ');
      expect(common.fetchActivityTypeToText(0)).toBe(undefined);
      expect(common.fetchActivityTypeToText(27)).toBe(undefined);
  })

});
テスト対象コード
export function preparePostData(resp) {
  const ret = {
    "activities_id": {"value": resp.id},
    "user_id": {"value": resp.createdUser.id},
    "datetime": {"value": resp.created},
    "type": {"value": resp.type},
    "type_string": {"value": fetchActivityTypeToText(resp.type)},
    "projectkey": {"value": resp.project.projectKey},
    "ticket_title": {"value": isInclude(resp.type, [5, 6, 7]) ? resp.content.name : resp.content.summary}
  };
  return ret;
}
export function fetchActivityTypeToText(type_number) {
  const TypeStringArray = [[1, "課題の追加"],[2, "課題の更新"],[3, "課題にコメント"],[4, "課題の削除"],
                           [5, "Wikiを追加"],[6, "Wikiを更新"],[7, "Wikiを削除"],[8, "共有ファイルを追加"],
                           [9, "共有ファイルを更新"],[10, "共有ファイルを削除"], [11, "Subversionコミット"],[12, "GITプッシュ"],
                           [13, "GITリポジトリ作成"],[14, "課題をまとめて更新"], [15, "プロジェクトに参加"],[16, "プロジェクトから脱退"],
                           [17, "コメントにお知らせを追加"],[18, "プルリクエストの追加"],[19, "プルリクエストの更新"],[20, "プルリクエストにコメント"],
                           [21, "プルリクエストの削除"],[22, "マイルストーンの追加"],[23, "マイルストーンの更新"], [24, "マイルストーンの削除"],
                           [25, "グループがプロジェクトに参加"],[26, "グループがプロジェクトから脱退"]];
  const TypeStringMap = new Map(TypeStringArray);
  return TypeStringMap.get(type_number);
}
設定ファイル
jest.config.js
module.exports = {
    transform: {
      '^.+\\.[t|j]sx?$'  : '<rootDir>/node_modules/babel-jest',
    },
    moduleFileExtensions: ['js', 'jsx']
  };
.babelrc
{
    "plugins": [
        "@babel/plugin-proposal-class-properties",
        "@babel/plugin-syntax-dynamic-import",
        "@babel/plugin-transform-modules-commonjs"
    ],
    "presets": [
        [
            "@babel/preset-env",
            {
                "useBuiltIns": "usage",
                "corejs": {
                    "version": 3,
                    "proposals": true
                }
            }
        ]
    ],
    "env": {
        "test": {
            "plugins": [
                "@babel/plugin-transform-modules-commonjs"
            ]
        }
    }
}
レコード登録先アプリ
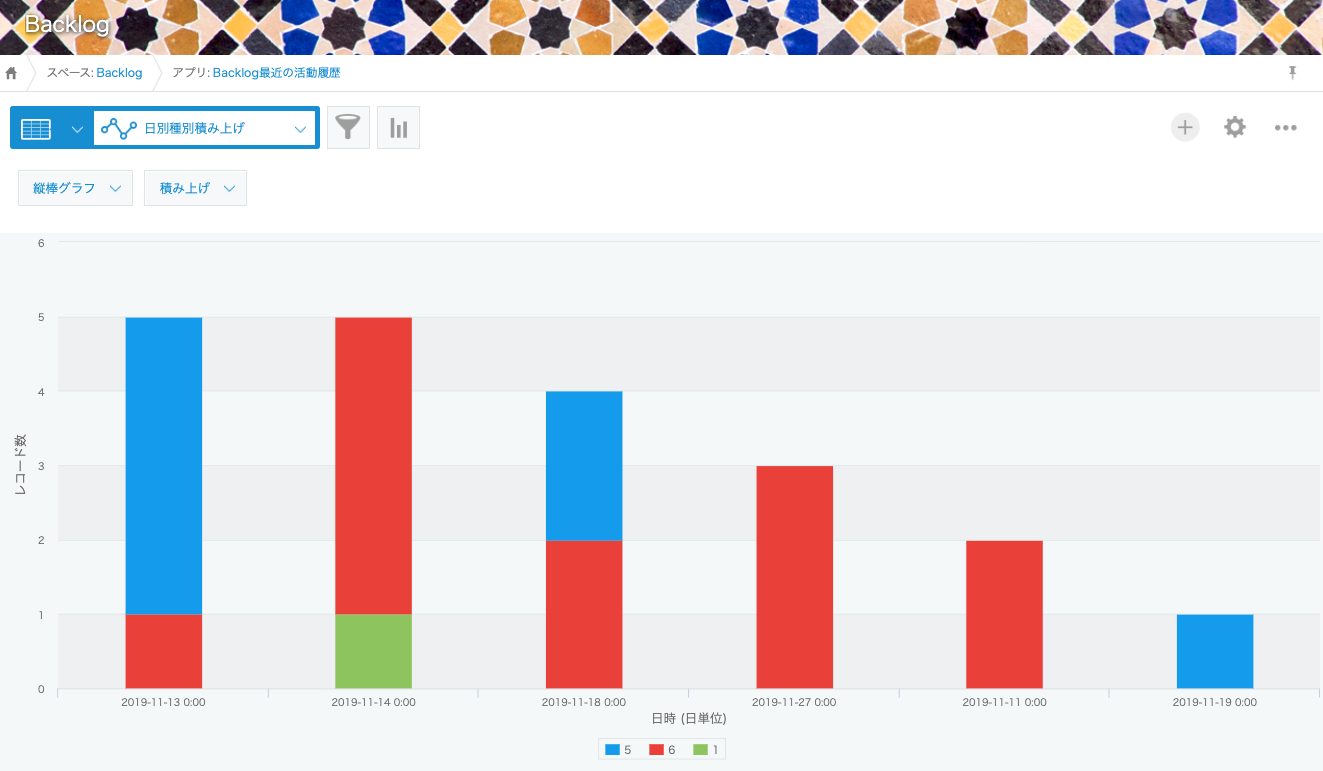
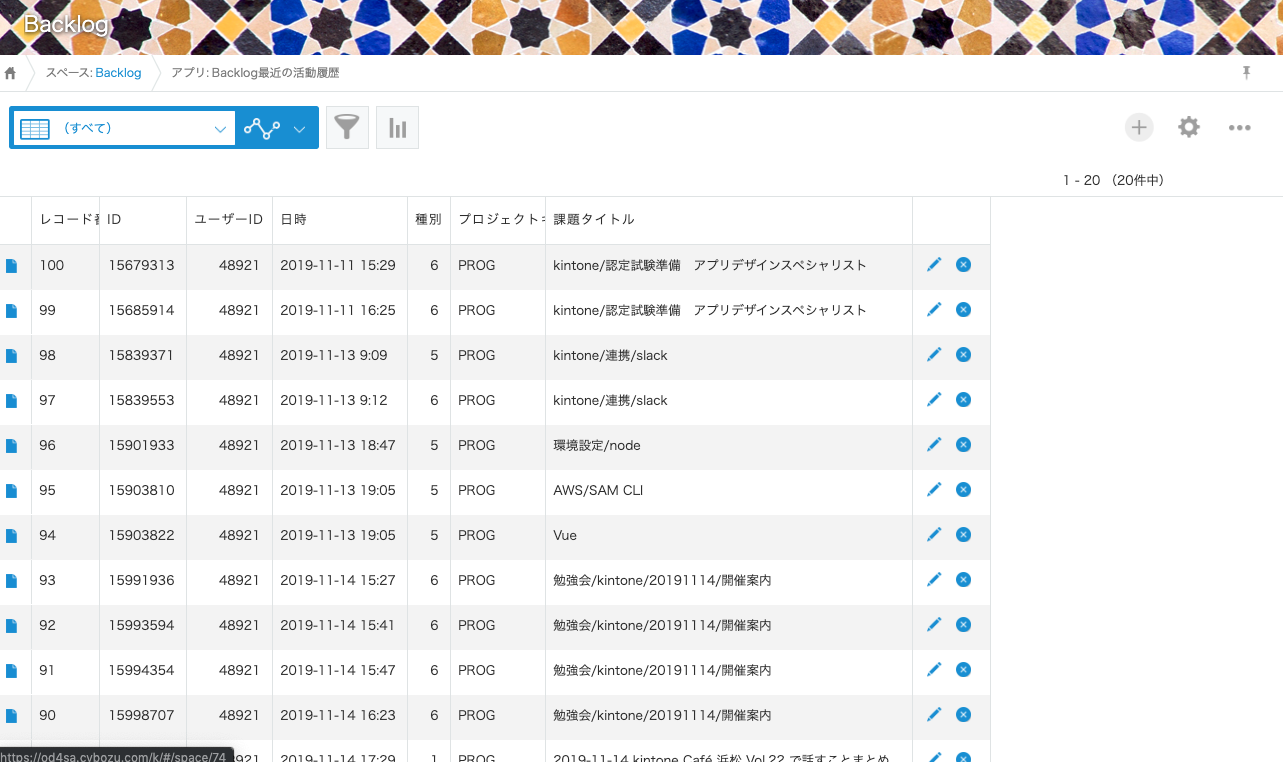
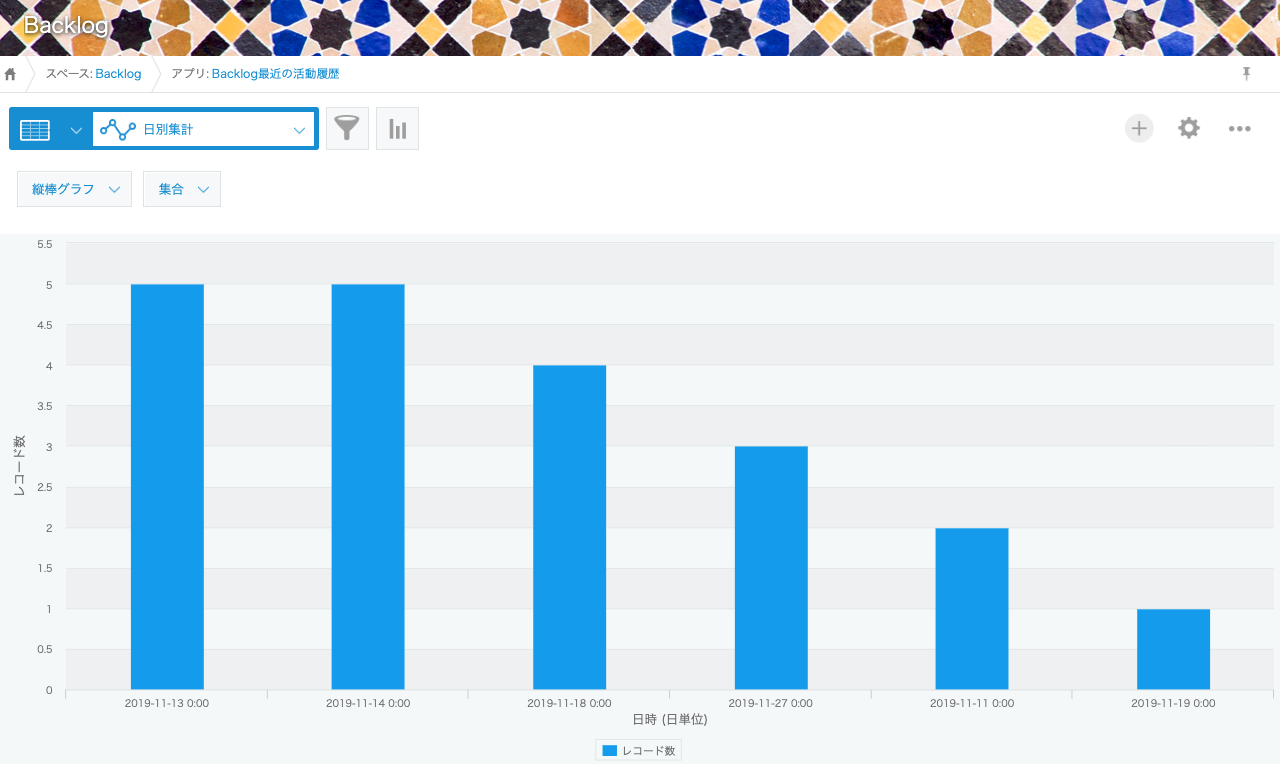
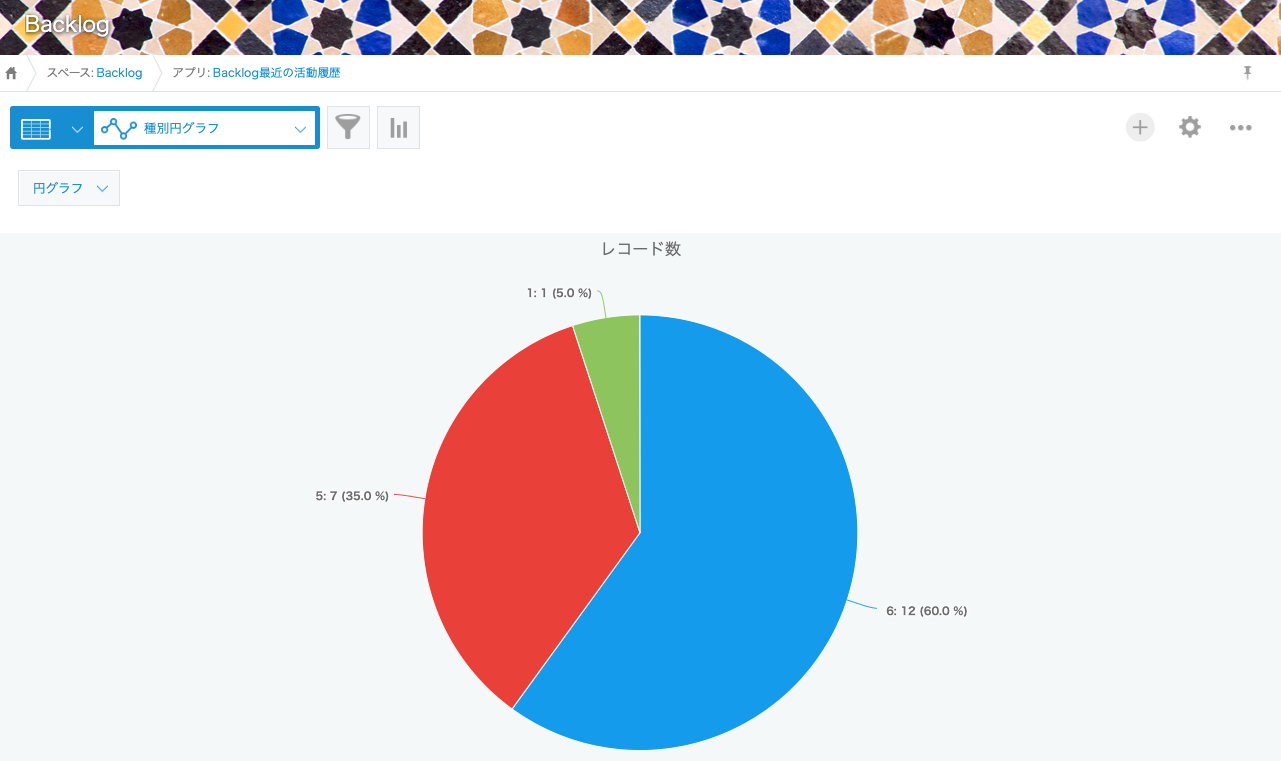
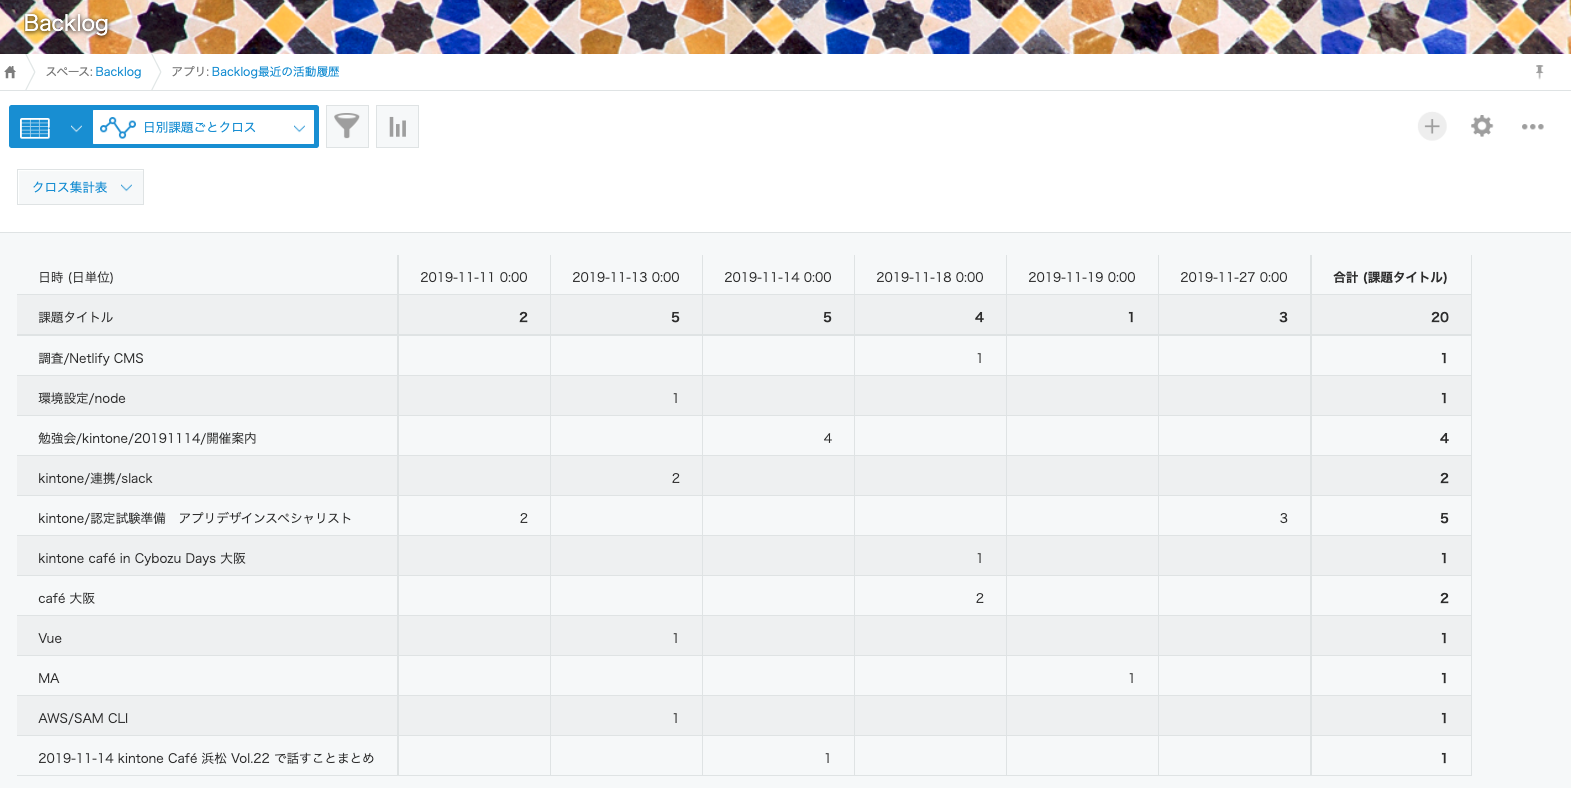
Backlogのレコードが首尾よく登録されると、以下のような画面が表示されます。
あとはもう少し件数を増やしたり、集計方法を工夫したり、Backlogの取得データを違うものにしたりなどなど。
良い感じでお使いいただければと思います。
それでは良い年末を![]()
開発環境の構築
開発環境の構築方法を追記します。(2019-12-24)
環境構築には kintone-cli を使っています。
ES6やReactなどの環境も良い感じで作ってくれます。便利。
1. プロジェクトフォルダの初期化
$ kintone-cli init --install -p b2k01
b2k01は任意のプロジェクトフォルダ名を指定してください。
$ tree ./b2k01/ -L 1 -a
./b2k01/
├── .git
├── .gitignore
├── node_modules
├── package-lock.json
└── package.json
指定したフォルダ配下にこんな感じでフォルダやら設定ファイルやらが作られます。
git initもしてくれて、初めからGit管理ができます。
2. kintoneカスタマイズJS用テンプレート作成
指定したオプションでkintoneカスタマイズJSのスケルトンを作ってくれます。
1.で作成されたプロジェクトフォルダにcdしてから実行してください。
今回は kintone-ui-componentをReactで使うので、オプションにReactの使用を指定しています。
$ kintone-cli create-template -t Customization -r -w -l -i 100 -n backlog2kintone
以下オプションの説明です。
- -t Customization or Plugin のどちらかを指定
- -r Reactを使う
- -w webpackを使う
- -l cybozu eslint rulesを使う
- -i カスタマイズする appID を指定
- -n appNameを指定
この時点ではappIDは仮でも良いです。後で設定ファイル(config.json)を開いて変更できます。
$ tree ./backlog2kintone/ -L 1 -a
./backlog2kintone/
├── .babelrc
├── .eslintrc.js
├── auth.json
├── config.json
├── dist
├── source
└── webpack.config.js
実行後は指定したappNameでフォルダが作成されて、こんな感じにファイル・フォルダが作られます。
3. 認証設定
kintone-cliは内部でkintone-customize-uploaderを利用して、deployコマンドにより自動でファイルをアップロード出来ます。そのためのkintoneログイン情報を設定ファイル(auth.json)として作成します。
$ kintone-cli auth --app-name backlog2kintone
auth.jsonは下記の内容で作ってもOKです。
{
    "domain": “サブドメイン.cybozu.com",
    "username": “ユーザーID”,
    "password": “パスワード”
}
4. 開発環境で実行
kintone-cli devコマンドを使えば、一時的にローカルサーバーを使ってカスタマイズしたファイルをkintone環境にアップロード出来ます。(実際はローカルサーバーのリンクが設定されます)
$ kintone-cli dev --app-name backlog2kintone
コマンド実行後に、ブラウザで下記リンクを開いて、ブラウザでフォルダが見える状態にしておきます。
https://:8000
その後、コマンドを実行したターミナル画面でEnterすると、ファイルがアップロードされます。
(実際はファイルのリンクが設定される)
5. 本環境用にビルド
本環境用にJSファイルをビルドします。
ビルドはwebpack.configや.babelrcファイルの設定から自動でビルドしてくれます。
特別なことが無ければ設定ファイルを変更する必要は無いです。
$ kintone-cli build --app-name backlog2kintone
6. 本環境にデプロイ
作成されたファイルをkintoneにデプロイします。
$ kintone-cli deploy --app-name backlog2kintone
良いクリスマスを![]()
