「ゼロから作るDeep Learning」(斎藤 康毅 著 オライリー・ジャパン刊)を延々と3ヶ月かけて読み込んできましたが、さすがに、現時点で理解できる事はやれたと思います。
なので、このまま続けて「ゼロから作るDeep Learning 2 自然言語処理編」を読んでいくことにします。学習環境はGoogleColabを使っています。
その19 ← → その21
1章はこれまでの復習
例題をGoogle Colab で動くかを確認しました。
Gitからダウンロードしたファイルから、フォルダ common 、 dataset を Googleドライブ上にアップします。
しかし、既に1巻目で同名のフォルダを作成してあります。1巻のフォルダにあるのと同名のファイルがありますが、内容が少し異なるようです。
なので、common2、dataset2 というフォルダ名でアップしました。
また、フォルダ中のファイルの頭にあるimport文で、
from common.config 等、フォルダ名を指定しているものは、 from config のように、フォルダ名を取り除きました。
そして、ドライブをマウントした後に、common2 dataset2 へのパスを通しておきます。
import sys, os
sys.path.append('/content/drive/My Drive/Colab Notebooks/deep_learning/common2')
sys.path.append('/content/drive/My Drive/Colab Notebooks/deep_learning/dataset2')
これで、例題が問題なく動く事を確認できました。
MatMul でのリストや配列について
MatMulクラスの定義の中で、なんとなくわかったような、でもはっきりしないことを、確認しました。
import numpy as np

class MatMul:
  def __init__(self, W):
    print('MatMul.init の W',type(W),'\n',W)
    self.params = [W]
    print('MatMul.init の params',type(self.params),'\n',self.params)
    self.grads = [np.zeros_like(W)]
    print('MatMul.init の grads',type(self.grads),'\n',self.grads)
    self.x = None
  def forward(self, x):
    W, = self.params
    print('MatMul.forward の W',type(W),'\n',W)
    out = np.dot(x, W)
    self.x = x
    return out
  def backward(self, dout):
    W, = self.params
    dx = np.dot(dout, W.T)
    dW = np.dot(self.x.T, dout)
    print('MatMul.backward の dW',type(dW),'\n',dW)
    self.grads[0][...] = dW
    print('MatMul.backward の grads',type(self.grads),'\n',self.grads)
    return dx

c = np.array([[1, 0, 0, 0, 0, 0, 0]])
W = np.random.randn(7, 3)
print('W',type(W),'\n',W)

layer = MatMul(W)
h = layer.forward(c)
print('layer.forwardの結果',type(h),'\n',h)

d = layer.backward(h)
print('layer.backwardの結果',type(d),'\n',d)
W <class 'numpy.ndarray'>
[[-0.23667587 -0.87239261 1.78452365]
[ 0.15478819 1.29866122 0.09294019]
[ 1.43214459 -1.22118166 0.62113305]
[ 0.64775692 0.79841636 -0.34525524]
[-1.88036387 -1.87567343 1.7864169 ]
[-0.53040566 -1.41120288 -0.00777481]
[-0.7218731 0.04275672 0.59743884]]
MatMul.init の W <class 'numpy.ndarray'>
[[-0.23667587 -0.87239261 1.78452365]
[ 0.15478819 1.29866122 0.09294019]
[ 1.43214459 -1.22118166 0.62113305]
[ 0.64775692 0.79841636 -0.34525524]
[-1.88036387 -1.87567343 1.7864169 ]
[-0.53040566 -1.41120288 -0.00777481]
[-0.7218731 0.04275672 0.59743884]]
MatMul.init の params <class 'list'>
[array([[-0.23667587, -0.87239261, 1.78452365],
[ 0.15478819, 1.29866122, 0.09294019],
[ 1.43214459, -1.22118166, 0.62113305],
[ 0.64775692, 0.79841636, -0.34525524],
[-1.88036387, -1.87567343, 1.7864169 ],
[-0.53040566, -1.41120288, -0.00777481],
[-0.7218731 , 0.04275672, 0.59743884]])]
MatMul.init の grads <class 'list'>
[array([[0., 0., 0.],
[0., 0., 0.],
[0., 0., 0.],
[0., 0., 0.],
[0., 0., 0.],
[0., 0., 0.],
[0., 0., 0.]])]
MatMul.forward の W <class 'numpy.ndarray'>
[[-0.23667587 -0.87239261 1.78452365]
[ 0.15478819 1.29866122 0.09294019]
[ 1.43214459 -1.22118166 0.62113305]
[ 0.64775692 0.79841636 -0.34525524]
[-1.88036387 -1.87567343 1.7864169 ]
[-0.53040566 -1.41120288 -0.00777481]
[-0.7218731 0.04275672 0.59743884]]
layer.forwardの結果 <class 'numpy.ndarray'>
[[-0.23667587 -0.87239261 1.78452365]]
MatMul.backward の dW <class 'numpy.ndarray'>
[[-0.23667587 -0.87239261 1.78452365]
[ 0. 0. 0. ]
[ 0. 0. 0. ]
[ 0. 0. 0. ]
[ 0. 0. 0. ]
[ 0. 0. 0. ]
[ 0. 0. 0. ]]
MatMul.backward の grads <class 'list'>
[array([[-0.23667587, -0.87239261, 1.78452365],
[ 0. , 0. , 0. ],
[ 0. , 0. , 0. ],
[ 0. , 0. , 0. ],
[ 0. , 0. , 0. ],
[ 0. , 0. , 0. ],
[ 0. , 0. , 0. ]])]
layer.backwardの結果 <class 'numpy.ndarray'>
[[ 4.00160899 -1.00372311 1.8348224 -1.4659571 5.2692636 1.34278285
1.19969304]]
self.params = [W] というのは、np配列W を、リスト[]に格納するということ。
W, = self.params というのは リストから最初の要素を取り出して np配列W にコピーするということです。スライス表記と言うようです。w1, w2 = params とすれば、リストparamsの1番目の要素をw1に、2番目の要素をw2にコピーすることになります。
self.grads = [np.zeros_like(W)] grads はリスト[]で、最初の要素にnp.zeros_like(W)が格納されている。
self.grads[0][...] = dW では grads[0] は init で格納した最初の要素np.zeros_like(W)のこと。_init_で格納したメモリ位置に dW をコピーする。こういう式の書き方を「3 点リーダー」と呼ぶそうです。
2章を読んで、昔やってた仕事を思い出した
もう30年近い昔、1990年代前半頃、医薬品副作用の論文と副作用名を結びつけて検索するシステムに関わっていました。
しかも、メインフレーム上で、COBOLで開発して、データベースなんてものはなくインデックスファイルを使い、電話回線のパソコン通信で送受信するという、今思えば、これはこれで、滅多にないことを経験させてもらいました。
で
当時やってたことを、思い出してみると、2章の59ページあたりからのことがそのまま当てはまります。
まず、論文をHappinessというパッケージに読み込ませて、文節で区切って単語を抜き出します。
そこからが人手の作業で、医薬品に関係する語、病名、症状等を抽出し、副作用に関するものは副作用辞書(シソーラス)というものを構築して、論文検索に利用できるようにしました。辞書で上位下位の概念があるので、検索するときに下位の分と類義語の分も検索するとか、指示すれば上位語で検索できるとか、まあ、今となっては当たり前のことをいろいろやらされました。
しかし、この辞書、人手で上位下位のポインタを割り当ててたから、当然、ミスもあって、下位の語に上位語へのポインタがつけられてループしたりなんてこともありました。この作業でやたら人手がかかり、作業が遅れ、結局、副作用辞書を使わず、入力した語で全文検索できるようにしたほうが早くない? というようなことになってしまいました。
だからP63ページ以降にある手法へと移っていったことは当然だろうと思います。
が
ここの説明で、例文として挙げられているテキストが、The Beatlesの歌からの、'You say goodbye and I say hello.'です。
例題としてはこれでいいでしょうが、日本語を扱おうとしたら、この処理の前に、分かち書きや単語の抽出という問題が出てきます。単語も複合語やひらがな、カタカナ、漢字での使い分けとかの問題があります。
まあ、ここにこだわると、肝心の Deep Learning の説明ができなくなりそうですが。
で、この2章の内容。
単語の「意味」とか「概念」なんてものにはこだわらず、実際に使われている文章を統計処理して、重要度や単語同士の関連とかを見えるようにできますよ、ということらしい。人間があれこれ手をかけ、頭を悩ましてシソーラスなんてものを作らなくてもいいですよ、ということ。
SVD 特異値分解(Singular Value Decomposition)
特異値分解の内容はまったく理解できていないが、行列Xを次のような3つの行列の積に分解できるということなので、これを利用すると次元削減できるというのは、わからないでもない。
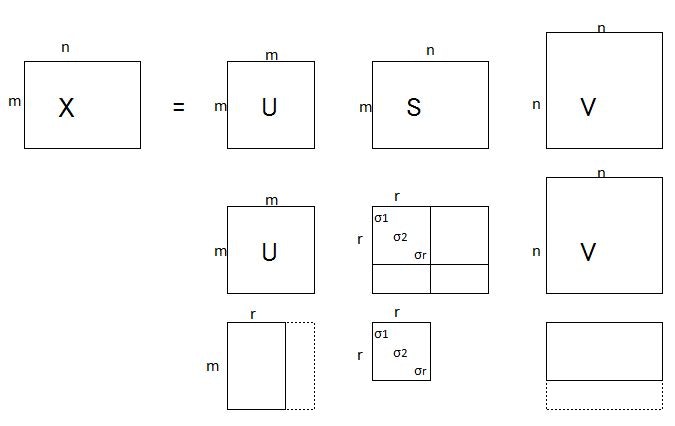
行列S(たぶんシグマのこと)の要素は、σ1≧σ2≧・・・≧σr>0 で、これら以外は全部0。
と言う事なので、このσで掛け算される以外の要素は0になってしまう。
だから、行列Uはm×rだけでよいことになる。
さらに、σは値が大きい(重要度)順に並んでいるから、要素の最初のほうだけを残して、あとは削っても大きな問題は無い、と考えていい。
PTBデータセットについて
import ptb
corpus, word_to_id, id_to_word = ptb.load_data('train')
print('corpus size:', len(corpus))
print('corpus[:30]:', corpus[:30])
print()
print('id_to_word[24]:', id_to_word[24])
print('id_to_word[26]:', id_to_word[26])
print('id_to_word[27]:', id_to_word[27])
Downloading ptb.train.txt ...
Done
corpus size: 929589
corpus[:30]: [ 0 1 2 3 4 5 6 7 8 9 10 11 12 13 14 15 16 17 18 19 20 21 22 23
24 25 26 27 28 29]
id_to_word[24]: eos
id_to_word[26]: unk
id_to_word[27]: N
print(len(np.where(corpus==24)[0]))
print(np.unique(corpus))
42068
[ 0 1 2 ... 9997 9998 9999]
corpus は93万語弱のデータですが、文の数は42068行、単語の数はジャスト10000語あるようです。
本では、PTBデータの構成や処理の仕方について書いてありますが、どのような内容なのか、まったく書いてありません。文章の意味とかテーマなんてものは無視して、統計処理で分析しようってことですから、それでいいと言えばいいわけですが、
やはり、どういう内容なのか見てみようかと思います。
corpus の内容を単語に置き換えて表示するスクリプトを作ってみました。
def decode_review(list):
  return ' '.join([id_to_word[idx] for idx in list])

def print_PTB(corpus, prtfrom, prtnum=10):
  sos = 0 #start of sentence
  cos = 0 #count of sentence
  prtend = prtfrom + prtnum - 1
  for i, idx in enumerate(corpus):
    if idx == 24:
      cos +=1
      if cos>=prtfrom:
        print(decode_review(corpus[sos:i+1]))
      if cos>=prtend:break
      sos = i+1
  return

print_PTB(corpus, 1, 10) #表示を開始する行の番号、表示する行数
aer banknote berlitz calloway centrust cluett fromstein gitano guterman hydro-quebec ipo kia memotec mlx nahb punts rake regatta rubens sim snack-food ssangyong swapo wachter
pierre N years old will join the board as a nonexecutive director nov. N
mr. is chairman of n.v. the dutch publishing group
rudolph N years old and former chairman of consolidated gold fields plc was named a nonexecutive director of this british industrial conglomerate
a form of asbestos once used to make kent cigarette filters has caused a high percentage of cancer deaths among a group of workers exposed to it more than N years ago researchers reported
the asbestos fiber is unusually once it enters the with even brief exposures to it causing symptoms that show up decades later researchers said
inc. the unit of new york-based corp. that makes kent cigarettes stopped using in its cigarette filters in N
although preliminary findings were reported more than a year ago the latest results appear in today 's new england journal of medicine a forum likely to bring new attention to the problem
a said this is an old story
we 're talking about years ago before anyone heard of asbestos having any questionable properties
どうやら新聞記事をまとめたもののようです。
最初のほうはアスベストの問題です。経済関係が多いような?
で、ここまではテキストデータをベクトル化してコンピュータで計算できるようにした、ということであって、DeepLearning は出てきていません。
日本語で同じ事をやってみた
まず、mecab を使って単語に分割しました。
mecab
# 形態素分析ライブラリーMeCab と 辞書(mecab-ipadic-NEologd)のインストール
!apt-get -q -y install sudo file mecab libmecab-dev mecab-ipadic-utf8 git curl python-mecab > /dev/null
!git clone --depth 1 https://github.com/neologd/mecab-ipadic-neologd.git > /dev/null
!echo yes | mecab-ipadic-neologd/bin/install-mecab-ipadic-neologd -n > /dev/null 2>&1
!pip install mecab-python3 > /dev/null

# シンボリックリンクによるエラー回避
!ln -s /etc/mecabrc /usr/local/etc/mecabrc
Cloning into 'mecab-ipadic-neologd'...
remote: Enumerating objects: 75, done.
remote: Counting objects: 100% (75/75), done.
remote: Compressing objects: 100% (74/74), done.
remote: Total 75 (delta 5), reused 54 (delta 0), pack-reused 0
Unpacking objects: 100% (75/75), done.
import MeCab
path = "-d /usr/lib/x86_64-linux-gnu/mecab/dic/mecab-ipadic-neologd"
sample_txt = "君はさようならって言うけど、僕はこんにちはって言うんだ。"
m = MeCab.Tagger(path)
m_result = m.parse(sample_txt).splitlines()
m_result = m_result[:-1]
for v in m_result:
  tangojouhou = v.split()
  tango = tangojouhou[0]
  hinsi = tangojouhou[1].split(',')[0]
  genkei = tangojouhou[1].split(',')[6]
  print(tango, hinsi, genkei)
君 名詞 君
は 助詞 は
さようなら 感動詞 さようなら
って 助詞 って
言う 動詞 言う
けど 助詞 けど
、 記号 、
僕 名詞 僕
は 助詞 は
こんにちは 感動詞 こんにちは
って 助詞 って
言う 動詞 言う
ん 名詞 ん
だ 助動詞 だ
。 記号 。
30年前は、これと同じことをやるのにパッケージ使用料がウン百万円かかったのに、今やフリーウェア。いい時代になったものです。
助詞はいらない、と言うかどう処理すればいいかわかりません。記号は、「、」はビミョーだけど、「。」は文の終わりということでに置き換えました。
txt = ''
for v in m_result:
  tangojouhou = v.split()
  tango = tangojouhou[0]
  hinsi = tangojouhou[1].split(',')[0]
  genkei = tangojouhou[1].split(',')[6]

  if genkei == '*':
    genkei = '<unk>'
  if hinsi == '名詞' or hinsi == '動詞' or hinsi == '感動詞':
    txt += genkei + ' '
  if genkei == '。':
    txt += '<eos> '

txt = txt[:-1]
print(txt)
君 さようなら 言う 僕 こんにちは 言う ん
from util import preprocess
corpus, word_to_id, id_to_word = preprocess(txt)
print(corpus, word_to_id, id_to_word)
[0 1 2 3 4 2 5 6]
{'君': 0, 'さようなら': 1, '言う': 2, '僕': 3, 'こんにちは': 4, 'ん': 5, '': 6}
{0: '君', 1: 'さようなら', 2: '言う', 3: '僕', 4: 'こんにちは', 5: 'ん', 6: ''}
# coding: utf-8
import sys
sys.path.append('..')
import numpy as np
from util import most_similar, create_co_matrix, ppmi
import ptb


window_size = 2
wordvec_size = 100

# corpus, word_to_id, id_to_word = ptb.load_data('train')

vocab_size = len(word_to_id)
print('counting  co-occurrence ...')
C = create_co_matrix(corpus, vocab_size, window_size)
print('calculating PPMI ...')
W = ppmi(C, verbose=True)

print('calculating SVD ...')
try:
    # truncated SVD (fast!)
    from sklearn.utils.extmath import randomized_svd
    U, S, V = randomized_svd(W, n_components=wordvec_size, n_iter=5,
                             random_state=None)
except ImportError:
    # SVD (slow)
    U, S, V = np.linalg.svd(W)

word_vecs = U[:, :wordvec_size]
counting co-occurrence ...
calculating PPMI ...
2.0% done
・・・
100.0% done
calculating SVD ...
matplotlib で日本語を扱うのに、ちょっと苦労しました
日本語対応版をインストールして
pip install japanize-matplotlib
Collecting japanize-matplotlib
Downloading https://files.pythonhosted.org/packages/aa/85/08a4b7fe8987582d99d9bb7ad0ff1ec75439359a7f9690a0dbf2dbf98b15/japanize-matplotlib-1.1.3.tar.gz (4.1MB)
|████████████████████████████████| 4.1MB 5.8MB/s
Requirement already satisfied: matplotlib in /usr/local/lib/python3.6/dist-packages (from japanize-matplotlib) (3.2.2)
Requirement already satisfied: cycler>=0.10 in /usr/local/lib/python3.6/dist-packages (from matplotlib->japanize-matplotlib) (0.10.0)
Requirement already satisfied: pyparsing!=2.0.4,!=2.1.2,!=2.1.6,>=2.0.1 in /usr/local/lib/python3.6/dist-packages (from matplotlib->japanize-matplotlib) (2.4.7)
Requirement already satisfied: numpy>=1.11 in /usr/local/lib/python3.6/dist-packages (from matplotlib->japanize-matplotlib) (1.18.5)
Requirement already satisfied: kiwisolver>=1.0.1 in /usr/local/lib/python3.6/dist-packages (from matplotlib->japanize-matplotlib) (1.3.1)
Requirement already satisfied: python-dateutil>=2.1 in /usr/local/lib/python3.6/dist-packages (from matplotlib->japanize-matplotlib) (2.8.1)
Requirement already satisfied: six in /usr/local/lib/python3.6/dist-packages (from cycler>=0.10->matplotlib->japanize-matplotlib) (1.15.0)
Building wheels for collected packages: japanize-matplotlib
Building wheel for japanize-matplotlib (setup.py) ... done
Created wheel for japanize-matplotlib: filename=japanize_matplotlib-1.1.3-cp36-none-any.whl size=4120275 sha256=cf3a7d93f47b04b7425c6cfd7e1dcefa2a68a4b108b0e59c0477908c424a32ed
Stored in directory: /root/.cache/pip/wheels/b7/d9/a2/f907d50b32a2d2008ce5d691d30fb6569c2c93eefcfde55202
Successfully built japanize-matplotlib
Installing collected packages: japanize-matplotlib
Successfully installed japanize-matplotlib-1.1.3
フォントの設定をしました。
import matplotlib.pyplot as plt
import japanize_matplotlib #日本語化matplotlib
import seaborn as sns
sns.set(font="IPAexGothic") #日本語フォント設定

plt.figure(figsize=(12, 6))
for word, word_id in word_to_id.items():
  plt.annotate(word, (U[word_id, 0], U[word_id, 1]), size=18)
plt.scatter(U[:,0], U[:,1], alpha=0.5)
plt.show()
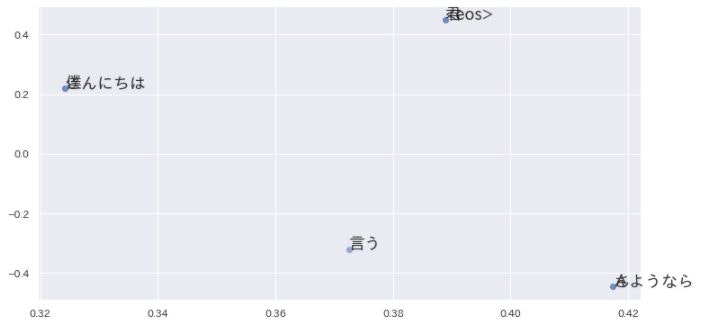
英語と日本語では、語の並び順が違うから、ぜんぜん違う結果になってます。
メモの目次等はこちらから 読めない用語集
参考サイト
自然言語処理における前処理の種類とその威力
Google ColabにMeCabとipadic-NEologdをインストールする
日本語を文節単位で分かち書きする
新語・固有表現に強い「mecab-ipadic-NEologd」の効果を調べてみた
2chのスレッドをWordCloudで可視化してみる