![]() Japanese article
Japanese article

はじめに
デバイスアクセス
PowerShellの開始
- キー入力:
Win+x>a>はい
UCI(SSH)アクセス
powershell:初期設定用
ssh -o StrictHostKeyChecking=no root@192.168.1.1
- root@192.168.1.1's password:
初期値:パスワード無し
OpenSSHのインストールが無い場合
- 機能の確認
※Windows 10 Fall Creators Update(1709)以降標準搭載
powershell
Get-WindowsCapability -Online | Where-Object Name -like 'OpenSSH*'
- 機能のインストール
powershell
Add-WindowsCapability -Online -Name OpenSSH.Server~~~~0.0.1.0
ファームウェアについて

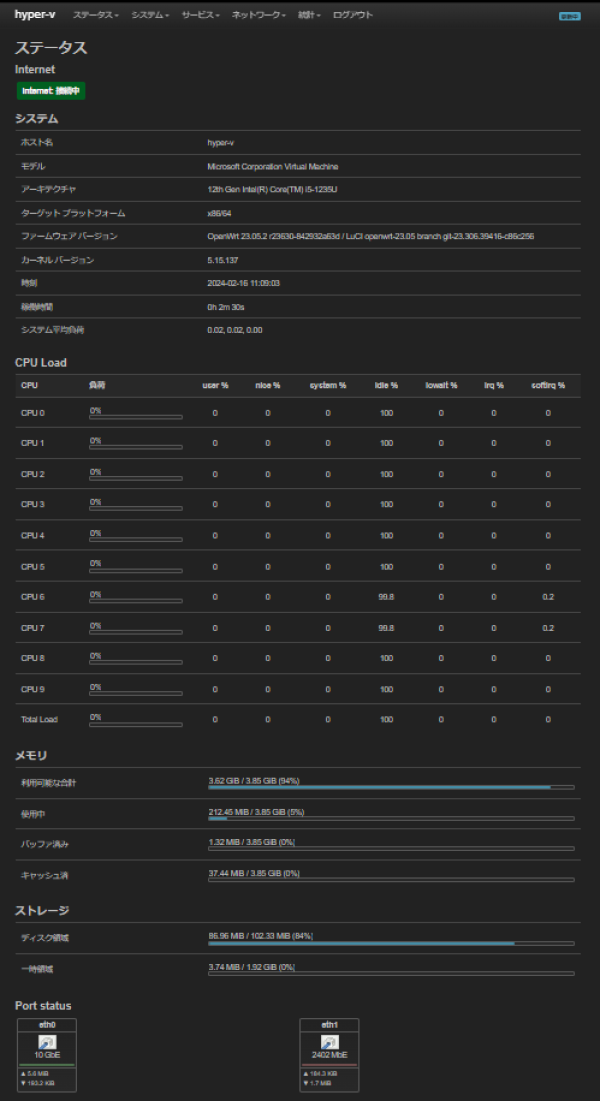
デバイスについて
- 仮想化ハードウェア仕様 (参考)
Windows11 Home- CPU : Intel i5-1235U
- RAM : 32 GB
- SSD : 512 GB
- BIOS : Virtualization Technology [Enabled]
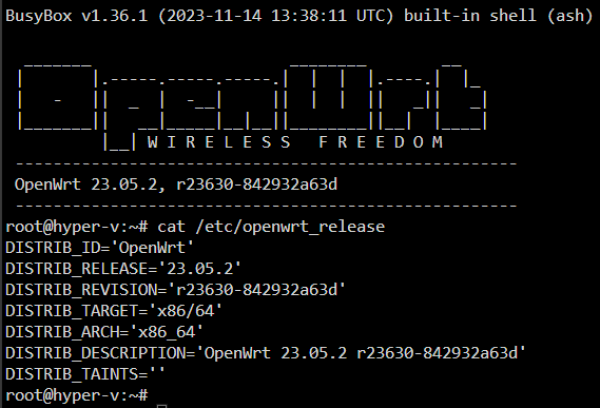
OpenWrt x86/64
Hyper-VをWindows11 Homeにインストール
![]() Proはスルー
Proはスルー
- スクリプト: hyperv.bat
- ディレクトリ:
C:\openwrt
powershell > Win+x > a > はい
警告 > 強制的に貼り付け
powershell
Set-ExecutionPolicy Unrestricted
New-Item C:\openwrt -ItemType Directory -Force
Invoke-WebRequest -Uri "https://raw.githubusercontent.com/site-u2023/windows/main/hyperv.bat" -OutFile "C:\openwrt\hyperv.bat"
Start-Process C:\openwrt\hyperv.bat
Set-ExecutionPolicy Restricted
今すぐコンピューターを再起動しますか? (Y/N)
y
imgをvhdxに変換
- 以下をダウンロード
デバイス用のOpenWrtカスタムファームウェアをダウンロード
イメージのダウンロード > COMBINED-EFI (EXT4) をダウンロード
powershell > Win+x > a > はい
警告 > 強制的に貼り付け
powershell
New-Item "c:\openwrt\" -ItemType Directory -ErrorAction SilentlyContinue
Move-Item C:\Users\*\Downloads\openwrt-*.img.gz c:\openwrt\ -force
- UbuntuをWindows11にインストール
PowerShell
wsl --install
powershell
wsl.exe --list --online
powershell
Ubuntu
アカウント名 及び パスワード 入力
SSH
sudo apt-get update
sudo apt-get install gzip
sudo apt install qemu-utils
cd /mnt/c/openwrt/
gunzip -k openwrt-*.img.gz
qemu-img resize -f raw openwrt-*.img 1G
qemu-img convert openwrt-*.img -O vhdx openwrt.vhdx
exit
exit
[sudo] password for openwrt: パスワード入力
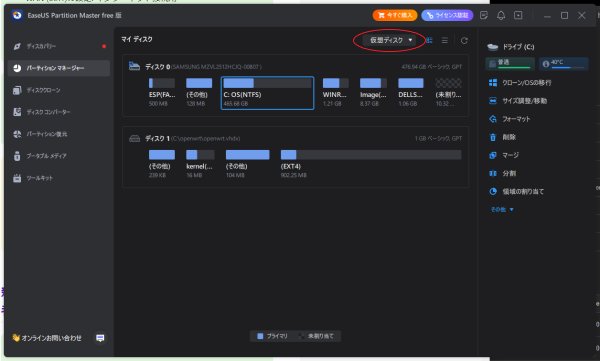
パーテーション拡張
フリーパーティション管理ソフト
EaseUS Partition Master Free
- 仮想ディスク
-
VHDxのマウント
C:\ProgramData\Microsoft\Windows\Virtual Hard Disks\openwrt.vhdx -
読み取り専用
-
- 未割当
- 作成
- サイズと位置を決定する: 最大
- ドライブレター: 無し
- ファイルシステム: EXT4
- 一個のタスクを実行
- アンマウント
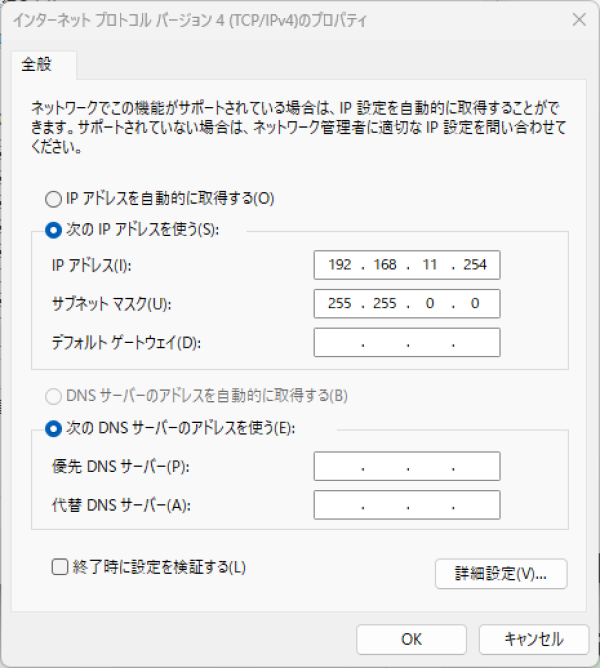
固定IPアドレス設定
- LANの設定: LuCiログイン用 (固定IP)
- LANに固定IPを環境に合わせ調整
コマンドをちょっとだけ覚える
- LANに固定IPを環境に合わせ調整
SSH
vi /etc/config/network
- キー配列を置き換えて入力 (Hyper-Vは英文字キーボード)
: =shift+;
_ =-
* ='
option ipaddr '192.168.1.1'をメインルーターと被らないように変更
例: 192.168.11.1
- クライアントPCの設定
- アダプターの設定の変更
- ネットワーク接続
任意内部
- ネットワーク接続
- アダプターの設定の変更
- o仮想マシンopenwrt
- 設定
- ハードウェアの追加
- ネットワークアダプター
- 追加
- 仮想スイッチ: 作成したWANとLANスイッチを追加
- 追加
- ネットワークアダプター
- ハードウェアの追加
- 設定
- 仮想マシンopenwrtを停止し、再度起動
- option ipaddrに設定したアドレスでLuCiログイン
※WANが無い場合、eth1でwanインターフェースを作成
フラッシュ&インストールシステム

OpenMPTCProuter x86/64
OpenMPTCProuter
検証中
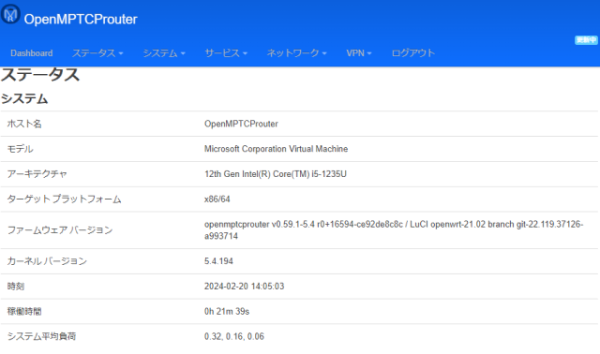
ログイン
覚え書き:
初期設定自体は、OpenWrtとさほど変わらない
基本OpenWrtだが、WireGuard、VPN機能などが最初から組み込まれている
それらを使い込む人には、OpenMPTCProuterは向いていると思われ
高速回線の冗長化をしたく、x86/64のmini-pcを検討中
banana-pi3、raspberry-pi5のファームウェアは今のところ無い
既知の問題
あとがき
OpenWrt初心者の方は、まずHyper-Vで検証されてみるのも良いかと思う
インストールするクライアントPCの性能はたとえ低くても動く
なにより、全て無料
ConfigSoftwareをVMに対応
参考資料(感謝 )
)
Windows 11 Home に Hyper-V をインストールする