Pixel Buds欲しいんですが、高くて手が出ない。
なので、自分で作ってしまいました。
<用意するもの>
Android 8.0以上スマホ
M5StickCのような、ESP32でボタンがあるもの
通話可能なBluetoothイヤホン
<できること>
スマホをポケットにいれて、イヤホンで音楽を聴きながら、
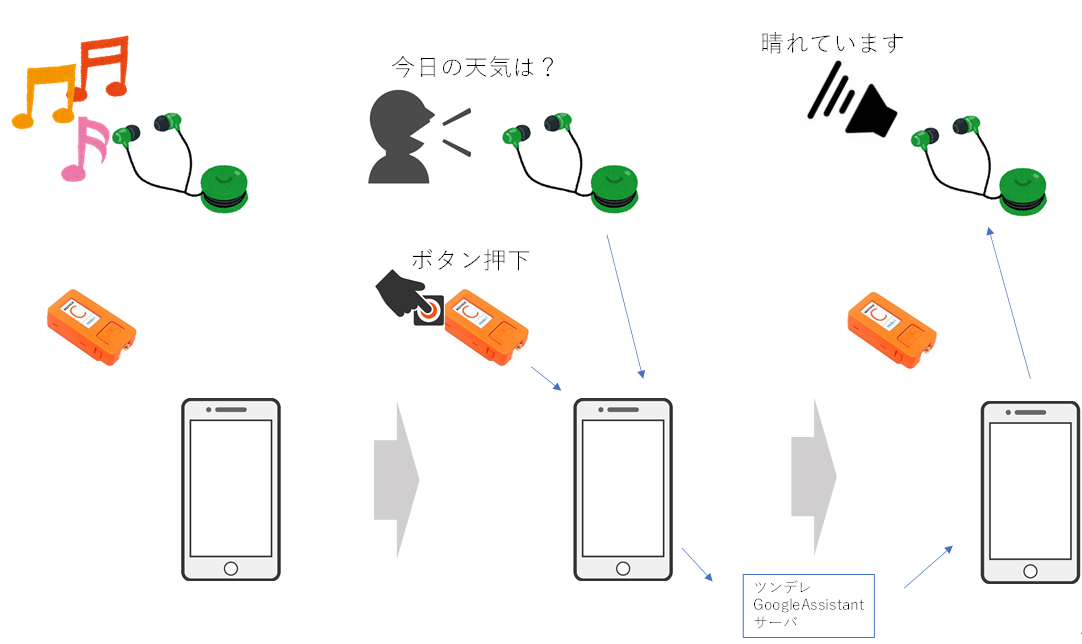
・ボタンを押して、イヤホンで質問し、イヤホンで応答を聞ける
・目的地までの距離を音声でイヤホンで教えてくれる。
<実装したこと>
・M5StickCとBLE接続し、ボタン押下を待ち受けます。
・AndroidでGPSの緯度経度を取得し続けます。
・音楽再生を一旦停止し、イヤホンのマイクから音声認識します。
・音楽再生を一旦停止し、イヤホンからTextToSpeech音声を流します。
・サーバとHTTP POST通信します。(今回は、GoogleAssistantを実装したサーバに接続)
・ボタン押下を契機に、今の現在地と、目的地までの距離と方角と現在速度を音声で流します。
・上記を、スマホがスタンバイ状態でも稼働するようにします。
・GoogleMapを表示して、目的地を設定します。
毎度の通り、GitHubに上げておきました。
AndroidとESP32(PlatformIOまたはArduinoIDE)の両方のソースコードを載せています。
poruruba/LocationResponder
https://github.com/poruruba/LocationResponder
#スマホがスタンバイ状態でも稼働するようにします
以下の記事を参考にしてください。
M5StickCのボタン押下でスマホから現在地をしゃべらせる(1/2)
動きとしてはこんな感じに動きます。
①最初にMainActivity.java を起動させたのち、Startボタン押下で、LocationService.javaを起動させます。その後、LocationService.javaがバックグラウンドで動き続けます。MainActivity.javaを閉じても動き続けます。そのとき、NotificationにLocationService.javaが動き続けているのがわかるようにアイコンを常駐させます。
②その後、MainActivity.javaを起動したままでもいいですし、閉じた後も起動することができます。起動している状態では、LocationService.javaが公開するメソッドを1秒間隔で呼び続け、状態をActivityの画面に表示しています。
加えて、IBinderをインスタンス化しています。これによって、MainActivity.javaはこれをバインドし、常駐化したLocationService.javaのメソッドを呼び出すことができます。例えば、状態取得やBLEデバイス接続の要求、現在地の緯度経度取得など(後述します)。
    public class LocationBinder extends Binder {
        public void connectDevice(BluetoothDevice device){
            if( mScanner != null ) {
                mDevice = device;
                mConnGatt = device.connectGatt(context, true, mGattcallback);
            }
        }

        public void setTargetLocation(Location location){
            targetLocation = location;
        }

        public Location getTargetLocation(){
            return targetLocation;
        }

        public ConnectionState isConnected(){
            return isConnected;
        }

        public Location getLastLocation(){
            return location;
        }

        public void setEnable(boolean enable){
            isEnable = enable;
        }

        public boolean getEnable(){
            return isEnable;
        }

        public BluetoothDevice[] getDeviceList(){
            return deviceList.toArray(new BluetoothDevice[0]);
        }

        public BluetoothDevice getDevice(){
            return mDevice;
        }
    }

    private final IBinder mBinder = new LocationBinder();

    @Override
    public IBinder onBind(Intent intent) {
        return mBinder;
    }
MainActivity.java側では以下を呼び出して、IBinderのバインドを待ち続けるとともに、1秒間隔で、(IBinderをバインドできていたら)LocationService.javaのメソッドを呼び出しています。
        Intent serviceIntent = new Intent(this, LocationService.class);
        bindService(serviceIntent, mConnection, 0);

        TimerTask task = new TimerTask() {
            @Override
            public void run(){
                handler.sendUIMessage(UIHandler.MSG_ID_TEXT, UIMSG_UPDATE, null);
            }
        };
        Timer timer = new Timer();
        timer.scheduleAtFixedRate(task, 0, INVOKE_INTERVAL);
#M5StickCと接続し、ボタン押下を待ち受けます
こちらも同じ投稿をご参照ください。
M5StickCのボタン押下でスマホから現在地をしゃべらせる(1/2)
LocationService.javaを常駐させると同時に、BLEデバイスとの接続とGPS緯度経度取得もバックグラウンドでするようにします。
その前にまず、接続可能なBLEデバイスを探し、さきほどのIBinderでBLEデバイスのリストをMainAcivity.javaに知ってもらいます。そして、MainActivity.javaからIBinderを使って、接続するBLEデバイスを指定してもらって接続します。
特定のサービスUUIDをもつBLEデバイスをスキャンするようにしています。
また、接続するまでずっとスキャンし続け、一度発見したデバイスも再度発見されるため、初めて発見したときだけリストに登録するようにしています。
MainActivity.javaからIBinderで接続要求しますが、LocationService.javaにおいて、connectGattメソッドで、2番目の引数をtrueにしています。これによって、途中でBLE切断が発生しても、またそのデバイスが復帰したら再接続してくれます。
M5StickCのボタン押下の待ち受けとしていますが、実際にはこのBLEのNotificationの受信を指します。M5StickCの方で、ボタンが押下されたら、BLEのNotificationを通知するように作っておきます。
PacketQueue queueは、受信するBLEのNotificationのアンマーシャライズ、M5StickC側へのWriteCharacteristicのマーシャライズのためのユーティリティです。実は、1回のNotificationやWriteCharacteristicの電文の長さがかなり限られる(今回は20バイト)なので、より大きな電文を送りには、複数の電文をくっつけてあげる必要があったわけです。
GPSの緯度経度を取得し続けます
こちらも同じ投稿をご参照ください。
M5StickCのボタン押下でスマホから現在地をしゃべらせる(1/2)
#音楽再生を一旦停止し、イヤホンののマイクから音声認識します
まずは、音声認識の準備の部分です。
・・・
        recognizer = SpeechRecognizer.createSpeechRecognizer(this);
        if( recognizer == null ) {
            Log.e(MainActivity.TAG, "SpeechRecognizer not available");
        }else {
            initializeRecognizer();
        }
・・・
    private void initializeRecognizer(){
        Log.d(MainActivity.TAG, "initializeRecognizer" );

        recognizer.setRecognitionListener(new RecognitionListener() {
            boolean recognizeActive;

            public void	onReadyForSpeech(Bundle params) {
                Log.d(MainActivity.TAG, "onReadyForSpeech" );

                recognizeActive = true;
            }

            public void	onResults(Bundle results) {
                Log.d(MainActivity.TAG, "onResults" );
・・・
次が、実際の音声認識のための録音処理の開始の部分です。
    private void startRecognizer() {
        if (recognizer == null)
            return;
        if (ActivityCompat.checkSelfPermission(this, Manifest.permission.RECORD_AUDIO) != PackageManager.PERMISSION_GRANTED &&
                ActivityCompat.checkSelfPermission(this, Manifest.permission.RECORD_AUDIO) != PackageManager.PERMISSION_GRANTED)
            return;

        if( recDevice != null ) {
            boolean result = mBluetoothHeadset.startVoiceRecognition(recDevice);
            Log.d(MainActivity.TAG, "Result:" + result);
        }

        Intent intent = new Intent(RecognizerIntent.ACTION_RECOGNIZE_SPEECH);
        intent.putExtra(RecognizerIntent.EXTRA_LANGUAGE_MODEL, RecognizerIntent.LANGUAGE_MODEL_FREE_FORM);

        recognizer.startListening(intent);
    }
直前で、mBluetoothHeadset.startVoiceRecognitionを呼び出しています。普通に音声認識を始めると、スマホ本体のマイクで録音が始まります。今回は、画面を消して(スリープにして)、ズボンのポケットに入れたまま操作したく、音楽を聴いているヘッドセットの通話用のマイクを使うための処理です。
mBluetoothHeader や recDeviceは以下で検索しています。要は、スマホにつながれているヘッドセットを検索し、先頭のデバイスを録音用のマイクとして選択しています。見つからなければ、スマホ本体のマイクを使います。
    private BluetoothProfile.ServiceListener mProfileListener = new BluetoothProfile.ServiceListener() {
        @Override
        public void onServiceConnected(int profile, BluetoothProfile proxy) {
            Log.d(MainActivity.TAG, "onServiceConnected");
            if (profile != BluetoothProfile.HEADSET)
                return;

            mBluetoothHeadset = (BluetoothHeadset)proxy;
            List<BluetoothDevice> devices = mBluetoothHeadset.getConnectedDevices();
            Log.d(MainActivity.TAG, "size=" + devices.size());
            if(devices.size() > 0){
                recDevice = devices.get(0);
            }
        }

        @Override
        public void onServiceDisconnected(int profile) {
            Log.d(MainActivity.TAG, "onServiceDisconnected");

            if (profile != BluetoothProfile.HEADSET)
                return;

            recDevice = null;
        }
    };
録音が終わったら、以下を呼び出しましょう。そうしないと、さっき再生していた音楽に戻らないです。
        if( recDevice != null )
            mBluetoothHeadset.stopVoiceRecognition(recDevice);
#音楽再生を一旦停止し、イヤホンからTextToSpeech音声を流します
TextToSpeechの準備です。mFocusRequestは後で使います。
        audioManager = (AudioManager)getSystemService(Context.AUDIO_SERVICE);
        tts = new TextToSpeech(this, new TextToSpeech.OnInitListener() {
            @Override
            public void onInit(int status) {
                if( status == TextToSpeech.SUCCESS ) {
                    AudioAttributes attributes = new AudioAttributes.Builder()
                            .setContentType(AudioAttributes.CONTENT_TYPE_SPEECH)
                            .build();
                    // ときどきフォーカス取得が遅れるので、setOnAudioFocusChangeListener() を使うのが望ましい
                    mFocusRequest = new AudioFocusRequest.Builder(AudioManager.AUDIOFOCUS_GAIN_TRANSIENT)
                            .setAudioAttributes(attributes)
                            .build();

                    tts.setOnUtteranceProgressListener(mTtsListener);

                    isTtsReady = true;
                }else{
                    Log.d(MainActivity.TAG, "TextToSpeech init error");
                }
            }
        });
        if( tts == null ){
            Log.e(MainActivity.TAG, "TextToSpeech not available");
        }
・・・
以下で、TTS開始です
    void speechTts(String message){
        Log.d(MainActivity.TAG, "speechTts");

        if(tts == null || !isTtsReady)
            return;

        if( audioManager != null )
            audioManager.requestAudioFocus( mFocusRequest );

        tts.speak(message, TextToSpeech.QUEUE_ADD, null, TextToSpeech.Engine.KEY_PARAM_UTTERANCE_ID );
    }
で、audioManager.requestAudioFocusを直前で呼んでいます。何もしないと、再生中の音楽が流れたまま、TTSが流れるため、音がダブって聞きづらいです。この処理を入れることで、いったん音楽再生の音を止めて、TTSの音だけにすることができます。
TTSの再生が終わったら、以下を呼び出して、音楽再生に戻します。
            if( audioManager != null )
                audioManager.abandonAudioFocusRequest(mFocusRequest);
#今の現在地と、現在地から目的地までの距離と方角と現在速度を音声で流します。
M5StickCからのNotificationの内容により処理を開始します。
private void processPacket(final JSONObject json) throws Exceptionの中の、case CMD_LOCATION:の部分です。
距離や方位は、便利なAndroidの関数であるLocation.distanceBetweenを使っています。
目的地は、MainActivity.java側で決めて、IBinder経由で変数targetLocationに設定しています。
#サーバとHTTP POST通信します。(今回は、GoogleAssistantを実装したサーバに接続)
大した処理はしていません。
GoogleAssistantを実装したサーバに接続するとしていますが、接続先はM5StickC側で決めてもらってます。
private void processPacket(final JSONObject json) throws Exceptionの中の、case CMD_HTTP_POST:の部分です。
OK Googleするまで、ちょっとだけややこしいのですが、以下の流れになります。
1.M5SticCでボタンを押下し、AndroidにBLE Notification
2.Androidは、音楽再生を一旦停止し、音声認識を実行
3.認識した結果をM5StickCに返し、M5StickCは、AndroidにHTTP Postを要求(認識したテキスト)
4.Androidは、HTTP Postして応答をAndroidに戻す(応答のテキスト)
5.M5StickCは、応答のテキストをAndroidにBLE Notification
6.Androidは、音楽再生を一旦停止し、TextToSpeechを実行
処理の内容や主導権をM5StickC側にして、今後いろいろなツールを考えるにあたって、Androidアプリは変更不要としたかったためです。
#GoogleMapを表示して、目的地を設定します。
MapsActivity.javaでの処理です。MainActivity.javaから起動されます。
Androidアプリに、GoogleMapを組み込んでいます。以下を参考にさせていただきました。
[Android] Google Maps API v2 キーを取得
https://akira-watson.com/android/google-maps-api-v2.html
MapsActivity.javaでは、以下の部分で、初期位置にマーカを設置し、マップを動かしてもマーカは必ず真ん中に来るようにしています。また、ズームレベルも設定し、現在地に飛べるボタンも表示させてます。
    @Override
    public void onMapReady(GoogleMap googleMap) {
        mMap = googleMap;

        LatLng latlng = new LatLng(latitude, longitude);
        marker = mMap.addMarker(new MarkerOptions().position(latlng));
        mMap.moveCamera(CameraUpdateFactory.newLatLng(latlng));

        mMap.moveCamera(CameraUpdateFactory.zoomTo(16.0f));

        mMap.setOnCameraMoveListener(new GoogleMap.OnCameraMoveListener(){
            @Override
            public void onCameraMove(){
                CameraPosition position = mMap.getCameraPosition();
                marker.setPosition(position.target);
            }
        });

        updateLocationUI();
・・・
以下の部分で、Activity終了時に、真ん中の緯度経度を親Activityに返すようにしています
    @Override
    public void onClick(View view) {
        switch(view.getId()){
            case R.id.btn_map_select:
                // 返すデータ(Intent&Bundle)の作成
                Intent intent = new Intent();
                LatLng latlng = mMap.getCameraPosition().target;
                intent.putExtra("latitude", latlng.latitude);
                intent.putExtra("longitude", latlng.longitude);
                setResult(RESULT_OK, intent);

                finish();
                break;
・・・
M5StickC側のソースコード
GitHubに上げてあります。
以下の記事を参考にしてください。
M5StickCのボタン押下でスマホから現在地をしゃべらせる(2/2)
#GoogleAssistantサーバ
以下の記事で立ち上げたものです。
ツンデレのGoogleアシスタントをLINEボットにする
#終わりに
細かな苦労はわかっていただけましたでしょうか ^_^;
以上
