以前の投稿 GoogleMapを使ってサイクリングに出かけよう で、GoogleMapに音声ナビゲーションしてもらいました。
今回は、GoogleMapに頼らずに、スマホのGPSだけでナビゲートしてもらいます。もちろんGoogleMapと併用も可能です。
ですが、自転車運転中は、スマホの画面を見るのは危険ですので、やっぱり音声でナビゲートして欲しいところです。
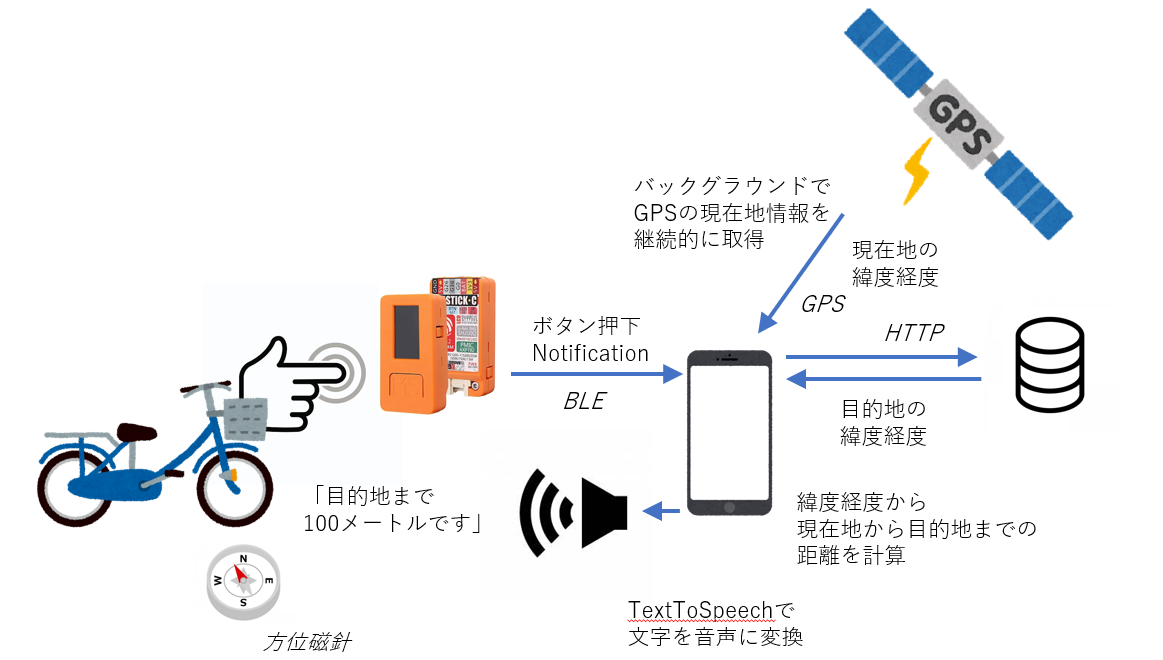
例えば、「目的地まで100メートル、北西方向です。」と言ってくれれば、助かります。方向はどうやって認識するかというと、そこはアナログに方位磁針に助けを借りて、自転車に取り付けました。自転車ベルと方位磁針がセットのやつが700円弱です。
ずっと、音声でだらだらと音声ナビしてもらうのもよいのですが、できれば、教えてほしい時に音声ナビして欲しいです。そこで、M5Stick-Cの出番です。バッテリが付いて単独で動き、BLEとボタンがついているので、無線でボタン押下をスマホに伝えることができそうです。
あとは、Androidアプリの開発だけです。いくつかの重要なAndroidの機能を使います。
- バックグラウンドで現在地取得と、BLE接続の維持が必要です。しかも、別のアプリが起動していたり、画面をOffにした状態でも動いている状態にしておく必要があります。そのために、Androidの「フォアグラウンドサービス」および「NotificationManger」という機能を使います。
- 位置情報の取得には、Androidの「LocationManager」を使います。
- 音声合成には、Androidの「TextToSpeech」の機能を使います。
- M5StickCとの接続には、「BLEセントラル」の機能を使います。
順番としては以下の通りです。
まずは準備から。
- Androidスマホで、フォアグラウンドサービスを起動します。
- NotificationManagerを使って常時通知をし、フォアグラウンドサービス稼働状態にします。
- LocationManagerを使って、位置情報の定期的な取得を開始します。
- BLEセントラルを使って、M5StickCをスキャンし、接続状態にします。
BLE接続されたM5StickCでボタンが押下されると、
- M5StickCからBLEのNotificationを受信します。
- HTTP Postを使って目的地の位置情報(緯度経度)を取得します。
- 現在地情報と目的地の位置情報を使って、距離と方位を計算します。
- TextToSpeechを使って、「目的地まで100メートル、方位は北西です」と音声再生します。
投稿第二弾はこちらです。Arduino編です。
M5StickCのボタン押下でスマホから現在地をしゃべらせる(2/2)
以降で、それぞれのAndroidの機能を順番に説明します。
フォアグラウンドサービスの起動
こちらを参考にしています。
https://developer.android.com/about/versions/oreo/background-location-limits?hl=ja
https://akira-watson.com/android/gps-background.html
Serviceを継承したクラスを用意します。
public class LocationService extends Service{
フォアグラウンドサービスとして起動を受けられるように、AndroidManifest.xmlに以下を記載します。
    <uses-permission android:name="android.permission.FOREGROUND_SERVICE" />

・・・

        <service
            android:name=".LocationService"
            android:parentActivityName=".MainActivity" />
最初のActivityから以下のように起動させます。
        Intent intent = new Intent(getApplication(), LocationService.class);
        startForegroundService(intent);
ちなみに、上記はAndroid8.0以降が前提です。
Service側では、以下の2つが呼び出されます。
    @Override
    public void onCreate() {
        super.onCreate();
・・・

    @Override
    public int onStartCommand(Intent intent, int flags, int startId) {
前者でNotificationの準備
        notificationManager = (NotificationManager)context.getSystemService(Context.NOTIFICATION_SERVICE);
        if( notificationManager == null ) {
            Log.d(MainActivity.TAG, "NotificationManager not available");
            return;
        }
特に後者の中で、5秒以内に、常時通知(Notification)を作る必要があるそうです。
例えば、こんな感じです。
        if( notificationManager != null ){
            Intent notifyIntent = new Intent(this, ResultActivity.class);
            notifyIntent.setFlags(Intent.FLAG_ACTIVITY_NEW_TASK | Intent.FLAG_ACTIVITY_CLEAR_TASK);
            PendingIntent pendingIntent = PendingIntent.getActivity(this, 0, notifyIntent, PendingIntent.FLAG_UPDATE_CURRENT );

            NotificationChannel channel = new NotificationChannel(CHANNEL_ID, NOTIFICATION_TITLE , NotificationManager.IMPORTANCE_DEFAULT);
            // 通知音を消さないと毎回通知音が出てしまう
            // この辺りの設定はcleanにしてから変更
            channel.setSound(null,null);
            channel.enableLights(false);
            channel.setLightColor(Color.BLUE);
            channel.enableVibration(false);

            notificationManager.createNotificationChannel(channel);
            Notification notification = new Notification.Builder(context, CHANNEL_ID)
                    .setContentTitle(NOTIFICATION_TITLE)
                    .setSmallIcon(android.R.drawable.btn_star)
                    .setContentText("GPSとBLEでナビゲーション中")
                    .setAutoCancel(true)
                    .setContentIntent(pendingIntent)
                    .setWhen(System.currentTimeMillis())
                    .build();
            startForeground(NOTIFICATION_ID, notification);
        }
notificationを作成して、startForegroundを呼び出しています。
また、作成した通知が表示され、それをタッチすることでアクティビティを起動するようにしています。PendingIntentのところです。
起動には標準のアクティビティと特殊なアクティビティの2種類の方法があるそうです。
https://developer.android.com/training/notify-user/navigation?hl=ja
今回は、通知からの起動専用のアクティビティを用意しようと思うので、特殊なアクティビティを採用しています。
位置情報の取得
位置情報の適宜の取得にLocationManagerを使っています。
そのために、AndroidManifest.xmlに以下を追加します。
    <uses-permission android:name="android.permission.ACCESS_GPS" />
    <uses-permission android:name="android.permission.ACCESS_FINE_LOCATION" />
    <uses-permission android:name="android.permission.ACCESS_COARSE_LOCATION" />
appフォルダの下にあるbuild.gradleに以下を追記します。
implementation 'com.google.android.gms:play-services-location:17.0.0'
まずは、スマホ操作者に対して、GPSを使った位置情報の取得の許可をもらいます。
        LocationManager locationManager = (LocationManager) getSystemService(LOCATION_SERVICE);
        final boolean gpsEnabled = locationManager.isProviderEnabled(LocationManager.GPS_PROVIDER);
        if (!gpsEnabled) {
            Intent settingsIntent = new Intent(Settings.ACTION_LOCATION_SOURCE_SETTINGS);
            startActivity(settingsIntent);
        }

        checkLocationPermissions();

・・・

    private  void checkLocationPermissions(){
        if (ContextCompat.checkSelfPermission(this, Manifest.permission.ACCESS_FINE_LOCATION) != PackageManager.PERMISSION_GRANTED){
            ActivityCompat.requestPermissions(this, new String[]{Manifest.permission.ACCESS_FINE_LOCATION}, REQUEST_PERMISSION_LOCATION);
        }else {
            isLocationReady = true;
        }
    }

    @Override
    public void onRequestPermissionsResult(int requestCode, @NonNull String[] permissions, @NonNull int[] grantResults) {
        if (requestCode == REQUEST_PERMISSION_LOCATION) {
            if (grantResults.length > 0 && grantResults[0] == PackageManager.PERMISSION_GRANTED) {
                isLocationReady = true;
            }else{
                Toast.makeText(this, "位置情報の許可がないので計測できません", Toast.LENGTH_LONG).show();
            }
        }
    }
あとは、LocationService.javaの中で、準備として、
        locationManager = (LocationManager) getSystemService(LOCATION_SERVICE);
        if( locationManager == null ) {
            Log.d(MainActivity.TAG, "LocationManager not available");
            return;
        }
ののち、以下を呼び出します。
     private void startGPS() {
        if (locationManager != null) {
            if (ActivityCompat.checkSelfPermission(this, Manifest.permission.ACCESS_FINE_LOCATION) != PackageManager.PERMISSION_GRANTED &&
                    ActivityCompat.checkSelfPermission(this, Manifest.permission.ACCESS_COARSE_LOCATION) != PackageManager.PERMISSION_GRANTED)
                return;

            locationManager.requestLocationUpdates(LocationManager.GPS_PROVIDER, MinTime, MinDistance, locationListener = new LocationListener() {
                @Override
                public void onLocationChanged(Location location) {
                    Log.d(MainActivity.TAG, "onLocationChanged");
                    CheckPoints.location = location;
                }

                @Override
                public void onStatusChanged(String s, int i, Bundle bundle) {
                }

                @Override
                public void onProviderEnabled(String s) {
                }

                @Override
                public void onProviderDisabled(String s) {
                }
            });
        }
    }
MinTimeと、MinDistanceは、現在地情報の更新の通知の頻度を調整するためのものです。主に、電池の消費を抑えるためのものです。
前者は例えば、5秒間は連続した通知はしない。後者は例えば、25メートル以上の前回からの位置差分がなければ通知しない。といったように、抑制します。
あとは、上記条件が満たすと、onLocationChangedが呼ばれ、現在地locationが取得できるようになります。
TextToSpeechを準備
まずは準備
        tts = new TextToSpeech(this, new TextToSpeech.OnInitListener() {
            @Override
            public void onInit(int status) {
                if( status == TextToSpeech.SUCCESS ) {
                    isTtsReady = true;

                }else{
                    Log.d(MainActivity.TAG, "TextToSpeech init error");
                }
            }
        });
あとは、音声再生したい時に、以下を呼び出すだけです。
    void doSpeech(String message){
        if(tts != null && isTtsReady)
            tts.speak(message, TextToSpeech.QUEUE_ADD, null, TextToSpeech.Engine.KEY_PARAM_UTTERANCE_ID );
    }
BLEセントラル機能
まずは準備
AndroidManifest.xmlに以下を追記します。
    <uses-feature
        android:name="android.hardware.bluetooth_le"
        android:required="true" />

    <uses-permission android:name="android.permission.BLUETOOTH" />
    <uses-permission android:name="android.permission.BLUETOOTH_ADMIN" />
LocationService.javaの onCreateで以下の準備をしておきます。
        btManager= (BluetoothManager)context.getSystemService(Activity.BLUETOOTH_SERVICE);
        if( btManager == null ) {
            Log.d(MainActivity.TAG, "BluetoothManager not available");
            return;
        }

        btAdapter = btManager.getAdapter();
        if (btAdapter == null) {
            Log.d(MainActivity.TAG, "BluetoothAdapter not available");
            return;
        }
そして、2つのコールバックを用意します。
private final ScanCallback mScanCallback
private final BluetoothGattCallback mGattcallback
前者が、BLEスキャンで発見したデバイスを取得するためのもの。
後者で、BLE接続・切断イベント、BLEサービス検索結果のイベント、キャクタリスティックのRead/Write/通知/MTU変更 などなど、BLE通信で必要な処理を実装するコールバック関数を定義できます
    private final ScanCallback mScanCallback = new ScanCallback(){
        @Override
        public void onScanResult(int callbackType, ScanResult result) {
            Log.d(MainActivity.TAG, "onScanResult");

            BluetoothDevice device = result.getDevice();
            if( device == null )
                return;
            String name = device.getName();
            if( name != null && name.equals(WIRELESS_BLE_DEVICE_NAME) ){
                if( mScanner != null ) {
                    mScanner.stopScan(this);
                    Log.d(MainActivity.TAG, WIRELESS_BLE_DEVICE_NAME + "を発見しました");
                    mConnGatt = device.connectGatt(context, false, mGattcallback);
                }
            }
        }
    };
BLEペリフェラルを発見したら、デバイス名を調べて、所望のものかを判別しています。所望のものだったら、connectGattを呼び出して接続を試みます。
そして、さきほどのコールバックともに以下を呼び出すことで、BLEペリフェラルのスキャンが開始されます。
    private void startBleScan(){
        if( btAdapter != null && mScanner == null ) {
            mScanner = btAdapter.getBluetoothLeScanner();
            mScanner.startScan(mScanCallback);
        }
    }
もう一つのコールバック。
    private final BluetoothGattCallback mGattcallback = new BluetoothGattCallback() {
        @Override
        public void onConnectionStateChange(BluetoothGatt gatt, int status, int newState) {
            if (newState == BluetoothProfile.STATE_CONNECTED) {
                Log.d(MainActivity.TAG, WIRELESS_BLE_DEVICE_NAME + "と接続しました");
                if (mConnGatt != null)
                    mConnGatt.discoverServices();
            }else if( newState == BluetoothProfile.STATE_DISCONNECTED ){
                Log.d(MainActivity.TAG, WIRELESS_BLE_DEVICE_NAME + "と切断しました");
                mConnGatt = null;
                if(mScanner != null)
                    mScanner.startScan(mScanCallback);
            }
        }

        @Override
        public void onServicesDiscovered(BluetoothGatt gatt, int status) {
            Log.d(MainActivity.TAG, "onServicesDiscovered");

            BluetoothGattDescriptor descriptor;
            boolean result;

            mGattService = mConnGatt.getService( serviceUuid );

            charNote = mGattService.getCharacteristic(noteUuid);
            result = mConnGatt.setCharacteristicNotification(charNote, true);
            if( !result ) {
                Log.d(MainActivity.TAG, "setCharacteristicNotification error");
                return;
            }
            descriptor = charNote.getDescriptor(UUID_CLIENT_CHARACTERISTIC_CONFIG);
            descriptor.setValue(BluetoothGattDescriptor.ENABLE_NOTIFICATION_VALUE);
            result = mConnGatt.writeDescriptor(descriptor);
            if( !result ) {
                Log.d(MainActivity.TAG, "writeDescriptor error");
                return;
            }

            charSend = mGattService.getCharacteristic(sendUuid);
        }

        @Override
        public void onCharacteristicChanged(BluetoothGatt gatt, BluetoothGattCharacteristic characteristic) {
            Log.d(MainActivity.TAG, "onCharacteristicChange");
            if( characteristic.getUuid().compareTo(noteUuid) == 0)
                processIndication(characteristic.getValue());
        }
BLEペリフェラルとの接続が完了すると、onConnectionStateChangeが呼ばれます。その中で、BLEペリフェラルのサービスの検索のために、discoverServicesを呼び出しています。
さらに、プライマリサービスを検出すると、onServicesDiscovered が呼び出されます。その中では、Notificationを受けるために、Notificationを有効化したり、(必須ではありませんが、) 今後BLEセントラル側からBLEペリフェラル側にキャラクタリスティックWriteするために、UUIDを指定してキャラクタリスティックを取得しておきます。
BLEペリフェラルからのNotificationは、onCharacteristicChanged で受け取ります。
後始末
フォアグラウンドサービスが終了するときには、確保したBLE、TextToSpeech、LocationManagerをクローズしましょう。
終了時には、onDestroyが呼び出されますので、その中で後始末をします。
    @Override
    public void onDestroy() {
        Log.d(MainActivity.TAG, "onDestroy");

        if( mConnGatt != null ){
            mScanner = null;
            try {
                mConnGatt.disconnect();
                mConnGatt.close();
            }catch (Exception ex){}
            mConnGatt = null;
        }
        if(tts != null) {
            try {
                tts.stop();
                tts.shutdown();
            }catch (Exception ex){}
            tts = null;
        }
        if (locationListener != null) {
            locationManager.removeUpdates(locationListener);
            locationListener = null;
        }
    }
おわりに
結構長い投稿となってしまいました。
いったんここで区切り、後は後半の投稿にします。
次回は、M5StickC側の実装です。Arduinoを使っています。また、ソースコード一式もGitHubに上げる予定です。
以上
