Spring Security は 5.4 以降、設定の書き方に大幅な変更が入っています。
詳しくは @suke_masa さんの Spring Security 5.7でセキュリティ設定の書き方が大幅に変わる件 - Qiita を参照してください。
認証・認可の話
Remember-Me の話
CSRF の話
セッション管理の話
レスポンスヘッダーの話
メソッドセキュリティの話
CORS の話
Run-As の話
ACL の話
テストの話
MVC, Boot との連携の話
番外編
Spring Security にできること・できないこと
環境
Java
1.8.0_xxx
AP サーバー
Tomcat 8.0.35
Gradle
3.2.1
OS
Windows 10
Spring Security とは
Spring のプロジェクトの1つ。
主に Web アプリケーションにセキュリティの機能を追加するフレームワーク。
CSRF やセッション固定化攻撃など、良く知られた様々な攻撃に対する保護機能を提供してくれる。
Hello World
こちらは発表向けにもうちょっと順序立てて書いてます。
スライドと合わせて読むと、より分かりやすいかもしれない(スライドの方にしか書いてないこととかもあった気がする)。
実装
|-build.gradle
`-src/main/webapp/
  |-index.jsp
  `-WEB-INF/
    |-applicationContext.xml
    `-web.xml
apply plugin: 'war'

sourceCompatibility = '1.8'
targetCompatibility = '1.8'
compileJava.options.encoding = 'UTF-8'

repositories {
    mavenCentral()
}

dependencies {
    providedCompile 'javax.servlet:javax.servlet-api:3.1.0'
    compile 'javax.servlet:jstl:1.2'
    compile 'org.springframework.security:spring-security-web:4.2.1.RELEASE'
    compile 'org.springframework.security:spring-security-config:4.2.1.RELEASE'
}

war.baseName = 'spring-security-sample'
<?xml version="1.0" encoding="UTF-8"?>
<web-app xmlns="http://xmlns.jcp.org/xml/ns/javaee"
         xmlns:xsi="http://www.w3.org/2001/XMLSchema-instance"
         xsi:schemaLocation="http://xmlns.jcp.org/xml/ns/javaee
         http://xmlns.jcp.org/xml/ns/javaee/web-app_3_1.xsd"
         version="3.1">
    <filter>
        <filter-name>springSecurityFilterChain</filter-name>
        <filter-class>org.springframework.web.filter.DelegatingFilterProxy</filter-class>
    </filter>

    <filter-mapping>
        <filter-name>springSecurityFilterChain</filter-name>
        <url-pattern>/*</url-pattern>
    </filter-mapping>

    <listener>
        <listener-class>org.springframework.web.context.ContextLoaderListener</listener-class>
    </listener>
</web-app>
<?xml version="1.0" encoding="UTF-8"?>
<beans xmlns="http://www.springframework.org/schema/beans"
       xmlns:sec="http://www.springframework.org/schema/security"
       xmlns:xsi="http://www.w3.org/2001/XMLSchema-instance"
       xsi:schemaLocation="
         http://www.springframework.org/schema/beans
         http://www.springframework.org/schema/beans/spring-beans-3.0.xsd
         http://www.springframework.org/schema/security
         http://www.springframework.org/schema/security/spring-security.xsd">

    <sec:http>
        <sec:intercept-url pattern="/login" access="permitAll" />
        <sec:intercept-url pattern="/**" access="isAuthenticated()" />
        <sec:form-login />
        <sec:logout />
    </sec:http>

    <sec:authentication-manager>
        <sec:authentication-provider>
            <sec:user-service>
                <sec:user name="hoge" password="HOGE" authorities="ROLE_USER" />
            </sec:user-service>
        </sec:authentication-provider>
    </sec:authentication-manager>
</beans>
<%@taglib prefix="c" uri="http://java.sun.com/jsp/jstl/core" %>
<%@page contentType="text/html" pageEncoding="UTF-8"%>
<!doctype html>
<html>
    <head>
        <meta charset="utf-8" />
        <title>Hello Spring Security!!</title>
    </head>
    <body>
        <h1>Hello Spring Security!!</h1>

        <c:url var="logoutUrl" value="/logout" />
        <form action="${logoutUrl}" method="post">
            <input type="submit" value="logout" />
            <input type="hidden" name="${_csrf.parameterName}" value="${_csrf.token}" />
        </form>
    </body>
</html>
動作確認
gradle war で war ファイル(spring-security-sample.war)を生成し、 Tomcat にデプロイする。
デプロイが完了したら、ブラウザで http://localhost:8080/spring-security-sample を開く。
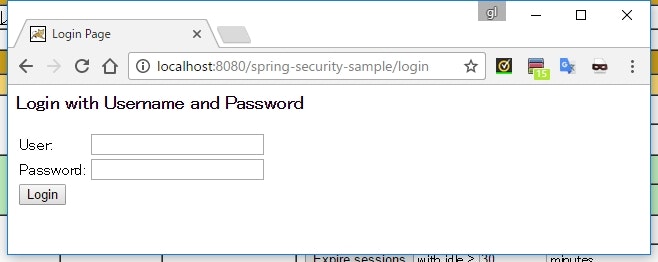
謎のログイン画面が表示される。
User, Password にそれぞれ hoge, HOGE と入力して Login ボタンをクリックする。
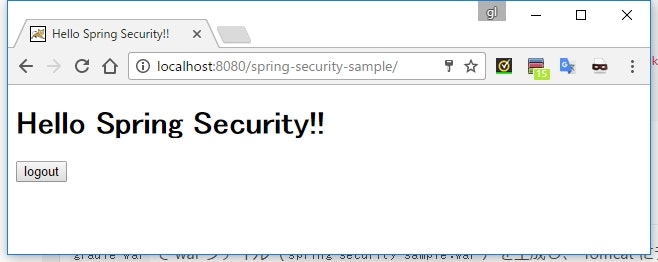
index.jsp の内容が表示される。
最後に logout ボタンをクリックする。
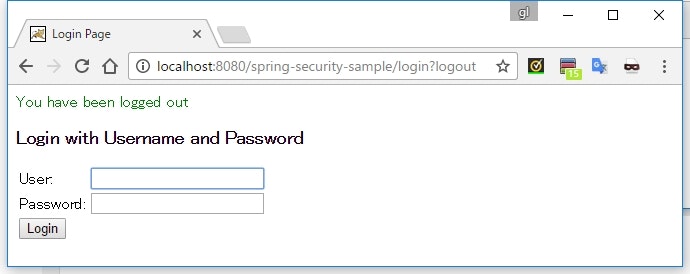
ログアウトが完了して、ログイン画面に戻る。
説明
依存関係
    compile 'org.springframework.security:spring-security-web:4.2.1.RELEASE'
    compile 'org.springframework.security:spring-security-config:4.2.1.RELEASE'
最小構成では spring-security-web と spring-security-config を依存に追加すればいいらしい。
spring-security-web
Filter とか Web アプリに関係するコードが含まれている。Web の認証機能や URL ベースのアクセス制御が必要な場合は、このモジュールが必要になる。
メインパッケージは org.springframework.security.web
spring-security-config
xml で定義を記述する際に使用する namespace を解析するコードや Java コンフィグのためのコードが含まれている。XML ベースの設定や Java コンフィグを利用する場合は、このモジュールが必要になる。
メインパッケージは org.springframework.security.config
ここに含まれるクラスを、アプリケーションが直接利用することはない。
Spring コンテナの初期化
    <listener>
        <listener-class>org.springframework.web.context.ContextLoaderListener</listener-class>
    </listener>
ContextLoaderListener をリスナーとして登録することで、 Spring のコンテナ(ApplicationContext)が初期化される。
ApplicationContext クラスに何を使用するか明示しない場合、デフォルトで XmlWebApplicationContext が使用される。
spring-web-x.x.x.RELEASE.jar の org/springframework/web/context/ContextLoader.properties に以下のように定義されていて、サーブレットコンテナが初期化されるときに ContextLoaderListener が読み込んでる。
# Default WebApplicationContext implementation class for ContextLoader.
# Used as fallback when no explicit context implementation has been specified as context-param.
# Not meant to be customized by application developers.

org.springframework.web.context.WebApplicationContext=org.springframework.web.context.support.XmlWebApplicationContext
XmlWebApplicationContext は、デフォルトで WEB-INF/applicationContext.xml を設定ファイルとして読み込む。
Spring Security の設定
<?xml version="1.0" encoding="UTF-8"?>
<beans xmlns="http://www.springframework.org/schema/beans"
       xmlns:sec="http://www.springframework.org/schema/security"
       ...>

    <sec:http>
        <sec:intercept-url pattern="/login" access="permitAll" />
        <sec:intercept-url pattern="/**" access="isAuthenticated()" />
        <sec:form-login />
        <sec:logout />
    </sec:http>

    <sec:authentication-manager>
        <sec:authentication-provider>
            <sec:user-service>
                <sec:user name="hoge" password="HOGE" authorities="ROLE_USER" />
            </sec:user-service>
        </sec:authentication-provider>
    </sec:authentication-manager>
</beans>
applicationContext.xml 自体は Spring の Bean 定義をするための標準的な設定ファイルで、 Spring Security 用の特別な設定ファイルというわけではない。
xmlns で http://www.springframework.org/schema/security を読み込むことで、 Spring Security 用のタグが使用できるようになる(リファレンスでは、この Spring Security 専用のタグを使うことを namespace と呼んでいる)。
このタグを使用することで、 Spring Security の設定をこのファイル上で行うことができる。
上の設定は、ざっくりと次のようなことを定義している。
-
/loginへのアクセスは誰でもOK(permitAll) - それ以外のすべてのパスへのアクセス(
/**)は、認証されている必要がある(isAuthenticated()) - ログイン方法は Form ログイン
- ログアウトができるようにする
- ユーザー情報として名前 =
hoge、パスワード =HOGEで、ROLE_USERというロールを持つユーザーを定義
以下、個々のタグについて少し細かく説明する。
<http>
<http> タグを定義すると、自動的にコンテナにいくつかの Bean が登録される。
その中でも重要な Bean として、次の2つのクラスがある。
FilterChainProxySecurityFilterChain
FilterChainProxy は、 "springSecurityFilterChain" という Bean 名でコンテナに登録される。
このクラスは Spring Security の処理の入り口となる。
SecurityFilterChain は、それ自体はただのインターフェースで、実装クラスとしては DefaultSecurityFilterChain がコンテナに登録される。
SecurityFilterChain は、名前の通りセキュリティ機能を持つ javax.servlet.Filter をチェイン(連鎖)させるもので、複数の Filter を内部に保持する。
Spring Security は、 Filter を利用することでセキュリティの機能を実現している。
FilterChainProxy は Proxy と名前に付いていることからも分かる通り、このクラス自体は処理を行わない。
具体的な処理は SecurityFilterChain が持つ Filter 達に委譲する。
<intercept-url>
URL のパターンごとに、アクセスに必要となる条件(アクセス制御)を定義している。
pattern 属性は、ant パスの形式で記述することができる。
access 属性には、 pattern 属性で指定した URL にアクセスするために必要となる条件を指定する。
permitAll は、全てのアクセスを許可する(認証不要)ことを意味している。
そして、 isAuthenticated() は、認証済み(ログイン済み)であればアクセスを許可することを意味している。
access 属性は、 Spring Expression Language (SpEL) と呼ばれる Spring 独自の式言語を用いて記述する。
<form-login>
Form 認証が必要なことを定義している。
認証エラーの場合は、デフォルトで /login にリダイレクトさせられる。
デフォルトの場合、/login にアクセスすると Spring Security が用意している簡易なログインページが表示される。
このデフォルトのログインページは、spring-security-web-x.x.x.RELEASE.jar の中の DefaultLoginPageGeneratingFilter によって生成されている。
<logout>
このタグを追加することで、ログアウトができるようになる。
デフォルトでは、 /logout に対して POST リクエストを実行するとログアウトが行われるようになっている。
<authentication-manager>
AuthenticationManager を Bean として定義する。
AuthenticationManager は認証処理を実行するクラスで、必ず定義しなければならない。
AuthenticationManager 自体はインターフェースで、実装クラスには ProviderManager が使用される。
ProviderManager 自体は具体的な認証処理は行わず、後述する AuthenticationProvider に認証処理を委譲する。
<authentication-provider>
AutheticationProvider を Bean として定義する。
このインターフェースは認証の種類に応じた具体的な認証処理を提供する。
例えば、 LDAP の認証処理を提供するクラスは LdapAuthenticationProvider という感じ。
このタグを宣言した場合は、 DaoAuthenticationProvider がコンテナに登録される。
このクラスは、 UserDetailsService からユーザーの情報を取得して認証処理を行う。
<user-service>
UserDetailsService を Bean として登録する。
このインターフェースはユーザーの詳細な情報(UserDetails)を取得してくる機能を提供する。
このタグを宣言すると、 InMemoryUserDetailsManager がコンテナに登録される。
このクラスは、名前の通りメモリ上にユーザー情報を保持しておくようになっている。いわば動作確認用の仮実装になる。
<user>
UserDetails のインスタンスを定義する。
このインターフェースには、ユーザーの詳細な情報にアクセスするための Getter メソッドなどが定義されている。
このタグを宣言すると、 User というクラスのインスタンスが生成される。
name, password, authorities 属性でユーザーを識別するための名前、パスワード、権限を指定することができる。
Spring Security をアプリケーションに適用する
    <filter>
        <filter-name>springSecurityFilterChain</filter-name>
        <filter-class>org.springframework.web.filter.DelegatingFilterProxy</filter-class>
    </filter>

    <filter-mapping>
        <filter-name>springSecurityFilterChain</filter-name>
        <url-pattern>/*</url-pattern>
    </filter-mapping>
DelegatingFilterProxy をサーブレットフィルタとして web.xml に定義する。
このとき、 <filter-name> を "springSecurityFilterChain" という名前で定義する。
これで、 <filter-mapping> で定義した URL にアクセスがあると、 Spring Security が適用されるようになる。
DelegatingFilterProxy は、自身の <filter-name> に設定された名前を使って Spring コンテナから javax.servlet.Filter を実装した Bean を取得する。
そして、その Bean に処理を委譲するだけのサーブレットフィルタになっている。
ここでは <filter-name> に "springSecurityFilterChain" を指定している。
この名前は、 applicationContext.xml で <http> タグを使用したときにコンテナに自動的に登録される FilterChainProxy の Bean 名と一致している。
つまり、 DelegatingFilterProxy は、サーブレットフィルタと Spring Security(FilterChainProxy)の橋渡しをするのが役割になっている。
CSRF 対策
<%@taglib prefix="c" uri="http://java.sun.com/jsp/jstl/core" %>
<%@page contentType="text/html" pageEncoding="UTF-8"%>
<!doctype html>
<html>
    <head>
        <meta charset="utf-8" />
        <title>Hello Spring Security!!</title>
    </head>
    <body>
        <h1>Hello Spring Security!!</h1>

        <c:url var="logoutUrl" value="/logout" />
        <form action="${logoutUrl}" method="post">
            <input type="submit" value="logout" />
            <input type="hidden" name="${_csrf.parameterName}" value="${_csrf.token}" />
        </form>
    </body>
</html>
デフォルトだと、 CSRF 対策が有効になる。
そのため、リクエストを送信するときは CSRF 対策用のトークンを一緒に渡す必要がある。
トークンの値やパラメータ名は、リクエストスコープに _csrf という名前で保存されている。
CSRF 対策についてのより詳細な説明は後日。。。
まとめ
サーバーを起動してからログインするまでの間に、裏でどのように処理が流れているかまとめる。
シーケンス図を利用しているが、分かりやすさ優先のため UML の厳密な記法には従っていないので悪しからず。
サーバー起動時の流れ
一部厳密ではないが、だいたい以下のような雰囲気で初期化→認証処理が行われていると思う。
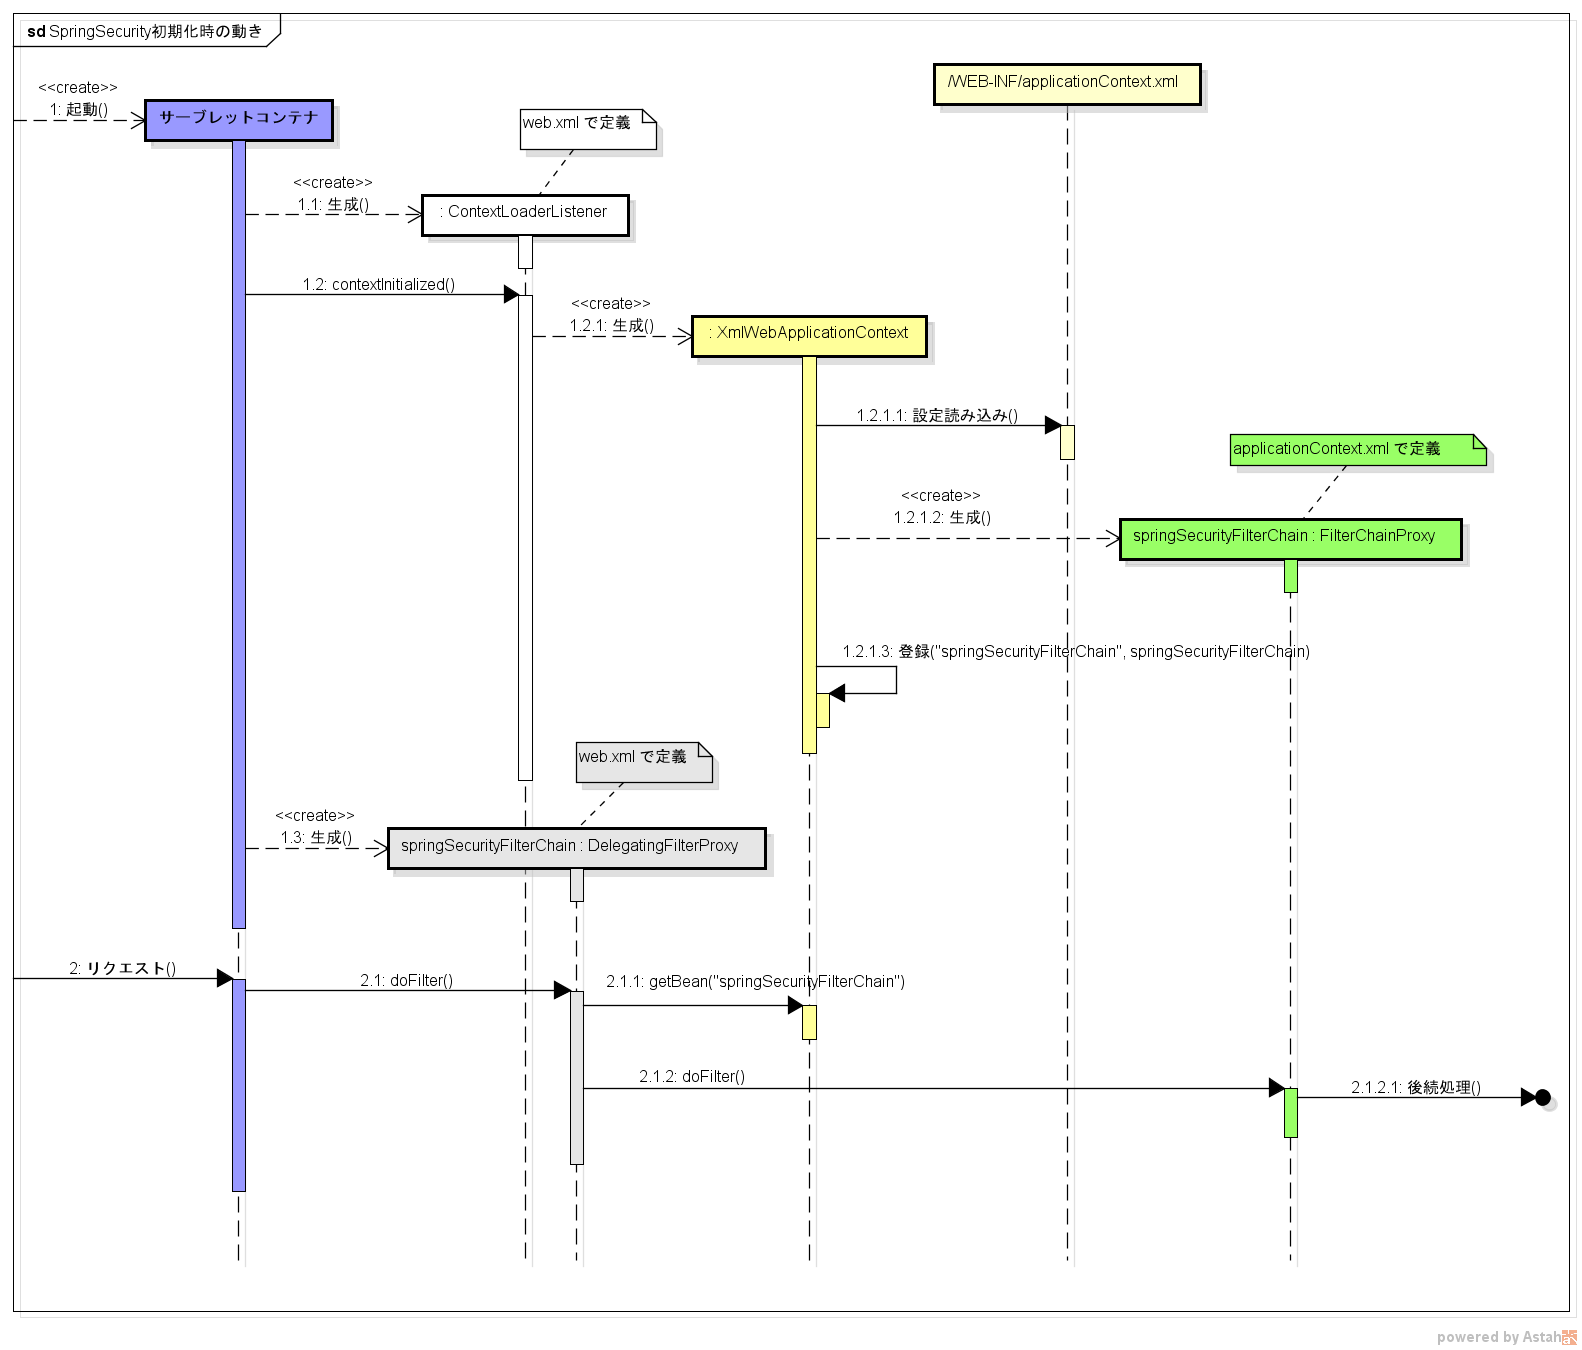
- サーブレットコンテナが起動し、
web.xmlにListenerとして登録されているContextLoaderListenerが実行される。 -
XmlWebApplicationContextのインスタンスが生成され、/WEB-INF/applicationContext.xmlが読み込まれる。 -
<http>タグによってFilterChainProxyのインスタンスが"springSecurityFilterChain"という名前で Spring コンテナに登録される。 -
web.xmlにFilterとして登録されているDelegateFilterProxyが、サーブレットコンテナによって生成される。 - リクエストがあると、
DelegateFilterProxyが呼ばれ、自身の名前("springSecurityFilterChain")で Spring コンテナから Bean を取得する(FilterChainProxyが取得される)。 -
FilterChainProxyに処理が委譲される。
未認証時にアクセスしてログイン画面に飛ばされるときの流れ
同じく厳密ではないが、ログインしていない状態でアクセスしたときに、ログイン画面にリダイレクトされるときの流れは次のような感じだと思う。
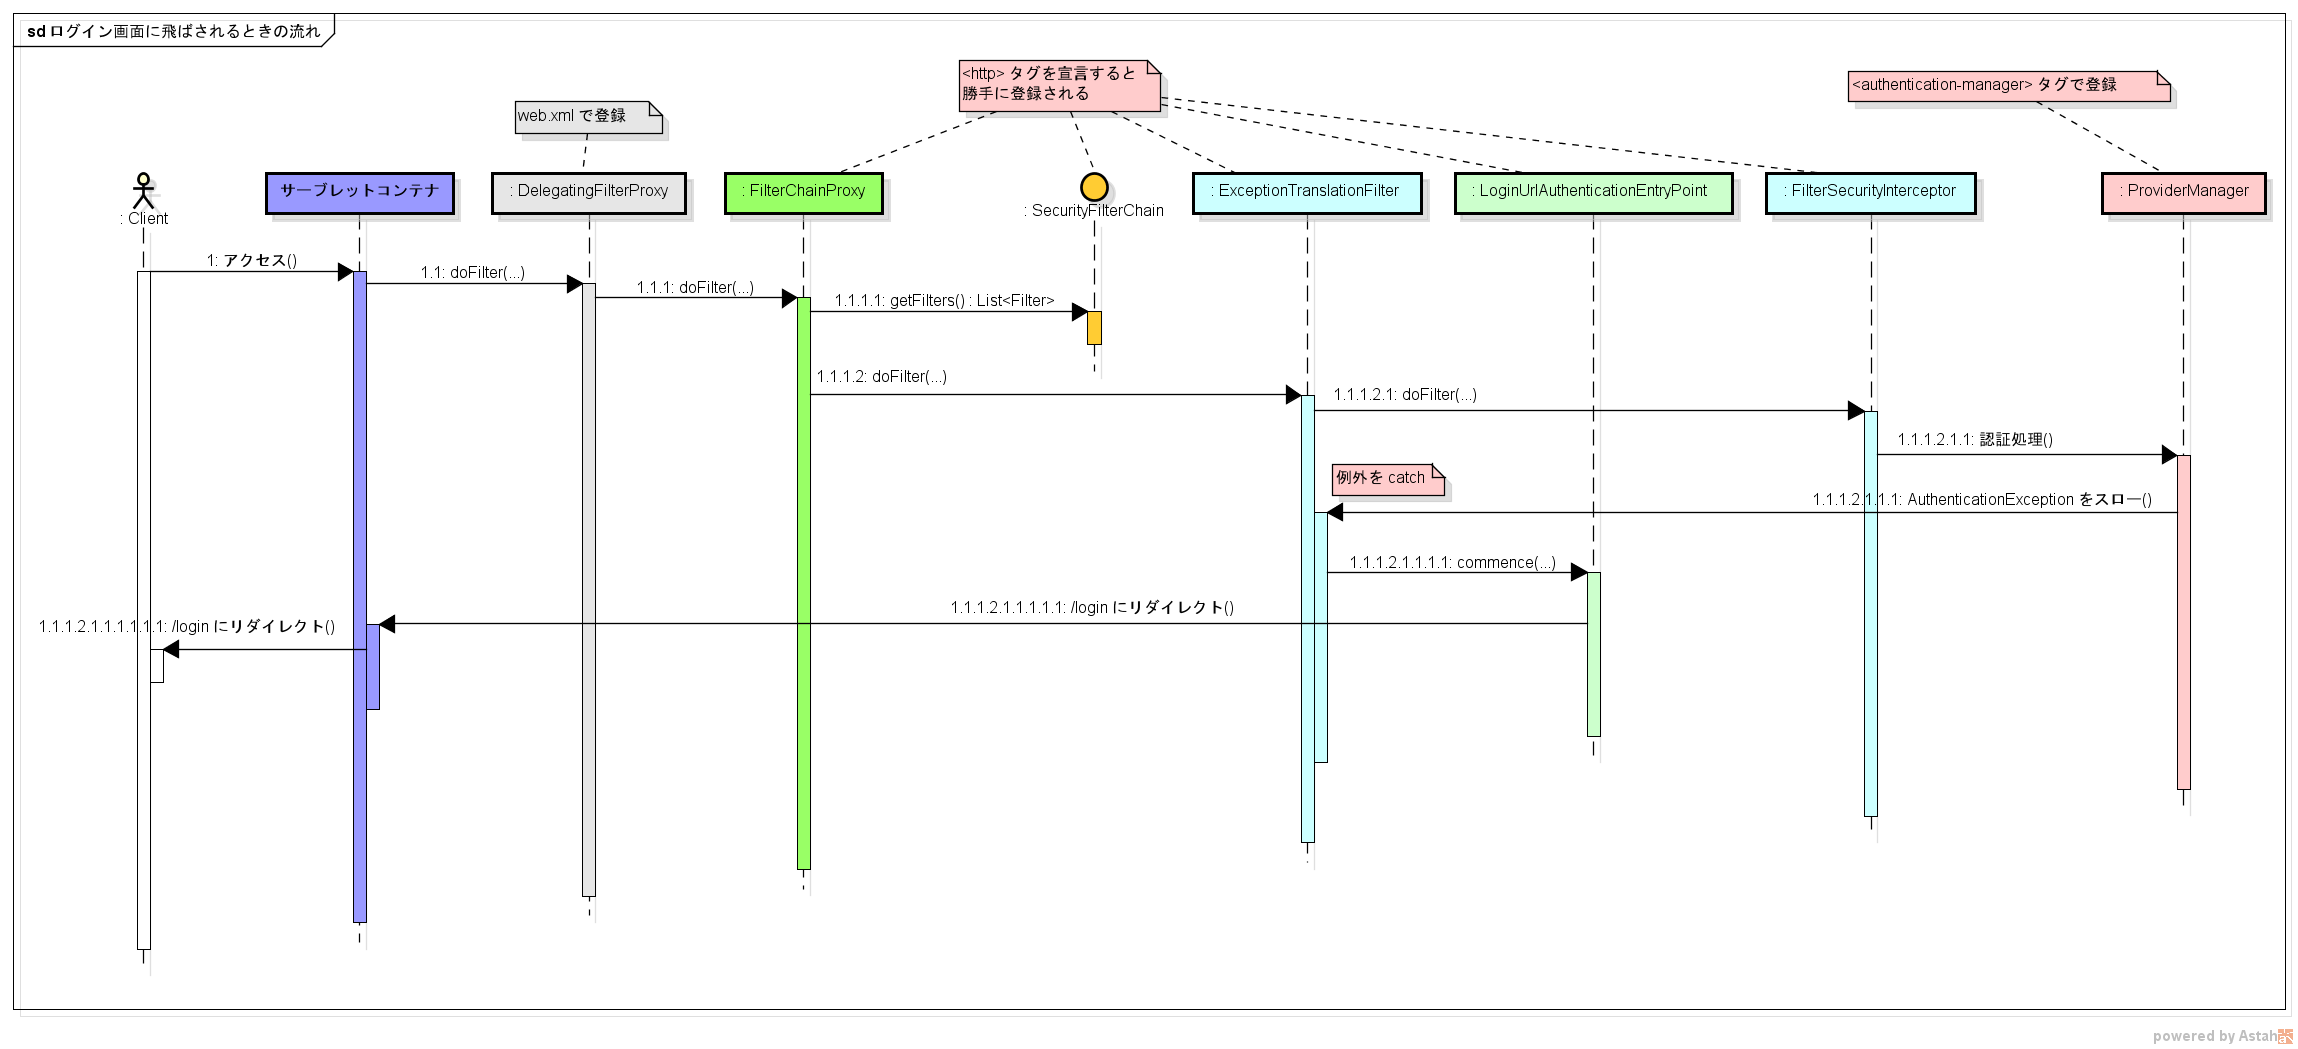
-
FilterSecurityInterceptorがAuthenticationManagerの認証処理を呼ぶ。 -
AuthenticationManagerが認証処理を行うが、未認証なのでAuthenticationExceptionをスローする。 - スローされた例外を、
ExceptionTranslationFilterがキャッチする。 -
LoginUrlAuthenticationEntryPointによって、ログイン画面にリダイレクトさせられる。
ログイン画面にアクセスしてから、実際にログインを行うときの流れ
LoginUrlAuthenticationEntryPoint によって /login にリダイレクトさせられた直後から、ユーザー名とパスワードを入力してログインを行うところまでの流れ。
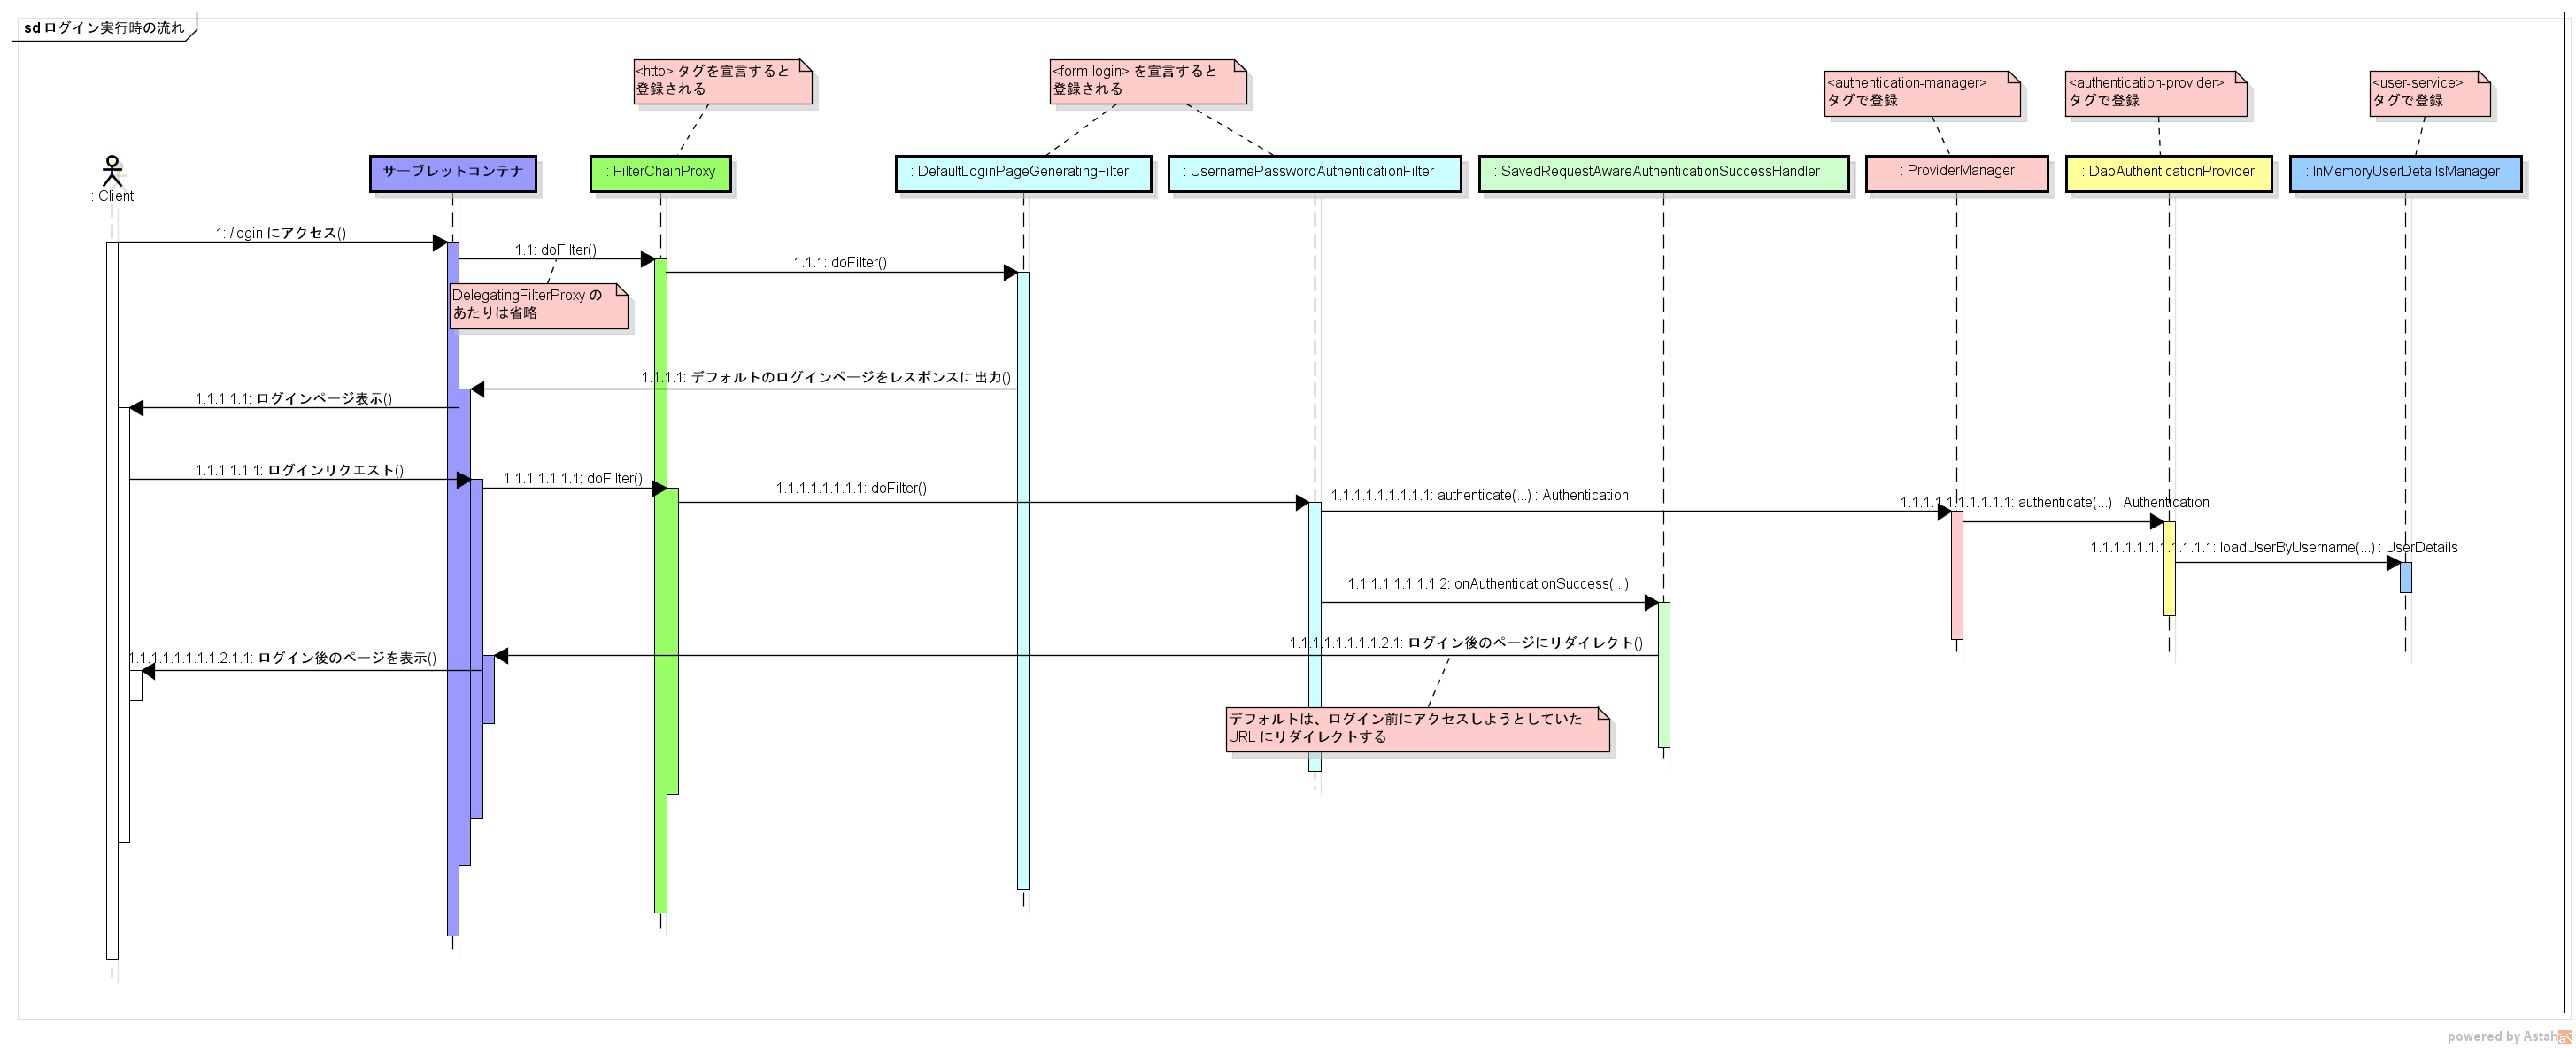
-
DefaultLoginPageGeneratingFilterが、デフォルトのログイン画面を生成する。 - ユーザーがログインを実行する。
-
/loginに POST リクエストがあるとUsernamePasswordAuthenticationFilterがAuthenticationManagerに認証処理を委譲する。 -
AuthenticationManagerの実装クラスであるProviderManagerは、AuthenticationProviderに認証処理を委譲する。 -
AuthenticationProviderの実装クラスであるDaoAuthenticationProviderは、UserDetailsServiceからユーザー情報(UserDetails)を取得して、認証処理を実行する。 - 認証に成功すると、
UsernamePasswordAuthenticationFilterはAuthenticationSuccessFilterに認証成功時の処理を委譲する。 -
AuthenticationSuccessFilterの実装クラスであるSavedRequestAwareAuthenticationSuccessHandlerは、ログイン画面に飛ばされる前にアクセスしようとしていた URL を復元し、リダイレクトを行う。- ログイン前にアクセスしていた URL は、
HttpSessionに保存されている。
- ログイン前にアクセスしていた URL は、
namespace を使わないとどうなるか
<?xml version="1.0" encoding="UTF-8"?>
<beans xmlns="http://www.springframework.org/schema/beans"
       xmlns:sec="http://www.springframework.org/schema/security"
       ...>

    <sec:http>
        <sec:intercept-url pattern="/login" access="permitAll" />
        <sec:intercept-url pattern="/**" access="isAuthenticated()" />
        <sec:form-login />
        <sec:logout />
    </sec:http>

    <sec:authentication-manager>
        <sec:authentication-provider>
            <sec:user-service>
                <sec:user name="hoge" password="HOGE" authorities="ROLE_USER" />
            </sec:user-service>
        </sec:authentication-provider>
    </sec:authentication-manager>
</beans>
namespace (専用タグ)を使うと、 Spring Security を動かすのに必要となる様々な Bean が自動的にコンテナに登録される。
このおかげで、 Spring Security の設定は非常にシンプルに記述できるようになっている。
しかし、認証機能を拡張する必要が出てくると、裏でどのような Bean が登録され、それらがどのような関係を持っているかを理解することは重要になってくる。
それを理解するため、 Hello World で作成した設定ファイルを、 namespace を使わずに書き直してみる。
ただし、 namespace での設定と完全に一致させるところまでは頑張らず、 Hello World で見た一連のログイン処理を再現させるところまでにする。
なので、一部の Bean 定義などは省略している。
<?xml version="1.0" encoding="UTF-8"?>
<beans xmlns="http://www.springframework.org/schema/beans"
       xmlns:util="http://www.springframework.org/schema/util"
       xmlns:xsi="http://www.w3.org/2001/XMLSchema-instance"
       xsi:schemaLocation="
         http://www.springframework.org/schema/beans
         http://www.springframework.org/schema/beans/spring-beans-3.0.xsd
         http://www.springframework.org/schema/util
         http://www.springframework.org/schema/util/spring-util-4.3.xsd">

    <bean id="springSecurityFilterChain"
          class="org.springframework.security.web.FilterChainProxy">
        <constructor-arg ref="securityFilterChain" />
    </bean>

    <bean id="securityFilterChain"
          class="org.springframework.security.web.DefaultSecurityFilterChain">
        <constructor-arg index="0">
            <bean class="org.springframework.security.web.util.matcher.AnyRequestMatcher" />
        </constructor-arg>

        <constructor-arg index="1">
            <list>
                <ref bean="securityContextPersistenceFilter" />
                <ref bean="csrfFilter" />
                <ref bean="logoutFilter" />
                <ref bean="usernamePasswordAuthenticationFilter" />
                <ref bean="defaultLoginPageGeneratingFilter" />
                <ref bean="exceptionTranslationFilter" />
                <ref bean="filterSecurityInterceptor" />
            </list>
        </constructor-arg>
    </bean>

    <!-- SecurityContextHolder の初期化・クリア -->
    <bean id="securityContextPersistenceFilter"
          class="org.springframework.security.web.context.SecurityContextPersistenceFilter" />

    <!-- CSRF -->
    <bean id="csrfFilter"
          class="org.springframework.security.web.csrf.CsrfFilter">
        <constructor-arg ref="csrfTokenRepository" />
    </bean>

    <bean id="csrfTokenRepository"
          class="org.springframework.security.web.csrf.LazyCsrfTokenRepository">
        <constructor-arg>
            <bean class="org.springframework.security.web.csrf.HttpSessionCsrfTokenRepository" />
        </constructor-arg>
    </bean>

    <!-- ログアウト -->
    <bean id="logoutFilter"
          class="org.springframework.security.web.authentication.logout.LogoutFilter">
        <constructor-arg index="0" value="/login?logout" />
        <constructor-arg index="1">
            <list>
                <bean class="org.springframework.security.web.authentication.logout.SecurityContextLogoutHandler" />
                <bean class="org.springframework.security.web.csrf.CsrfLogoutHandler">
                    <constructor-arg ref="csrfTokenRepository" />
                </bean>
            </list>
        </constructor-arg>
    </bean>

    <!-- ログイン認証 -->
    <bean id="usernamePasswordAuthenticationFilter"
          class="org.springframework.security.web.authentication.UsernamePasswordAuthenticationFilter">
        <property name="authenticationManager" ref="authenticationManager" />
        <property name="authenticationFailureHandler">
            <bean class="org.springframework.security.web.authentication.SimpleUrlAuthenticationFailureHandler">
                <property name="defaultFailureUrl" value="/login?error" />
            </bean>
        </property>
    </bean>

    <!-- デフォルトのログインページ生成 -->
    <bean id="defaultLoginPageGeneratingFilter"
          class="org.springframework.security.web.authentication.ui.DefaultLoginPageGeneratingFilter">
        <constructor-arg ref="usernamePasswordAuthenticationFilter" />
        <property name="authenticationUrl" value="/login" />
    </bean>

    <!-- 認証系の例外ハンドラ -->
    <bean id="exceptionTranslationFilter"
          class="org.springframework.security.web.access.ExceptionTranslationFilter">
        <constructor-arg>
            <bean class="org.springframework.security.web.authentication.LoginUrlAuthenticationEntryPoint">
                <constructor-arg value="/login" />
            </bean>
        </constructor-arg>
    </bean>

    <!-- 認証・認可処理 -->
    <bean id="filterSecurityInterceptor"
          class="org.springframework.security.web.access.intercept.FilterSecurityInterceptor">
        <property name="authenticationManager" ref="authenticationManager"/>
        <property name="accessDecisionManager" ref="accessDecisionManager"/>
        <property name="securityMetadataSource" ref="securityMetadataSource" />
    </bean>

    <!-- 認証処理本体 -->
    <bean id="authenticationManager"
          class="org.springframework.security.authentication.ProviderManager">
        <constructor-arg>
            <list>
                <bean class="org.springframework.security.authentication.dao.DaoAuthenticationProvider">
                    <property name="userDetailsService">
                        <bean class="org.springframework.security.provisioning.InMemoryUserDetailsManager">
                            <constructor-arg>
                                <list>
                                    <bean class="org.springframework.security.core.userdetails.User">
                                        <constructor-arg index="0" value="hoge" />
                                        <constructor-arg index="1" value="HOGE" />
                                        <constructor-arg index="2">
                                            <bean class="org.springframework.security.core.authority.AuthorityUtils"
                                                  factory-method="commaSeparatedStringToAuthorityList">
                                                <constructor-arg value="ROLE_USER" />
                                            </bean>
                                        </constructor-arg>
                                    </bean>
                                </list>
                            </constructor-arg>
                        </bean>
                    </property>
                </bean>
            </list>
        </constructor-arg>
    </bean>

    <!-- 認可処理本体 -->
    <bean id="accessDecisionManager"
          class="org.springframework.security.access.vote.AffirmativeBased">
        <constructor-arg>
            <list>
                <bean class="org.springframework.security.web.access.expression.WebExpressionVoter" />
            </list>
        </constructor-arg>
    </bean>

    <!-- 認証が必要な URL と権限のマッピングなどの定義情報 -->
    <bean id="securityMetadataSource"
          class="org.springframework.security.web.access.expression.ExpressionBasedFilterInvocationSecurityMetadataSource">
        <constructor-arg index="0">
            <util:map id="requestMap" map-class="java.util.LinkedHashMap">
                <entry>
                    <key>
                        <bean class="org.springframework.security.web.util.matcher.AntPathRequestMatcher">
                            <constructor-arg value="/login" />
                        </bean>
                    </key>
                    <bean class="org.springframework.security.access.SecurityConfig"
                          factory-method="createList">
                        <constructor-arg value="permitAll" />
                    </bean>
                </entry>
                <entry>
                    <key>
                        <bean class="org.springframework.security.web.util.matcher.AntPathRequestMatcher">
                            <constructor-arg value="/**" />
                        </bean>
                    </key>
                    <bean class="org.springframework.security.access.SecurityConfig"
                          factory-method="createList">
                        <constructor-arg value="isAuthenticated()" />
                    </bean>
                </entry>
            </util:map>
        </constructor-arg>
        <constructor-arg index="1">
            <bean class="org.springframework.security.web.access.expression.DefaultWebSecurityExpressionHandler" />
        </constructor-arg>
    </bean>
</beans>
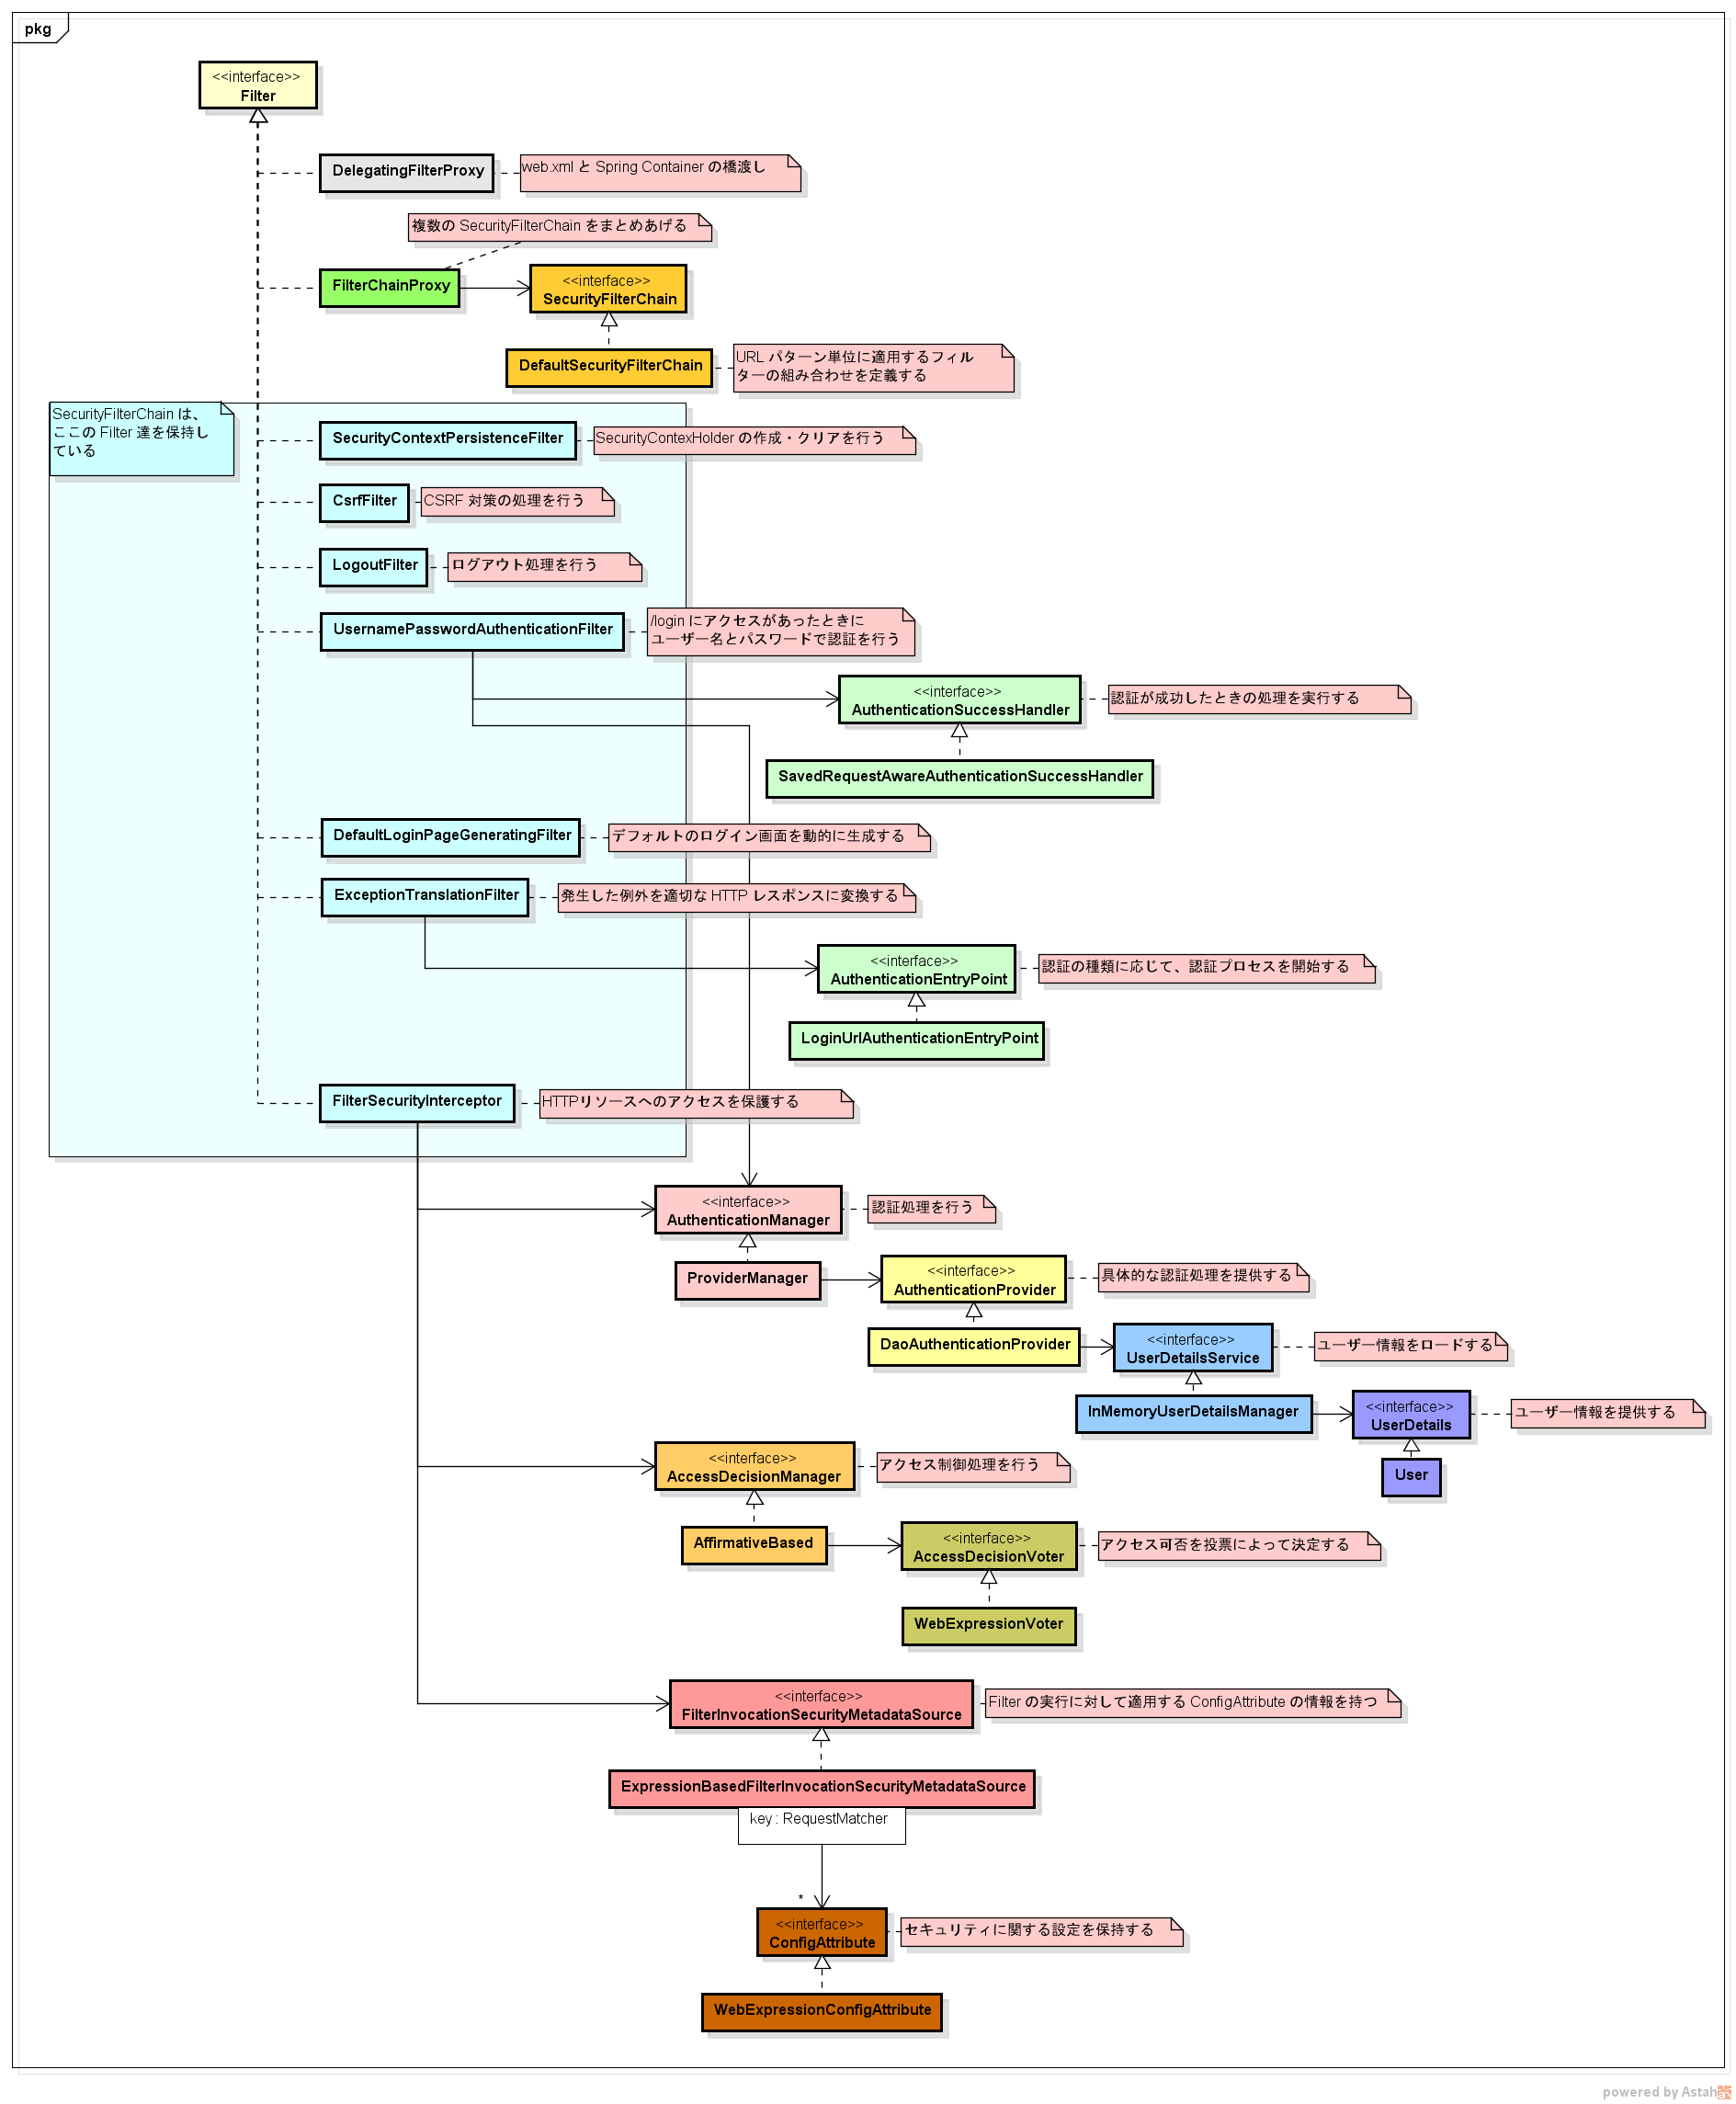
クラス図にすると、次のような感じ。
もうちょっとざっくりと表現すると、
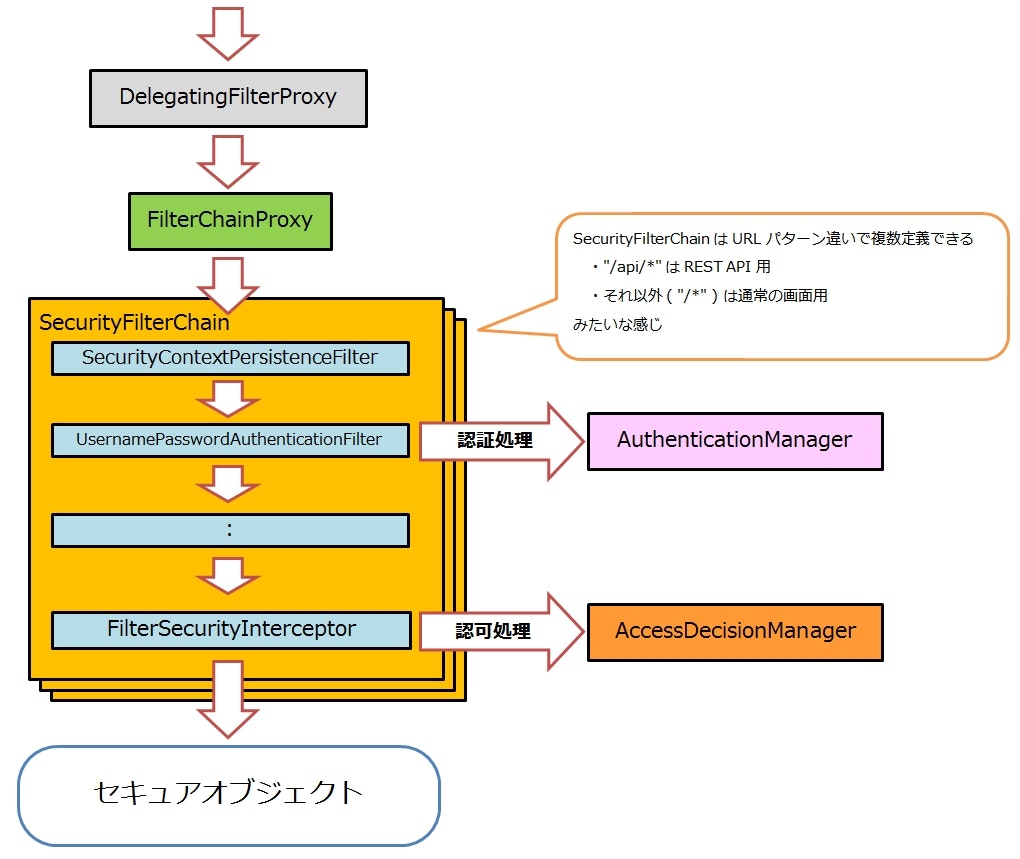
こんな感じ。
FilterChainProxy が入り口となり、 SecurityFilterChain によってまとめられた各種 Filter 達が順番に実行され、 FilterSecurityInterceptor が保護対象(secure object)の直前で認証・認可の処理を行っている。
※メソッドセキュリティの話は今は外している。
セキュアオブジェクト
Spring Security のリファレンスを読んでいると、ちょくちょく secure object (セキュアオブジェクト)という言葉が出てくる。
これは Spring Security が定義した用語で、セキュリティが確保された(確保すべき)対象を表している。
※「オブジェクト」はオブジェクト指向のインスタンスを指しているのではなく、純粋に「対象」という意味で使われているものと思われる。
代表的なものとして、「Web のリクエスト」や「メソッドの実行」などがある。
FilterSecurityInterceptor は Filter なのか Interceptor なのか
FilterSecurityInterceptor について、最初その名前を見たとき「これは Filter なのか Interceptor なのか、どっちなんだ?」と混乱した。
このクラスは Filter インターフェースを実装しているので、一見すると Filter っぽい。
答えというか、自分の中でこのクラスの正体についてしっくり来たのが、このクラスの型階層を見たとき。
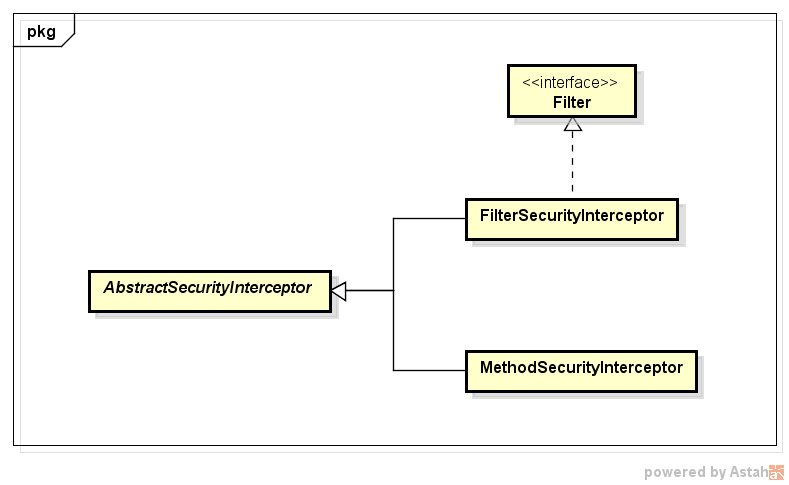
AbstractSecurityInterceptor を同じ親に持つ、 MethodSecurityInterceptor が兄弟クラスとして存在している。
つまり、 Filter のセキュリティのための Interceptor が FilterSecurityInterceptor で、
メソッド実行のセキュリティのための Interceptor が MethodSecurityInterceptor ということで、これらはあくまで Interceptor ということになる。
FilterSecurityInterceptor は、言うなれば「Filter の Filter による Filter のための Interceptor」ということなのだろう。たぶん。
Java Configuration
Spring Security 3.2 からは、 Spring 3.1 で追加された Java Configuration が利用できるようになっている。
Java Configuration を利用すると、 XML ファイルなしで namespace と同様の設定を記述できる。
Java Configuration を使うことで、ある程度の設定ミスはコンパイラがチェックしてくれる・リファクタリングが容易になる、といったメリットがある。
Hello World を Java Configuration で置き換える
実装
|-build.gradle
`-src/main/
  |-java/
  |  `-sample/spring/security/
  |    `-MySpringSecurityConfig.java
  `-webapp/
    |-index.jsp
    `-WEB-INF/
      `-web.xml
<?xml version="1.0" encoding="UTF-8"?>
<web-app xmlns="http://xmlns.jcp.org/xml/ns/javaee"
         xmlns:xsi="http://www.w3.org/2001/XMLSchema-instance"
         xsi:schemaLocation="http://xmlns.jcp.org/xml/ns/javaee
         http://xmlns.jcp.org/xml/ns/javaee/web-app_3_1.xsd"
         version="3.1">

    <filter>
        <filter-name>springSecurityFilterChain</filter-name>
        <filter-class>org.springframework.web.filter.DelegatingFilterProxy</filter-class>
    </filter>

    <filter-mapping>
        <filter-name>springSecurityFilterChain</filter-name>
        <url-pattern>/*</url-pattern>
    </filter-mapping>

    <listener>
        <listener-class>org.springframework.web.context.ContextLoaderListener</listener-class>
    </listener>

    <context-param>
        <param-name>contextClass</param-name>
        <param-value>org.springframework.web.context.support.AnnotationConfigWebApplicationContext</param-value>
    </context-param>

    <context-param>
        <param-name>contextConfigLocation</param-name>
        <param-value>sample.spring.security.MySpringSecurityConfig</param-value>
    </context-param>
</web-app>
package sample.spring.security;

import org.springframework.beans.factory.annotation.Autowired;
import org.springframework.security.config.annotation.authentication.builders.AuthenticationManagerBuilder;
import org.springframework.security.config.annotation.web.builders.HttpSecurity;
import org.springframework.security.config.annotation.web.configuration.EnableWebSecurity;
import org.springframework.security.config.annotation.web.configuration.WebSecurityConfigurerAdapter;

@EnableWebSecurity
public class MySpringSecurityConfig extends WebSecurityConfigurerAdapter {

    @Override
    public void configure(HttpSecurity http) throws Exception {
        http.authorizeRequests()
                .antMatchers("/login").permitAll()
                .anyRequest().authenticated()
                .and()
                .formLogin();
    }

    @Autowired
    public void configure(AuthenticationManagerBuilder auth) throws Exception {
        auth.inMemoryAuthentication()
                .withUser("hoge").password("HOGE").roles("USER");
    }
}
index.jsp は変更なし。
説明
コンテナの実装を変更する
<?xml version="1.0" encoding="UTF-8"?>
<web-app ...>

    <filter>
        <filter-name>springSecurityFilterChain</filter-name>
        <filter-class>org.springframework.web.filter.DelegatingFilterProxy</filter-class>
    </filter>

    <filter-mapping>
        <filter-name>springSecurityFilterChain</filter-name>
        <url-pattern>/*</url-pattern>
    </filter-mapping>

    <listener>
        <listener-class>org.springframework.web.context.ContextLoaderListener</listener-class>
    </listener>

    <context-param>
        <param-name>contextClass</param-name>
        <param-value>org.springframework.web.context.support.AnnotationConfigWebApplicationContext</param-value>
    </context-param>

    <context-param>
        <param-name>contextConfigLocation</param-name>
        <param-value>sample.spring.security.MySpringSecurityConfig</param-value>
    </context-param>
</web-app>
デフォルトで使用されていた XmlWebApplicationContext ではなく、 AnnotationConfigWebApplicationContext を使うように設定を変更する。
contextClass という名前で <context-param> を定義すると、 ContextLoaderListener はそこで指定したクラスをコンテナとして利用するようになる。
さらに AnnotationConfigWebApplicationContext が読み込む設定クラスは、 contextConfigLocation という名前で <context-param> を定義することで指定できる。
Spring Security を有効にする
package sample.spring.security;

...
import org.springframework.security.config.annotation.web.configuration.EnableWebSecurity;
import org.springframework.security.config.annotation.web.configuration.WebSecurityConfigurerAdapter;

@EnableWebSecurity
public class MySpringSecurityConfig extends WebSecurityConfigurerAdapter {

    ...
}
Spring Security の Java Configuration を有効にするには、 AnnotationConfigWebApplicationContext で読み込むクラスを @EnableWebSecurity でアノテートする。
なぜこれで Spring Security が有効になるのかは、このアノテーションの実装を見るとわかる。
...
package org.springframework.security.config.annotation.web.configuration;

...

import org.springframework.context.annotation.Configuration;
import org.springframework.context.annotation.Import;
import org.springframework.security.config.annotation.authentication.configuration.EnableGlobalAuthentication;

...
@Import({ WebSecurityConfiguration.class,
		SpringWebMvcImportSelector.class })
@EnableGlobalAuthentication
@Configuration
public @interface EnableWebSecurity {
...
}
@Import を使って WebSecurityConfiguration が読み込まれている。
このクラスも @Configuration でアノテートされた設定クラスになっている。
...
package org.springframework.security.config.annotation.web.configuration;
...

import javax.servlet.Filter;

...
@Configuration
public class WebSecurityConfiguration implements ImportAware, BeanClassLoaderAware {
	...

	@Bean(name = AbstractSecurityWebApplicationInitializer.DEFAULT_FILTER_NAME)
	public Filter springSecurityFilterChain() throws Exception {
		...
		return webSecurity.build();
	}

	...
}
AbstractSecurityWebApplicationInitializer.DEFAULT_FILTER_NAME の値は "springSecurityFilterChain" になっている。
webSecurity.build() の戻り値は FilterChainProxy になっており、ちょうど xml でやっていたのと同じ形で Bean が登録されるようになっている。
なので、 @EnableWebSecurity でアノテートすることで Spring Security が有効になる。
Spring Security の設定
package sample.spring.security;

...
import org.springframework.security.config.annotation.web.builders.HttpSecurity;
import org.springframework.security.config.annotation.web.configuration.WebSecurityConfigurerAdapter;

@EnableWebSecurity
public class MySpringSecurityConfig extends WebSecurityConfigurerAdapter {

    @Override
    public void configure(HttpSecurity http) throws Exception {
        http.authorizeRequests()
                .antMatchers("/login").permitAll()
                .anyRequest().authenticated()
                .and()
                .formLogin();
    }

    ...
}
Spring Security の具体的な設定をしていくには、まず WebSecurityConfigurerAdapter というクラスを継承する。
WebSecurityConfigurerAdapter は、デフォルトでシンプルな SecurityFilterChain を構築するようになっている。
このクラスを継承して configure(HttpSecurity) などのメソッドをオーバーライドすることで、構築される SecurityFilterChain を任意にカスタマイズすることができる。
引数で受け取る HttpSecurity が、 namespace でいう <http> タグに対応している。
基本的に <http> でできた設定は HttpSecurity でもできるようになっている。
上記の実装は、下記の XML と同じ意味になる。
(※ログアウトは WebSecurityConfigurerAdapter が内部で自動的に登録しているので省略している)
    <sec:http>
        <sec:intercept-url pattern="/login" access="permitAll" />
        <sec:intercept-url pattern="/**" access="isAuthenticated()" />
        <sec:form-login />
        <sec:logout />
    </sec:http>
authorizeRequests() メソッドは namespace でいうところの <intercept-url> の設定を開始するメソッドになる。
メソッドの戻り値の型が ExpressionInterceptUrlRegistry というクラスに代わっており、専用の設定メソッドが呼べるようになっている。
<intercept-url> の設定を終了させて別の設定を続けたい場合は、 and() メソッドを挟む。
and() メソッドは HttpSecurity を返すので、メソッドチェーンを途切れさせることなく次の設定を続けることができる。
formLogin() は、名前の通り Form 認証を有効にしている。
ユーザー情報の定義
package sample.spring.security;

...
import org.springframework.beans.factory.annotation.Autowired;
import org.springframework.security.config.annotation.authentication.builders.AuthenticationManagerBuilder;

@EnableWebSecurity
public class MySpringSecurityConfig extends WebSecurityConfigurerAdapter {

    ...

    @Autowired
    public void configure(AuthenticationManagerBuilder auth) throws Exception {
        auth.inMemoryAuthentication()
                .withUser("hoge").password("HOGE").roles("USER");
    }
}
AuthenticationManagerBuilder は AuthenticationManager 以下のクラスを定義するためのサポートクラスで、上記実装のようにメソッドチェーンを使って UserDetailsService などを定義することができる。
ちなみに、 AuthenticationManagerBuilder を使わずに直接 Bean を定義するメソッドを宣言しても良い。
package sample.spring.security;

import org.springframework.context.annotation.Bean;
import org.springframework.security.core.userdetails.User;
import org.springframework.security.core.userdetails.UserDetailsService;
import org.springframework.security.provisioning.InMemoryUserDetailsManager;
...

@EnableWebSecurity
public class MySpringSecurityConfig extends WebSecurityConfigurerAdapter {

    ...

    @Bean
    public UserDetailsService userDetailsService() {
        InMemoryUserDetailsManager manager = new InMemoryUserDetailsManager();
        manager.createUser(User.withUsername("hoge").password("HOGE").roles("USER").build());
        return manager;
    }
}
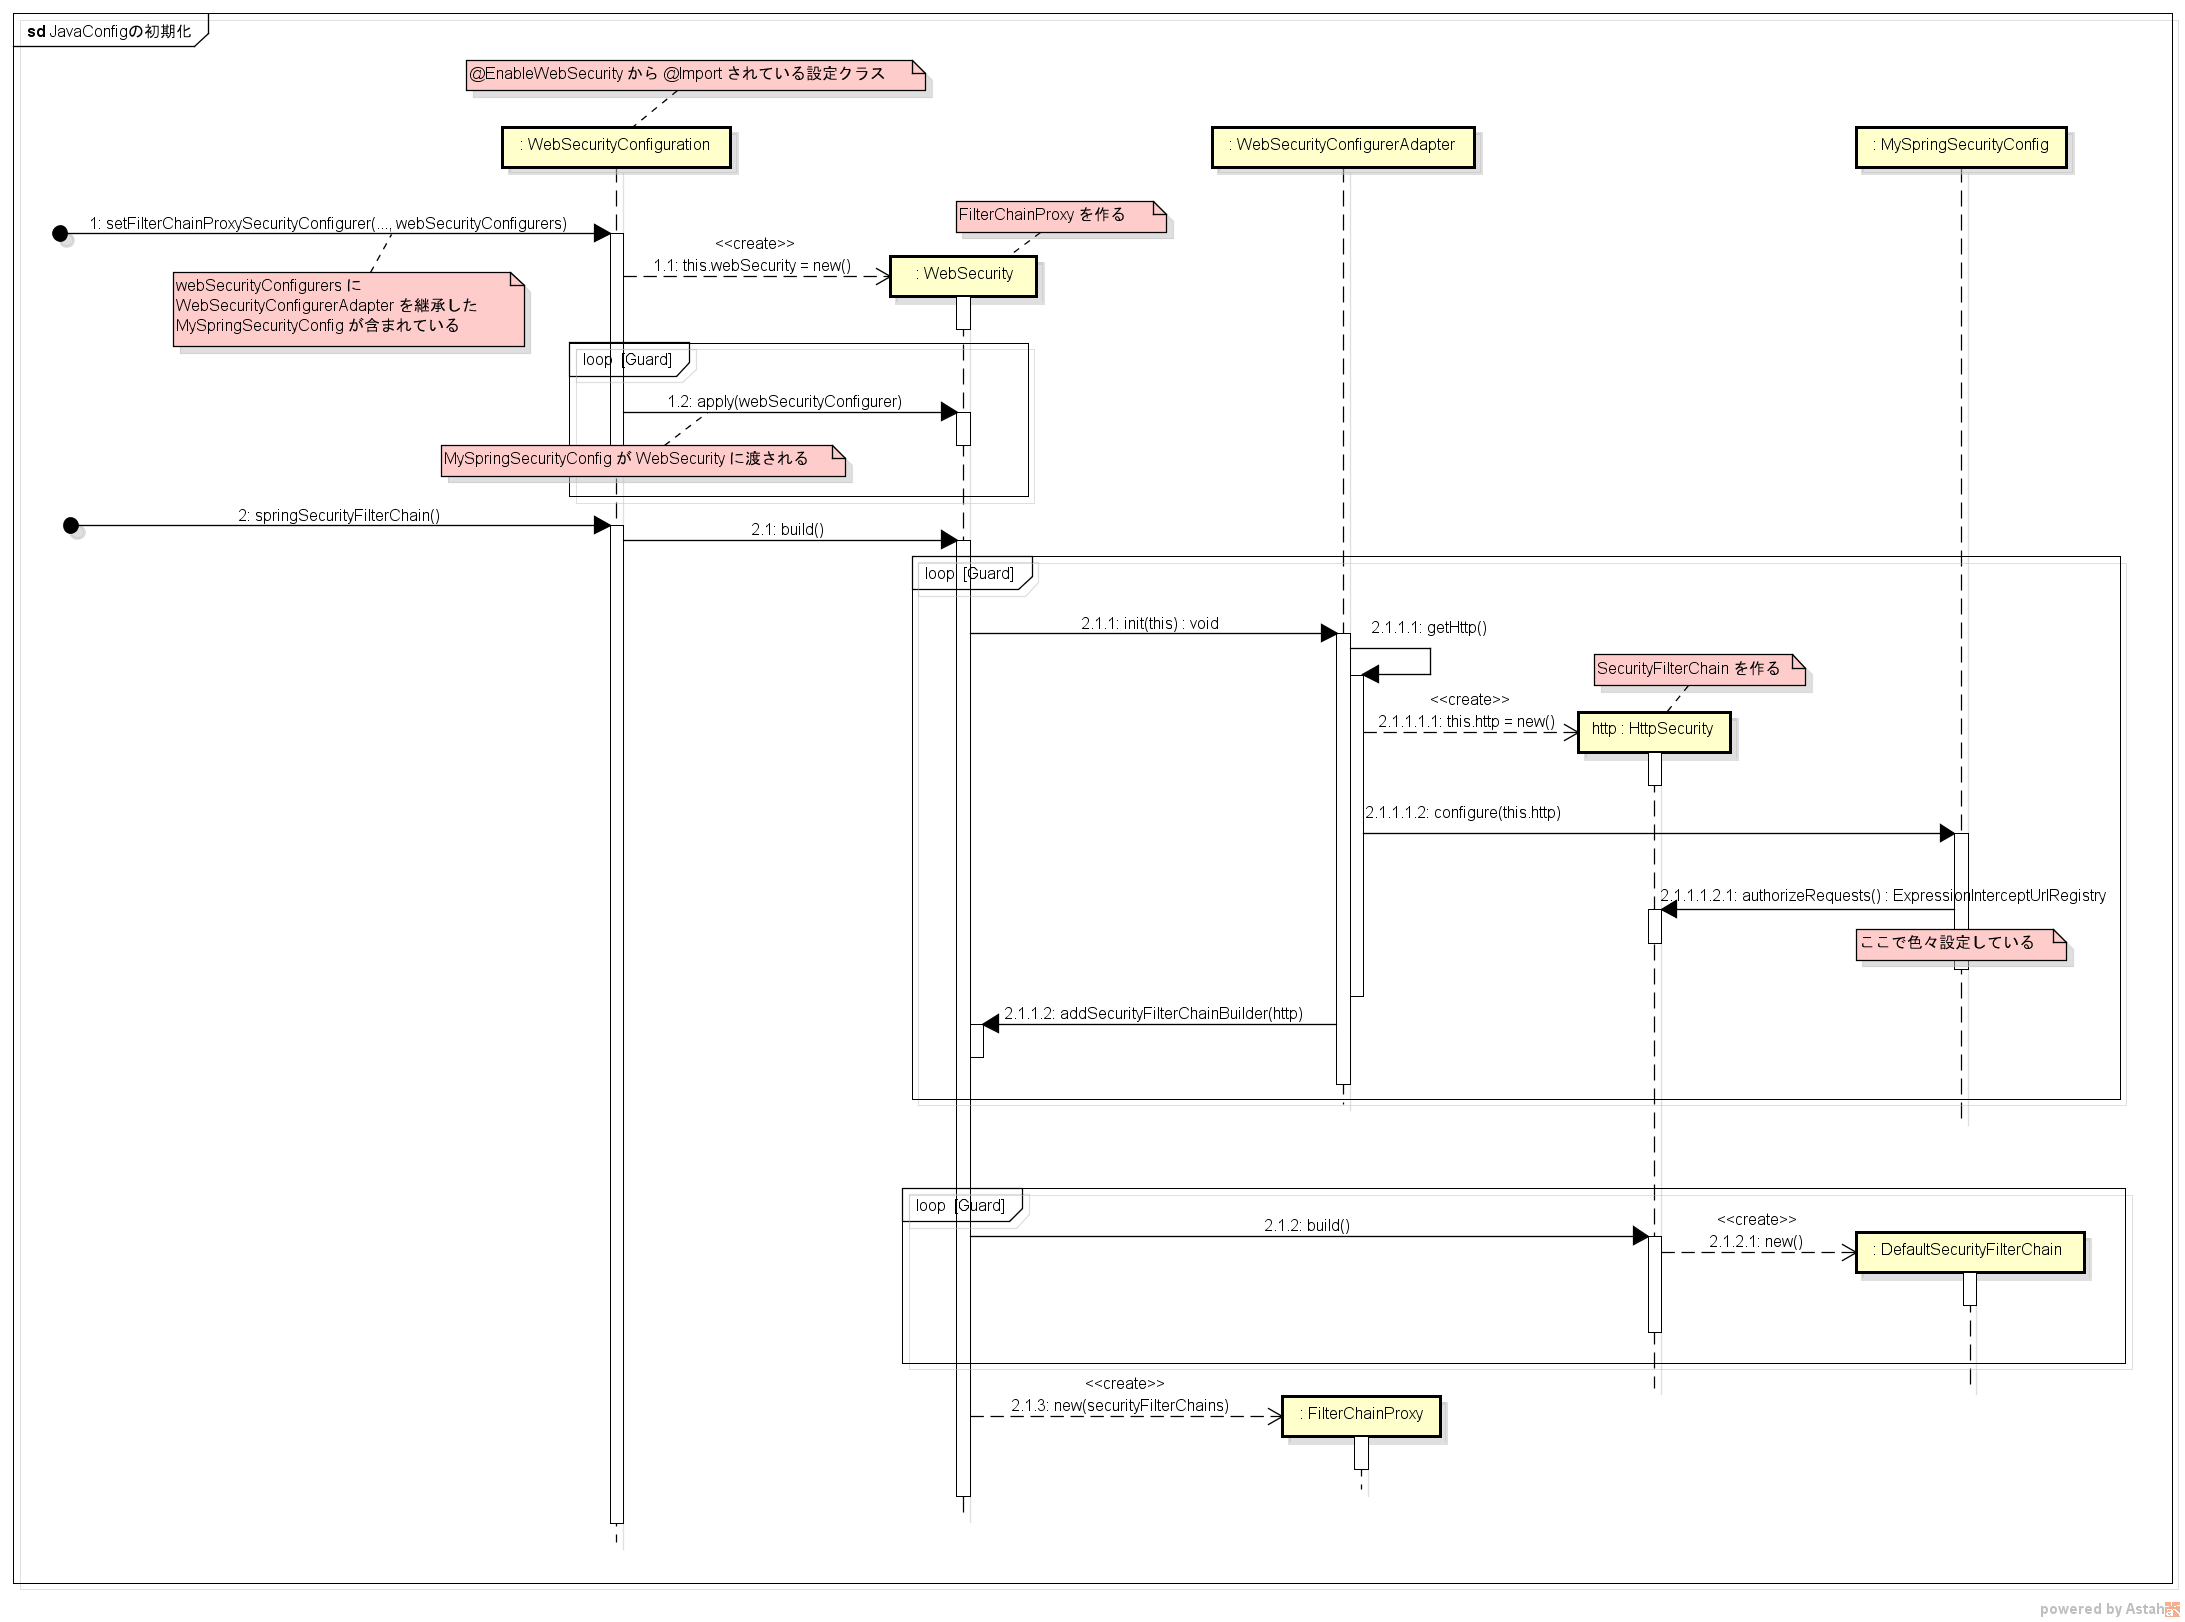
Java Configuration 初期化の流れ
ざっくりと、次のような流れで初期化されているもよう。
※図を見やすくするため、意図的にメソッドの呼び出しや表記を省略しています(doBuild() とか)。
厳密な流れを知りたい場合は、下図を参考に実際の実装を追ってみてください。
web.xml を使わない
AP サーバが Servlet 3.0 以上なら、 web.xml 無しでも Spring Security を使い始められる。
実装
|-build.gradle
`-src/main/
  |-java/
  |  `-sample/spring/security/
  |    |-MySpringSecurityInitializer.java
  |    `-MySpringSecurityConfig.java
  `-web/
    `-index.jsp
package sample.spring.security;

import org.springframework.security.web.context.AbstractSecurityWebApplicationInitializer;

public class MySpringSecurityInitializer extends AbstractSecurityWebApplicationInitializer {
    public MySpringSecurityInitializer() {
        super(MySpringSecurityConfig.class);
    }
}
MySpringSecurityConfig.java と index.jsp はこれまでの奴と一緒なので割愛。
説明
web.xml を削除して、代わりに MySpringSecurityInitializer というクラスを追加している。
このクラスは、 AbstractSecurityWebApplicationInitializer を継承して作成する。
そして、コンストラクタで Java Configuration のクラス(MySpringSecurityConfig)の Class オブジェクトを親クラスに渡すように実装する。
こうすることで、 web.xml でしていた設定が全部不要になる。
仕組み
この機能の実現には、 Servlet 3.0 で追加されたいくつかの仕組みが利用されている。
どのようにして web.xml なしで設定が実現されているのか、その仕組みを見ていく。
ServletContainerInitializer
AbstractSecurityWebApplicationInitializer は WebApplicationInitializer というインターフェースを実装している。
この WebApplicationInitializer の Javadoc には次のように記載されている。
/**
 * ...
 *
 * <p>Implementations of this SPI will be detected automatically by {@link
 * SpringServletContainerInitializer}, which itself is bootstrapped automatically
 * by any Servlet 3.0 container. See {@linkplain SpringServletContainerInitializer its
 * Javadoc} for details on this bootstrapping mechanism.
 * ...
 */
public interface WebApplicationInitializer {
このインターフェースを実装したクラスは、 Servlet 3.0 以上の環境だと SpringServletContainerInitializer というクラスによって自動的に読み込まれるようになっているらしい。
SpringServletContainerInitializer の実装を見に行く。
package org.springframework.web;

...
import javax.servlet.ServletContainerInitializer;
import javax.servlet.annotation.HandlesTypes;

...
@HandlesTypes(WebApplicationInitializer.class)
public class SpringServletContainerInitializer implements ServletContainerInitializer {
   ...
ServletContainerInitializer を実装し、 @HandlesTypes でアノテートされている。
どちらも Servlet 3.0 で追加されている。
Servlet コンテナが起動するときに、このクラスの onStartup(Set<Class<?>>, ServletContext) メソッドが実行される。
メソッドの第一引数には、 @HandlesTypes で指定された Class に関係する1クラスがコンテナによって自動的に検索され、渡される。
SpringServletContainerInitializer の場合は WebApplicationInitializer が指定されているので、このインターフェースを実装したクラスが Servlet コンテナによって検索されて渡ってくる。
SpringServletContainerInitializer の onStartup() メソッドが実行されると、 WebApplicationInitializer を実装したクラスのインスタンスを生成して、 WebApplicationInitializer の onStartup(ServletContext) メソッドを実行する。
AbstractSecurityWebApplicationInitializer
AbstractSecurityWebApplicationInitializer の onStartup(ServletContext) メソッドは次のような実装になっている。
package org.springframework.security.web.context;

import java.util.Arrays;
import java.util.EnumSet;
import java.util.Set;

import javax.servlet.Filter;
import javax.servlet.ServletContext;
...

import org.springframework.context.ApplicationContext;
...
import org.springframework.web.WebApplicationInitializer;
import org.springframework.web.context.AbstractContextLoaderInitializer;
import org.springframework.web.context.ContextLoaderListener;
import org.springframework.web.context.WebApplicationContext;
import org.springframework.web.context.support.AnnotationConfigWebApplicationContext;
import org.springframework.web.filter.DelegatingFilterProxy;

...
public abstract class AbstractSecurityWebApplicationInitializer
		implements WebApplicationInitializer {

	...

	public static final String DEFAULT_FILTER_NAME = "springSecurityFilterChain";

	...

	public final void onStartup(ServletContext servletContext) throws ServletException {
		beforeSpringSecurityFilterChain(servletContext);
		if (this.configurationClasses != null) {
			AnnotationConfigWebApplicationContext rootAppContext = new AnnotationConfigWebApplicationContext(); ★
			rootAppContext.register(this.configurationClasses);
			servletContext.addListener(new ContextLoaderListener(rootAppContext)); ★
		}
		if (enableHttpSessionEventPublisher()) {
			servletContext.addListener(
					"org.springframework.security.web.session.HttpSessionEventPublisher");
		}
		servletContext.setSessionTrackingModes(getSessionTrackingModes());
		insertSpringSecurityFilterChain(servletContext);
		afterSpringSecurityFilterChain(servletContext);
	}

	...

	private void insertSpringSecurityFilterChain(ServletContext servletContext) {
		String filterName = DEFAULT_FILTER_NAME;
		DelegatingFilterProxy springSecurityFilterChain = new DelegatingFilterProxy(
				filterName); ★
		String contextAttribute = getWebApplicationContextAttribute();
		if (contextAttribute != null) {
			springSecurityFilterChain.setContextAttribute(contextAttribute);
		}
		registerFilter(servletContext, true, filterName, springSecurityFilterChain);
	}

        ...
}
何やら見覚えのあるクラスがちらほらと...
要は、 web.xml でやっていた設定がこの実装の中で行われている。
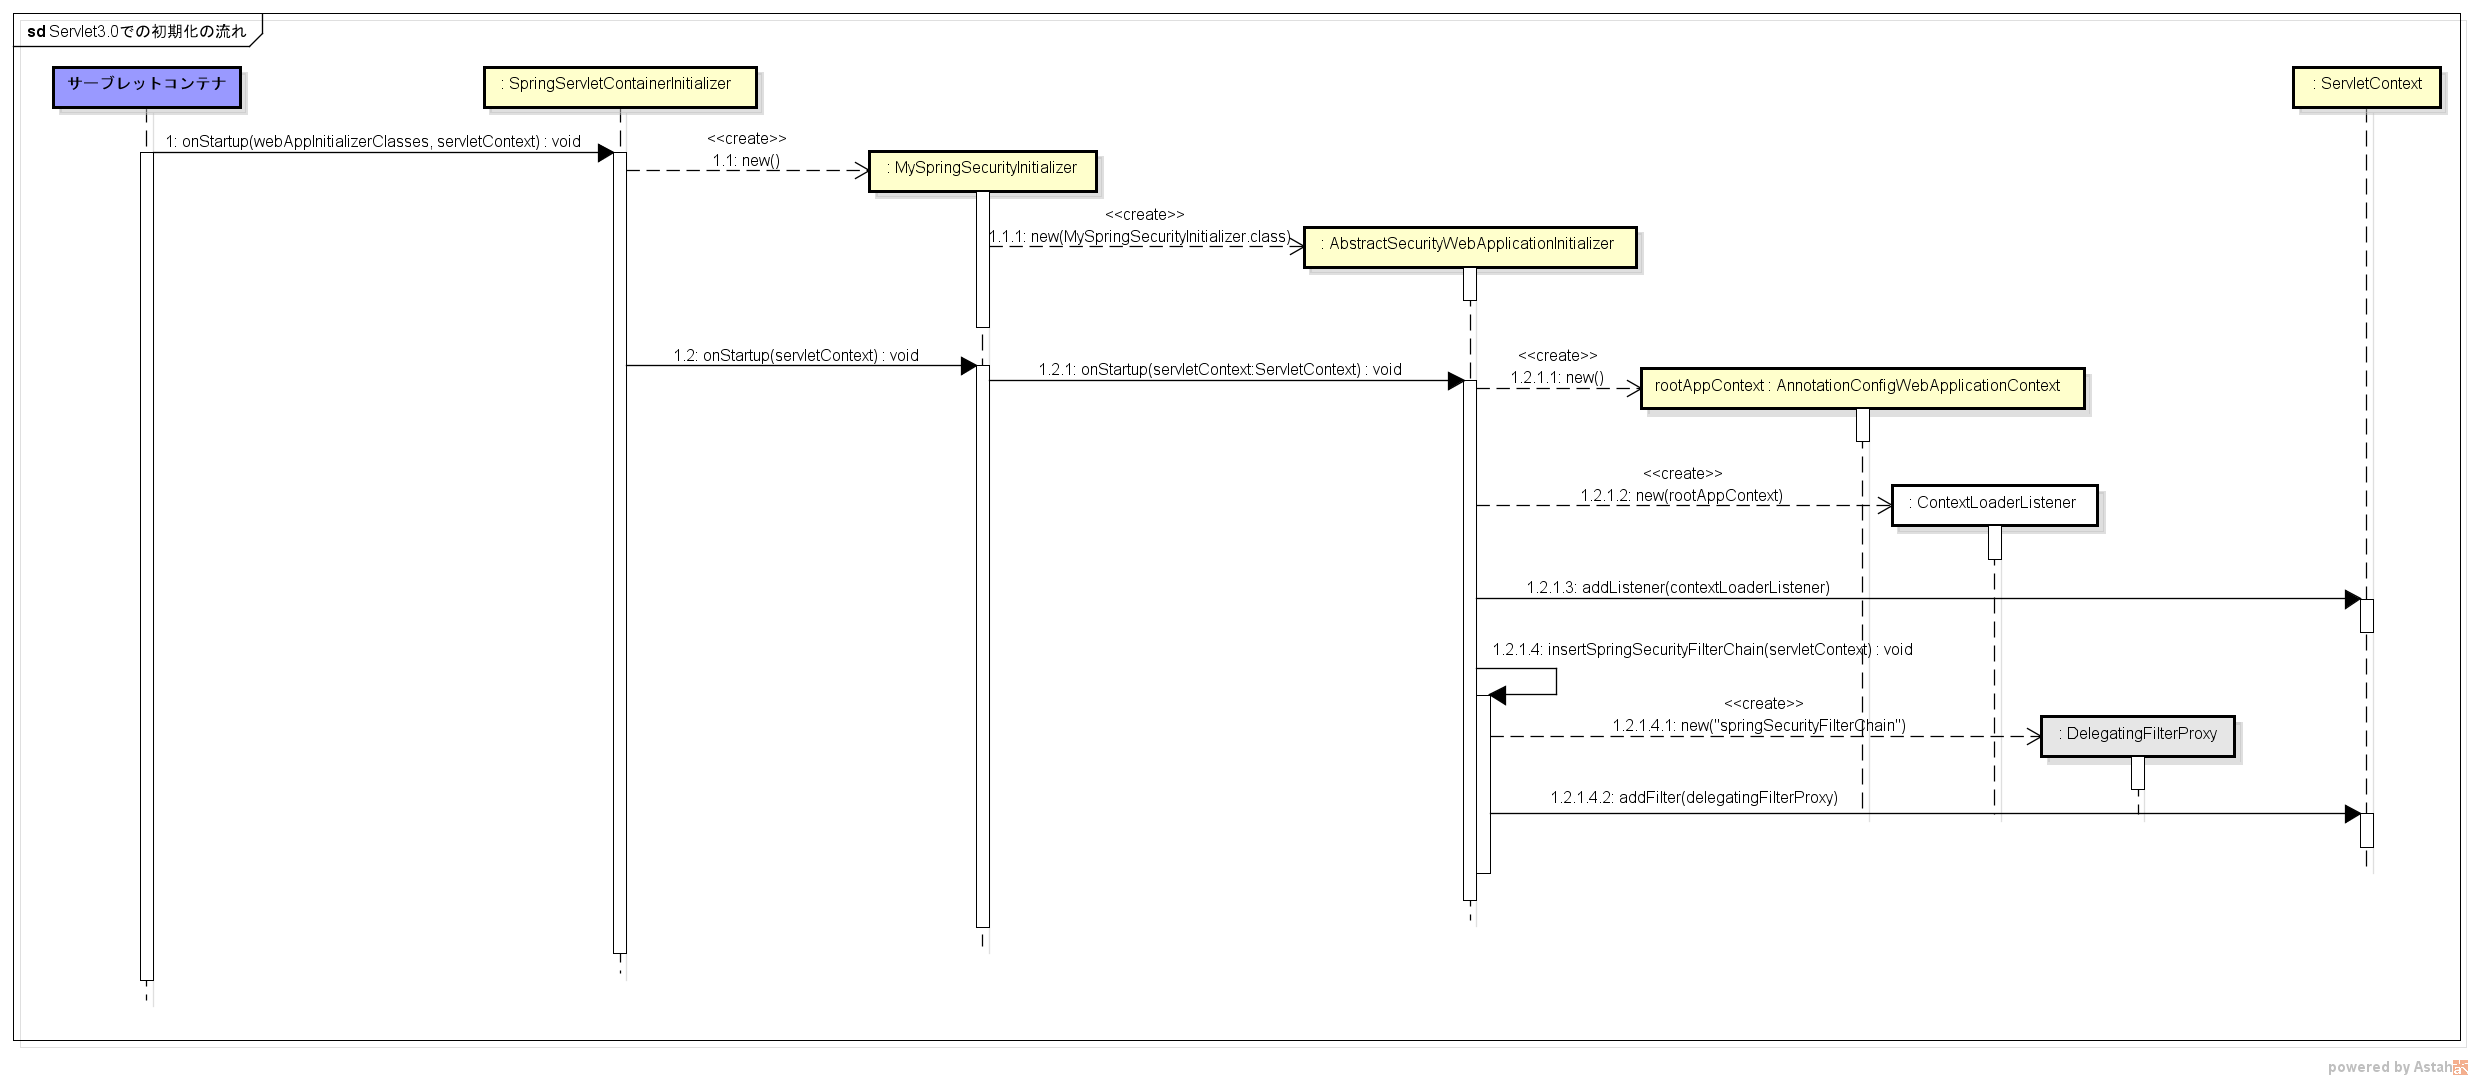
まとめ
だいたい次のような流れて初期化されている。
(例によって、簡略化のため厳密ではない部分はあります)
参考
- Spring Security Reference
- TERASOLUNA Server Framework for Java (5.x) Development Guideline — TERASOLUNA Server Framework for Java (5.x) Development Guideline 5.3.0.RELEASE documentation
- Tomcat 7の新機能で何ができるようになるのか?(1):Tomcat 7も対応したServlet 3.0の6つの主な変更点 (3/3) - @IT
- HandlesTypes annotation examples
- annotations - Benefits of JavaConfig over XML configurations in Spring? - Stack Overflow
-
インターフェースなら実装クラス、抽象・具象クラスならそのクラスおよびサブクラス、アノテーションならアノテートされたクラスが対象になる ↩