Spring Security は 5.4 以降、設定の書き方に大幅な変更が入っています。
詳しくは @suke_masa さんの Spring Security 5.7でセキュリティ設定の書き方が大幅に変わる件 - Qiita を参照してください。
基礎・仕組み的な話
認証・認可の話
Remember-Me の話
CSRF の話
セッション管理の話
メソッドセキュリティの話
CORS の話
Run-As の話
ACL の話
テストの話
MVC, Boot との連携の話
番外編
Spring Security にできること・できないこと
デフォルトで設定されるヘッダー
Spring Security を使用していると、デフォルトで下記ヘッダーがレスポンスに追加される。
Cache-Control: no-cache, no-store, max-age=0, must-revalidate
Pragma: no-cache
Expires: 0
X-Content-Type-Options: nosniff
Strict-Transport-Security: max-age=31536000 ; includeSubDomains
X-Frame-Options: DENY
X-XSS-Protection: 1; mode=block
※Strict-Transport-Security は HTTPS のときのみ追加。
キャッシュに関するヘッダー
Cache-Control, Pragma, Expires は、どれもブラウザにキャッシュをさせないように設定されている。
ログインしなければ見れないページをキャッシュされていると、ログアウト後であっても悪意あるユーザはローカルに残されたキャッシュを見ることで保護すべき情報を見れてしまう可能性がある。
そのため、このようにキャッシュを許可しない設定になっている。
X-Content-Type-Options: nosniff
Web ブラウザのなかには、 Content-Type ではなくファイルの中身を見て、そのファイルの種類を判別しようとするものがある。
これを Content Sniffing と言うっぽい。
これが有効になっていると、ファイルに仕込まれた悪意のあるコード1をブラウザが誤って実行してしまう危険性がある。
このヘッダー(X-Content-Type-Options: nosniff)がレスポンスに設定されていると、ブラウザはファイル種別の自動判定をしなくなる(IE は 8 以上がサポート)。
Strict-Transport-Security
このヘッダーは HTTPS 通信の場合のみデフォルトで設定される。
あるサイトにアクセスする際、ブラウザの URL 欄に xxx.com/xxxx のようにプロトコルを省略してホスト名だけを入力してアクセスしたとする。
普通、この URL のプロトコルは HTTP で補完され、リクエストが実行される
サイトによっては HTTP でリクエストが来た場合は HTTPS の通信に切り替えるようリダイレクトをするものがあるかもしれない。
しかし、最初の通信は HTTP で行われているため、中間者攻撃 を受ける危険性がある。
Strict-Transport-Security ヘッダーをつけると、ブラウザは「そのホストには HTTPS で通信しなければならない」と認識するようになる。
すると、プロトコルを省略して URL 入力しても、自動的に HTTPS で通信するようになる。
ただし、このヘッダーはレスポンスヘッダーなので、最低1回は HTTPS で通信していなければならない。
当然、最初の1回目を HTTP でアクセスした場合、その通信は無防備になっている。
(こういうのを TOFU (Trust On First Use) と言うらしい)
このヘッダーにはパラメータが指定でき、 namespace や Java Configuration の場合は次のようにする。
namespace
<?xml version="1.0" encoding="UTF-8"?>
<beans xmlns="http://www.springframework.org/schema/beans"
       xmlns:sec="http://www.springframework.org/schema/security"
       ...>

    ...

    <sec:http>
        ...
        <sec:headers>
            <sec:hsts max-age-seconds="60"
                      include-subdomains="false" />
        </sec:headers>
    </sec:http>

    ...
</beans>
-
<http>の下に<headers>タグを追加し、さらにその下に<hsts>タグを追加して制御する。-
hsts=HTTP Strict Transport Securityの略
-
-
max-age-secondsはmax-ageを、 -
include-subdomainsはincludeSubDomainsをそれぞれ設定する。 - パラメータの意味は Strict-Transport-Securty の説明を参照。
Java Configuration
package sample.spring.security;

import org.springframework.beans.factory.annotation.Autowired;
import org.springframework.context.annotation.ComponentScan;
import org.springframework.security.config.annotation.authentication.builders.AuthenticationManagerBuilder;
import org.springframework.security.config.annotation.web.builders.HttpSecurity;
import org.springframework.security.config.annotation.web.configuration.EnableWebSecurity;
import org.springframework.security.config.annotation.web.configuration.WebSecurityConfigurerAdapter;

import java.util.Collections;

@EnableWebSecurity
@ComponentScan
public class MySpringSecurityConfig extends WebSecurityConfigurerAdapter {

    @Override
    public void configure(HttpSecurity http) throws Exception {
        http.authorizeRequests()
                ...
                .headers()
                    .httpStrictTransportSecurity()
                    .maxAgeInSeconds(60)
                    .includeSubDomains(false);
    }

    ...
}
-
.headers().httpStrictTransportSecurity()でStrict-Transport-Securityの設定を開始できる。
X-Frame-Options
自分の Web サイトを <iframe> で埋め込むことができるようにしていると、クリックジャッキング攻撃を受ける危険性がある。
英語だが、 Youtube に解説動画 が上がっている(Spring Security のリファレンスで紹介されていた動画)。
前半は解説のために <iframe> が見えるようにして、後半は <iframe> を完全に見えなくして攻撃の様子を説明している。
これを防ぐには、自サイトを <iframe> で埋め込むことができないようにする必要がある。
X-Frame-Options をレスポンスヘッダーに付けることで、それが実現できる。
Spring Security がデフォルトで設定する DENY は、全てのサイトから <iframe> での埋め込みを拒否する。
同じオリジン(スキーム・ホスト・ポートの組み合わせ)は信頼できるということで埋め込みを許可したい場合は、次のように設定する。
namespace
<?xml version="1.0" encoding="UTF-8"?>
<beans xmlns="http://www.springframework.org/schema/beans"
       xmlns:sec="http://www.springframework.org/schema/security"
       ...>

    ...

    <sec:http>
        ...
        <sec:headers>
            <sec:frame-options policy="SAMEORIGIN" />
        </sec:headers>
    </sec:http>

    ...
</beans>
-
<frame-options>タグのpolicyで設定する。
Java Configuration
package sample.spring.security;

import org.springframework.beans.factory.annotation.Autowired;
import org.springframework.context.annotation.ComponentScan;
import org.springframework.security.config.annotation.authentication.builders.AuthenticationManagerBuilder;
import org.springframework.security.config.annotation.web.builders.HttpSecurity;
import org.springframework.security.config.annotation.web.configuration.EnableWebSecurity;
import org.springframework.security.config.annotation.web.configuration.WebSecurityConfigurerAdapter;

import java.util.Collections;

@EnableWebSecurity
@ComponentScan
public class MySpringSecurityConfig extends WebSecurityConfigurerAdapter {

    @Override
    public void configure(HttpSecurity http) throws Exception {
        http.authorizeRequests()
                ...
                .headers()
                    .frameOptions().sameOrigin();
    }

    ...
}
-
frameOptions()でX-Frame-Optionsについての設定を開始できる。
X-XSS-Protection
Web ブラウザには 反射型の XSS を抑止するための機能が標準で備わっているものがある。
しかしブラウザによっては何もしないとその機能が有効にならないものもある。
レスポンスヘッダーに X-XSS-Protection を入れておくと、ブラウザの反射型 XSS を抑止する機能を有効にすることができる。
ただし、この機能は XSS を完全に防げるようになるものではなく、あくまで攻撃を緩和させるものな点に注意(これをセットしていればオールOKという話ではない、ということ)。
デフォルトでは設定されないヘッダー
Content-Security-Policy
Content-Security-Policy は、 XSS 攻撃の軽減と報告を目的としたヘッダー。
例えば、レスポンスヘッダーに
Content-Security-Policy: script-src 'self'
とすることで、自分自身のオリジン以外から JavaScript のソースを読み込もうとするのをブロックできるようになる。
要は、あらかじめ信頼できるオリジンだけからしかファイルなどを読み込めないようにしておくことで、攻撃者の用意した意図しないスクリプトを読み込んで実行してしまわないようにする防衛策、という感じ。
このヘッダー自体の細かい書き方は
この辺を参照のこと。
Spring Security で使う場合は次のように書く。
namespace
<?xml version="1.0" encoding="UTF-8"?>
<beans xmlns="http://www.springframework.org/schema/beans"
       xmlns:sec="http://www.springframework.org/schema/security"
       ...>

    <context:component-scan base-package="sample.spring.security" />

    <sec:http>
        ...
        <sec:headers>
            <sec:content-security-policy policy-directives="script-src 'self'" />
        </sec:headers>
    </sec:http>

    ...
</beans>
-
<content-security-policy>タグを追加し、policy-directives属性で定義する。
Java Configuration
package sample.spring.security;

import org.springframework.beans.factory.annotation.Autowired;
import org.springframework.context.annotation.ComponentScan;
import org.springframework.security.config.annotation.authentication.builders.AuthenticationManagerBuilder;
import org.springframework.security.config.annotation.web.builders.HttpSecurity;
import org.springframework.security.config.annotation.web.configuration.EnableWebSecurity;
import org.springframework.security.config.annotation.web.configuration.WebSecurityConfigurerAdapter;

import java.util.Collections;

@EnableWebSecurity
@ComponentScan
public class MySpringSecurityConfig extends WebSecurityConfigurerAdapter {

    @Override
    public void configure(HttpSecurity http) throws Exception {
        http.authorizeRequests()
                ...
                .headers()
                    .contentSecurityPolicy("script-src 'self'");
    }

    ...
}
-
contentSecurityPolicy()メソッドで定義する。
任意のヘッダーを書き出す
ヘッダーを固定で指定する
namespace
<?xml version="1.0" encoding="UTF-8"?>
<beans xmlns="http://www.springframework.org/schema/beans"
xmlns:sec="http://www.springframework.org/schema/security"
...>
<sec:http>
...
<sec:headers>
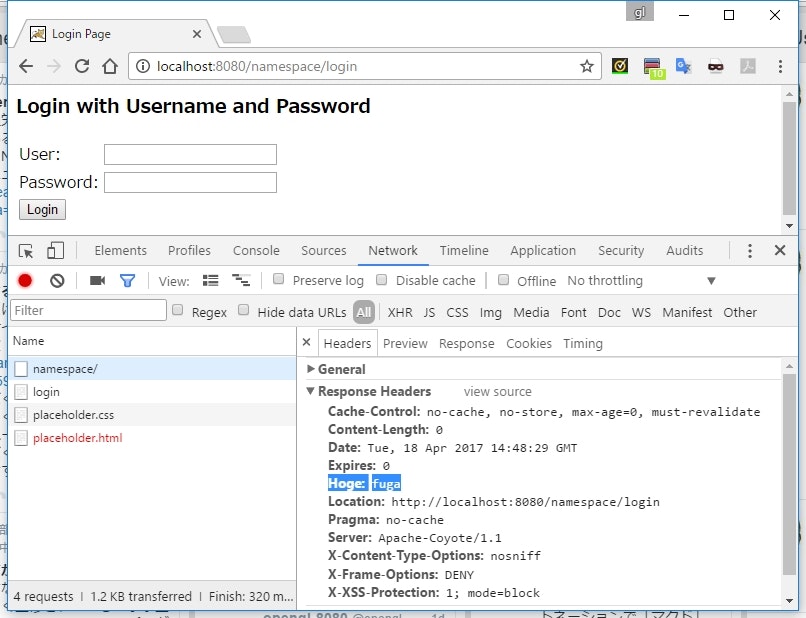
<sec:header name="Hoge" value="fuga" />
</sec:headers>
</sec:http>
...
</beans>
-
<header>タグで任意のレスポンスヘッダーを設定できる。
Java Configuration
package sample.spring.security;

import org.springframework.beans.factory.annotation.Autowired;
import org.springframework.context.annotation.ComponentScan;
import org.springframework.security.config.annotation.authentication.builders.AuthenticationManagerBuilder;
import org.springframework.security.config.annotation.web.builders.HttpSecurity;
import org.springframework.security.config.annotation.web.configuration.EnableWebSecurity;
import org.springframework.security.config.annotation.web.configuration.WebSecurityConfigurerAdapter;
import org.springframework.security.web.header.writers.StaticHeadersWriter;

import java.util.Collections;

@EnableWebSecurity
@ComponentScan
public class MySpringSecurityConfig extends WebSecurityConfigurerAdapter {

    @Override
    public void configure(HttpSecurity http) throws Exception {
        http.authorizeRequests()
                ...
                .headers()
                    .addHeaderWriter(new StaticHeadersWriter("Hoge", "fuga"));
    }

    ...
}
-
addHeaderWriter()の引数にStaticHeadersWriterのインスタンスを渡す。 -
StaticHeadersWriterのコンストラクタは、第一引数がヘッダー名で、第二引数がヘッダーの値。
実行結果
HeaderWriter を指定する
HeaderWriter インターフェースを実装したクラスを作成すれば、ヘッダーの書き出しをプログラムで制御できる。
package sample.spring.security.header;
import org.springframework.security.web.header.HeaderWriter;
import javax.servlet.http.HttpServletRequest;
import javax.servlet.http.HttpServletResponse;
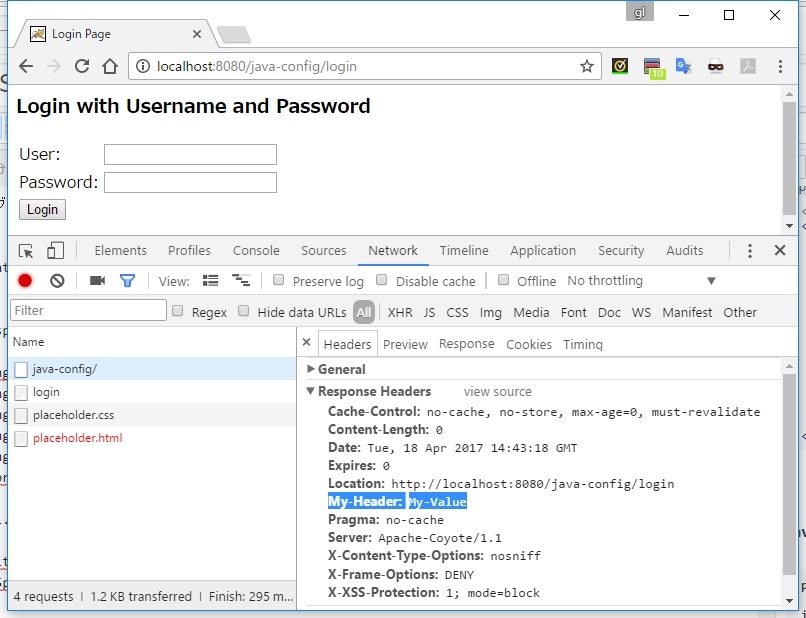
public class MyHeaderWriter implements HeaderWriter {
@Override
public void writeHeaders(HttpServletRequest request, HttpServletResponse response) {
response.setHeader("My-Header", "My-Value");
}
}
namespace
<?xml version="1.0" encoding="UTF-8"?>
<beans xmlns="http://www.springframework.org/schema/beans"
       xmlns:sec="http://www.springframework.org/schema/security"
       ...>

    <sec:http>
        ...
        <sec:headers>
            <sec:header ref="myHeaderWriter" />
        </sec:headers>
    </sec:http>

    <bean id="myHeaderWriter" class="sample.spring.security.header.MyHeaderWriter" />

    ...
</beans>
-
<header>タグのref属性に、HeaderWriterの Bean を指定する。
Java Configuration
package sample.spring.security;

import org.springframework.beans.factory.annotation.Autowired;
import org.springframework.security.config.annotation.authentication.builders.AuthenticationManagerBuilder;
import org.springframework.security.config.annotation.web.builders.HttpSecurity;
import org.springframework.security.config.annotation.web.configuration.EnableWebSecurity;
import org.springframework.security.config.annotation.web.configuration.WebSecurityConfigurerAdapter;
import sample.spring.security.header.MyHeaderWriter;

import java.util.Collections;

@EnableWebSecurity
public class MySpringSecurityConfig extends WebSecurityConfigurerAdapter {

    @Override
    public void configure(HttpSecurity http) throws Exception {
        http.authorizeRequests()
                ...
                .headers()
                    .addHeaderWriter(new MyHeaderWriter());
    }

    ...
}
-
addHeaderWriter()に、HeaderWriterのインスタンスを設定。
実行結果
参考
- キャッシュについて整理してみた - Qiita
- X-XSS-Protection - セキュリティ
- HTTP Strict Transport Security - Web セキュリティ | MDN
- IEのMIME Sniffing - てきとうなメモ
- IE8のMIME処理 - てきとうなメモ
- #05 ブラウザのバッドノウハウ コンテンツ編:BK通信 ―Bad Knowhow Tsushin―|gihyo.jp … 技術評論社
- X-Content-Type-Options: nosniff つかわないやつは死ねばいいのに! - 葉っぱ日記
- クリックジャッキングって? TECHSCORE BLOG
- 「クロスサイトスクリプティング(XSS)」の脆弱性の種類 - IPA (PDF)
- X-XSS-Protection - セキュリティ
- 同一オリジンポリシー - Web セキュリティ | MDN
- Content Security Policy (CSP) - Web セキュリティ | MDN
- リファラとは|referer : 意味/定義 - IT用語辞典
- 自堕落な技術者の日記 : HPKP(HTTP Public Key Pinning)公開鍵ピニングについて考える - livedoor Blog(ブログ)
-
XSS を成立させる JavaScript コードが埋め込まれた画像ファイルとか ↩