Spring Security は 5.4 以降、設定の書き方に大幅な変更が入っています。
詳しくは @suke_masa さんの Spring Security 5.7でセキュリティ設定の書き方が大幅に変わる件 - Qiita を参照してください。
基礎・仕組み的な話
Remember-Me の話
CSRF の話
セッション管理の話
レスポンスヘッダーの話
メソッドセキュリティの話
CORS の話
Run-As の話
ACL の話
テストの話
MVC, Boot との連携の話
番外編
Spring Security にできること・できないこと
認証
UserDetailsService:ユーザー情報を検索する
ユーザーの情報を検索する役割は、 UserDetailsService が担っている。
Spring Security には UserDetailsService を実装したクラスがいくつか用意されている。
インメモリ
ユーザー情報をメモリ上に保存しておく実装。
具体的なクラスは InMemoryUserDetailsManager になる。
namespace
<?xml version="1.0" encoding="UTF-8"?>
<beans xmlns="http://www.springframework.org/schema/beans"
       xmlns:sec="http://www.springframework.org/schema/security"
       xmlns:xsi="http://www.w3.org/2001/XMLSchema-instance"
       ...>

    ...

    <sec:authentication-manager>
        <sec:authentication-provider>
            <sec:user-service>
                <sec:user name="hoge" password="HOGE" authorities="ROLE_USER" />
            </sec:user-service>
        </sec:authentication-provider>
    </sec:authentication-manager>
</beans>
-
<user-service>と<user>タグを使って宣言する。
Java Configuration
package sample.spring.security;

import org.springframework.beans.factory.annotation.Autowired;
import org.springframework.security.config.annotation.authentication.builders.AuthenticationManagerBuilder;
import org.springframework.security.config.annotation.web.builders.HttpSecurity;
import org.springframework.security.config.annotation.web.configuration.EnableWebSecurity;
import org.springframework.security.config.annotation.web.configuration.WebSecurityConfigurerAdapter;

@EnableWebSecurity
public class MySpringSecurityConfig extends WebSecurityConfigurerAdapter {

    @Override
    public void configure(HttpSecurity http) throws Exception {
        ...
    }

    @Autowired
    public void configure(AuthenticationManagerBuilder auth) throws Exception {
        auth.inMemoryAuthentication()
                .withUser("hoge").password("HOGE").roles("USER");
    }
}
- 設定クラスに
AuthenticationManagerBuilderを受け取るメソッドを宣言し、@Autowiredでアノテートする。 -
inMemoryAuthentication()メソッドで定義情報を設定する。
JDBC
データベースからユーザー情報を取得する実装。
実際のクラスは JdbcUserDetailsManager になる。
共通
    compile 'org.springframework:spring-jdbc:4.3.6.RELEASE'
    compile 'com.h2database:h2:1.4.193'
- 検証のため、 DB には H2 を埋め込みモードで使用する。
- また
DataSourceを作るためにspring-jdbcも依存関係に追加している。
CREATE TABLE USERS (
    USERNAME VARCHAR_IGNORECASE(50) NOT NULL PRIMARY KEY,
    PASSWORD VARCHAR_IGNORECASE(50) NOT NULL,
    ENABLED  BOOLEAN NOT NULL
);

CREATE TABLE AUTHORITIES (
    USERNAME  VARCHAR_IGNORECASE(50) NOT NULL,
    AUTHORITY VARCHAR_IGNORECASE(50) NOT NULL,
    CONSTRAINT FK_AUTHORITIES_USERS FOREIGN KEY (USERNAME) REFERENCES USERS(USERNAME),
    CONSTRAINT UK_AUTHORITIES UNIQUE (USERNAME, AUTHORITY)
);

INSERT INTO USERS VALUES ('fuga', 'FUGA', true);
INSERT INTO AUTHORITIES VALUES ('fuga', 'USER');
- デフォルトでは上述のようにテーブル・カラムを宣言すると、自動的にユーザー情報が検索されるようになる。
- 設定によって変更することも可能。
- ファイルはクラスパス配下に配備されるようにしておく(あとでデータソースを作るときに初期化スクリプトとして使用する)
namespace
<?xml version="1.0" encoding="UTF-8"?>
<beans xmlns="http://www.springframework.org/schema/beans"
       xmlns:sec="http://www.springframework.org/schema/security"
       xmlns:xsi="http://www.w3.org/2001/XMLSchema-instance"
       xmlns:jdbc="http://www.springframework.org/schema/jdbc"
       xsi:schemaLocation="
         ...
         http://www.springframework.org/schema/jdbc
         http://www.springframework.org/schema/jdbc/spring-jdbc.xsd">

    ...

    <jdbc:embedded-database id="dataSource" type="H2">
        <jdbc:script location="classpath:/sql/create_database.sql" />
    </jdbc:embedded-database>

    <sec:authentication-manager>
        <sec:authentication-provider>
            <sec:jdbc-user-service data-source-ref="dataSource"  />
        </sec:authentication-provider>
    </sec:authentication-manager>
</beans>
-
<jdbc-user-service>タグを使用する。 - データソースの定義では、
<jdbc:script>タグを利用して上で書いた初期化スクリプトを実行している。
Java Configuration
package sample.spring.security;

import org.springframework.beans.factory.annotation.Autowired;
import org.springframework.context.annotation.Bean;
import org.springframework.jdbc.datasource.embedded.EmbeddedDatabaseBuilder;
import org.springframework.jdbc.datasource.embedded.EmbeddedDatabaseType;
import org.springframework.security.config.annotation.authentication.builders.AuthenticationManagerBuilder;
import org.springframework.security.config.annotation.web.builders.HttpSecurity;
import org.springframework.security.config.annotation.web.configuration.EnableWebSecurity;
import org.springframework.security.config.annotation.web.configuration.WebSecurityConfigurerAdapter;

import javax.sql.DataSource;

@EnableWebSecurity
public class MySpringSecurityConfig extends WebSecurityConfigurerAdapter {

    @Override
    public void configure(HttpSecurity http) throws Exception {
        ...
    }

    @Bean
    public DataSource dataSource() {
        return new EmbeddedDatabaseBuilder()
                .generateUniqueName(true)
                .setType(EmbeddedDatabaseType.H2)
                .setScriptEncoding("UTF-8")
                .addScript("/sql/create_database.sql")
                .build();
    }

    @Autowired
    public void configure(AuthenticationManagerBuilder auth, DataSource dataSource) throws Exception {
        auth.jdbcAuthentication().dataSource(dataSource);
    }
}
-
AuthenticationManagerBuilderのjdbcAuthentication()メソッドを使う。
テーブル名やカラム名を調整する
CREATE TABLE USERS (
    LOGIN_ID VARCHAR_IGNORECASE(50) NOT NULL PRIMARY KEY,
    PASSWORD VARCHAR_IGNORECASE(50) NOT NULL,
    ENABLED  BOOLEAN NOT NULL
);

CREATE TABLE AUTHORITIES (
    LOGIN_ID  VARCHAR_IGNORECASE(50) NOT NULL,
    ROLE VARCHAR_IGNORECASE(50) NOT NULL,
    CONSTRAINT FK_AUTHORITIES_USERS FOREIGN KEY (LOGIN_ID) REFERENCES USERS(LOGIN_ID),
    CONSTRAINT UK_AUTHORITIES UNIQUE (LOGIN_ID, ROLE)
);
USERNAME を LOGIN_ID に、 AUTHORITY を ROLE に変更してみる。
テーブル名やカラム名を任意のものに変更したい場合は、ユーザー情報を検索するときの SQL を調整する。
検索時の項目の並びさえ一致していれば、カラム名は何でも良い。
namespace
<?xml version="1.0" encoding="UTF-8"?>
<beans xmlns="http://www.springframework.org/schema/beans"
       xmlns:sec="http://www.springframework.org/schema/security"
       xmlns:xsi="http://www.w3.org/2001/XMLSchema-instance"
       xmlns:jdbc="http://www.springframework.org/schema/jdbc"
       ...>

    ...

    <sec:authentication-manager>
        <sec:authentication-provider>
            <sec:jdbc-user-service
                data-source-ref="dataSource"
                users-by-username-query="SELECT LOGIN_ID, PASSWORD, ENABLED FROM USERS WHERE LOGIN_ID=?"
                authorities-by-username-query="SELECT LOGIN_ID, ROLE FROM AUTHORITIES WHERE LOGIN_ID=?" />
        </sec:authentication-provider>
    </sec:authentication-manager>
</beans>
-
users-by-username-query属性で、USERNAME,PASSWORD,ENABLEDを検索するクエリを定義する。 -
authorities-by-username-query属性で、USERNAME,AUTHORITYを検索するクエリを定義する。
Java Configuration
package sample.spring.security;

import org.springframework.beans.factory.annotation.Autowired;
import org.springframework.context.annotation.Bean;
import org.springframework.jdbc.datasource.embedded.EmbeddedDatabaseBuilder;
import org.springframework.jdbc.datasource.embedded.EmbeddedDatabaseType;
import org.springframework.security.config.annotation.authentication.builders.AuthenticationManagerBuilder;
import org.springframework.security.config.annotation.web.builders.HttpSecurity;
import org.springframework.security.config.annotation.web.configuration.EnableWebSecurity;
import org.springframework.security.config.annotation.web.configuration.WebSecurityConfigurerAdapter;

import javax.sql.DataSource;

@EnableWebSecurity
public class MySpringSecurityConfig extends WebSecurityConfigurerAdapter {

    @Override
    public void configure(HttpSecurity http) throws Exception {
        ...
    }

    @Bean
    public DataSource dataSource() {
        ...
    }

    @Autowired
    public void configure(AuthenticationManagerBuilder auth, DataSource dataSource) throws Exception {
        auth.jdbcAuthentication().dataSource(dataSource)
        .usersByUsernameQuery("SELECT LOGIN_ID, PASSWORD, ENABLED FROM USERS WHERE LOGIN_ID=?")
        .authoritiesByUsernameQuery("SELECT LOGIN_ID, ROLE FROM AUTHORITIES WHERE LOGIN_ID=?");
    }
}
-
usersByUsernameQuery(String)メソッドで、USERNAME,PASSWORD,ENABLEDを検索するクエリを定義する。 -
authoritiesByUsernameQuery(String)メソッドで、USERNAME,AUTHORITYを検索するクエリを定義する。
UserDetailsService を自作する
package sample.spring.security;

import org.springframework.security.core.authority.AuthorityUtils;
import org.springframework.security.core.userdetails.User;
import org.springframework.security.core.userdetails.UserDetails;
import org.springframework.security.core.userdetails.UserDetailsService;
import org.springframework.security.core.userdetails.UsernameNotFoundException;

public class MyUserDetailsService implements UserDetailsService {
    @Override
    public UserDetails loadUserByUsername(String username) throws UsernameNotFoundException {
        if ("hoge".equals(username)) {
            return new User(username, "HOGE", AuthorityUtils.createAuthorityList("USER"));
        }

        throw new UsernameNotFoundException("not found : " + username);
    }
}
-
UserDetailsServiceを実装したクラスを作成する。 -
UserDetailsServiceにはloadUserByUsername(String)というメソッドが1つだけ存在する。- 引数でユーザーを識別するための文字列(普通はログイン画面などで入力されたユーザー名)が渡ってくるので、その識別文字列に対応するユーザー情報を返却する。
- 対応するユーザー情報が存在しない場合は
UsernameNotFoundExceptionをスローする。
- ユーザー情報は
UserDetailsインターフェースを実装したクラスで作成する。- 標準で
Userというクラスが用意されている。 - 大人の事情で
Userクラスでは色々問題がある場合はUserDetailsを実装したクラスを自作すればいい。
- 標準で
namespace
<?xml version="1.0" encoding="UTF-8"?>
<beans xmlns="http://www.springframework.org/schema/beans"
       xmlns:sec="http://www.springframework.org/schema/security"
       ...>

    ...

    <bean id="myUserDetailsService" class="sample.spring.security.MyUserDetailsService" />

    <sec:authentication-manager>
        <sec:authentication-provider user-service-ref="myUserDetailsService" />
    </sec:authentication-manager>
</beans>
-
<authentication-provider>のuser-service-ref属性で作成したUserDetailsServiceを指定する。
Java Configuration
package sample.spring.security;

import org.springframework.beans.factory.annotation.Autowired;
import org.springframework.security.config.annotation.authentication.builders.AuthenticationManagerBuilder;
import org.springframework.security.config.annotation.web.builders.HttpSecurity;
import org.springframework.security.config.annotation.web.configuration.EnableWebSecurity;
import org.springframework.security.config.annotation.web.configuration.WebSecurityConfigurerAdapter;

@EnableWebSecurity
public class MySpringSecurityConfig extends WebSecurityConfigurerAdapter {

    ...

    @Autowired
    public void configure(AuthenticationManagerBuilder auth) throws Exception {
        auth.userDetailsService(new MyUserDetailsService());
    }
}
-
AuthenticationManagerBuilderのuserDetailsService()メソッドでUserDetailsServiceを登録する。
パスワードのハッシュ化
なぜハッシュ化が必要か
万が一データが漏洩した場合に、パスワードが平文のまま保存されているのは具合が悪い。
そのため、通常パスワードは元の文字列が特定できない形でデータベースなどに保存しておく。
また、パスワードの複合化が不要な場合は、ハッシュ関数を使ってパスワードを変換する。
BCrypt
ハッシュ関数といえば MD5 や SHA とかがあるが、パスワードをハッシュ化させるのであれば BCrypt というのを使うのが良いらしい。
単純にハッシュ関数を1回適用しただけだと、総当たり攻撃や辞書攻撃、レインボーテーブルなどのパスワード攻撃に対して脆弱になる。
BCrypt は単純に入力を1回ハッシュ化するのではなく、ランダムなソルトを付与したうえで複数回ハッシュ化を適用することで元のパスワードを推測しづらくする。
Spring Security もこの BCrypt を利用することを推奨している。
実装
パスワードのハッシュ化は、 PasswordEncoder を DaoAuthenticationProvider に設定することで実現できる。
BCrypt を使う場合は、 BCryptPasswordEncoder という PasswordEncoder の実装を使用する。
なお、ハッシュ値は BCrypt ハッシュ値 計算 | tekboy とかであらかじめ計算しておいたものを記載している。
namespace
<?xml version="1.0" encoding="UTF-8"?>
<beans xmlns="http://www.springframework.org/schema/beans"
       xmlns:sec="http://www.springframework.org/schema/security"
       ...>

    ...

    <bean id="passwordEncoder"
          class="org.springframework.security.crypto.bcrypt.BCryptPasswordEncoder"/>

    <sec:authentication-manager>
        <sec:authentication-provider>
            <sec:user-service>
                <sec:user
                    name="hoge"
                    password="$2a$08$CekzJRYhb5bzp5mx/eZmX.grG92fRXo267QVVyRs0IE.V.zeCIw8S"
                    authorities="ROLE_USER" />
            </sec:user-service>

            <sec:password-encoder ref="passwordEncoder" />
        </sec:authentication-provider>
    </sec:authentication-manager>
</beans>
-
BCryptPasswordEncoderを Bean として定義して、<password-encoder>のref属性に指定する。 -
<password-encoder>は<authentication-provider>の子要素として設定する。
Java Configuration
package sample.spring.security;

import org.springframework.beans.factory.annotation.Autowired;
import org.springframework.context.annotation.Bean;
import org.springframework.security.config.annotation.authentication.builders.AuthenticationManagerBuilder;
import org.springframework.security.config.annotation.web.builders.HttpSecurity;
import org.springframework.security.config.annotation.web.configuration.EnableWebSecurity;
import org.springframework.security.config.annotation.web.configuration.WebSecurityConfigurerAdapter;
import org.springframework.security.crypto.bcrypt.BCryptPasswordEncoder;
import org.springframework.security.crypto.password.PasswordEncoder;

@EnableWebSecurity
public class MySpringSecurityConfig extends WebSecurityConfigurerAdapter {

    ...

    @Bean
    public PasswordEncoder passwordEncoder() {
        return new BCryptPasswordEncoder();
    }

    @Autowired
    public void configure(AuthenticationManagerBuilder auth, PasswordEncoder passwordEncoder) throws Exception {
        auth.inMemoryAuthentication()
            .passwordEncoder(passwordEncoder)
            .withUser("hoge")
            .password("$2a$08$CekzJRYhb5bzp5mx/eZmX.grG92fRXo267QVVyRs0IE.V.zeCIw8S")
            .roles("USER");
    }
}
-
AbstractDaoAuthenticationConfigurerのpasswordEncoder()メソッドでPasswordEncoderを登録する。 -
AbstractDaoAuthenticationConfigurerは、AuthenticationManagerBuilderのinMemoryAuthentication()メソッドの戻り値の型であるInMemoryUserDetailsManagerConfigurerの親クラス。
パスワードをエンコードする
任意のパスワードをエンコードするには PasswordEncoder をコンテナからとってきて encode() メソッドを使えばいい。
package sample.spring.security.servlet;

import org.springframework.security.crypto.password.PasswordEncoder;
import org.springframework.web.context.WebApplicationContext;
import org.springframework.web.context.support.WebApplicationContextUtils;

import javax.servlet.ServletException;
import javax.servlet.annotation.WebServlet;
import javax.servlet.http.HttpServlet;
import javax.servlet.http.HttpServletRequest;
import javax.servlet.http.HttpServletResponse;
import java.io.IOException;

@WebServlet("/encode-password")
public class EncodePasswordServlet extends HttpServlet {

    @Override
    protected void doGet(HttpServletRequest req, HttpServletResponse resp) throws ServletException, IOException {
        WebApplicationContext context = WebApplicationContextUtils.getRequiredWebApplicationContext(req.getServletContext());
        PasswordEncoder passwordEncoder = context.getBean(PasswordEncoder.class);

        String password = req.getParameter("password");
        String encode = passwordEncoder.encode(password);
        System.out.println(encode);
    }
}
※設定は前述のものと同じ(BCryptPasswordEncoder を Bean として登録している)
※動作確認のための簡易実装のためコンテナから明示的に PasswordEncoder を取得しているが、実際はコンテナ管理の Bean に PasswordEncoder を DI するなどして参照を得ることになる
ログイン後 http://localhost:8080/xxxx/encode-password?password=fuga にアクセス(コンテキストパスは適宜置き換え)。
$2a$10$2qVDkAqxp8eDrxR8Be2ZpubYGOCVZ7Qy9uK/XzOIY1ZoxpChtrWDK
Authentication
Spring Security を構成する重要なクラスの1つに Authentication が存在する。
このクラスには、認証されたユーザーの情報(ユーザー名や付与されている権限の一覧など)が格納されている。
AuthenticationProvider による認証が成功すると、 AuthenticationProvider は認証済みの Authentication オブジェクトを生成して返却する(isAuthenticated() が true を返す)。
以後、この認証済みの Authentication オブジェクトが権限のチェックなど後続の処理で参照されることになる。
Authentication の取得方法と参照可能な情報
package sample.spring.security.servlet;

import org.springframework.security.core.Authentication;
import org.springframework.security.core.GrantedAuthority;
import org.springframework.security.core.context.SecurityContextHolder;
import org.springframework.security.core.userdetails.UserDetails;
import org.springframework.security.web.authentication.WebAuthenticationDetails;

import javax.servlet.ServletException;
import javax.servlet.annotation.WebServlet;
import javax.servlet.http.HttpServlet;
import javax.servlet.http.HttpServletRequest;
import javax.servlet.http.HttpServletResponse;
import java.io.IOException;

import static java.util.stream.Collectors.*;

@WebServlet("/authentication")
public class SecurityContextHolderSampleServlet extends HttpServlet {

    @Override
    protected void doGet(HttpServletRequest req, HttpServletResponse resp) throws ServletException, IOException {
        Authentication auth = SecurityContextHolder.getContext().getAuthentication();
        System.out.println("[authorities]");
        System.out.println("  " + auth.getAuthorities().stream()
                                    .map(GrantedAuthority::getAuthority)
                                    .collect(joining("\n  ")));

        WebAuthenticationDetails details = (WebAuthenticationDetails) auth.getDetails();
        System.out.println("[details]");
        System.out.println("  IP Address : " + details.getRemoteAddress());
        System.out.println("  Session ID : " + details.getSessionId());

        UserDetails principal = (UserDetails) auth.getPrincipal();
        System.out.println("[principal]");
        System.out.println("  username : " + principal.getUsername());
        System.out.println("  password : " + principal.getPassword());

        System.out.println("[credentials]");
        System.out.println("  " + auth.getCredentials());
    }
}
[authorities]
  USER
[details]
  IP Address : 0:0:0:0:0:0:0:1
  Session ID : 0225051BCDFE2C34D55DF4FA9D9685C2
[principal]
  username : hoge
  password : null
[credentials]
  null
- 現在のリクエストに紐づく
Authenticationを取得するにはSecurityContextHolder.getContext().getAuthentication()とする。-
SecurityContextHolder.getContext()は、現在のリクエストに紐づくSecurityContextを返している。
-
-
Authentication.getAuthorities()で、現在のログインユーザーに付与されている権限(GrantedAuthorityのコレクション)を取得できる。 -
Authentication.getDetails()は、デフォルトではWebAuthenticationDetailsを返す。- このクラスからは、 IP アドレスとセッションIDを取得できる。
-
Authentication.getPrincipal()で、ログインユーザーのUserDetailsを取得できる。 -
Authentication.getCredentials()は、仕様的にはユーザー認証に用いる情報(通常ならログインパスワード)を返す。
安全のため、パスワード情報はログイン成功後に AuthenticationManager (ProviderManager) によって明示的に消去(null をセット)されている。
オプション(eraseCredentialsAfterAuthentication)で消さないようにすることも可能。
Authentication の保存場所
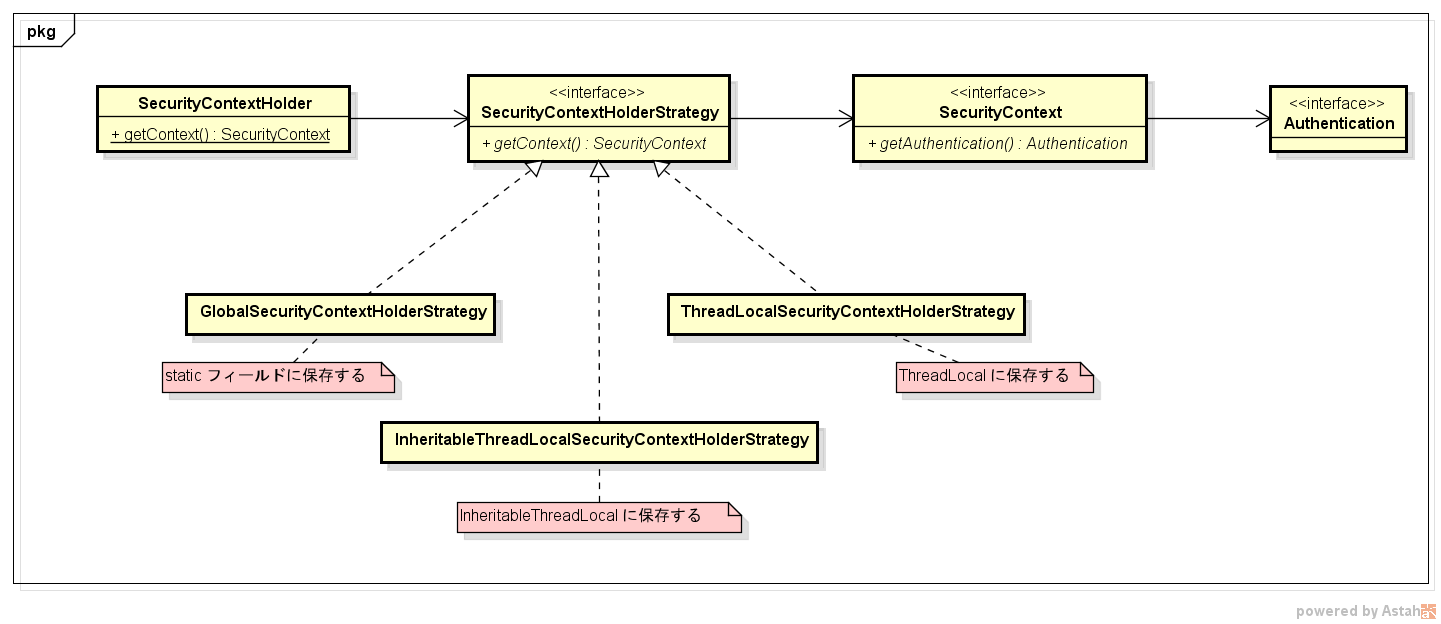
Authentication を保持している SecurityContext は、認証終了後デフォルトでは HttpSession に保存される。
次に同じセッションでアクセスがあったときは、 HttpSession に保存されている SecurityContext が取得され、 SecurityContextHolder に格納される。
この SecurityContextHolder は、デフォルトでは ThreadLocal を使って static フィールドに SecurityContext を格納する。
このため、現在のリクエストに紐づく SecurityContext をグローバルに取得できるようになっている。
厳密には、 SecurityContextHolder が SecurityContextHolderStrategy のインスタンスを保持しており、このインターフェースの実装として、 SecurityContext を ThreadLocal に保存する ThreadLocalSecurityContextHolderStrategy が使用されている。
ちなみに、 SecurityContextHolder への SecurityContext の出し入れや、リクエストごとの ThreadLocal のクリアは SecurityContextPersistenceFilter が行っている。
ThreadLocal 以外の保存方法
SecurityContextHolderStrategy の実装には、 ThreadLocalSecurityContextHolderStrategy 以外にも残り2つのクラスが存在する。
GlobalSecurityContextHolderStrategy
アプリケーションでただ1つの SecurityContext を保存する。
このクラスは、例えばスタンドアロンのアプリケーションなどで使用する。
スタンドアロンアプリの場合は、起動しているユーザーが唯一のユーザーとなるかもしれない。
その場合はスレッドを複数作ったとしても、その全てで同じ認証情報を共有しなければならないかもしれない。
InheritableThreadLocalSecurityContextHolderStrategy
新規にスレッドが生成された場合は、親スレッドの SecurityContext を共有する。
このクラスは、複数のユーザーが利用することがあるが、各ユーザーの処理の中で新しくスレッドを作成してバックグラウンド処理を走らせるような場合に使用する。
その場合、スレッドは分かれているが、認証情報は親スレッドのユーザー情報を引き継がなければならない。
どの保存方法を使用するかは、以下のいずれかの方法で変更することができる。
システムプロパティで指定する
システムプロパティ spring.security.strategy を、 JVM の起動オプションに渡すことで指定することができる。
> set JAVA_OPTS=-Dspring.security.strategy=MODE_INHERITABLETHREADLOCAL

> cd %TOMCAT_HOME%\bin

> startup.bat
static メソッドで指定する
SecurityContextHolder.setStrategyName(SecurityContextHolder.MODE_INHERITABLETHREADLOCAL);
SecurityContextHolder に setStrategyName(String) というメソッドが用意されている。
引数には、同じく SecurityContextHolder に定義されている定数を指定すればいい。
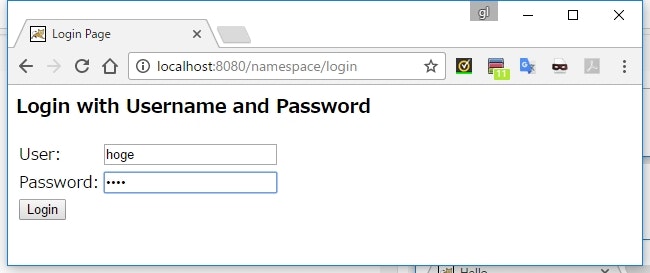
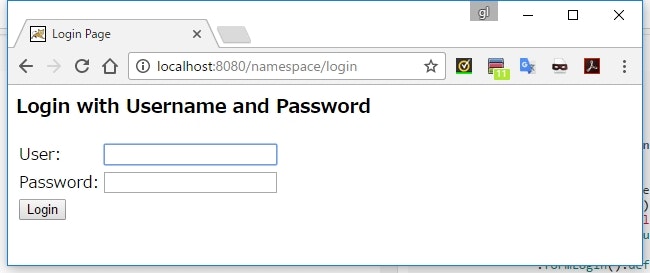
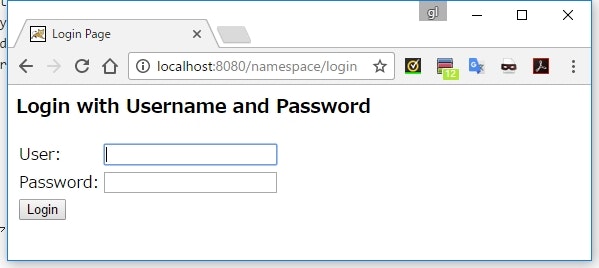
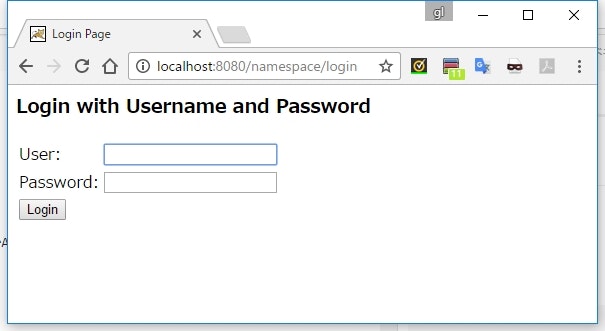
ログインページを指定する
Form ログインを有効にしてもログインページを指定していない場合、デフォルトだと Spring Security が生成する簡易なログインページが使用される。
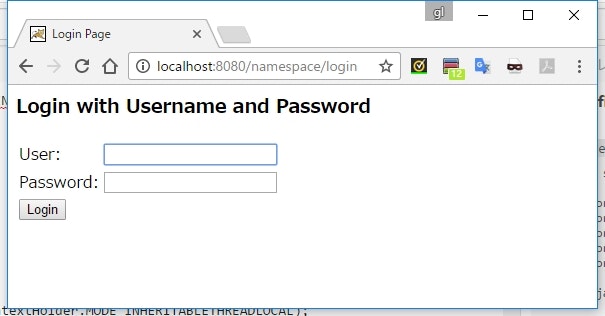
これはあくまで動作確認用の画面であり、実アプリでは自分で作成したログインページに差し替える必要がある。
ログインページは次のようにして変更する。
実装
<%@taglib prefix="c" uri="http://java.sun.com/jsp/jstl/core" %>
<%@page contentType="text/html" pageEncoding="UTF-8"%>
<!doctype html>
<html>
    <head>
        <meta charset="utf-8" />
        <title>My Login Page</title>
    </head>
    <body>
        <h1>My Login Page</h1>

        <c:url var="loginUrl" value="/login" />
        <form action="${loginUrl}" method="post">
            <div>
                <label>ユーザー名: <input type="text" name="username" /></label>
            </div>
            <div>
                <label>パスワード: <input type="password" name="password" /></label>
            </div>
            <input type="submit" value="login" />
            <input type="hidden" name="${_csrf.parameterName}" value="${_csrf.token}" />
        </form>
    </body>
</html>
namespace
<?xml version="1.0" encoding="UTF-8"?>
<beans xmlns="http://www.springframework.org/schema/beans"
       xmlns:sec="http://www.springframework.org/schema/security"
       ...>

    <sec:http>
        <sec:intercept-url pattern="/login" access="permitAll" />
        <sec:intercept-url pattern="/my-login.jsp" access="permitAll" />
        <sec:intercept-url pattern="/**" access="isAuthenticated()" />
        <sec:form-login login-page="/my-login.jsp" />
        <sec:logout />
    </sec:http>

    ...
</beans>
Java Configuration
...

@EnableWebSecurity
public class MySpringSecurityConfig extends WebSecurityConfigurerAdapter {

    @Override
    public void configure(HttpSecurity http) throws Exception {
        http.authorizeRequests()
                .antMatchers("/login").permitAll()
                .antMatchers("/my-login.jsp").permitAll()
                .anyRequest().authenticated()
                .and()
                .formLogin().loginPage("/my-login.jsp");
    }

    ...
}
動作確認
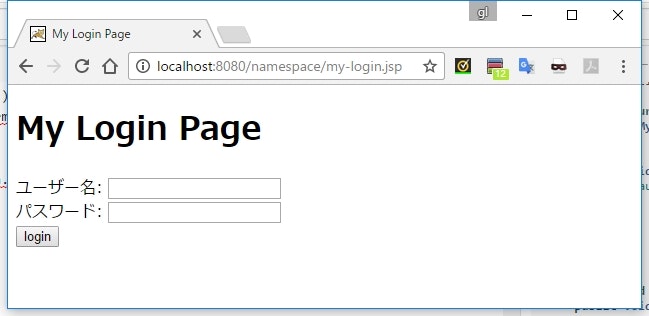
任意のページにアクセスしようとすると、自作のログインページに飛ばされる。
説明
        <sec:intercept-url pattern="/login" access="permitAll" />
        <sec:intercept-url pattern="/my-login.jsp" access="permitAll" />
        <sec:intercept-url pattern="/**" access="isAuthenticated()" />
        <sec:form-login login-page="/my-login.jsp" />
- 自作のログインページは未認証でもログインできるようにしないといけないので、
permitAllでアクセスできるようにする。 -
<form-login>タグのlogin-page属性に、自作ログインページのパスを指定する。- Java Configuration の場合は
.loginPage(String)メソッド。
- Java Configuration の場合は
        <c:url var="loginUrl" value="/login" />
        <form action="${loginUrl}" method="post">
            <div>
                <label>ユーザー名: <input type="text" name="username" /></label>
            </div>
            <div>
                <label>パスワード: <input type="password" name="password" /></label>
            </div>
            <input type="submit" value="login" />
            <input type="hidden" name="${_csrf.parameterName}" value="${_csrf.token}" />
        </form>
- ログインのリクエストは、
/loginに POST メソッドで実行できる。- ログインのパスは
<form-login>のlogin-processing-urlで変更可能。 - Java Configuration なら
loginProcessingUrl(String)メソッド。
- ログインのパスは
- ユーザ名は
username、パスワードはpasswordという名前で飛ぶようにする。- それぞれのパラメータ名は、
<form-login>のusername-parameter,password-parameter属性で変更可能 - Java Configuration なら
usernameParameter(String),passwordParameter(String)で変更可能
- それぞれのパラメータ名は、
ログイン後のページを指定する
デフォルトだと、ログイン後の遷移先は次のように制御される。
- ログイン前にアクセスしていた URL があれば、そこにリダイレクト
- 直接ログインページを開いてログインした場合は、アプリケーションルート(
/)にリダイレクト(デフォルトターゲット)
実装
<!doctype html>
<html>
    <head>
        <meta charset="UTF-8" />
        <title>Hello</title>
    </head>
    <body>
        <h1>Hello!!</h1>
    </body>
</html>
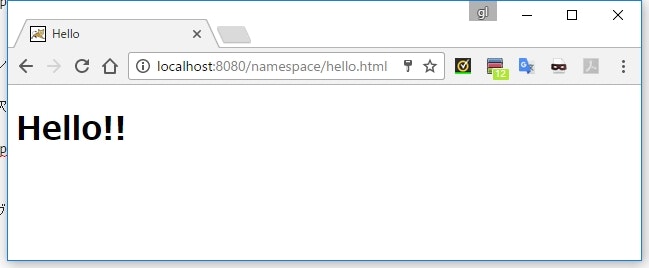
簡単な画面を追加する。
動作確認
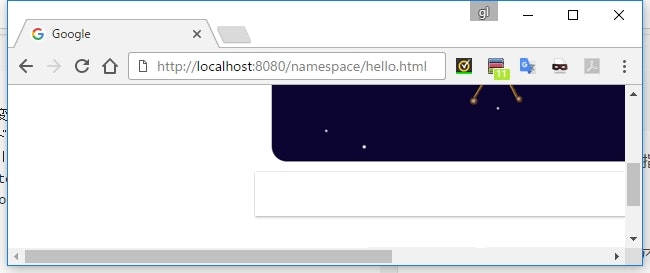
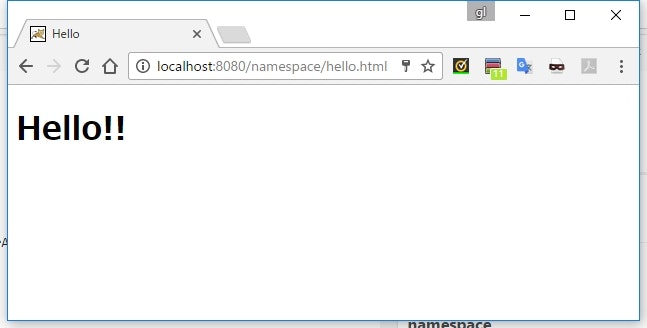
/hello.html にアクセスする。
ログイン画面に飛ばされるので、ログインする。
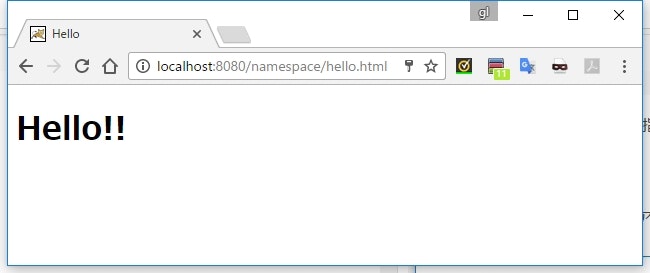
ログイン前にアクセスしていたページ(/hello.html)に飛ばされる。
続いて、1回ログアウトしてからログインページ(/login)に直接アクセスする。
ログインする。
アプリケーションルート(/)に飛ばされる。
デフォルトターゲットを変更する
直接ログインページを開いてログインしたあとの遷移先は、 default-target-url で変更できる
実装
namespace
<?xml version="1.0" encoding="UTF-8"?>
<beans xmlns="http://www.springframework.org/schema/beans"
       xmlns:sec="http://www.springframework.org/schema/security"
       ...>

    <sec:http>
        <sec:intercept-url pattern="/login" access="permitAll" />
        <sec:intercept-url pattern="/**" access="isAuthenticated()" />
        <sec:form-login default-target-url="/hello.html" />
        <sec:logout />
    </sec:http>

    ...
</beans>
-
default-target-urlで指定
Java Configuration
...

@EnableWebSecurity
public class MySpringSecurityConfig extends WebSecurityConfigurerAdapter {

    @Override
    public void configure(HttpSecurity http) throws Exception {
        http.authorizeRequests()
                .antMatchers("/login").permitAll()
                .anyRequest().authenticated()
                .and()
                .formLogin().defaultSuccessUrl("/hello.html");
    }

    ...
}
-
defaultSuccessUrl(String)で指定
動作確認
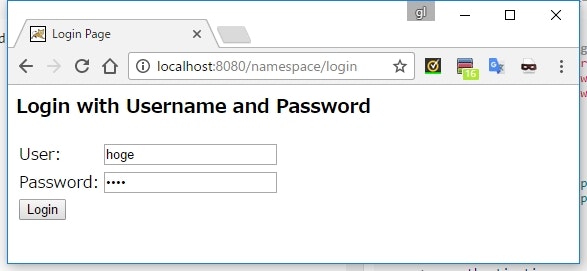
直接ログイン画面(/login)にアクセスする。
ログインする
default-target-url で指定した URL (/hello.html)に飛ばされる。
常にデフォルトターゲットに遷移するようにする
ログイン前にアクセスしようとしたページがあったとしても、ログイン後はデフォルトターゲットに遷移するように変更する。
実装
namespace
<?xml version="1.0" encoding="UTF-8"?>
<beans xmlns="http://www.springframework.org/schema/beans"
       xmlns:sec="http://www.springframework.org/schema/security"
       ...>

    <sec:http>
        <sec:intercept-url pattern="/login" access="permitAll" />
        <sec:intercept-url pattern="/**" access="isAuthenticated()" />
        <sec:form-login default-target-url="/hello.html"
                        always-use-default-target="true" />
        <sec:logout />
    </sec:http>

    ...
</beans>
-
always-use-default-targetにtrueを指定する
Java Configuration
...

@EnableWebSecurity
public class MySpringSecurityConfig extends WebSecurityConfigurerAdapter {

    @Override
    public void configure(HttpSecurity http) throws Exception {
        http.authorizeRequests()
                .antMatchers("/login").permitAll()
                .anyRequest().authenticated()
                .and()
                .formLogin().defaultSuccessUrl("/hello.html", true);
    }

    ...
}
-
defaultSuccessUrl(String, boolean)の第二引数にtrueを指定する
動作確認
適当な URL にアクセスする。
ログイン画面に飛ばされるので、ログインする。
default-target-url で指定したページに飛ばされる。
ログインに成功したときの処理を実装する
実装
package sample.spring.security.handler;

import org.springframework.security.core.Authentication;
import org.springframework.security.web.DefaultRedirectStrategy;
import org.springframework.security.web.RedirectStrategy;
import org.springframework.security.web.authentication.AuthenticationSuccessHandler;

import javax.servlet.ServletException;
import javax.servlet.http.HttpServletRequest;
import javax.servlet.http.HttpServletResponse;
import java.io.IOException;

public class MyAuthenticationSuccessHandler implements AuthenticationSuccessHandler {

    @Override
    public void onAuthenticationSuccess(
            HttpServletRequest request, HttpServletResponse response, Authentication authentication)
                throws IOException, ServletException {
        RedirectStrategy redirectStrategy = new DefaultRedirectStrategy();
        redirectStrategy.sendRedirect(request, response, "/hello.html");
    }
}
namespace
<?xml version="1.0" encoding="UTF-8"?>
<beans xmlns="http://www.springframework.org/schema/beans"
       xmlns:sec="http://www.springframework.org/schema/security"
       ...>

    <bean id="authenticationSuccessHandler"
          class="sample.spring.security.handler.MyAuthenticationSuccessHandler" />

    <sec:http>
        ...
        <sec:form-login authentication-success-handler-ref="authenticationSuccessHandler" />
        ...
    </sec:http>

    ...
</beans>
-
<form-login>タグのauthentication-success-handler-ref属性で、作成したAuthenticationSuccessHandlerの Bean を指定する
Java Configuration
...

import sample.spring.security.handler.MyAuthenticationSuccessHandler;

@EnableWebSecurity
public class MySpringSecurityConfig extends WebSecurityConfigurerAdapter {

    @Override
    public void configure(HttpSecurity http) throws Exception {
        http.authorizeRequests()
                ...
                .and()
                .formLogin().successHandler(new MyAuthenticationSuccessHandler());
    }

    ...
}
-
successHandler()メソッドで作成したAuthenticationSuccessHandlerのインスタンスを指定する
動作の様子は、 /hello.html にリダイレクトするだけなので割愛。
デフォルトターゲットと同時に指定した場合
デフォルトターゲットと AuthenticationSuccessHandler を同時に指定した場合、次のように動作する
- namespace の場合は
AuthenticationSuccessHandlerが優先 - Java Configuration の場合は後で設定したほうが採用
namespace は優先順位をつけて設定を決定しているが、 Java Configuration の方はメソッドが呼ばれた時点で設定を上書きしているので、こんな違いが出てる。
ログインに失敗したときの処理を実装する
package sample.spring.security.handler;

import org.springframework.security.core.AuthenticationException;
import org.springframework.security.web.DefaultRedirectStrategy;
import org.springframework.security.web.authentication.AuthenticationFailureHandler;

import javax.servlet.ServletException;
import javax.servlet.http.HttpServletRequest;
import javax.servlet.http.HttpServletResponse;
import java.io.IOException;

public class MyAuthenticationFailureHandler implements AuthenticationFailureHandler {

    @Override
    public void onAuthenticationFailure(
            HttpServletRequest request, HttpServletResponse response, AuthenticationException exception)
                throws IOException, ServletException {
        DefaultRedirectStrategy redirectStrategy = new DefaultRedirectStrategy();
        redirectStrategy.sendRedirect(request, response, "/login");
    }
}
-
AuthenticationFailureHandlerを実装したクラスを作成する - ログインページに飛ばすだけの簡単な実装
namespace
<?xml version="1.0" encoding="UTF-8"?>
<beans xmlns="http://www.springframework.org/schema/beans"
       xmlns:sec="http://www.springframework.org/schema/security"
       ...>

    <bean id="authenticationFailureHandler"
          class="sample.spring.security.handler.MyAuthenticationFailureHandler" />

    <sec:http>
        ...
        <sec:form-login authentication-failure-handler-ref="authenticationFailureHandler"/>
        ...
    </sec:http>

    ...
</beans>
-
<form-login>のauthentication-failure-handler-refで、作成したAuthenticationFailureHandlerの Bean を指定する
Java Configuration
...

import sample.spring.security.handler.MyAuthenticationFailureHandler;

@EnableWebSecurity
public class MySpringSecurityConfig extends WebSecurityConfigurerAdapter {

    @Override
    public void configure(HttpSecurity http) throws Exception {
        http.authorizeRequests()
                .antMatchers("/login").permitAll()
                .anyRequest().authenticated()
                .and()
                .formLogin()
                    .failureHandler(new MyAuthenticationFailureHandler());
    }

    ...
}
-
failureHandler()でハンドラーを指定する
動作の様子は、単純にログイン画面に戻るだけなので割愛。
ログイン失敗の原因を識別する
AuthenticationFailureHandler の onAuthenticationFailure() は、引数の最後で認証時に発生した例外を受け取れる。
この例外を調べることで、ログイン失敗の原因を識別することができる。
アカウントがロックされている場合にエラーメッセージを調整したい場合とかは、ここで制御できる気がする。
| 例外 | シチュエーション |
|---|---|
BadCredentialsException |
ユーザが存在しない、パスワードが間違ってるなど |
LockedException |
UserDetails.isAccountNonLocked() が false を返した |
DisabledException |
UserDetails.isEnabled() が false を返した |
AccountExpiredException |
UserDetails.isAccountNonExpired() が false を返した |
CredentialsExpiredException |
UserDetails.isCredentialsNonExpired() が false を返した |
SessionAuthenticationException |
セッション数が上限を超えた場合など(詳細後日) |
認可
Hello World
実装
namespace
<?xml version="1.0" encoding="UTF-8"?>
<beans xmlns="http://www.springframework.org/schema/beans"
       xmlns:sec="http://www.springframework.org/schema/security"
       xmlns:xsi="http://www.w3.org/2001/XMLSchema-instance"
       ...>

    ...

    <sec:http>
        <sec:intercept-url pattern="/login" access="permitAll" />
        <sec:intercept-url pattern="/**" access="isAuthenticated() and hasAuthority('USER')" />
        <sec:form-login />
        <sec:logout />
    </sec:http>

    <sec:authentication-manager>
        <sec:authentication-provider>
            <sec:user-service>
                <sec:user
                    name="hoge"
                    password="hoge"
                    authorities="USER" />
                <sec:user
                    name="fuga"
                    password="fuga"
                    authorities="" />
            </sec:user-service>
        </sec:authentication-provider>
    </sec:authentication-manager>
</beans>
Java Configuration
package sample.spring.security;

import org.springframework.beans.factory.annotation.Autowired;
import org.springframework.security.config.annotation.authentication.builders.AuthenticationManagerBuilder;
import org.springframework.security.config.annotation.web.builders.HttpSecurity;
import org.springframework.security.config.annotation.web.configuration.EnableWebSecurity;
import org.springframework.security.config.annotation.web.configuration.WebSecurityConfigurerAdapter;

import java.util.Collections;

@EnableWebSecurity
public class MySpringSecurityConfig extends WebSecurityConfigurerAdapter {

    @Override
    public void configure(HttpSecurity http) throws Exception {
        http.authorizeRequests()
                .antMatchers("/login").permitAll()
                .anyRequest().access("isAuthenticated() and hasAuthority('USER')")
                .and()
                .formLogin();
    }

    @Autowired
    public void configure(AuthenticationManagerBuilder auth) throws Exception {
        auth.inMemoryAuthentication()
            .withUser("hoge")
            .password("hoge")
            .authorities("USER")
            .and()
            .withUser("fuga")
            .password("fuga")
            .authorities(Collections.emptyList());
    }
}
動作確認
hoge ユーザーでログインする
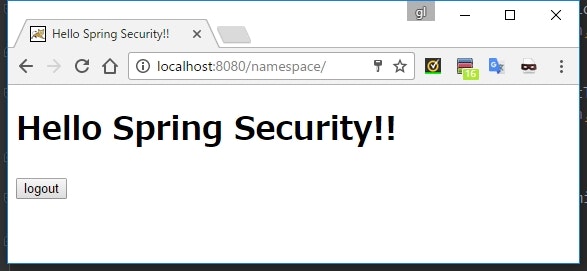
トップページが表示できる。
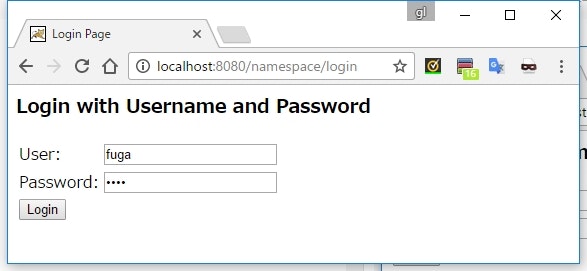
続いて fuga ユーザーでログインする
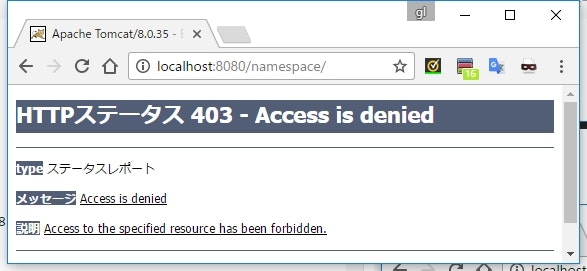
403 エラーになる。
説明
※namespace の方で説明するが、 Java Configuration も結局は同じ
    <sec:http>
        <sec:intercept-url pattern="/login" access="permitAll" />
        <sec:intercept-url pattern="/**" access="isAuthenticated() and hasAuthority('USER')" />
        <sec:form-login />
        <sec:logout />
    </sec:http>
-
<intercept-url>のaccess属性で、アクセスに必要な条件を定義する。 - この条件には Spring 独自の式言語である SpEL (Spring Expression Language) を使用する。
- ここでは Spring Security が独自に拡張した関数(
hasAuthority()など)や定数(permitAll)が使用できる。 -
isAuthenticated()は認証済みであればtrueになり、hasAuthority('USER')はユーザーがUSERという権限を持っていればtrueになる(andでつなげているので、その両方が満たされる必要がある)。
    <sec:user
        name="hoge"
        password="hoge"
        authorities="USER" />
    <sec:user
        name="fuga"
        password="fuga"
        authorities="" />
-
authorities属性で指定した文字列が、そのユーザーの持つ権限になる。 - 複数指定する場合は
,で区切る(例:USER, ADMIN)。
仕組み
認可処理が実行されるタイミング
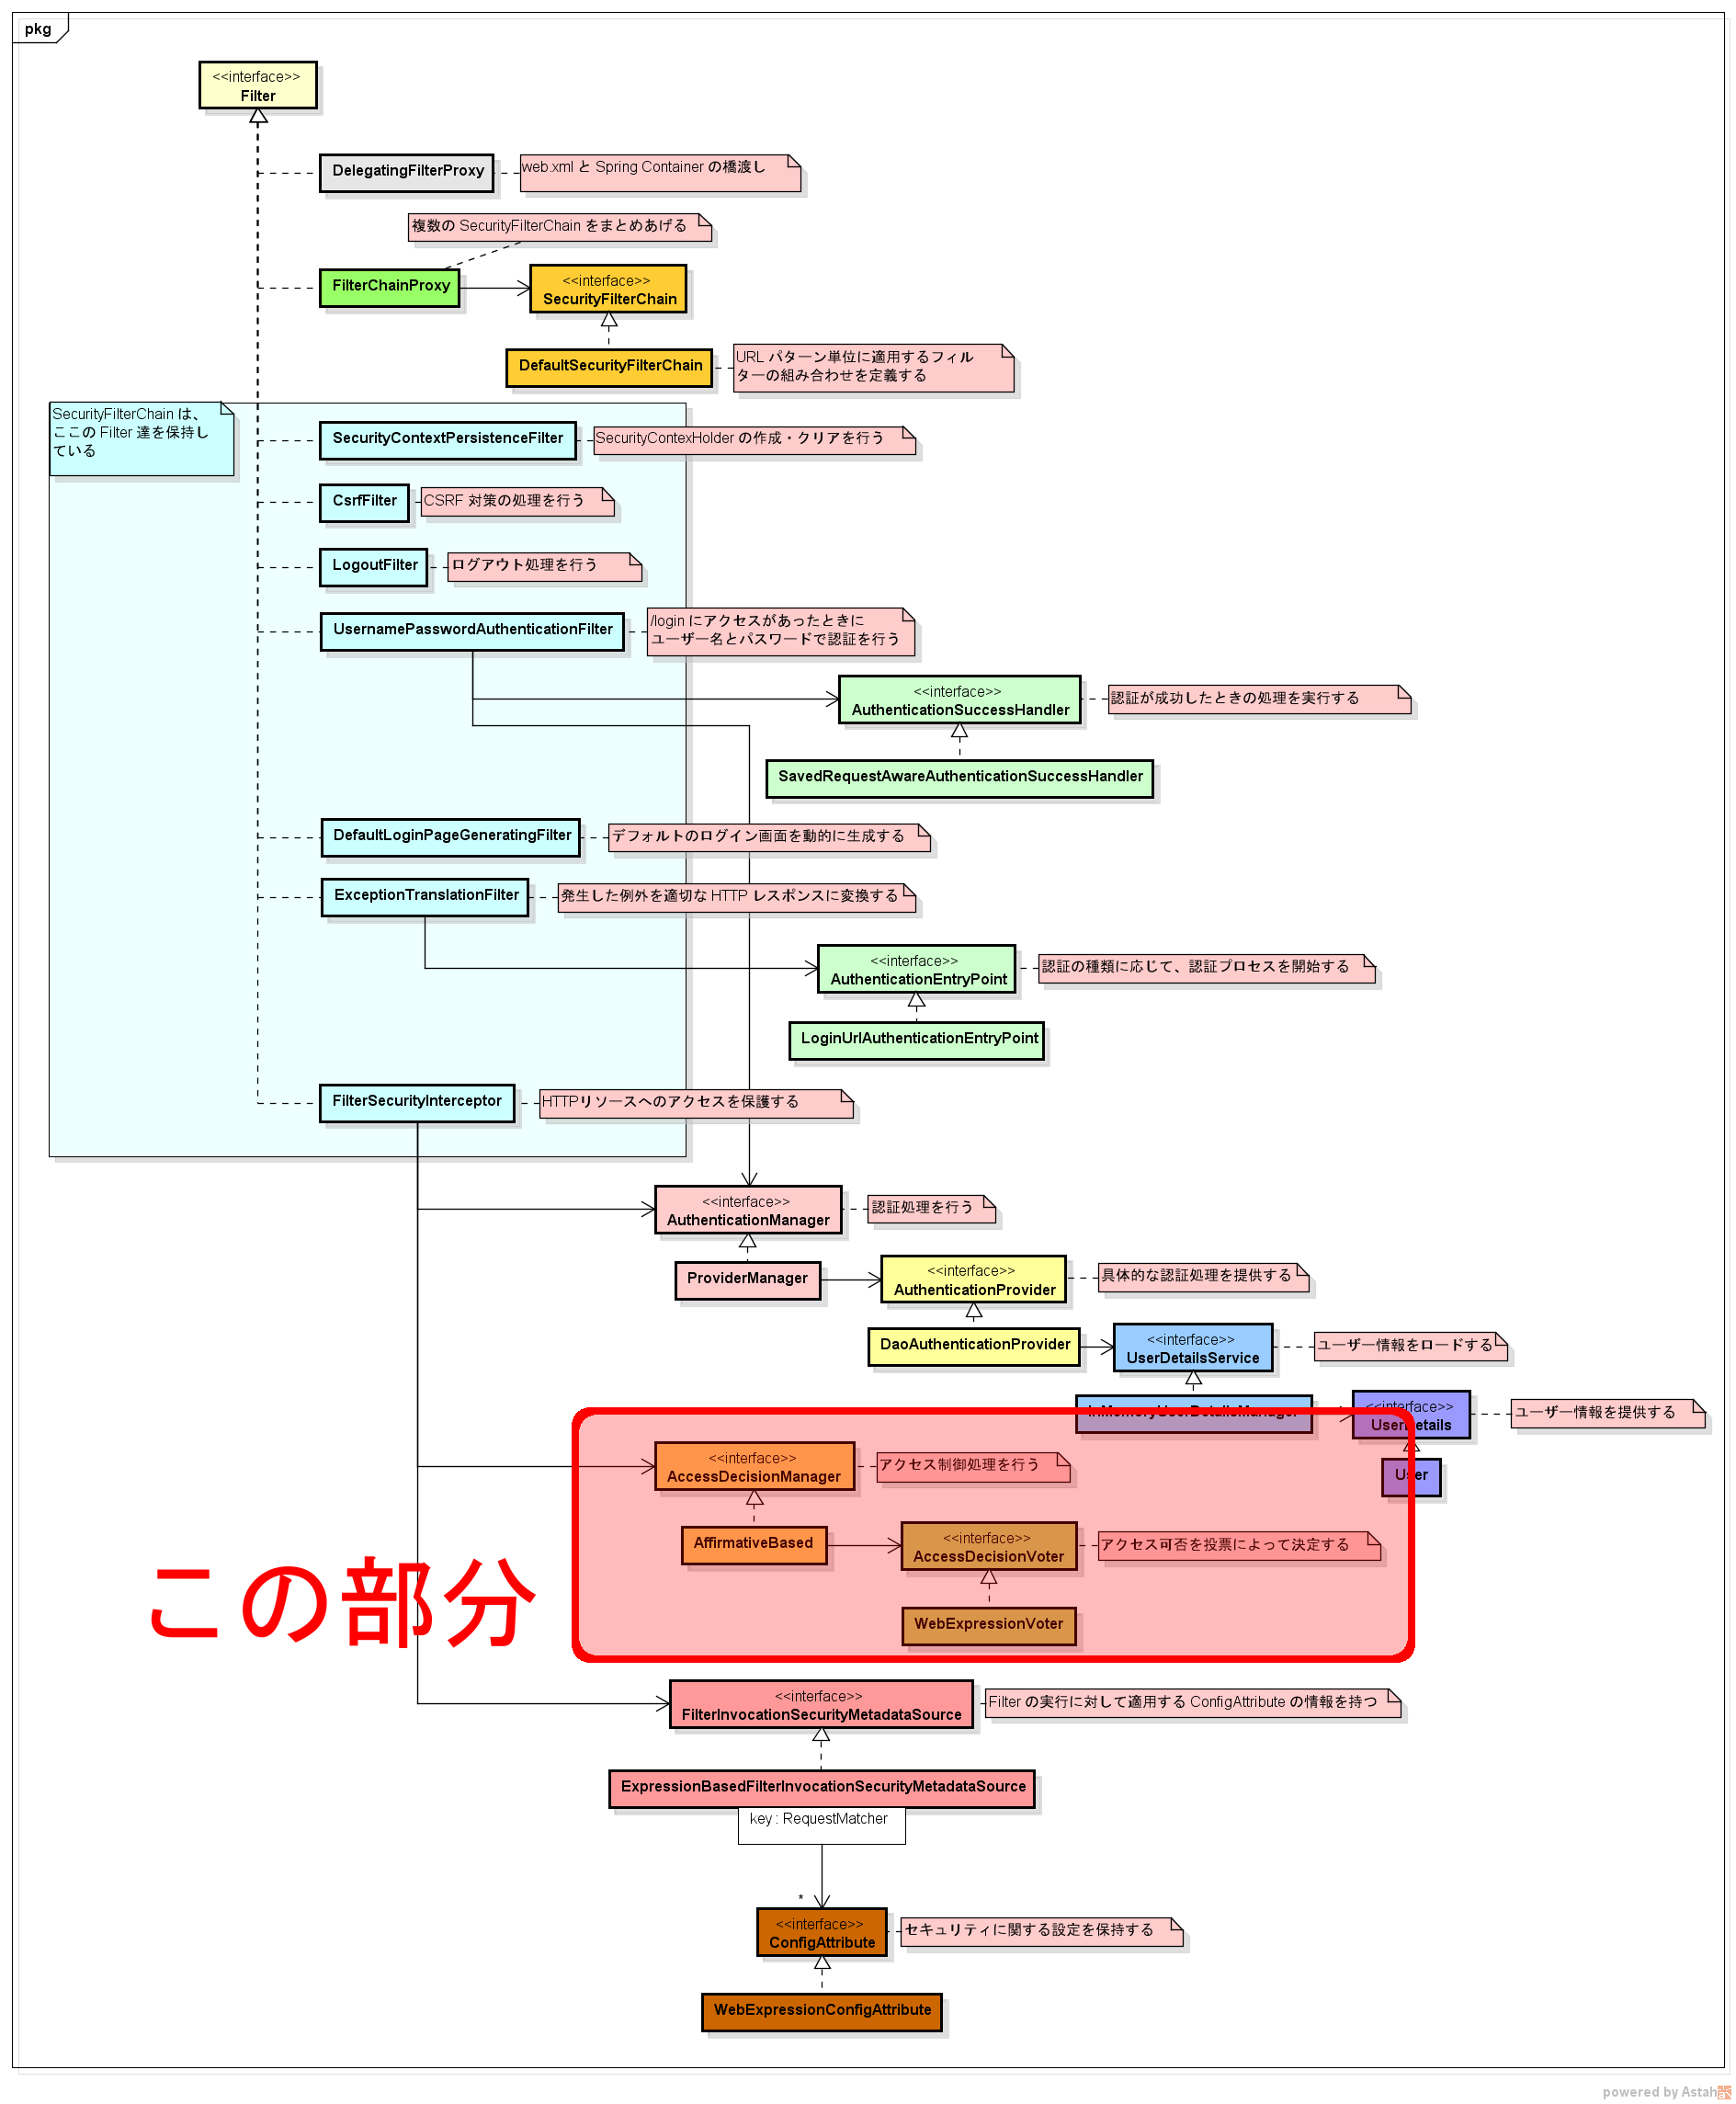
URL ベースの認可の処理が行われているのは、一連の Filter による処理の最後。
FilterSecurityInterceptor の処理の中で AccessDecisionManager によって行われている。
投票による判定
Spring Security が標準で提供している AccessDecisionManager の実装は、**「投票」**によってアクセスの可否を判定している。
AccessDecisionManager の実装クラスは AccessDecisionVoter という投票を行うクラスを複数持つことができるようになっている。
そして、対象(セキュアオブジェクト)に対して現在のユーザーがアクセスの権限があるかどうかを、各 AccessDecisionVoter にチェック(投票)させる。
投票結果は「付与(ACCESS_GRANTED)」「拒否(ACCESS_DENIED)」「棄権(ACCESS_ABSTAIN)」のいずれかになる。
AccessDecisionManager の実装クラスは、 AccessDecisionVoter 達の投票結果を集計して、最終的なアクセスの可否を決定する。
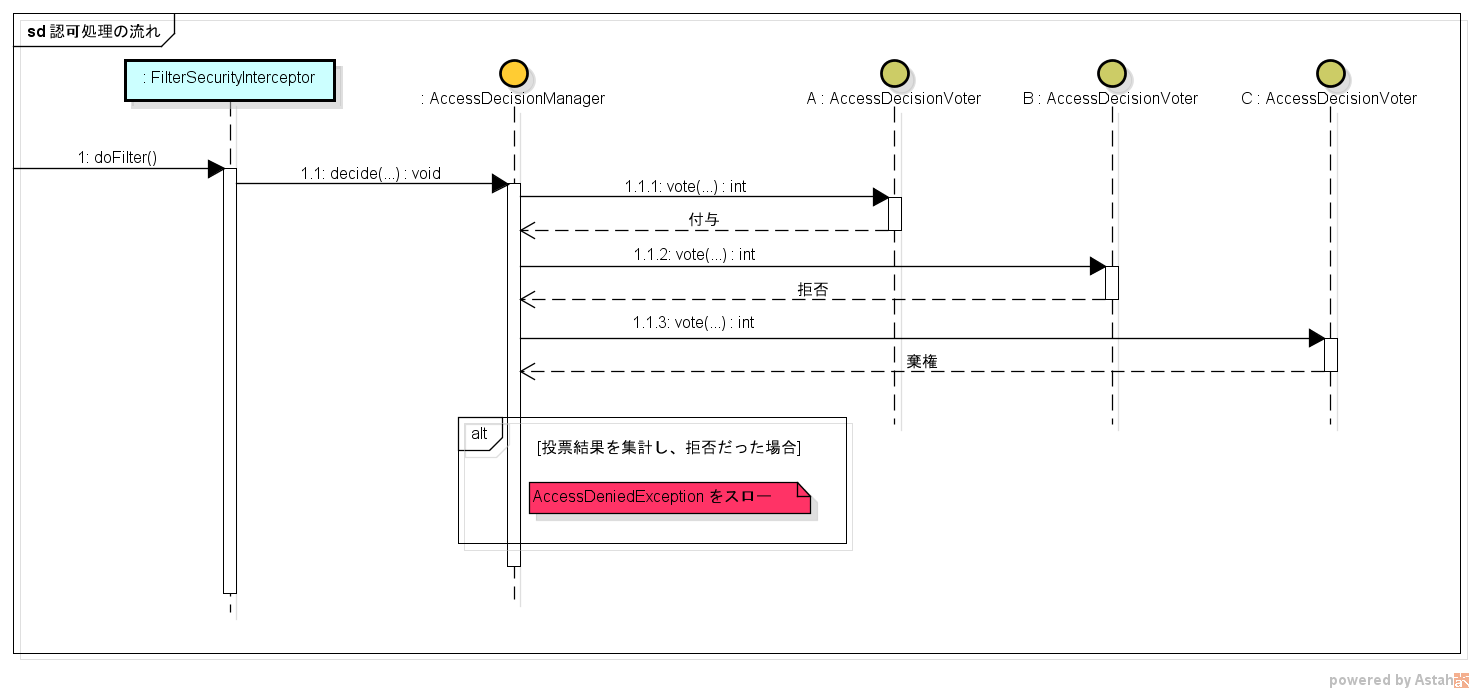
AccessDecisionManager の実装クラスには、集計方法の違いによって AffirmativeBased, ConsensusBased, UnanimousBased の3つが用意されている。
-
AffirmativeBased- 「付与」の投票が1つでもあればアクセス権を認める。
- 全ての投票が「棄権」だった場合は、デフォルトではアクセス権を認めない。
-
ConsensusBased- 「付与」の投票が「拒否」の投票よりも多ければアクセス権を認める。
- 「付与」と「拒否」が同数だった場合は、デフォルトではアクセス権を認める。
- 全ての投票が「棄権」だった場合は、デフォルトではアクセス権を認めない。
-
UnanimousBased- 全ての投票が「付与」の場合はアクセス権を認める。
- 全ての投票が「棄権」だった場合は、デフォルトではアクセス権を認めない。
デフォルトで使用されるのは AffirmativeBased になる。
アクセス権の判断方法
AccessDecisionManager のデフォルトの実装クラス3つは、直接はアクセス権の有無を判断していない。
実際にアクセス権の有無の判定をしているのは、 AccessDecisionVoter インターフェースを実装した投票者クラスになる。
AccessDecisionVoter インターフェースは次のような定義になっている(一部のみ)。
package org.springframework.security.access;

import java.util.Collection;

import org.springframework.security.core.Authentication;

public interface AccessDecisionVoter<S> {
	int ACCESS_GRANTED = 1;
	int ACCESS_ABSTAIN = 0;
	int ACCESS_DENIED = -1;

	...

	int vote(Authentication authentication, S object, Collection<ConfigAttribute> attributes);

}
vote() という投票を行うメソッドがある。
このメソッドが受け取った引数の情報からアクセス権の有無を判断し、同じく AccessDecisionVoter に定義されている定数(ACCESS_GRANTED, ACCESS_ABSTAIN, ACCESS_DENIED)のいずれかを返す。
各引数は、次のような意味を持つ。
-
authentication- 現在アクセスしているユーザーの認証情報
-
object- セキュリティ保護対象のオブジェクト(セキュアオブジェクト)
-
Filterの場合はFilterInvocation - メソッドセキュリティの場合は
MethodInvocation
-
attributes- セキュアオブジェクトに関連するセキュリティの設定
- Hello World の例だと、
<intercept-url>タグのaccess属性で設定した式(isAuthenticated() and hasAuthority('USER'))のこと
AccessDecisionVoter の実装クラスは、 authentication からユーザーに付与された権限を取得する。
そして、 attributes で渡ってきたセキュリティ設定と照らし合わせて、ユーザーにアクセス権限があるかどうかを判定する。
AccessDecisionVoter の実装
<http> タグの use-expressions 属性で true が指定されている場合(デフォルトは true)、 AccessDecisionVoter の実装には WebExpressionVoter が使用される。
このクラスは Expression 、すなわち式(SpEL)を評価してアクセスの有無を判定する Voter となっている。
AccessDecisionVoter には、他に RoleVoter とかメソッドセキュリティで使用される PreInvocationAuthorizationAdviceVoter とかが存在している。
ユーザーの権限を表す GrantedAuthority
Authentication インターフェースには、 getAuthorities() というメソッドが定義されている。
このメソッドは GrantedAuthority のコレクションを返却する。
GrantedAuthority もインターフェースで、名前の通り**「ユーザーに付与された権限」**を表している。
GrantedAuthority には getAuthority() という String を返すメソッドが1つだけ定義されている。
このメソッドは、「GrantedAuthority のインスタンスが表す権限を文字列で表現したもの」を返すようになっている1。
要は、 ROLE_USER とか OP_REGISTER_ITEM とか、そういう権限を表す文字列のこと。
Hello World でいうと、 <user> タグの authorities 属性で設定した値が GrantedAuthority になる。
<sec:user
    name="hoge"
    password="hoge"
    authorities="USER" /> ★これ
ここで設定した権限情報は、最初 UserDetetails を実装したクラスの中に保存されている。
そして、 AuthenticationProvider によって認証処理が行われたときに UserDetails の getAuthorities() メソッドによって取得され、 Authentication インスタンスの中に格納される。
仕組みまとめ

-
FilterSecurityInterceptorがAccessDecisionManager(AffirmativeBased) にアクセス権の判定を指示する。 -
AffirmativeBasedはAccessDecisionVoter(WebExpressionVoter) にアクセス権の判定を委譲する。 -
WebExpressionVoterはAuthenticationからGrantedAuthorityのコレクションを取得する。 -
WebExpressionVoterは、引数の情報とGrantedAuthorityの情報から条件となる式(SpEL)を実行する。 - 式の評価結果が
trueの場合は権限の付与を、falseであれば拒否を投票結果として返却する。 -
AffirmativeBasedは Voter の投票結果を集計して、アクセス権の有無を判定する。 - アクセス権なしと判定した場合は、
AccessDeniedExceptionをスローする。 - 例外がスローされなければ、アクセス権ありということで後続処理に続く。
式ベースでのアクセス制御
AccessDecisionVoter の実装に WebExpressionVoter が使用されている場合、 <intercept-url> タグの access 属性には式ベースのアクセス制御を定義することができる。
ここで使用する式には、 Spring Expression Language (SpEL) を使用する。
Spring Security ではアクセス制御の定義を容易にできるようにするため、独自の関数や変数が使用できるように拡張されている。
この式は最終的に単一の boolean に評価されるように記述する。
すると、式の評価結果が true ならアクセスを許可、 false ならアクセスを拒否するようになる。
使用できる関数・変数
| 関数・変数 | チェック内容・値 | 例 |
|---|---|---|
hasRole(String) |
指定したロールを持つ | hasRole('USER') |
hasAnyRole(String...) |
指定したロールのうち、いずれか1つを持つ | hasAnyRole('FOO', 'ROLE_BAR') |
hasAuthority(String) |
指定した権限を持つ | hasAuthority('CREATE_TICKET') |
hasAnyAuthority(String...) |
指定した権限のうち、いずれか1つを持つ | hasAnyAuthority('CREATE_TICKET', 'MANAGE_TICKET') |
isAnonymous() |
匿名認証されていること | - |
isRememberMe() |
Remember-Me 認証されていること | - |
isAuthenticated() |
認証済みであること | - |
isFullyAuthenticated() |
完全に認証されていること | - |
permitAll |
常に true と評価される |
- |
denyAll |
常に false と評価される |
- |
isAnonymous(), isRememberMe(), isAuthenticated(), isFullyAuthenticated() の関係は次のような感じ。
| 匿名認証 | Remember-Me認証 | 完全な認証2 | |
|---|---|---|---|
isAnonymous() |
true | false | false |
isRememberMe() |
false | true | false |
isAuthenticated() |
false | true | true |
isFullyAuthenticated() |
false | false | true |
hasRole() と hasAuthority() の違い
WebExpressionVoter で使用できる関数のなかには、権限の有無をチェックする関数として hasRole() と hasAuthority() がある。
どちらもユーザーに付与された GrantedAuthority の有無についてチェックする点は変わらない。
違うのは、 hasRole() の方は ROLE_ プレフィックスを補完するという点。
| ユーザが持つ権限→ | USER |
ROLE_USER |
|---|---|---|
hasRole('USER') |
false | true |
hasRole('ROLE_USER') |
false | true |
hasAuthority('USER') |
true | false |
hasAuthority('ROLE_USER') |
false | true |
hasAuthority() は、 GrantedAuthority の文字列表現が完全に一致することを検証する。
一方 hasRole() は、引数で渡した文字列が ROLE_ で始まっていない場合は ROLE_ を補完したうえで GrantedAuthority と比較する。
(hasRole('USER') は、 ROLE_ を補完して ROLE_USER として比較する)
ROLE とは?
Role (役割)は Authority (権限)と何か違うのかというと、別に何も変わらない。
違いは、先頭が ROLE_ で始まっているかどうかというだけで、どちらも実体は GrantedAuthority なのは同じ。
なぜ ROLE_ というプレフィックスがついたものが特別扱いされているかというと、これは自分の推測だが、昔は RoleVoter という Voter が使われていたことに起因している気がする。
WebExpressionVoter は ver 3.0 で追加されたもので、それ以前はたぶん RoleVoter と AuthenticatedVoter の組み合わせが使われていたっぽい。
namespace を使用している場合は、 <http> の use-expression に false を設定することでその状態にできる。
<?xml version="1.0" encoding="UTF-8"?>
<beans xmlns="http://www.springframework.org/schema/beans"
       xmlns:sec="http://www.springframework.org/schema/security"
       xmlns:xsi="http://www.w3.org/2001/XMLSchema-instance"
       ...>

    <sec:http use-expressions="false">
        <sec:intercept-url pattern="/login" access="IS_AUTHENTICATED_ANONYMOUSLY" />
        <sec:intercept-url pattern="/**" access="ROLE_ADMIN" />
        <sec:form-login />
        <sec:logout />
    </sec:http>

    <sec:authentication-manager>
        <sec:authentication-provider>
            <sec:user-service>
                <sec:user
                    name="user"
                    password="user"
                    authorities="ROLE_USER" />
                <sec:user
                    name="admin"
                    password="admin"
                    authorities="ROLE_ADMIN" />
            </sec:user-service>
        </sec:authentication-provider>
    </sec:authentication-manager>
</beans>
<intercept-url> の access に SpEL は使えなくなる。
代わりに、 AuthenticatedVoter と RoleVoter 用の設定を記述する。
IS_AUTHENTICATED_ANONYMOUSLY は AuthenticatedVoter 用の設定で、匿名認証であることを検証する(つまり、未ログインでも OK という設定)。
また ROLE_ADMIN は RoleVoter 用の設定で ROLE_ADMIN という権限を持つかどうかを検証する。
pattern="/login" の方は AuthenticatedVoter 用の設定しかないので、 RoleVoter による検証は不要となる。
しかし、 AccessDecisionManager はその要・不要をいちいち判断してられないので3、とりあえず各 AccessDecisionVoter に投票の依頼を出すようになっている(ここでは AuthenticatedVoter と RoleVoter が投票を行う)。
要・不要の判断は各 Voter が持つ supports(ConfigAttribute) メソッドで行われる。
以下は RoleVoter の supports() メソッドになる。
    public boolean supports(ConfigAttribute attribute) {
        if ((attribute.getAttribute() != null)
                && attribute.getAttribute().startsWith(getRolePrefix())) {
            return true;
        }
        else {
            return false;
        }
    }
attribute は、 access 属性で指定した値が渡ってくる(カンマ区切りで複数指定していた場合は、1つずつ渡ってくる)
getRolePrefix() は "ROLE_" を返す。
つまり、 access 属性で指定された値が ROLE_ で始まるかどうかを検証し、始まっていればサポートするし、そうでなければサポートしない、ということになる。
サポートしない場合、 RoleVoter は投票結果として「棄権」を返す。
このように、権限の名前を ROLE_ で始めるルールにすることで、 RoleVoter が無駄な権限チェック処理をしないようなる。
同様に AuthenticatedVoter も access で指定された値が特定の文字列でなければ処理しないようになっている。つまり、 ROLE_ で始まる設定値はサポート外として処理をしないようになっている。
このようにそれぞれの Voter がサポートの有無を制御することで、無駄な判定をしないように工夫されている。
その結果が ROLE_ という特殊なプレフィックスとなっている。
ところが WebExpressionVoter が現れた今となっては、 SpEL で柔軟な定義ができるようになっており、複数の Voter を組み合わせるという必要性は薄まっている気がする。
(実際 WebExpressionVoter と RoleVoter を組み合わせようとしても access="ROLE_USER" なんて書いたら SpEL 式のパースでエラーになり、そもそも組み合わせができない状態になってる)
SpEL 式から Bean を参照する
実装
package sample.spring.security.expression;

import org.springframework.security.core.Authentication;

public class MyExpression {

    public boolean check(Authentication authentication) {
        String name = authentication.getName();
        System.out.println("name = " + name);
        return "hoge".equals(name);
    }
}
namespace
<?xml version="1.0" encoding="UTF-8"?>
<beans xmlns="http://www.springframework.org/schema/beans"
       xmlns:sec="http://www.springframework.org/schema/security"
       ...>

    <bean id="myExpression" class="sample.spring.security.expression.MyExpression" />

    <sec:http>
        <sec:intercept-url pattern="/login" access="permitAll" />
        <sec:intercept-url pattern="/**" access="@myExpression.check(authentication)" />
        <sec:form-login />
        <sec:logout />
    </sec:http>

    <sec:authentication-manager>
        <sec:authentication-provider>
            <sec:user-service>
                <sec:user
                        name="hoge"
                        password="hoge"
                        authorities="" />
                <sec:user
                        name="fuga"
                        password="fuga"
                        authorities="" />
            </sec:user-service>
        </sec:authentication-provider>
    </sec:authentication-manager>
</beans>
Java Configuration
package sample.spring.security;

import org.springframework.beans.factory.annotation.Autowired;
import org.springframework.context.annotation.Bean;
import org.springframework.security.config.annotation.authentication.builders.AuthenticationManagerBuilder;
import org.springframework.security.config.annotation.web.builders.HttpSecurity;
import org.springframework.security.config.annotation.web.configuration.EnableWebSecurity;
import org.springframework.security.config.annotation.web.configuration.WebSecurityConfigurerAdapter;
import sample.spring.security.expression.MyExpression;

import java.util.Collections;

@EnableWebSecurity
public class MySpringSecurityConfig extends WebSecurityConfigurerAdapter {

    @Override
    public void configure(HttpSecurity http) throws Exception {
        http.authorizeRequests()
                .antMatchers("/login").permitAll()
                .anyRequest().access("@myExpression.check(authentication)")
                .and()
                .formLogin();
    }

    @Autowired
    public void configure(AuthenticationManagerBuilder auth) throws Exception {
        auth.inMemoryAuthentication()
                .withUser("hoge")
                .password("hoge")
                .authorities(Collections.emptyList())
                .and()
                .withUser("fuga")
                .password("fuga")
                .authorities(Collections.emptyList());
    }

    @Bean
    public MyExpression myExpression() {
        return new MyExpression();
    }
}
動作確認
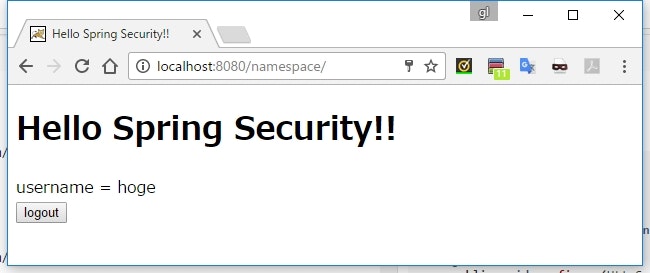
左が hoge でアクセスしたとき、右が fuga でアクセスしたとき
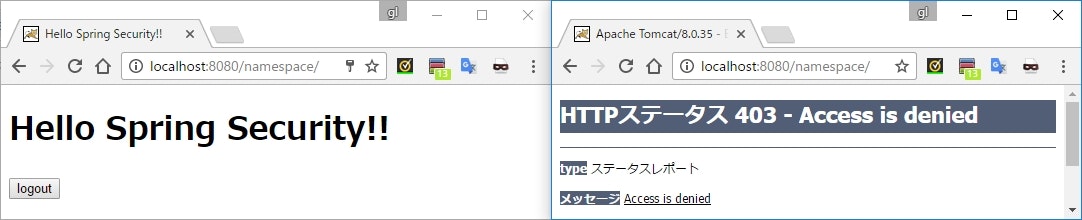
name = hoge
name = fuga
説明
package sample.spring.security.expression;

import org.springframework.security.core.Authentication;

public class MyExpression {

    public boolean check(Authentication authentication) {
        String name = authentication.getName();
        System.out.println("name = " + name);
        return "hoge".equals(name);
    }
}
    <sec:http>
        ...
        <sec:intercept-url pattern="/**" access="@myExpression.check(authentication)" />
        ...
    </sec:http>
-
@bean名で、任意の Bean を参照することができる
定数・関数が定義されているオブジェクト
permitAll や hasAuthority() などは、 SecurityExpressionRoot に定義されている。
さらに、 Filter に対するアクセス制御が処理されるときは WebSecurityExpressionRoot が使用されている。
自作の Voter を使用する
実装
package sample.spring.security.voter;

import org.springframework.security.access.AccessDecisionVoter;
import org.springframework.security.access.ConfigAttribute;
import org.springframework.security.core.Authentication;
import org.springframework.security.core.userdetails.UserDetails;

import java.util.Collection;

public class AcceptFugaVoter implements AccessDecisionVoter<Object> {
    @Override
    public boolean supports(ConfigAttribute attribute) {
        return true;
    }

    @Override
    public boolean supports(Class<?> clazz) {
        return true;
    }

    @Override
    public int vote(Authentication authentication, Object object, Collection<ConfigAttribute> attributes) {
        Object principal = authentication.getPrincipal();
        if (!(principal instanceof UserDetails)) {
            return ACCESS_ABSTAIN;
        }

        String username = ((UserDetails)principal).getUsername();
        return "fuga".equals(username) ? ACCESS_GRANTED : ACCESS_DENIED;
    }
}
ユーザー名が fuga ならアクセスを許可するガバガバな Voter。
namespace
<?xml version="1.0" encoding="UTF-8"?>
<beans xmlns="http://www.springframework.org/schema/beans"
       xmlns:sec="http://www.springframework.org/schema/security"
       ...>

    <bean id="accessDecisionManager"
          class="org.springframework.security.access.vote.AffirmativeBased">
        <constructor-arg>
            <list>
                <bean class="org.springframework.security.web.access.expression.WebExpressionVoter" />
                <bean class="sample.spring.security.voter.AcceptFugaVoter" />
            </list>
        </constructor-arg>
    </bean>

    <sec:http access-decision-manager-ref="accessDecisionManager">
        <sec:intercept-url pattern="/login" access="permitAll" />
        <sec:intercept-url pattern="/**" access="hasAuthority('HOGE')" />
        <sec:form-login />
        <sec:logout />
    </sec:http>

    <sec:authentication-manager>
        <sec:authentication-provider>
            <sec:user-service>
                <sec:user
                    name="hoge"
                    password="hoge"
                    authorities="HOGE" />
                <sec:user
                    name="fuga"
                    password="fuga"
                    authorities="" />
                <sec:user
                    name="piyo"
                    password="piyo"
                    authorities="" />
            </sec:user-service>
        </sec:authentication-provider>
    </sec:authentication-manager>
</beans>
Java Configuration
package sample.spring.security;

import org.springframework.beans.factory.annotation.Autowired;
import org.springframework.security.access.AccessDecisionManager;
import org.springframework.security.access.vote.AffirmativeBased;
import org.springframework.security.config.annotation.authentication.builders.AuthenticationManagerBuilder;
import org.springframework.security.config.annotation.web.builders.HttpSecurity;
import org.springframework.security.config.annotation.web.configuration.EnableWebSecurity;
import org.springframework.security.config.annotation.web.configuration.WebSecurityConfigurerAdapter;
import org.springframework.security.web.access.expression.WebExpressionVoter;
import sample.spring.security.voter.AcceptFugaVoter;

import java.util.Arrays;
import java.util.Collections;

@EnableWebSecurity
public class MySpringSecurityConfig extends WebSecurityConfigurerAdapter {

    @Override
    public void configure(HttpSecurity http) throws Exception {
        http.authorizeRequests()
                .accessDecisionManager(this.createAccessDecisionManager())
                .antMatchers("/login").permitAll()
                .anyRequest().hasAuthority("HOGE")
                .and()
                .formLogin();
    }

    private AccessDecisionManager createAccessDecisionManager() {
        return new AffirmativeBased(Arrays.asList(
            new WebExpressionVoter(),
            new AcceptFugaVoter()
        ));
    }

    @Autowired
    public void configure(AuthenticationManagerBuilder auth) throws Exception {
        auth.inMemoryAuthentication()
            .withUser("hoge")
            .password("hoge")
            .authorities("HOGE")
        .and()
            .withUser("fuga")
            .password("fuga")
            .authorities(Collections.emptyList())
        .and()
            .withUser("piyo")
            .password("piyo")
            .authorities(Collections.emptyList());
    }
}
動作確認
左から順に hoge, fuga, piyo ユーザーでログインした後の状態。

説明
<?xml version="1.0" encoding="UTF-8"?>
<beans xmlns="http://www.springframework.org/schema/beans"
       xmlns:sec="http://www.springframework.org/schema/security"
       ...>

    <bean id="accessDecisionManager"
          class="org.springframework.security.access.vote.AffirmativeBased">
        <constructor-arg>
            <list>
                <bean class="org.springframework.security.web.access.expression.WebExpressionVoter" />
                <bean class="sample.spring.security.voter.AcceptFugaVoter" />
            </list>
        </constructor-arg>
    </bean>

    <sec:http access-decision-manager-ref="accessDecisionManager">
        ...
    </sec:http>

    ...
</beans>
-
<http>タグのaccess-decision-manager-refでAccessDecisionManagerを指定できる。- Java Configuration の場合は
accessDecisionManager()メソッドで指定できる。
- Java Configuration の場合は
- ここに、自作の
Voterを設定したAccessDecisionManagerを渡す。 -
Voterの指定は、AffirmativeBasedのコンストラクタで行う。-
ConsensusBasedとUnanimousBasedも同じ。
-
Role の継承
Role には継承関係がある
Role には、普通継承関係がある。
例えば、「ユーザー」と「管理者」の Role があったとした場合、普通「管理者」は「ユーザー」を継承している。
つまり、「ユーザー」ができることは「管理者」にもできる、という関係になっている。
しかし、これを単純に Role の有り無しだけで制御しようとすると、次のような設定になる。
<?xml version="1.0" encoding="UTF-8"?>
<beans xmlns="http://www.springframework.org/schema/beans"
       xmlns:sec="http://www.springframework.org/schema/security"
       xmlns:xsi="http://www.w3.org/2001/XMLSchema-instance"
       ...>

    <sec:http>
        <sec:intercept-url pattern="/login" access="permitAll" />
        <sec:intercept-url pattern="/hierarchy/admin" access="hasRole('ADMIN')" />
        <sec:intercept-url pattern="/hierarchy/user" access="hasRole('USER') or hasRole('ADMIN')" />
        <sec:intercept-url pattern="/**" access="isAuthenticated()" />
        <sec:form-login />
        <sec:logout />
    </sec:http>

    <sec:authentication-manager>
        <sec:authentication-provider>
            <sec:user-service>
                <sec:user
                    name="user"
                    password="user"
                    authorities="ROLE_USER" />
                <sec:user
                    name="admin"
                    password="admin"
                    authorities="ROLE_ADMIN" />
            </sec:user-service>
        </sec:authentication-provider>
    </sec:authentication-manager>
</beans>
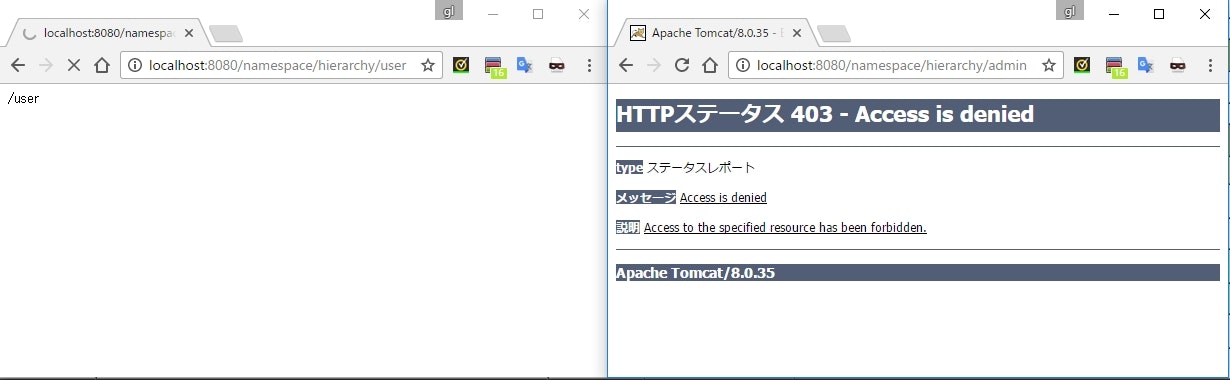
/hierarchy/admin は「管理者」のみが、 /hierarchy/user は「ユーザー」であればアクセスできるようにしている。
/hierarchy/admin の方は単純に hasRole('ADMIN') で済んでいる。
しかし /hierarchy/user の方は hasRole('USER') or hasRole('ADMIN') としている。
もし hasRole('USER') だけだと、 ROLE_ADMIN のみを持つユーザーがアクセスしたときにブロックしてしまうため、このような冗長な設定になっている。
このように、単純に Role の有る無しだけで Role の継承関係を実現しようとすると、親となる Role (ROLE_USER)を指定している場所全てに子の Role (ROLE_ADMIN)も設定しなければならなくなる。
access の方は hasRole('USER') だけにして、 authorities に ADMIN を設定する場合は必ず USER も一緒に設定するという方法もある。
しかし、いずれにしても記述が冗長という点に違いはない。
RoleHierarchy を使って Role の継承関係を定義する
Spring Security には、 Role の継承関係を定義する仕組みが用意されている。
先ほどの設定は、 RoleHierarchy を利用すると次のように書き換えられる。
namespace
<?xml version="1.0" encoding="UTF-8"?>
<beans xmlns="http://www.springframework.org/schema/beans"
       xmlns:sec="http://www.springframework.org/schema/security"
       xmlns:xsi="http://www.w3.org/2001/XMLSchema-instance"
       ...>

    <bean id="roleHierarchy"
          class="org.springframework.security.access.hierarchicalroles.RoleHierarchyImpl">
        <property name="hierarchy">
            <value>
                ROLE_ADMIN > ROLE_USER
            </value>
        </property>
    </bean>

    <bean id="expressionHandler"
          class="org.springframework.security.web.access.expression.DefaultWebSecurityExpressionHandler">
        <property name="roleHierarchy" ref="roleHierarchy" />
    </bean>

    <sec:http>
        <sec:expression-handler ref="expressionHandler" />

        <sec:intercept-url pattern="/login" access="permitAll" />
        <sec:intercept-url pattern="/hierarchy/admin" access="hasRole('ADMIN')" />
        <sec:intercept-url pattern="/hierarchy/user" access="hasRole('USER')" />
        <sec:intercept-url pattern="/**" access="isAuthenticated()" />
        <sec:form-login />
        <sec:logout />
    </sec:http>

    <sec:authentication-manager>
        <sec:authentication-provider>
            <sec:user-service>
                <sec:user
                    name="user"
                    password="user"
                    authorities="ROLE_USER" />
                <sec:user
                    name="admin"
                    password="admin"
                    authorities="ROLE_ADMIN" />
            </sec:user-service>
        </sec:authentication-provider>
    </sec:authentication-manager>
</beans>
Java Configuration
package sample.spring.security;

import org.springframework.beans.factory.annotation.Autowired;
import org.springframework.security.access.expression.SecurityExpressionHandler;
import org.springframework.security.access.hierarchicalroles.RoleHierarchyImpl;
import org.springframework.security.config.annotation.authentication.builders.AuthenticationManagerBuilder;
import org.springframework.security.config.annotation.web.builders.HttpSecurity;
import org.springframework.security.config.annotation.web.configuration.EnableWebSecurity;
import org.springframework.security.config.annotation.web.configuration.WebSecurityConfigurerAdapter;
import org.springframework.security.web.FilterInvocation;
import org.springframework.security.web.access.expression.DefaultWebSecurityExpressionHandler;

@EnableWebSecurity
public class MySpringSecurityConfig extends WebSecurityConfigurerAdapter {

    @Override
    public void configure(HttpSecurity http) throws Exception {
        http.authorizeRequests()
                .expressionHandler(this.createSecurityExpressionHandler())
                .antMatchers("/login").permitAll()
                .antMatchers("/hierarchy/user").hasRole("USER")
                .antMatchers("/hierarchy/admin").hasRole("ADMIN")
                .anyRequest().authenticated()
                .and()
                .formLogin();
    }

    private SecurityExpressionHandler<FilterInvocation> createSecurityExpressionHandler() {
        RoleHierarchyImpl roleHierarchy = new RoleHierarchyImpl();
        roleHierarchy.setHierarchy("ROLE_ADMIN > ROLE_USER");

        DefaultWebSecurityExpressionHandler expressionHandler = new DefaultWebSecurityExpressionHandler();
        expressionHandler.setRoleHierarchy(roleHierarchy);

        return expressionHandler;
    }

    @Autowired
    public void configure(AuthenticationManagerBuilder auth) throws Exception {
        auth.inMemoryAuthentication()
            .withUser("user")
            .password("user")
            .roles("USER")
        .and()
            .withUser("admin")
            .password("admin")
            .roles("ADMIN");
    }
}
動作確認
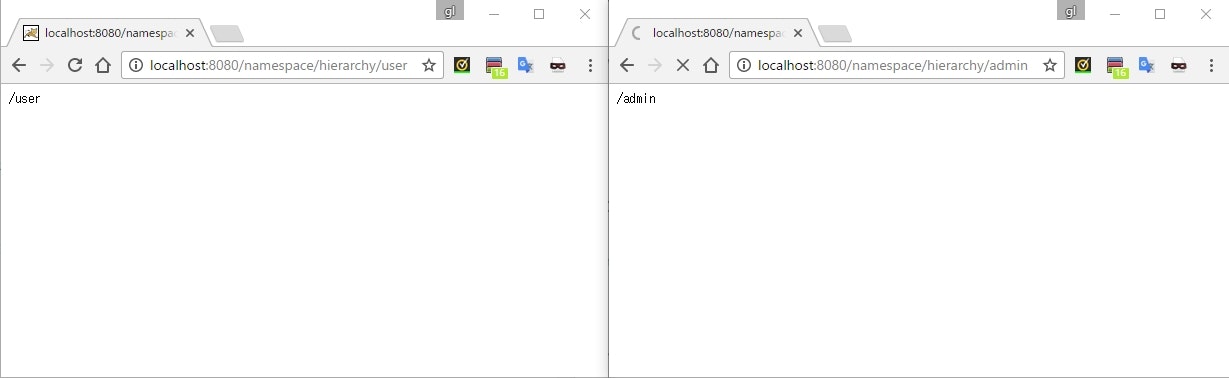
user, admin のそれぞれでログインして /hierarchy/user と /hierarchy/admin にアクセスする。
user でログインした場合
admin でログインした場合
説明
    <bean id="roleHierarchy"
          class="org.springframework.security.access.hierarchicalroles.RoleHierarchyImpl">
        <property name="hierarchy">
            <value>
                ROLE_ADMIN > ROLE_USER
            </value>
        </property>
    </bean>
-
RoleHierarchyインターフェースの実装クラスとして、RoleHierarchyImplを Bean 定義する。 - このとき、
hierarchyプロパティに Role の継承関係の定義を記述する。 - 継承関係の定義は、
子ロール名 > 親ロール名で記述する。
複数定義する場合は、
ROLE_A > ROLE_B
ROLE_B > ROLE_C
のようにできる(改行は無くてもいいが、あったほうが見やすい)。
    <bean id="roleHierarchy"
          class="org.springframework.security.access.hierarchicalroles.RoleHierarchyImpl">
        ...
    </bean>

    <bean id="expressionHandler"
          class="org.springframework.security.web.access.expression.DefaultWebSecurityExpressionHandler">
        <property name="roleHierarchy" ref="roleHierarchy" />
    </bean>

    <sec:http>
        <sec:expression-handler ref="expressionHandler" />

        ...
    </sec:http>
次に、SpEL が評価されるときに、この RoleHierarchyImpl が使用されるように設定する。
そのためには SecurityExpressionHandler を Bean として登録する。
実装クラスとしては DefaultWebSecurityExpressionHandler を使用し、 roleHierarchy プロパティに先ほど定義した RoleHierarchyImpl を指定する。
そして、 <http> のサブ要素として <expression-handler> を追加し、 ref 属性で SecurityExpressionHandler を指定する。
WebExpressionVoter を使用しない
RoleHierarchyVoter を WebExpressionVoter を使用せずに利用する。
<?xml version="1.0" encoding="UTF-8"?>
<beans xmlns="http://www.springframework.org/schema/beans"
       xmlns:sec="http://www.springframework.org/schema/security"
       xmlns:xsi="http://www.w3.org/2001/XMLSchema-instance"
       ...>

    <bean id="roleHierarchy"
          class="org.springframework.security.access.hierarchicalroles.RoleHierarchyImpl">
        <property name="hierarchy">
            <value>
                ROLE_ADMIN > ROLE_USER
            </value>
        </property>
    </bean>

    <bean id="roleHierarchyVoter"
          class="org.springframework.security.access.vote.RoleHierarchyVoter">
        <constructor-arg ref="roleHierarchy" />
    </bean>

    <bean id="accessDecisionManager"
          class="org.springframework.security.access.vote.AffirmativeBased">
        <constructor-arg>
            <list>
                <bean class="org.springframework.security.access.vote.AuthenticatedVoter" />
                <ref bean="roleHierarchyVoter" />
            </list>
        </constructor-arg>
    </bean>

    <sec:http use-expressions="false"
              access-decision-manager-ref="accessDecisionManager">
        <sec:intercept-url pattern="/login" access="IS_AUTHENTICATED_ANONYMOUSLY" />
        <sec:intercept-url pattern="/hierarchy/admin" access="ROLE_ADMIN" />
        <sec:intercept-url pattern="/hierarchy/user" access="ROLE_USER" />
        <sec:intercept-url pattern="/**" access="IS_AUTHENTICATED_FULLY" />
        <sec:form-login />
        <sec:logout />
    </sec:http>

    <sec:authentication-manager>
        <sec:authentication-provider>
            <sec:user-service>
                <sec:user
                    name="user"
                    password="user"
                    authorities="ROLE_USER" />
                <sec:user
                    name="admin"
                    password="admin"
                    authorities="ROLE_ADMIN" />
            </sec:user-service>
        </sec:authentication-provider>
    </sec:authentication-manager>
</beans>
認可エラー時の制御
エラーページを指定する
実装
<!doctype html>
<html>
    <head>
        <meta charset="UTF-8" />
        <title>認可エラー</title>
    </head>
    <body>
        <h1>その操作は許可されてません!</h1>
    </body>
</html>
namespace
<?xml version="1.0" encoding="UTF-8"?>
<beans xmlns="http://www.springframework.org/schema/beans"
       xmlns:sec="http://www.springframework.org/schema/security"
       ...>

    <sec:http>
        <sec:intercept-url pattern="/login" access="permitAll" />
        <sec:intercept-url pattern="/test" access="hasAuthority('HOGE')" />
        <sec:intercept-url pattern="/**" access="isAuthenticated()" />
        <sec:form-login />
        <sec:logout />
        <sec:access-denied-handler error-page="/access-denied.html" />
    </sec:http>

    ...
</beans>
Java Configuration
...

@EnableWebSecurity
public class MySpringSecurityConfig extends WebSecurityConfigurerAdapter {

    @Override
    public void configure(HttpSecurity http) throws Exception {
        http.authorizeRequests()
                ...
                .and()
                .exceptionHandling().accessDeniedPage("/access-denied.html");
    }

    ...
}
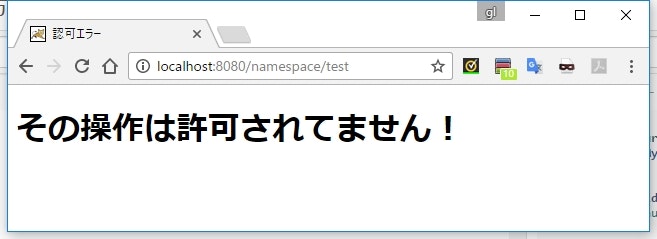
動作確認
hoge でログイン後、 /test にアクセス
説明
<sec:access-denied-handler error-page="/access-denied.html" />
.exceptionHandling().accessDeniedPage("/access-denied.html");
- namespace の場合は、
<access-denied-handler>タグを追加して、error-page属性で指定する - Java Configuration の場合は、
exceptionHandler().accessDeniedPage(String)で指定する - 遷移は forward で行われる
任意の実装で制御する
実装
package sample.spring.security.handler;

import org.springframework.security.access.AccessDeniedException;
import org.springframework.security.web.DefaultRedirectStrategy;
import org.springframework.security.web.access.AccessDeniedHandler;

import javax.servlet.ServletException;
import javax.servlet.http.HttpServletRequest;
import javax.servlet.http.HttpServletResponse;
import java.io.IOException;

public class MyAccessDeniedHandler implements AccessDeniedHandler {

    @Override
    public void handle(HttpServletRequest request, HttpServletResponse response, AccessDeniedException accessDeniedException) throws IOException, ServletException {
        if (response.isCommitted()) {
            return;
        }

        response.setStatus(HttpServletResponse.SC_FORBIDDEN);

        DefaultRedirectStrategy redirectStrategy = new DefaultRedirectStrategy();
        redirectStrategy.sendRedirect(request, response, "/access-denied.html");
    }
}
-
AccessDeniedHandlerを実装したクラスを作成し、handle()メソッドの中で認可エラー時の処理を実装する - ここでは
/access-denied.htmlにリダイレクトするように実装している
namespace
<?xml version="1.0" encoding="UTF-8"?>
<beans xmlns="http://www.springframework.org/schema/beans"
       xmlns:sec="http://www.springframework.org/schema/security"
       ...>

    <bean id="accessDeniedHandler"
          class="sample.spring.security.handler.MyAccessDeniedHandler" />

    <sec:http>
        ...
        <sec:access-denied-handler ref="accessDeniedHandler" />
    </sec:http>

    ...
</beans>
-
<access-denied-handler>のref属性でAccessDeniedHandlerの Bean を指定する
Java Configuration
...

import sample.spring.security.handler.MyAccessDeniedHandler;

@EnableWebSecurity
public class MySpringSecurityConfig extends WebSecurityConfigurerAdapter {

    @Override
    public void configure(HttpSecurity http) throws Exception {
        http.authorizeRequests()
                ...
                .and()
                .exceptionHandling().accessDeniedHandler(new MyAccessDeniedHandler());
    }

    ...
}
-
accessDeniedHandler()でAccessDeniedHandlerのインスタンスを渡す。
実行結果
error-page を指定していたときと同じように操作する。
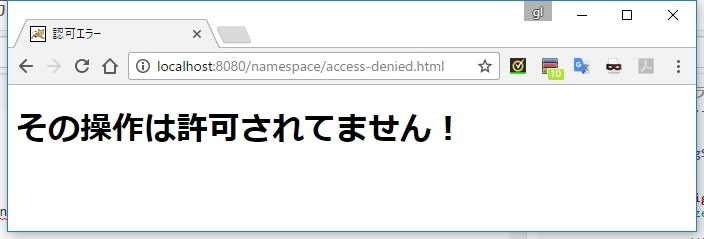
今度は URL が変わってリダイレクトになってるのが分かる。
参考
- Spring Security Reference
- TERASOLUNA Server Framework for Java (5.x) Development Guideline — TERASOLUNA Server Framework for Java (5.x) Development Guideline 5.3.0.RELEASE documentation
- java - Difference between Role and GrantedAuthority in Spring Security - Stack Overflow
- Spring Security 3.1 リファレンス - テクニカル・サマリ (1) - M12i.