Spring Security は 5.4 以降、設定の書き方に大幅な変更が入っています。
詳しくは @suke_masa さんの Spring Security 5.7でセキュリティ設定の書き方が大幅に変わる件 - Qiita を参照してください。
基礎・仕組み的な話
認証・認可の話
CSRF の話
セッション管理の話
レスポンスヘッダーの話
メソッドセキュリティの話
CORS の話
Run-As の話
ACL の話
テストの話
MVC, Boot との連携の話
番外編
Spring Security にできること・できないこと
Remember-Me 認証とは?
よく Web サービスのログイン画面についてる「ログインしたままにする」とか「○週間ログイン状態のままにする」とか書いてるアレ。
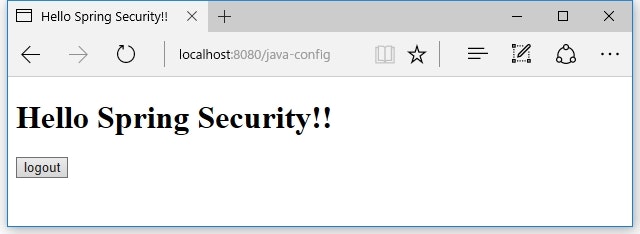
Hello World
実装
namespace
<?xml version="1.0" encoding="UTF-8"?>
<beans xmlns="http://www.springframework.org/schema/beans"
       xmlns:sec="http://www.springframework.org/schema/security"
       xmlns:xsi="http://www.w3.org/2001/XMLSchema-instance"
       xsi:schemaLocation="
         http://www.springframework.org/schema/beans
         http://www.springframework.org/schema/beans/spring-beans-3.0.xsd
         http://www.springframework.org/schema/security
         http://www.springframework.org/schema/security/spring-security.xsd">

    <sec:http>
        <sec:intercept-url pattern="/login" access="permitAll" />
        <sec:intercept-url pattern="/**" access="isAuthenticated()" />
        <sec:form-login />
        <sec:logout />
        <sec:remember-me /> ★これで Remember-Me が有効になる
    </sec:http>

    <sec:authentication-manager>
        <sec:authentication-provider>
            <sec:user-service>
                <sec:user
                    name="hoge"
                    password="hoge"
                    authorities="" />
            </sec:user-service>
        </sec:authentication-provider>
    </sec:authentication-manager>
</beans>
Java Configuration
package sample.spring.security;

import org.springframework.beans.factory.annotation.Autowired;
import org.springframework.context.annotation.ComponentScan;
import org.springframework.security.config.annotation.authentication.builders.AuthenticationManagerBuilder;
import org.springframework.security.config.annotation.web.builders.HttpSecurity;
import org.springframework.security.config.annotation.web.configuration.EnableWebSecurity;
import org.springframework.security.config.annotation.web.configuration.WebSecurityConfigurerAdapter;

import java.util.Collections;

@EnableWebSecurity
@ComponentScan
public class MySpringSecurityConfig extends WebSecurityConfigurerAdapter {

    @Override
    public void configure(HttpSecurity http) throws Exception {
        http.authorizeRequests()
                .antMatchers("/login").permitAll()
                .anyRequest().access("isAuthenticated()")
                .and()
                .formLogin()
                .and()
                .rememberMe(); // ★ここで Remember-Me を有効化
    }

    @Autowired
    public void configure(AuthenticationManagerBuilder auth) throws Exception {
        auth.inMemoryAuthentication()
            .withUser("hoge")
            .password("hoge")
            .authorities(Collections.emptyList());
    }
}
動作確認
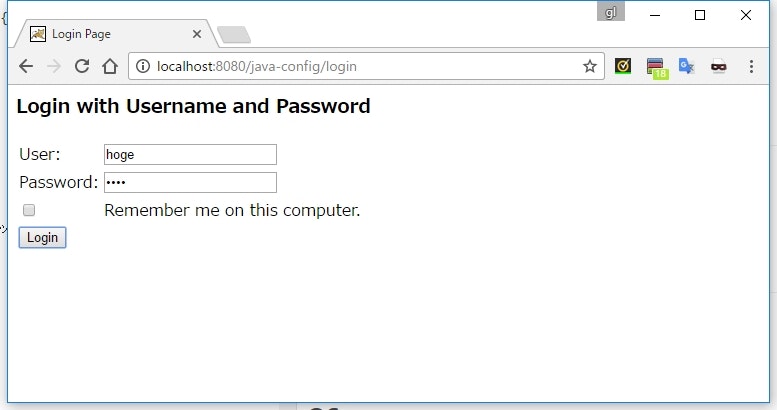
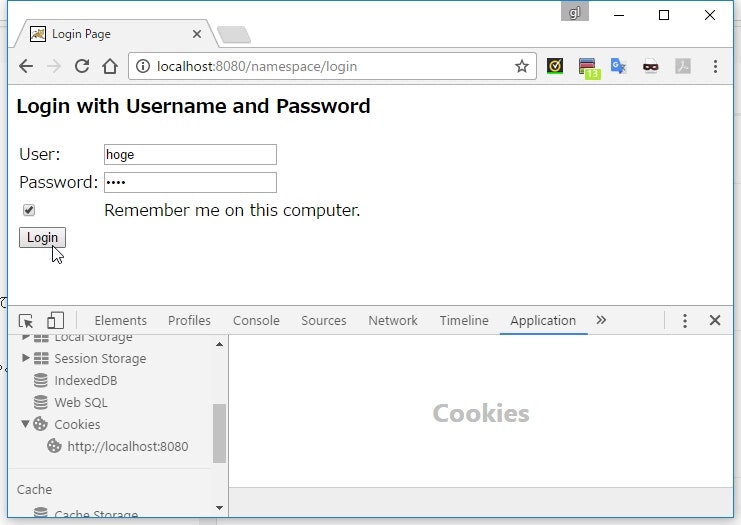
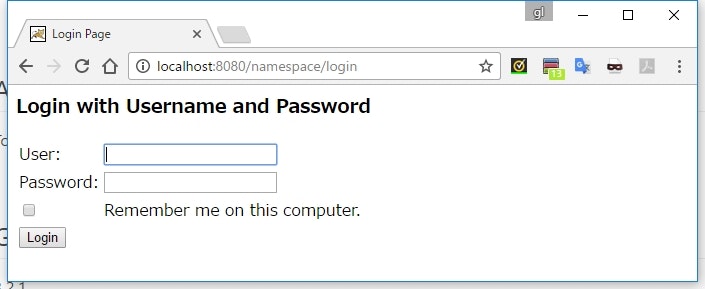
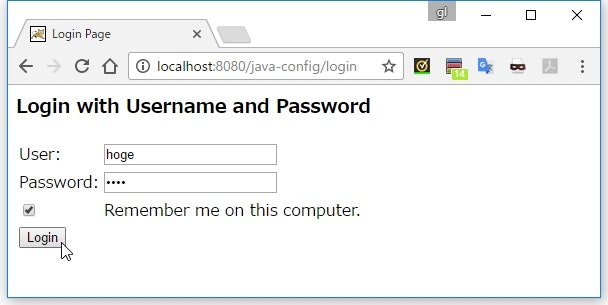
ログイン画面(/login)を開くと、 Remember me on this computer. というチェックボックスが追加されている(デフォルトのログイン画面を使用している場合のみ)。
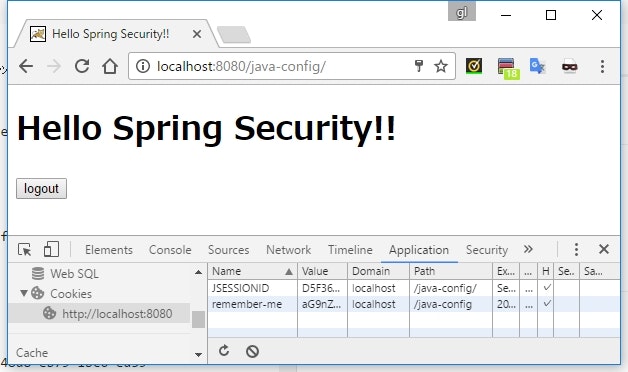
最初は、チェックを入れずにログインしてみる。
ログイン後に、ブラウザの Cookie を確認してみる。
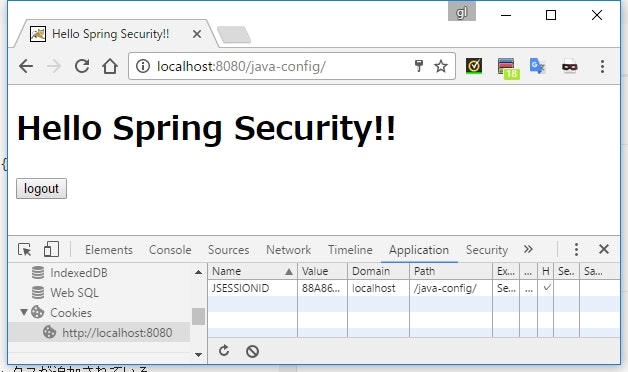
JSESSIONID というのが保存されている。
これを削除してから画面を再描画させる。
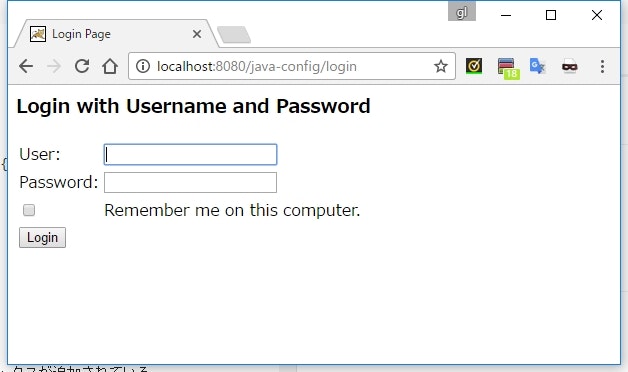
当然、ログイン画面に戻される。
次に、ログイン画面の Remember me on this computer. のチェックをオンにした状態でログインする。
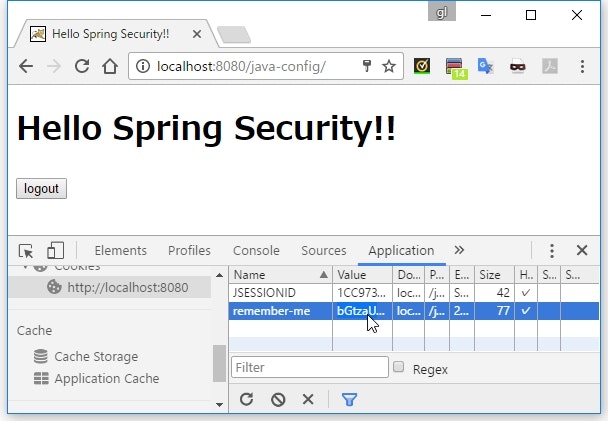
ログイン後 Cookie を見ると、 JSESSIONID ともう1つ、 remember-me というのが保存されている。
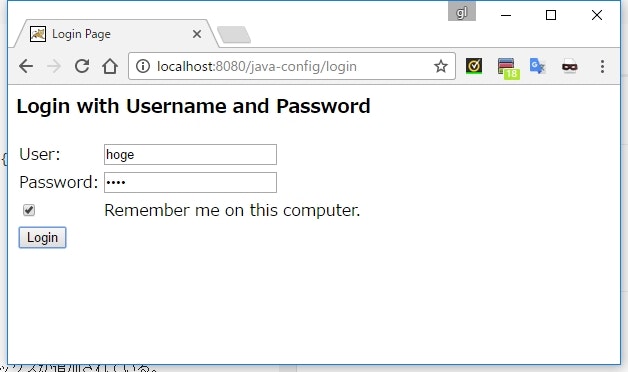
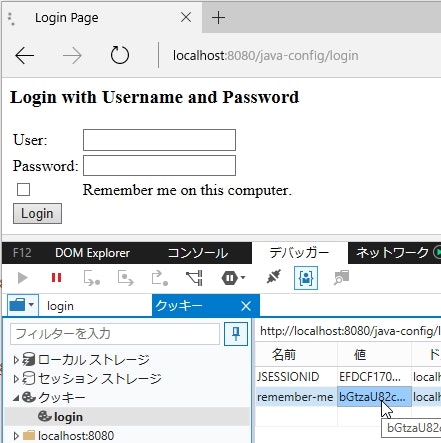
再び JSESSIONID を削除してから画面を再描画させる。
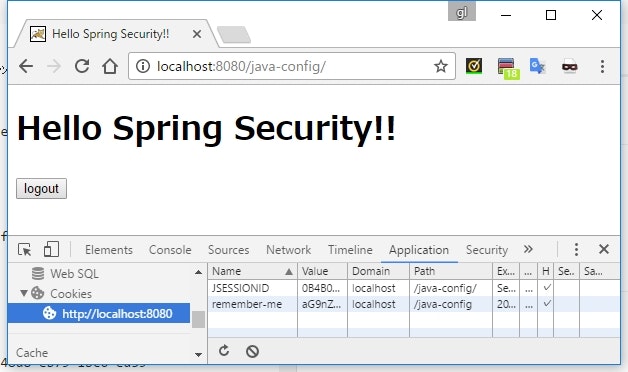
すると、今度はログイン画面に飛ばされることなく画面が再描画できる。
Cookie を見てみると、先ほどとは異なる値で JSESSIONID が保存されている。
仕組み
- ログイン時のパラメータに
remember-meという名前のパラメータが追加されると、ログイン時に Remember-Me が有効になる- パラメータが渡ればいいっぽいので、値は空でいい
- 要は、
<input type="checkbox" name="remember-me" />をログインページに追加しておけばいい
- Remember-Me を有効にしている状態でログインすると、
remember-meという Cookie が追加される- この Cookie は「ユーザー名」「有効期限」「署名」をコロン(
:)連結して Base64 でエンコードしたものになっている - 「署名」は、「ユーザー名」「有効期限」「パスワード」「KEY(詳細後述)」を連結して MD5 でハッシュ化したものでできている
- この Cookie は「ユーザー名」「有効期限」「署名」をコロン(

- 未ログインの状態でアクセスすると、この Cookie から「有効期限」と「署名」が抽出され、次のような検証が行われる
- 「有効期限」が切れていないか
- Cookie の情報やサーバー側で保存しているユーザ情報などから「署名」を再作成して、 Cookie 中に保存されていた値と等しいか
- 検証で問題がなかった場合は、自動的にログイン済みの状態になる
- 「有効期限」が切れていたり、「署名」の比較結果が異なっていた場合などは認証エラーになる
KEY について
署名に使用される KEY は、設定ファイルの <remember-me> の key 属性で指定できる任意の文字列を指している。
<?xml version="1.0" encoding="UTF-8"?>
<beans xmlns="http://www.springframework.org/schema/beans"
       xmlns:sec="http://www.springframework.org/schema/security"
       ...>

    ...

    <sec:http>
        ...
        <sec:remember-me key="foobar" />
    </sec:http>

    ...
</beans>
ただし、この属性は省略可能で、省略した場合は SecureRandom を使って生成されたランダムな文字列が使用される。
なら SecureRandom を使ったほうが安全な気がするが、この値が生成されるのはアプリケーション起動時に一回だけになっている。
なので、 SecureRandom を使った状態でアプリケーションを再起動したりすると、クライアントが記録している remember-me の Cookie は全て無効になってしまう。
(KEY が変わると署名の値も変わるので、署名の検証で必ずエラーになってしまう)
アプリケーションを再起動してもクライアントの持つ remember-me Cookie を維持させたいなら、固定の文字列を指定しておく必要があるっぽい。
デフォルトの Remember-Me を使う場合の注意点
- 上述の仕組みのため、 Cookie の値が分かれば簡単になりすましができてしまう。
- また、盗まれた Cookie によってアクセスされた場合、システム側はそれが盗まれた Cookie なのかどうかを識別することはできない。
- このように、デフォルトの Remember-Me の仕組みはセキュリティが弱くなることに注意しなければならない。
本格的に使うならやっておいたほうが良いこと
Cookie の secure 属性を有効にする
Cookie の secure 属性を有効にすると、 https 通信の場合にしか Cookie を送信しなくなる。
暗号化されていない http 通信で Cookie を送信した場合、第三者に傍受され Cookie を盗まれる可能性があるので、この設定は有効にしておいたほうが良い。
Spring Securty を使っている場合は、次のように設定することで Remember-Me で使用する Cookie の secure 属性を有効にできる。
namespace
<?xml version="1.0" encoding="UTF-8"?>
<beans xmlns="http://www.springframework.org/schema/beans"
       xmlns:sec="http://www.springframework.org/schema/security"
       ...>

    ...

    <sec:http>
        ...
        <sec:remember-me use-secure-cookie="true" />
    </sec:http>

    ...
</beans>
<remember-me> タグの use-secure-cookie 属性に true を設定する。
Java Configuration
package sample.spring.security;

import org.springframework.beans.factory.annotation.Autowired;
import org.springframework.context.annotation.ComponentScan;
import org.springframework.security.config.annotation.authentication.builders.AuthenticationManagerBuilder;
import org.springframework.security.config.annotation.web.builders.HttpSecurity;
import org.springframework.security.config.annotation.web.configuration.EnableWebSecurity;
import org.springframework.security.config.annotation.web.configuration.WebSecurityConfigurerAdapter;

import java.util.Collections;

@EnableWebSecurity
@ComponentScan
public class MySpringSecurityConfig extends WebSecurityConfigurerAdapter {

    @Override
    public void configure(HttpSecurity http) throws Exception {
        http.authorizeRequests()
                .antMatchers("/login").permitAll()
                .anyRequest().authenticated()
                .and()
                .formLogin()
                .and()
                .rememberMe()
                .useSecureCookie(true);
    }

    ...
}
useSecureCookie(true) を設定する。
Remember-Me によるログインの場合は重要な処理の実行を許可しない
Remember-Me によるログインを完全には信頼せず、本当に重要な処理の前には改めてパスワードによる認証を求める。
重要な処理とは、例えばデータの更新や個人情報を表示するページへのアクセスなどがあたる。
そうすることで、もし Remember-Me の Cookie を盗まれたことによるなりすましのアクセスがあったとしても、本当に重要な処理は実行できないように守ることができる。
よくネット通販サイトとかで注文を確定させる前にパスワードの入力が求められるようなやつが、それだと思う(たぶん)。
Spring Security の場合は、アクセス制御の式で isFullyAuthenticated() など Remember-Me でないことを考慮した式が利用できるので、それを使うことで実現できる。
namespace
<?xml version="1.0" encoding="UTF-8"?>
<beans xmlns="http://www.springframework.org/schema/beans"
       xmlns:sec="http://www.springframework.org/schema/security"
       ...>

    ...

    <sec:http>
        <sec:intercept-url pattern="/login" access="permitAll" />
        <sec:intercept-url pattern="/remember-me/high-level" access="isFullyAuthenticated()" />
        <sec:intercept-url pattern="/**" access="isAuthenticated()" />
        ...
        <sec:remember-me />
    </sec:http>

    ...
</beans>
Java Configuration
package sample.spring.security;

import org.springframework.beans.factory.annotation.Autowired;
import org.springframework.context.annotation.ComponentScan;
import org.springframework.security.config.annotation.authentication.builders.AuthenticationManagerBuilder;
import org.springframework.security.config.annotation.web.builders.HttpSecurity;
import org.springframework.security.config.annotation.web.configuration.EnableWebSecurity;
import org.springframework.security.config.annotation.web.configuration.WebSecurityConfigurerAdapter;

import java.util.Collections;

@EnableWebSecurity
@ComponentScan
public class MySpringSecurityConfig extends WebSecurityConfigurerAdapter {

    @Override
    public void configure(HttpSecurity http) throws Exception {
        http.authorizeRequests()
                .antMatchers("/login").permitAll()
                .antMatchers("/remember-me/high-level").fullyAuthenticated()
                .anyRequest().authenticated()
                .and()
                .formLogin()
                .and()
                .rememberMe();
    }

    ...
}
/remember-me/high-level にアクセスした場合は完全な認証ができていなければならないように設定している(fullyAuthenticated())
なお、 /remember-me/* にアクセスしたらそのときのパスを返すだけの簡単な Servlet を用意している。
動作確認
Remember-Me を有効にしてログインする。
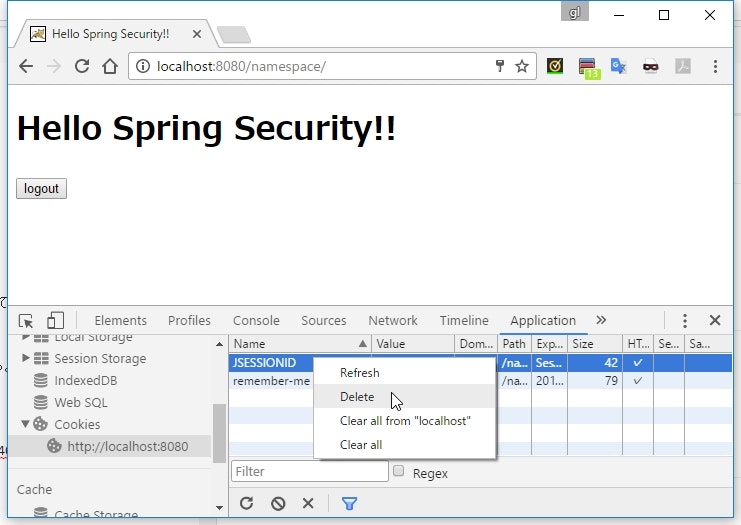
Cookie から JSESSIONID を削除する(セッション切れと同じ状態にする)。
この状態で、再度トップページにアクセスすると、 Remember-Me による自動ログインが実行され、トップページが表示される。
Remember-Me によるログインが完了した状態で /remember-me/foo にアクセスする。
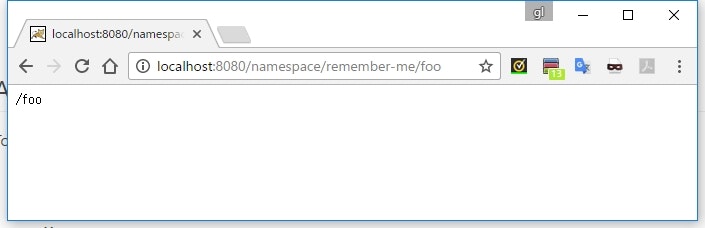
普通にページが表示される。
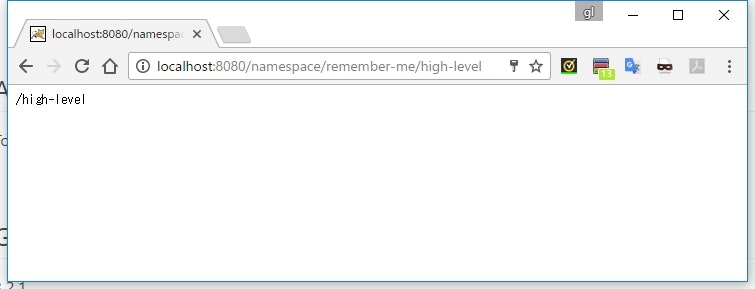
次に /remember-me/high-level にアクセスする。
今度はログインページに飛ばされる。
/remember-me/high-level は fullyAuthenticated すなわちパスワードを入力した完全なログインでなければ見れないように設定しているため、このようになる。
パスワードを入力してログインを実行する。
今度はちゃんと /remember-me/high-level が表示される。
ログイン後の遷移先はログイン前にアクセスしようとしていた URL になるよう Spring Security が自動的に制御しているので、特に設定などは必要ない(任意の URL を指定することも可能)。
Cookie が盗まれたことを検知できるようにする
前述したデフォルトの Remember-Me の仕組みだと、 Cookie が第三者によって盗まれたものかどうかを判断することができない。
そのため、被害者は被害を受けていることに気付かず、攻撃者が好き勝手にできる余裕を与えてしまう。
そこで、 Spring Security では被害をなるべく小さくするため、 Cookie が盗まれたかどうかを検知できる仕組みを用意している。
盗まれたことを検知する仕組み
Spring Security は こちら の記事で説明されている仕組みを採用することで、盗難を検知する仕組みを実現している。
ざっくり Cookie の取り扱いは次のようになっている。
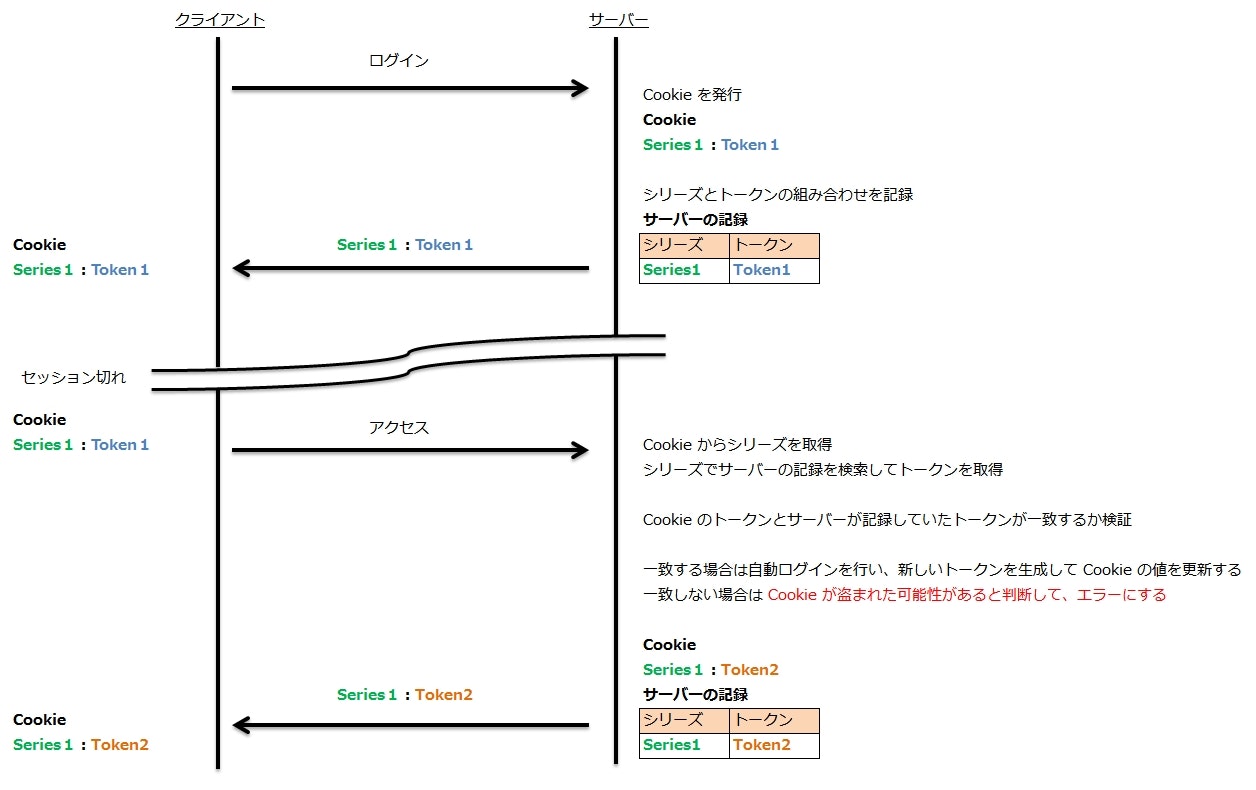
Cookie の中身が「シリーズ」と「トークン」の2つになっている。そして、サーバーはその2つの組み合わせを記録している。
自動ログインの際は、 Cookie から取り出した「シリーズ」でサーバーが記録している「トークン」を検索し、 Cookie 内の「トークン」と一致するかを検証する。
「トークン」が一致する場合のみ自動ログインが実行され、その後「トークン」は新しい値に置き換えられる。
この、値を使いまわす「シリーズ」を Cookie を特定する識別子として使用し、「トークン」を自動ログインのたびに更新するという仕組みが、盗難を検知する仕掛けのタネとなっている。
もし攻撃者が盗んだ Cookie で自動ログインを行った場合、攻撃者の Cookie に含まれる「トークン」とサーバーが記録している「トークン」は更新されるが、被害者が持つ Cookie の「トークン」は古いままになる。
そのため、不正ログインがされたあとで被害者が自動ログインを行おうとすると、サーバー側に記録している「トークン」と被害者の Cookie が持つ「トークン」が一致しなくなる。
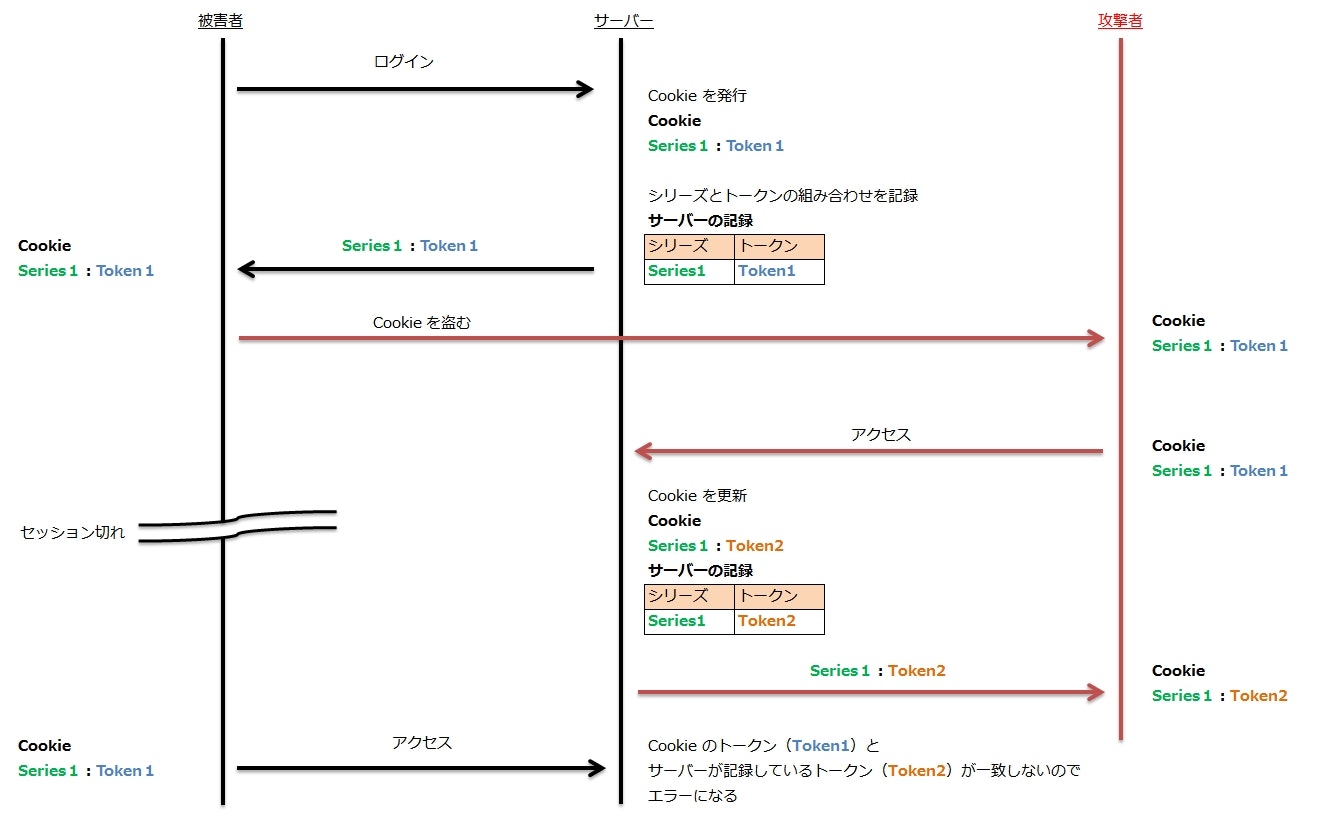
これにより、サーバーは Cookie が盗まれた可能性があることを検知できるようになり、被害者やサービス管理者にそのことを通知することができるようになる。
これは私見だが、セッションタイムアウトの時間が短ければ短いほど、より早期に盗難が検知できるようになる気がする。
ただし、その場合は頻繁にセッションタイムアウトが発生することになり、前述したような完全なログインが必要な画面を開こうとするたびにパスワード入力が必要になり、使いやすさは低下する気がする(セキュリティと使いやすさのどちらを優先するか次第かと)。
なお、「シリーズ」と「トークン」には SecureRandom を使って生成されたランダムな文字列が使用されている。
Spring Security で盗難検知の仕組みを有効にする
dependencies {
    compile 'org.springframework.security:spring-security-web:4.2.1.RELEASE'
    compile 'org.springframework.security:spring-security-config:4.2.1.RELEASE'
    compile 'org.springframework:spring-jdbc:4.3.7.RELEASE' ★
}
依存関係に spring-jdbc を追加。
namespace
<?xml version="1.0" encoding="UTF-8"?>
<beans xmlns="http://www.springframework.org/schema/beans"
       xmlns:sec="http://www.springframework.org/schema/security"
       ...>

    ...

    <bean id="rememberMeTokenRepository"
          class="org.springframework.security.web.authentication.rememberme.InMemoryTokenRepositoryImpl" />

    <sec:http>
        ...
        <sec:remember-me token-repository-ref="rememberMeTokenRepository" />
    </sec:http>

    ...
</beans>
InMemoryTokenRepositoryImpl を Bean 定義に追加して、 <remember-me> タグの token-repository-ref に指定する。
Java Configuration
package sample.spring.security;

import org.springframework.beans.factory.annotation.Autowired;
import org.springframework.context.annotation.ComponentScan;
import org.springframework.security.config.annotation.authentication.builders.AuthenticationManagerBuilder;
import org.springframework.security.config.annotation.web.builders.HttpSecurity;
import org.springframework.security.config.annotation.web.configuration.EnableWebSecurity;
import org.springframework.security.config.annotation.web.configuration.WebSecurityConfigurerAdapter;
import org.springframework.security.web.authentication.rememberme.InMemoryTokenRepositoryImpl;

import java.util.Collections;

@EnableWebSecurity
@ComponentScan
public class MySpringSecurityConfig extends WebSecurityConfigurerAdapter {

    @Override
    public void configure(HttpSecurity http) throws Exception {
        http.authorizeRequests()
                .antMatchers("/login").permitAll()
                .antMatchers("/remember-me/high-level").fullyAuthenticated()
                .anyRequest().authenticated()
                .and()
                .formLogin()
                .and()
                .rememberMe()
                .tokenRepository(new InMemoryTokenRepositoryImpl()); ★
    }

    ...
}
tokenRepository() で InMemoryTokenRepositoryImpl のインスタンスを渡す。
Remember-Me を有効にしてログイン。
発行された Cookie の値をコピー。
別のブラウザを開き、 Cookie に remember-me を追加して先ほどコピーした値を設定する。
トップページにアクセスすれば、パスワード入力なしでログインできる(攻撃が成功した状態)。
この状態で、もともと普通にパスワードログインしていたほうのブラウザにもどり、 JSESSIONID を削除後、トップページにアクセスする。
(被害者のほうがセッション切れしたあとに、再度アクセスしてきた状態の再現)
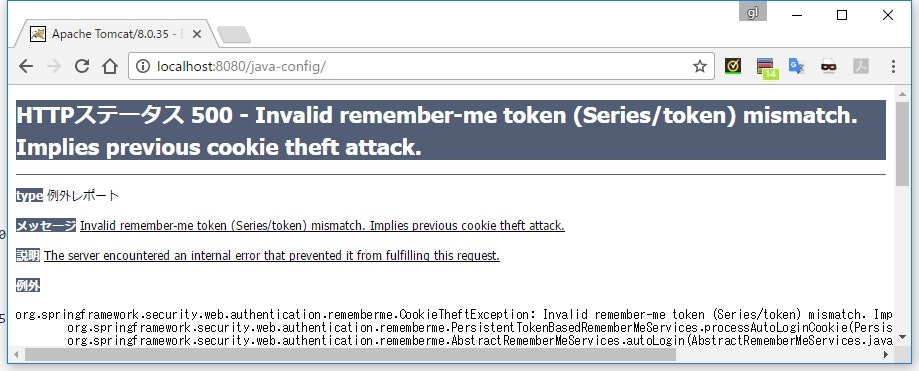
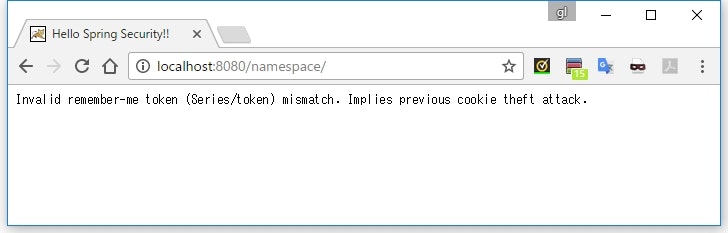
CookieTheftException がスローされ、エラー画面になる。
デフォルトでは Cookie の盗難を意味する例外がスローされてもハンドリングがされないらしく、システムエラー扱いになる。
(とりあえず、 Cookie が盗難されたことは検知できている)
登場するクラス達
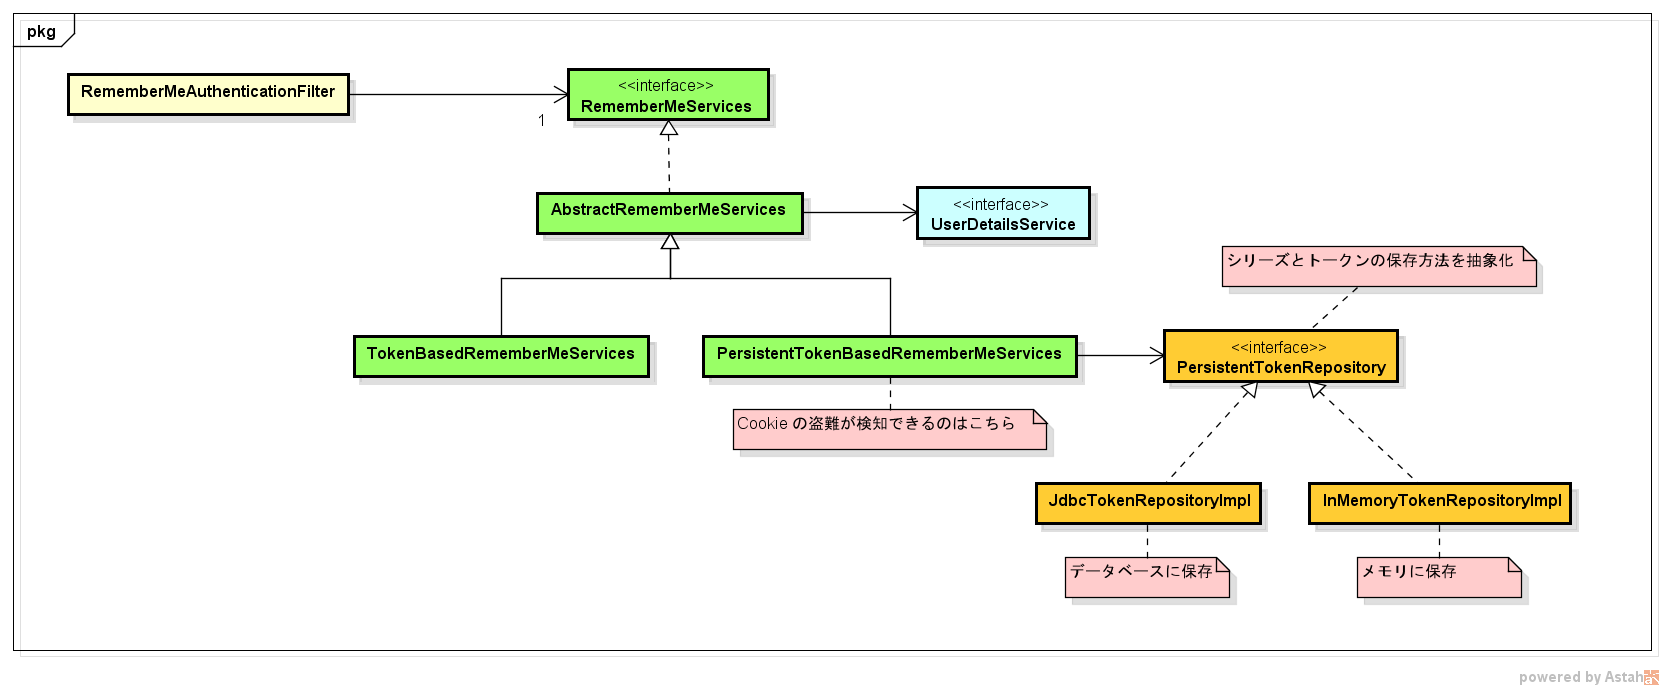
Remember-Me の処理は、 RememberMeAuthenticationFilter によって開始される。
未認証の状態でアクセスがあると、この Filter が RememberMeService に認証処理を委譲する。
RememberMeService には2つの実装クラスがある。
TokenBasedRememberMeServices は最初の Hello World で見た簡易な方法による Remember-Me 認証を実現する。
一方 PersistentTokenBasedRememberMeServices は後述した盗難の検知が可能な方法で Remember-Me を実現する。
PersistentTokenBasedRememberMeServices は「シリーズ」と「トークン」の保存を PersistentTokenRepository に委譲しており、 PersistentTokenRepository には具体的な保存方法により2つのクラスが用意されている。
JdbcTokenRepositoryImpl はデータベースのテーブルに情報を記録し、 InMemoryTokenRepositoryImpl はメモリ上に記録する。
Remember-Me を有効にしただけだと RememberMeService の実装には TokenBasedRememberMeServices が使用される。
しかし、 token-repository-ref で PersistentTokenRepository を指定したりすることで、 RememberMeService の実装を PersistentTokenBasedRememberMeServices に切り替えることができる。
Cookie 盗難を検知したときのエラーハンドリング
Cookie の盗難が検知されると、 CookieTheftException がスローされる。
しかし、この例外をハンドリングしようと思うと、 Spring Security が用意している API では実現できないっぽい。
PersistentTokenBasedRememberMeServices によってスローされた CookieTheftException は、一度 AbstractRememberMeServices によってキャッチされる。
そして Cookie のクリアが行われたあと再スローされる。
そのあとは、どこにもキャッチされず Servlet のほうにまで飛んで行ってしまう。
なので、この例外をハンドリングしようとした場合は、 Servlet 標準の例外ハンドリングの仕組みを利用するしかないことになる。
<?xml version="1.0" encoding="UTF-8"?>
<web-app ...>

    ...

    <error-page>
        <exception-type>org.springframework.security.web.authentication.rememberme.CookieTheftException</exception-type>
        <location>/cookie-theft.html</location>
    </error-page>
</web-app>
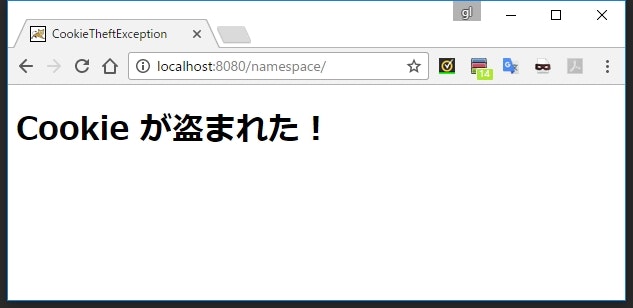
<!DOCTYPE html>
<html>
    <head>
        <meta charset="UTF-8" />
        <title>CookieTheftException</title>
    </head>
    <body>
        <h1>Cookie が盗まれた!</h1>
    </body>
</html>
CookieTheftException がスローされるように操作すると、スタックトレースのエラー画面は表示されず次の画面に飛ばされる。
Servlet は web.xml でエラーが発生したときの遷移先を <error-page> タグで定義できるようになっているので、これを利用する。
上記の例の場合は静的なページしか表示できないが、 Servlet と組み合わせることで動的な処理を挟むこともできる。
<?xml version="1.0" encoding="UTF-8"?>
<web-app ...>

    ...

    <error-page>
        <exception-type>org.springframework.security.web.authentication.rememberme.CookieTheftException</exception-type>
        <location>/cookie-theft</location>
    </error-page>
</web-app>
package sample.spring.security.servlet;

import org.springframework.security.web.authentication.rememberme.CookieTheftException;

import javax.servlet.RequestDispatcher;
import javax.servlet.ServletException;
import javax.servlet.annotation.WebServlet;
import javax.servlet.http.HttpServlet;
import javax.servlet.http.HttpServletRequest;
import javax.servlet.http.HttpServletResponse;
import java.io.IOException;
import java.io.PrintWriter;

@WebServlet("/cookie-theft")
public class CookieTheftServlet extends HttpServlet {

    @Override
    protected void doGet(HttpServletRequest req, HttpServletResponse resp) throws ServletException, IOException {
        CookieTheftException e = (CookieTheftException)req.getAttribute(RequestDispatcher.ERROR_EXCEPTION);
        try (PrintWriter writer = resp.getWriter()) {
            writer.println(e.getMessage());
        }
    }
}
エラーを発生させたときの様子
<error-page> の <location> で指定したパスで Servlet が受け付けるようにしておく。
この Servlet で、 HttpServletRequest から getAttribute() を使って例外オブジェクトなどエラーの情報を参照することができる。
試してないけど、 Spring MVC を使っている場合は MVC の Controller で受け付けるようにすることもできる気がする。
いずれにせよ、これなら任意の処理を実行できるので、エラー情報をメールで送信したりできるようになる。
データベースに保存する
dependencies {
    compile 'org.springframework.security:spring-security-web:4.2.1.RELEASE'
    compile 'org.springframework.security:spring-security-config:4.2.1.RELEASE'
    compile 'org.springframework:spring-jdbc:4.3.7.RELEASE'
    compile 'com.h2database:h2:1.4.193'
}
データベースには、とりあえず組み込み DB の H2 を利用する。
CREATE TABLE PERSISTENT_LOGINS (
    USERNAME  VARCHAR(64) NOT NULL,
    SERIES    VARCHAR(64) NOT NULL PRIMARY KEY,
    TOKEN     VARCHAR(64) NOT NULL,
    LAST_USED TIMESTAMP   NOT NULL
);
トークンの情報を記録するためのテーブルを作成する SQL ファイル。
namespace
<?xml version="1.0" encoding="UTF-8"?>
<beans xmlns="http://www.springframework.org/schema/beans"
       xmlns:sec="http://www.springframework.org/schema/security"
       xmlns:jdbc="http://www.springframework.org/schema/jdbc"
       ...
       xsi:schemaLocation="
         ...
         http://www.springframework.org/schema/jdbc
         http://www.springframework.org/schema/jdbc/spring-jdbc.xsd">

    ...

    <jdbc:embedded-database id="dataSource" type="H2">
        <jdbc:script location="classpath:/sql/create_remember-me_tables.sql" />
    </jdbc:embedded-database>

    <sec:http>
        <sec:intercept-url pattern="/login" access="permitAll" />
        <sec:intercept-url pattern="/remember-me/high-level" access="isFullyAuthenticated()" />
        <sec:intercept-url pattern="/**" access="isAuthenticated()" />
        <sec:form-login />
        <sec:logout />
        <sec:remember-me data-source-ref="dataSource" />
    </sec:http>

    ...
</beans>
データソースを Bean として定義し、 <remember-me> タグの data-source-ref 属性で指定する。
Java Configuration
package sample.spring.security;

import org.springframework.beans.factory.annotation.Autowired;
import org.springframework.context.annotation.ComponentScan;
import org.springframework.jdbc.datasource.embedded.EmbeddedDatabaseBuilder;
import org.springframework.jdbc.datasource.embedded.EmbeddedDatabaseType;
import org.springframework.security.config.annotation.authentication.builders.AuthenticationManagerBuilder;
import org.springframework.security.config.annotation.web.builders.HttpSecurity;
import org.springframework.security.config.annotation.web.configuration.EnableWebSecurity;
import org.springframework.security.config.annotation.web.configuration.WebSecurityConfigurerAdapter;
import org.springframework.security.web.authentication.rememberme.JdbcTokenRepositoryImpl;
import org.springframework.security.web.authentication.rememberme.PersistentTokenRepository;

import javax.sql.DataSource;
import java.util.Collections;

@EnableWebSecurity
@ComponentScan
public class MySpringSecurityConfig extends WebSecurityConfigurerAdapter {

    @Override
    public void configure(HttpSecurity http) throws Exception {
        http.authorizeRequests()
                .antMatchers("/login").permitAll()
                .anyRequest().authenticated()
                .and()
                .formLogin()
                .and()
                .rememberMe()
                .tokenRepository(this.createTokenRepository());
    }

    public PersistentTokenRepository createTokenRepository() {
        DataSource dataSource =
                new EmbeddedDatabaseBuilder()
                    .generateUniqueName(true)
                    .setType(EmbeddedDatabaseType.H2)
                    .setScriptEncoding("UTF-8")
                    .addScript("/sql/create_remember-me_tables.sql")
                    .build();

        JdbcTokenRepositoryImpl tokenRepository = new JdbcTokenRepositoryImpl();
        tokenRepository.setDataSource(dataSource);

        return tokenRepository;
    }

    ...
}
Java Configuration の方には DataSource を直接指定するメソッドはないっぽいので、 JdbcTokenRepositoryImpl に DataSource を設定してから tokenRepository() メソッドで渡してあげる。
トークンを保存するテーブルをカスタマイズする
実装を見た感じ、標準実装だけでテーブル名やカラム名のカスタマイズは無理っぽい。
JdbcTokenRepositoryImpl の実装は次のような感じになっている。
public class JdbcTokenRepositoryImpl extends JdbcDaoSupport implements
		PersistentTokenRepository {
	// ~ Static fields/initializers
	// =====================================================================================

	/** Default SQL for creating the database table to store the tokens */
	public static final String CREATE_TABLE_SQL = "create table persistent_logins (username varchar(64) not null, series varchar(64) primary key, "
			+ "token varchar(64) not null, last_used timestamp not null)";
	/** The default SQL used by the <tt>getTokenBySeries</tt> query */
	public static final String DEF_TOKEN_BY_SERIES_SQL = "select username,series,token,last_used from persistent_logins where series = ?";
	/** The default SQL used by <tt>createNewToken</tt> */
	public static final String DEF_INSERT_TOKEN_SQL = "insert into persistent_logins (username, series, token, last_used) values(?,?,?,?)";
	/** The default SQL used by <tt>updateToken</tt> */
	public static final String DEF_UPDATE_TOKEN_SQL = "update persistent_logins set token = ?, last_used = ? where series = ?";
	/** The default SQL used by <tt>removeUserTokens</tt> */
	public static final String DEF_REMOVE_USER_TOKENS_SQL = "delete from persistent_logins where username = ?";

	// ~ Instance fields
	// ================================================================================================

	private String tokensBySeriesSql = DEF_TOKEN_BY_SERIES_SQL;
	private String insertTokenSql = DEF_INSERT_TOKEN_SQL;
	private String updateTokenSql = DEF_UPDATE_TOKEN_SQL;
	private String removeUserTokensSql = DEF_REMOVE_USER_TOKENS_SQL;

        ...
public な static フィールドに SQL のテキストが定義されていて、インスタンス生成時にフィールドにセットされている。
このフィールドにセットされた SQL がトークンの検索などのときに使用されるが、このフィールドを書き換えるメソッドが用意されていない。
なので、書き換えができないっぽい(マジで? なんか見間違えてる?)。
どうしても大人の事情でテーブル名やカラム名を指定できないと困る場合は、 JdbcTokenRepositoryImpl をコピーして自作の TokenRepository を作る必要がありそう。