現在記事作成中です
この記事参考になります
https://qiita.com/sc30gsw/items/ef618030a0aa538e28e0#_reference-9de0ac3941d147239107
RDSの作成(こちら追記して改善予定)
エンジンのオプションを選択
- MySQL
無料枠を選択
EC2インスタンスの作成
独学ではじめてAWSのEC2にデプロイする方法①(インスタンスの作成)
独学ではじめてAWSのEC2にデプロイする方法②(Elastic IPの作成と紐付け)
独学ではじめてAWSのEC2にデプロイする方法③(AWSセキュリティグループの設定)
独学ではじめてAWSのEC2にデプロイする方法④(EC2インスンタンスにSSHログイン)
過去に作成した記事ですが、わかりやすいはずです。
mysql
[myuser@xxx.xxx.xxx.xxx ~]sudo yum install mysql
[myuser@xxx.xxx.xxx.xxx ~]sudo yum install mysql-devel
EC2の環境を整える
[ec2-user@xxx.xxx.xxx.xxx ~]$ sudo yum update
EC2の管理アカウントを作成
[ec2-user@xxx.xxx.xxx.xxx ~]$ sudo adduser ユーザー名 #ユーザーの追加
[ec2-user@xxx.xxx.xxx.xxx ~]$ sudo passwd ユーザー名 #パスワード変更
新しいパスワード: (登録したいパスワードを入力)
新しいパスワードを再入力してください: (登録したいパスワードを入力)
passwd: すべての認証トークンが正しく更新できました。
visudoはsudo権限を変更するためのコマンドです
[ec2-user@xxx.xxx.xxx.xxx ~]$ sudo visudo

# 編集画面になるので、
root            ALL=(ALL) ALL #この下に追記する
追加したユーザー名 ALL=(ALL) ALL
:wqで保存する
新しく作成したユーザーでもpemでSSHできるように以下のコマンドを入力
(うまくいかない場合は、一度exitしてEC2に再度入り直そう)
[ec2-user@xxx.xxx.xxx.xxx ~]$ sudo rsync -a ~/.ssh/authorized_keys ~ユーザー名/.ssh/
[ec2-user@xxx.xxx.xxx.xxx ~]$ sudo chown -R ユーザー名:ユーザー名 ~ユーザー名/.ssh
[ec2-user@xxx.xxx.xxx.xxx ~]$ sudo chmod -R go-rwx ~ユーザー名/.ssh
作成したユーザーでssh接続できるかご確認
[ec2-user@xxx.xxx.xxx.xxx ~]$ exit
.ssh$ ssh -i ~/ダウンロードした.pem 追加したユーザー名@xxx.xxx.xxx.xxx

# 追加したユーザー名で入れたら成功
[追加したユーザー名@xxx.xxx.xxx.xxx ~]$
Docker環境を整える
続いてEC2にDockerとdocker-composeをインストールしていきます。
Dockerをインストール
[myuser@xxx.xxx.xxx.xxx ~]$ sudo yum install -y docker
[myuser@xxx.xxx.xxx.xxx ~]$ sudo service docker start #Dockerを起動
[myuser@xxx.xxx.xxx.xxx ~]$ sudo usermod -G docker myuser #dockerコマンドを権限なしで利用できるようにする
[myuser@xxx.xxx.xxx.xxx ~]$ exit
$ ssh -i ~/.ssh/myapp.pem myuser@xxx.xxx.xxx.xxx #再ログイン
[myuser@xxx.xxx.xxx.xxx ~]$ docker info
Containers: 0
 Running: 0
 Paused: 0
 Stopped: 0
Images: 0
・・・
# こんな感じの表示が出ればOK!
[myuser@xxx.xxx.xxx.xxx ~]$ sudo chkconfig docker on #EC2起動時にDockerを自動で立ち上げる
docker-composeをインストール
docker-composeのインストールは「Install Docker Compose | Docker Documentation」を参照です。
$docker-compose --version
>docker-compose version 1.25.0, build c7bdf9e
指定したバージョンをインストールする
# 注意:/download/1.25.0(指定したいバージョン)
[myuser@xxx.xxx.xxx.xxx ~]$ sudo curl -L "https://github.com/docker/compose/releases/download/1.25.0/docker-compose-$(uname -s)-$(uname -m)" -o /usr/local/bin/docker-compose

[myuser@xxx.xxx.xxx.xxx ~]$ sudo chmod +x /usr/local/bin/docker-compose
[myuser@xxx.xxx.xxx.xxx ~]$ docker-compose -v
docker-compose version 1.25.0, build 0aa59064 #こんな表示が出ればOK!
GithubでEC2上にcloneする
sudo yum install git
[myuser@xxx.xxx.xxx.xxx ~]$sudo mkdir /var/www/
[ec2-user@ip-172-31-23-189 ~]$ sudo chown ec2-user /var/www/
[myuser@xxx.xxx.xxx.xxx ~]$ cd /var/www
[myuser@xxx.xxx.xxx.xxx www]$ git clone githubのリポジトリurl ファイル名
[myuser@xxx.xxx.xxx.xxx www]$ cd アプリ名
[myuser@xxx.xxx.xxx.xxx アプリ名]$
Dockerの起動
[myuser@xxx.xxx.xxx.xxx ~]$ exit

.ssh$ scp -i myapp.pem ~/myapp/config/master.key myuser@xxx.xxx.xxx.xxx:./var/www/myapp/config/
[myuser@xxx.xxx.xxx.xxx ~]$ cd /var/www/myapp
[myuser@xxx.xxx.xxx.xxx ~/myapp]$ docker-compose build
[myuser@xxx.xxx.xxx.xxx ~/myapp]$ docker-compose run web rails db:create RAILS_ENV=production
[myuser@xxx.xxx.xxx.xxx ~/myapp]$ docker-compose run web rails db:migrate RAILS_ENV=production
[myuser@xxx.xxx.xxx.xxx ~/myapp]$ docker-compose run web rails assets:precompile RAILS_ENV=production
[myuser@xxx.xxx.xxx.xxx ~/myapp]$ mkdir tmp/sockets
[myuser@xxx.xxx.xxx.xxx ~/myapp]$ docker-compose up
補足:rails assets:precompilについて
cssなどをコンパイルさせて適用させる
これでhttp://xxx.xxx.xxx.xxx(Elastic IP)にアクセスすれば、ひとまずRailsアプリが表示されているはずです。
Capistranoの導入
master.keyの配備
ec2-user@ip-17-242-2-2 アプリ名$ mkdir shared
ec2-user@ip-17-242-2-2 アプリ名$ cd shared
ec2-user@ip-17-242-2-2 shared$ mkdir config
ec2-user@ip-17-242-2-2 shared$ exit
# ローカルのmaster.keyをEC2にコピー
$ scp -i myapp.pem ~/myapp/config/master.key myuser@xxx.xxx.xxx.xxx:./var/www/myapp/config/
ec2-user@ip-17-242-2-2 ~$ cd myapp/shared/config
ec2-user@ip-17-242-2-2 config$ ls
>master.key
Gemのインストール
ローカルのwebappにCapistranoのgemを追加しましょう
group :development, :test do
  gem 'capistrano'
  gem 'capistrano-rbenv'
  gem 'capistrano-bundler'
  gem 'capistrano-rails'
  gem 'capistrano3-unicorn'
end
続いて、インストールします
$ bundle install
gemがインストールできたところで、Capistranoの下記のコマンドを実施
$ bundle exec cap install
するとファイルが作成されます。
railsルート
├─  Capfile
├─  config
│ ├─  deploy
│ │ ├─production.rb
│ │ └─staging.rb
│ └─deploy.rb
└─  lib
    └─capistrano
        └─tasks
これらのファイル説明は作業しながら学びましょう
編集するファイル
- Capfile
- production.rb
- deploy.rb
- rails.conf
- unicorn.rb
Capfileを編集
一度ファイルの中身を全部消して、下記のように編集しましょう
require "capistrano/setup"
require "capistrano/deploy"
require 'capistrano/rbenv'
require 'capistrano/bundler'
require 'capistrano/rails/assets'
require 'capistrano/rails/migrations'
require 'capistrano3/unicorn'

Dir.glob("lib/capistrano/tasks/*.rake").each { |r| import r }
production.rbを編集
production.rbですが2つファイルがあります
❌ config/environment/production.rb
⭕️ config/deploy/production.rb
今回作業はするのはconfig/deploy/production.rbです
実際に開くと下記の画面が出ます。
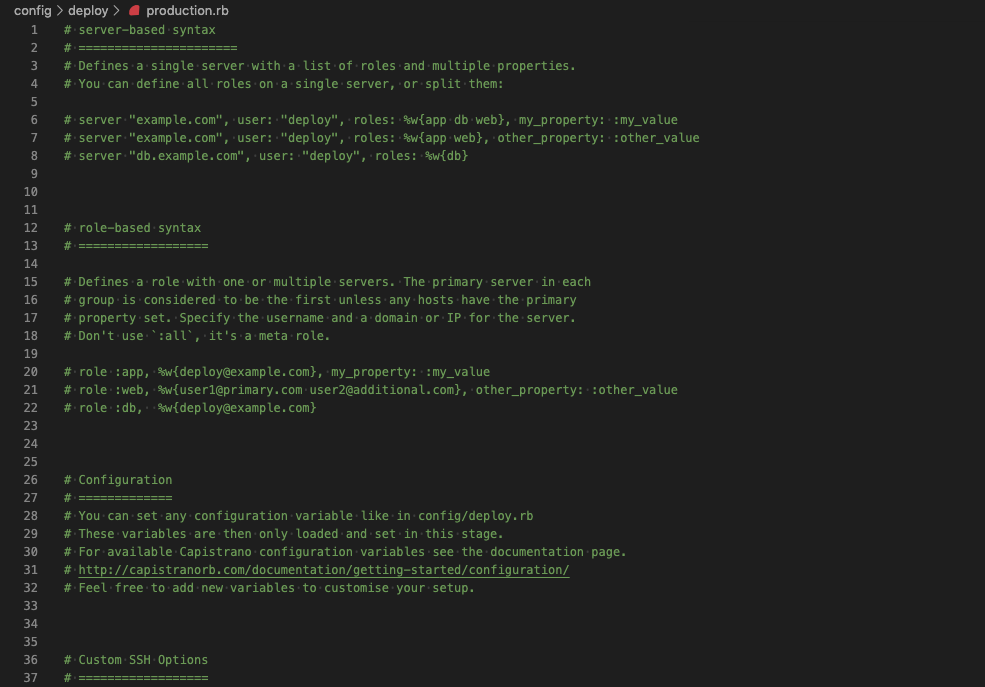
このファイルを下記を追記しましょう!(元が全部コメントアウトなので、どこでも可能)
server '18.○○○.○○.○○○(Elastic IP)', user: 'ec2-user', roles: %w{app db web}
deploy.rbを編集
config/deploy.rbを開くと下記の画面が出ます
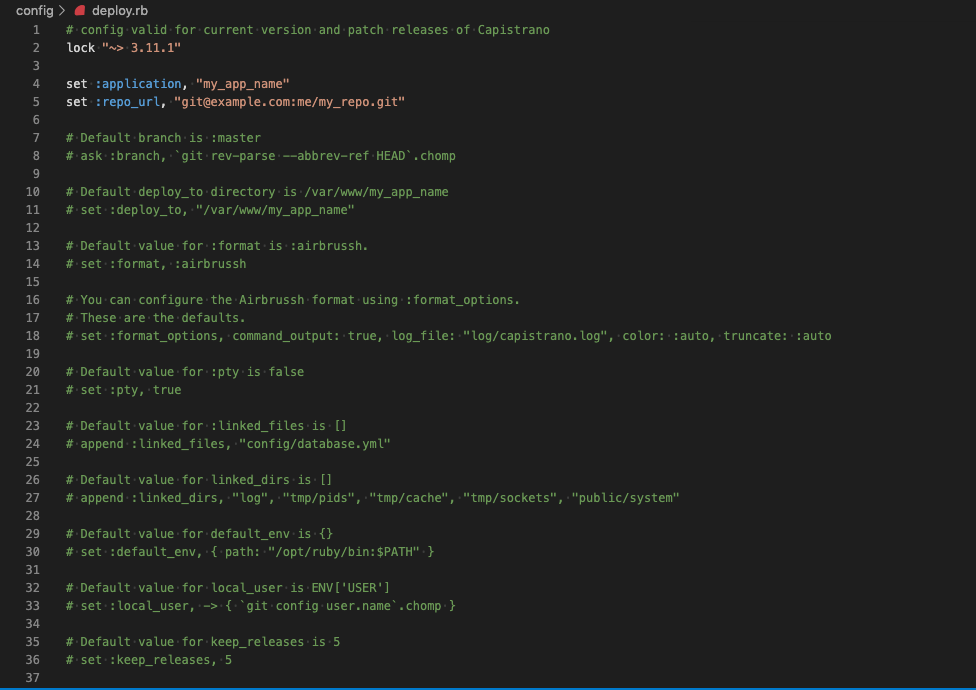
deploy.rbの記述をすべて削除
下記を追加します
# config valid only for current version of Capistrano
# capistranoのバージョンを記載。固定のバージョンを利用し続け、バージョン変更によるトラブルを防止する
lock '○.○○.○(Capistranoのバージョン)'

# Capistranoのログの表示に利用する
set :application, '○○○(自身のアプリケーション名)'
set :deploy_to, '/var/○○○(アプリを入れているディレクトリ)/○○○(アプリ名)'

# どのリポジトリからアプリをpullするかを指定する
set :repo_url,  'git@github.com:○○○(Githubのユーザー名)/○○○(レポジトリ名.git'

# バージョンが変わっても共通で参照するディレクトリを指定
set :linked_dirs, fetch(:linked_dirs, []).push('log', 'tmp/pids', 'tmp/cache', 'tmp/sockets', 'vendor/bundle', 'public/system', 'public/uploads')

set :rbenv_type, :user
set :rbenv_ruby, '○.○.○(rubyのバージョン)' #カリキュラム通りに進めた場合、2.5.1か2.3.1です

# どの公開鍵を利用してデプロイするか
set :ssh_options, auth_methods: ['publickey'],
                  keys: ['~/.ssh/○○○○○.pem(ローカルPCのEC2インスタンスのSSH鍵(pem)へのパス 例:~/.ssh/key_pem.pem))']

# プロセス番号を記載したファイルの場所
set :unicorn_pid, -> { "#{shared_path}/tmp/pids/unicorn.pid" }

# Unicornの設定ファイルの場所
set :unicorn_config_path, -> { "#{current_path}/config/unicorn.rb" }
set :keep_releases, 5

# デプロイ処理が終わった後、Unicornを再起動するための記述
after 'deploy:publishing', 'deploy:restart'
namespace :deploy do
  task :restart do
    invoke 'unicorn:restart'
  end
end
貼り付けたテンプレートの一部を修正しましょう
lock '<Capistranoのバージョン>'
Capistranoのバージョンを確認するために、Gemfile.lockを開きましょう
    capistrano (3.11.1)
      airbrussh (>= 1.0.0)
      i18n
      rake (>= 10.0.0)
      sshkit (>= 1.9.0)
これでCapistranoのバージョンが(3.11.1)とわかりました。
ではdeploy.rbを修正しましょう
lock '3.11.1'
rubyのバージョン確認
set :rbenv_ruby, '○.○.○(rubyのバージョン)'
ターミナルで下記を実行しましょう
$ ruby -v

> ruby 2.5.1p57 (2018-03-29 revision 63029) [x86_64-darwin18]
○○○のところは、アプリ名などを入れる必要があるので、穴埋めしてください
set :application, '○○○(自身のアプリケーション名)'
set :repo_url,  'git@github.com:○○○(Githubのユーザー名)/○○○(レポジトリ名.git'
keys: ['~/.ssh/○○○○○.pem(ローカルPCのEC2インスタンスのSSH鍵(pem)へのパス 例:~/.ssh/key_pem.pem))']
unicorn.rbを編集
app_path = File.expand_path('../../', __FILE__)

worker_processes 1

working_directory app_path
pid "#{app_path}/tmp/pids/unicorn.pid"
listen "#{app_path}/tmp/sockets/unicorn.sock"
stderr_path "#{app_path}/log/unicorn.stderr.log"
stdout_path "#{app_path}/log/unicorn.stdout.log"
上記のunicorn.rbの記述を下記に変更
# ../が一つ増えている
app_path = File.expand_path('../../../', __FILE__)

worker_processes 1
# currentを指定
working_directory "#{app_path}/current"

# それぞれ、sharedの中を参照するよう変更(#{app_path}/shared/)
listen "#{app_path}/shared/tmp/sockets/unicorn.sock"
pid "#{app_path}/shared/tmp/pids/unicorn.pid"
stderr_path "#{app_path}/shared/log/unicorn.stderr.log"
stdout_path "#{app_path}/shared/log/unicorn.stdout.log"
rails.conf(Nginxの設定ファイル)を編集
[ec2-user@ip-172-31-25-189 ~]$ sudo vim /etc/nginx/conf.d/rails.conf
そして、capistranoに合わせた参照先に変更します。(詳細はコメントアウトで解説しています。)
upstream app_server {
  # sharedの中を参照するよう変更(/shared/tmp/sockets/unicorn.sock;)
  server unix:/var/○○○(アプリをまとめているディレクトリ)/○○○○○(アプリケーション名)/shared/tmp/sockets/unicorn.sock;
}

server {
  listen 80;
  server_name 18.○○○.○○(Elastic IP);

  # currentの中を参照するよう変更(/current/public;)
  root /var/○○○(アプリをまとめているディレクトリ)/○○○○○(アプリケーション名)/current/public;

  location ^~ /assets/ {
    gzip_static on;
    expires max;
    add_header Cache-Control public;
    # currentの中を参照するよう変更(/current/public;)
    root   /var/○○○/○○○○○○(アプリケーション名)/current/public;
  }

  try_files $uri/index.html $uri @unicorn;

  location @unicorn {
    proxy_set_header X-Forwarded-For $proxy_add_x_forwarded_for;
    proxy_set_header Host $http_host;
    proxy_redirect off;
    proxy_pass http://app_server;
  }

  error_page 500 502 503 504 /500.html;
}
Nginxの権限を変更
[ec2-user@ip-172-31-25-189 ~]$ cd /var/lib
[ec2-user@ip-172-31-25-189 lib]$ sudo chmod -R 775 nginx
Nginxの設定を変更したら、忘れずに再読込・再起動
[ec2-user@ip-172-31-25-189 ~]$ sudo service nginx reload
[ec2-user@ip-172-31-25-189 ~]$ sudo service nginx restart
MySQLの起動を確認
[ec2-user@ip-172-31-25-189 ~]$ sudo service mysqld restart
unicornのプロセスをkillしよう
[ec2-user@ip-172-31-23-189 <リポジトリ名>]$ ps aux | grep unicorn

ec2-user 17877  0.4 18.1 588472 182840 ?       Sl   01:55   0:02 unicorn_rails master -c config/unicorn.rb -E production -D
ec2-user 17881  0.0 17.3 589088 175164 ?       Sl   01:55   0:00 unicorn_rails worker[0] -c config/unicorn.rb -E production -D
ec2-user 17911  0.0  0.2 110532  2180 pts/0    S+   02:05   0:00 grep --color=auto unicorn
一番上のunicorn_rails masterをkillしたいので、下記を実施
[ec2-user@ip-172-31-23-189 <リポジトリ名>]$ kill 17877
ローカルでの修正を全てmasterにpushしてください
自動デプロイの実施
# アプリケーションのディレクトリで実行する
$ bundle exec cap production deploy
すると下記ん画像のように、徐々に処理が進み出す。

エラーが発生する場合
ディレクトリ `/var/www' を作成できません: 許可がありません

mkdir stdout: Nothing written
mkdir stderr: mkdir: ディレクトリ `/var/www' を作成できません: 許可がありません
mkdir: ディレクトリ `/var/www' を作成できません: 許可がありません
ヒヤリング:手動デプロイはできていたか?
・YES:Capistranoの設定の問題(ここまで進めている以上、できているはず)
・NO:もう一度手動デプロイを確認する必要があるかもしれません。
設定の見直し
rails.confとdeploy.rbのパスの確認をしてください。

var/www/アプリ名で設定しているか?
・ディレクトリはwwwの場合、入力間違いがないか???
・ディレクトリは"wwwでない"場合、capistranoのデフォルト設定を変更する必要がある。
EC2でのアプリの保存場所が『 var/www/アプリ名 』でない場合、、
[参考](https://capistranorb.com/documentation/getting-started/configuration/)
deplory.rbに下記を追加してください。
set :deploy_to, '/var/○○○/アプリ名'
capistranoのデフォルト設定では、/var/www/アプリ名が設定されているため、これを変更する必要がある。
そのオプション設定がset :deploy_to, '/var/○○○/アプリ名'である。
Master.keyがないエラー( Missing encryption key to decrypt file with. Ask your team for your master key and write it to )
このエラーが表示されたということは、『 本番環境にあるmaster.keyをうまく読み込めていない 』ことを意味します。
rake stdout: Nothing written
rake stderr: Missing encryption key to decrypt file with. Ask your team for your master key and write it to /var/○○○(アプリを格納しているディレクトリ名)/○○○(アプリ名)/releases/20200121124714/config/master.key or put it in the ENV['RAILS_MASTER_KEY'].
なので現状として可能性は二つです。
- master.keyを作成していない。
- master.keyを作成する場所が間違っている。
ここまで作業を進めている人は,master.keyを作成しているはずです。
>つまり、master.keyの作成場所をまちがている可能性が高いです。
# 誤解が生まれやすいmaster.keyの作成場所

✖︎ アプリ名>config>master.key
○ アプリ名>shared>config>master.key
おそらく、上記のようにmaster.keyの作成場所に誤りがある可能性が高いです。
ですから、
[ec2-user@ip-172-31-23-189 <リポジトリ名>]$ cd shared
[ec2-user@ip-172-31-23-189 shared ]$ cd config
[ec2-user@ip-172-31-23-189 config ]$ ls
>ここでmaster.keyがない場合、 master.keyを作成してください。
master.keyを作成する場合、、、
アプリ名 $ vi config/master.key
>master.keyを中身がわかります。
>間違っても編集しないようにしましょう
ローカル環境のmaster.keyをコピーしたら、EC2にmaster.keyを作成しましょう
[ec2-user@ip-172-31-23-189 <リポジトリ名>]$ cd shared/config
[ec2-user@ip-172-31-23-189 config ]$ vi master.key
>編集画面が出るので
>ローカルのmaster.keyをコピペします。
>:wpで保存しましょう
master.keyを読み込ませるために、deploy.rbに
下記を追加してください
set :linked_files, fetch(:linked_files, []).push("config/master.key")
再度自動デプロイしましょう
# アプリケーションのディレクトリで実行する
$ bundle exec cap production deploy
参考記事
最も参考になる記事
無料!かつ最短?で Ruby on Rails on Docker on AWS のアプリを公開するぞ。
Ruby on Rails + Docker + Capistrano + Puma + Nginx AWS EC2へデプロイ方法のメモ
Docker + Rails + Puma + Nginx + MySQL
dockerとdocker-composeのインストール(Linux編)
【AWSのEC2にgit入れたい】AWSのEC2でgit cloneできない現象を解決した話【凡ミス系】
DockerでNginx+unicorn+rails+Mysqlの開発環境を作ってみた
[AWS] EC2からRDS(MySQL)へ接続する方法
RDSを無料枠で起動して接続する
EC2からRDS(MySQL)に接続できない。
RDSへEC2から接続する方法