この記事はNCC Advent Calendar 2018の4日目の記事です.
アドベントカレンダー内で勝手にやってるMetalの連載も4日目です.
勝手にやってるMetal連載
最近Metalを初めて楽しくなっちゃったのでたくさんoutputしてみる会です.
- Rendererを作る
- プロシージャルモデリング的な何か
- フラグメントシェーダで遊ぶ
- テクスチャで遊ぶ ← イマココ
(15分前に3個目を書き終わったのにもう4個目かよ...)
VCの訂正!!というか追記!!
ViewControllerのviewDidLoadないで,mtkViewを宣言して,Rendererに渡していました
そして.このmtkViewを表示するためになんらかの処理をするのですが...
こんな方法をよくみました.
let mtkView = self.view as! MTKView
それなりに最近の文献にも関わらずこれ,落ちるんじゃあ!!
そんな中で,こんな表現にたどり着きました.
guard let mtlDevice = MTLCreateSystemDefaultDevice() else { ~ }
let mtkView = MTKView(~~)
mtkView.delegate = ~
self.view = mtkView
今回のサンプルコードもすべてこれで作っていました.
でも,これだとStoryBoardを使って開発したりできないですよね.
それに,せっかくインスタンス化したviewControllerのViewを,viewをLoadしてから書き換えるというのもなんだか不自然な話です.
Metalで遊ぶだけだったら全然十分ですが,なんだか直感にそぐわない実装で府に落ちてはいませんでした
ということで,view上の一番背面に背景のようにmtkViewを追加するのも紹介しておきます.
guard let mtlDevice = MTLCreateSystemDefaultDevice() else { ~ }
let mtkView = MTKView(frame: view.frame, device: mtlDevice)
mtkView.delegate = ~
view.insertSubview(mtkView, at: 0)
これで,StoryBoardで配置したUIパーツたちの背景として追加できます.
また,こんな書き方でも同じようなことができます.
guard let mtlDevice = MTLCreateSystemDefaultDevice() else { ~ }
let mtkView = MTKView(frame: view.frame, device: mtlDevice)
mtkView.device = ~
view.layer.addSub
view.layer.addSublayer(mtkView.layer)
いや,これなら元からCALayer使ってやれよって話ですね
テクスチャやっていき
まずは描画
第2回のポリゴンを描画します.
テクスチャを使うので,真っ白にしました.

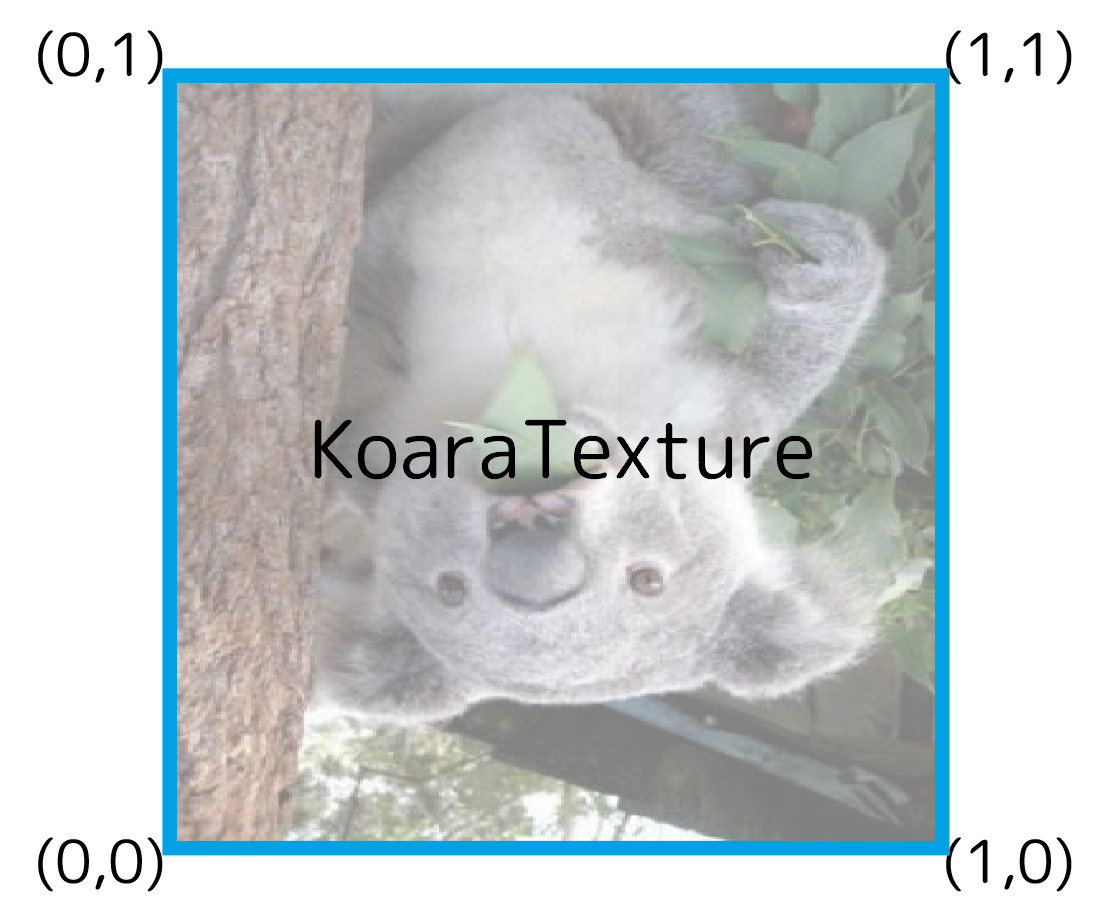
Koaraの紹介
そして,Koaraと遊びます.K o a r aです.
弊学科のアイドルは色々あってKoaraなんです.

こいつがKoaraです.
Texture用にRendererを拡張
Textureを使うための仕込みをします.
ほぼ全部Rendererが対象です
// このextensionは丸々追加
// for use Texture
extension Renderer {
    // Textures
    private var koaraTexture: MTLTexture!

    // start()内でこのメソッドを呼んでテクスチャを生成する
    private func buildTexture() {
        koaraTexture = imageTexture(imageName: "koara.jpg", device: mtlDevice)
    }

    // プロジェクト配下にある画像の名前から,MTLTextureを生成するメソッド.
    // 長くなるので関数に分けました.
    private func imageTexture(imageName: String, device: MTLDevice) -> MTLTexture? {
        guard let image = UIImage(named: imageName)?.cgImage else {
            return nil
        }
        let (w,h) = (image.width, image.height)
        let colorSpace = CGColorSpaceCreateDeviceRGB()

        let rawData = calloc(h*w*4, MemoryLayout<UInt8>.size)

        let bytesPerPixel = 4
        let bytesPerRow = bytesPerPixel * w
        let bitsPerComponent = 8

        let options = CGImageAlphaInfo.premultipliedLast.rawValue | CGBitmapInfo.byteOrder32Big.rawValue

        let context = CGContext(data: rawData, width: w, height: h,
                                bitsPerComponent: bitsPerComponent, bytesPerRow: bytesPerRow,
                                space: colorSpace, bitmapInfo: options)

        context?.draw(image, in: CGRect(x: 0, y: 0, width: CGFloat(w), height: CGFloat(h)))

        let textureDescriptor = MTLTextureDescriptor.texture2DDescriptor(pixelFormat: .rgba8Unorm, width: w, height: h, mipmapped: false)
        let texture = device.makeTexture(descriptor: textureDescriptor)

        let region = MTLRegionMake2D(0, 0, w, h)

        texture?.replace(region: region, mipmapLevel: 0, slice: 0, withBytes: rawData!, bytesPerRow: bytesPerRow, bytesPerImage: bytesPerRow*h)

        free(rawData)

        return texture
    }
}

// 描画時のテクスチャ設定
public func draw() {
    commandEncoder?.setFragmentTexture(koaraTexture, index: 0)
}
⚠️⚠️⚠️注意点⚠️⚠️⚠️
普通に,CGImageをTextureに書き込むと,このように上下反転したTextureになってしまいます.
これは,CGImageの上のrowからTextureに書き込まれていくのですが,それが,言うなればTexture[0]から順に書き込まれていくためです.
このTexture[0]はテクスチャ座標上の$ y=0$に相当します.
よって,CGImageとTextureでは上下反転してしまうのです.
このサンプルコードでは,fragmentシェーダ上でテクスチャ座標を変換することで対処しています.
viewControllerの変更点
また,Koaraの画像のアスペクト比が$3:4$なので,歪まずに表示できるようにmtkViewのサイズを変更しています.
これは,ViewControllerでの宣言時に行います.
また,フルスクリーンで使用しないので,冒頭に書いたようなview.insertSubview(mtkView)を使用したいと思います.
import UIKit
import Metal
import MetalKit

class viewController: UIViewController {
    private var renderer: Renderer!

    override func viewDidLoad() {
        super.viewDidLoad()
        guard let mtlDevice = MTLCreateSystemDefaultDevice() else {
            print("Metal is not supported on this device")
            return
        }
        let (w,h) = (view.frame.width,view.frame.height)
        let mtkViewFrame = CGRect(x: 0, y: h/2 - 2*w/3,width: w, height: 4*w/3)
        let mtkView = MTKView(frame: mtkViewFrame, device: mtlDevice)
        mtkView.device = mtlDevice
        mtkView.framebufferOnly = true
        mtkView.preferredFramesPerSecond = 60
        mtkView.colorPixelFormat = .bgra8Unorm
        mtkView.clearColor = MTLClearColor(red: 0, green: 0, blue: 0, alpha: 1)
        renderer = Renderer(metalKitView: mtkView)

        view.insertSubview(mtkView, at: 0)

        var polygonVertices = [Vertex]()
        for i in -5..<6 {
            for j in -5..<6 {
                let x = Float(i)/Float(5)
                let y = Float(j)/Float(5)
                let regPoly = RegularPolygon(center: float3(x, y, 0), r: 0.09, n: 8+i, Color: Color(1.0))
                polygonVertices += regPoly.triangles
            }
        }
        renderer.setVertices(polygonVertices)
        renderer.start()
    }

    override func touchesBegan(_ touches: Set<UITouch>, with event: UIEvent?) {
    }
}
Metal Sdhading Languageでsamplerを扱う
毎度のように,シンタックスハイライトのために拡張子はcpp
# include <metal_stdlib>
using namespace metal;

struct VertexIn {
    float3 offset;
    float3 position;
    float4 color;
};

struct Uniforms {
    float time;
    float aspectRatio;
    float2 touch;
};

struct VertexOut {
    float4 position [[ position ]];
    float4 screenCoord;
    float4 color;
    float time;
    float2 touch;
};

vertex VertexOut vertexDay4(constant VertexIn *vertexIn [[buffer(0)]],
                            constant Uniforms &uniforms [[buffer(1)]],
                            uint vid [[ vertex_id ]]) {

    float t = uniforms.time;

    float3 offset = vertexIn[vid].offset;
    float3 position = vertexIn[vid].position;
    float4 screenCoord = float4(offset, 0.0) + float4(position, 1.0);
    float4 color = vertexIn[vid].color;
    VertexOut out;


    float4 pos = float4(screenCoord.x, screenCoord.y*uniforms.aspectRatio, screenCoord.zw);

    out.position = pos;
    out.screenCoord = pos; // screenCoordから更新.
    out.color = color;
    out.time = uniforms.time;
    out.touch = uniforms.touch;
    return out;
}

fragment half4 fragmentDay4(VertexOut vertexIn [[stage_in]],
                            texture2d<float, access::sample> koaraTexture [[texture(0)]]) {
    float4 p = (vertexIn.screenCoord+float4(1))/2;
    p.y = 1.0-p.y;
    constexpr sampler nearestSampler(coord::normalized, filter:: nearest);
    float4 koara = koaraTexture.sample(nearestSampler, p.xy);
    return half4(koara);
}
スクリーン座標toテクスチャ座標変換
fragmentシェーダ内では,次のようにスクリーン座標からテクスチャ座標へと変換しています,
float4 p = (vertexIn.screenCoord+1)/2;
p.y = 1.0-p.y;
下の図の,青い座標が,最終的なテクスチャ座標となります.
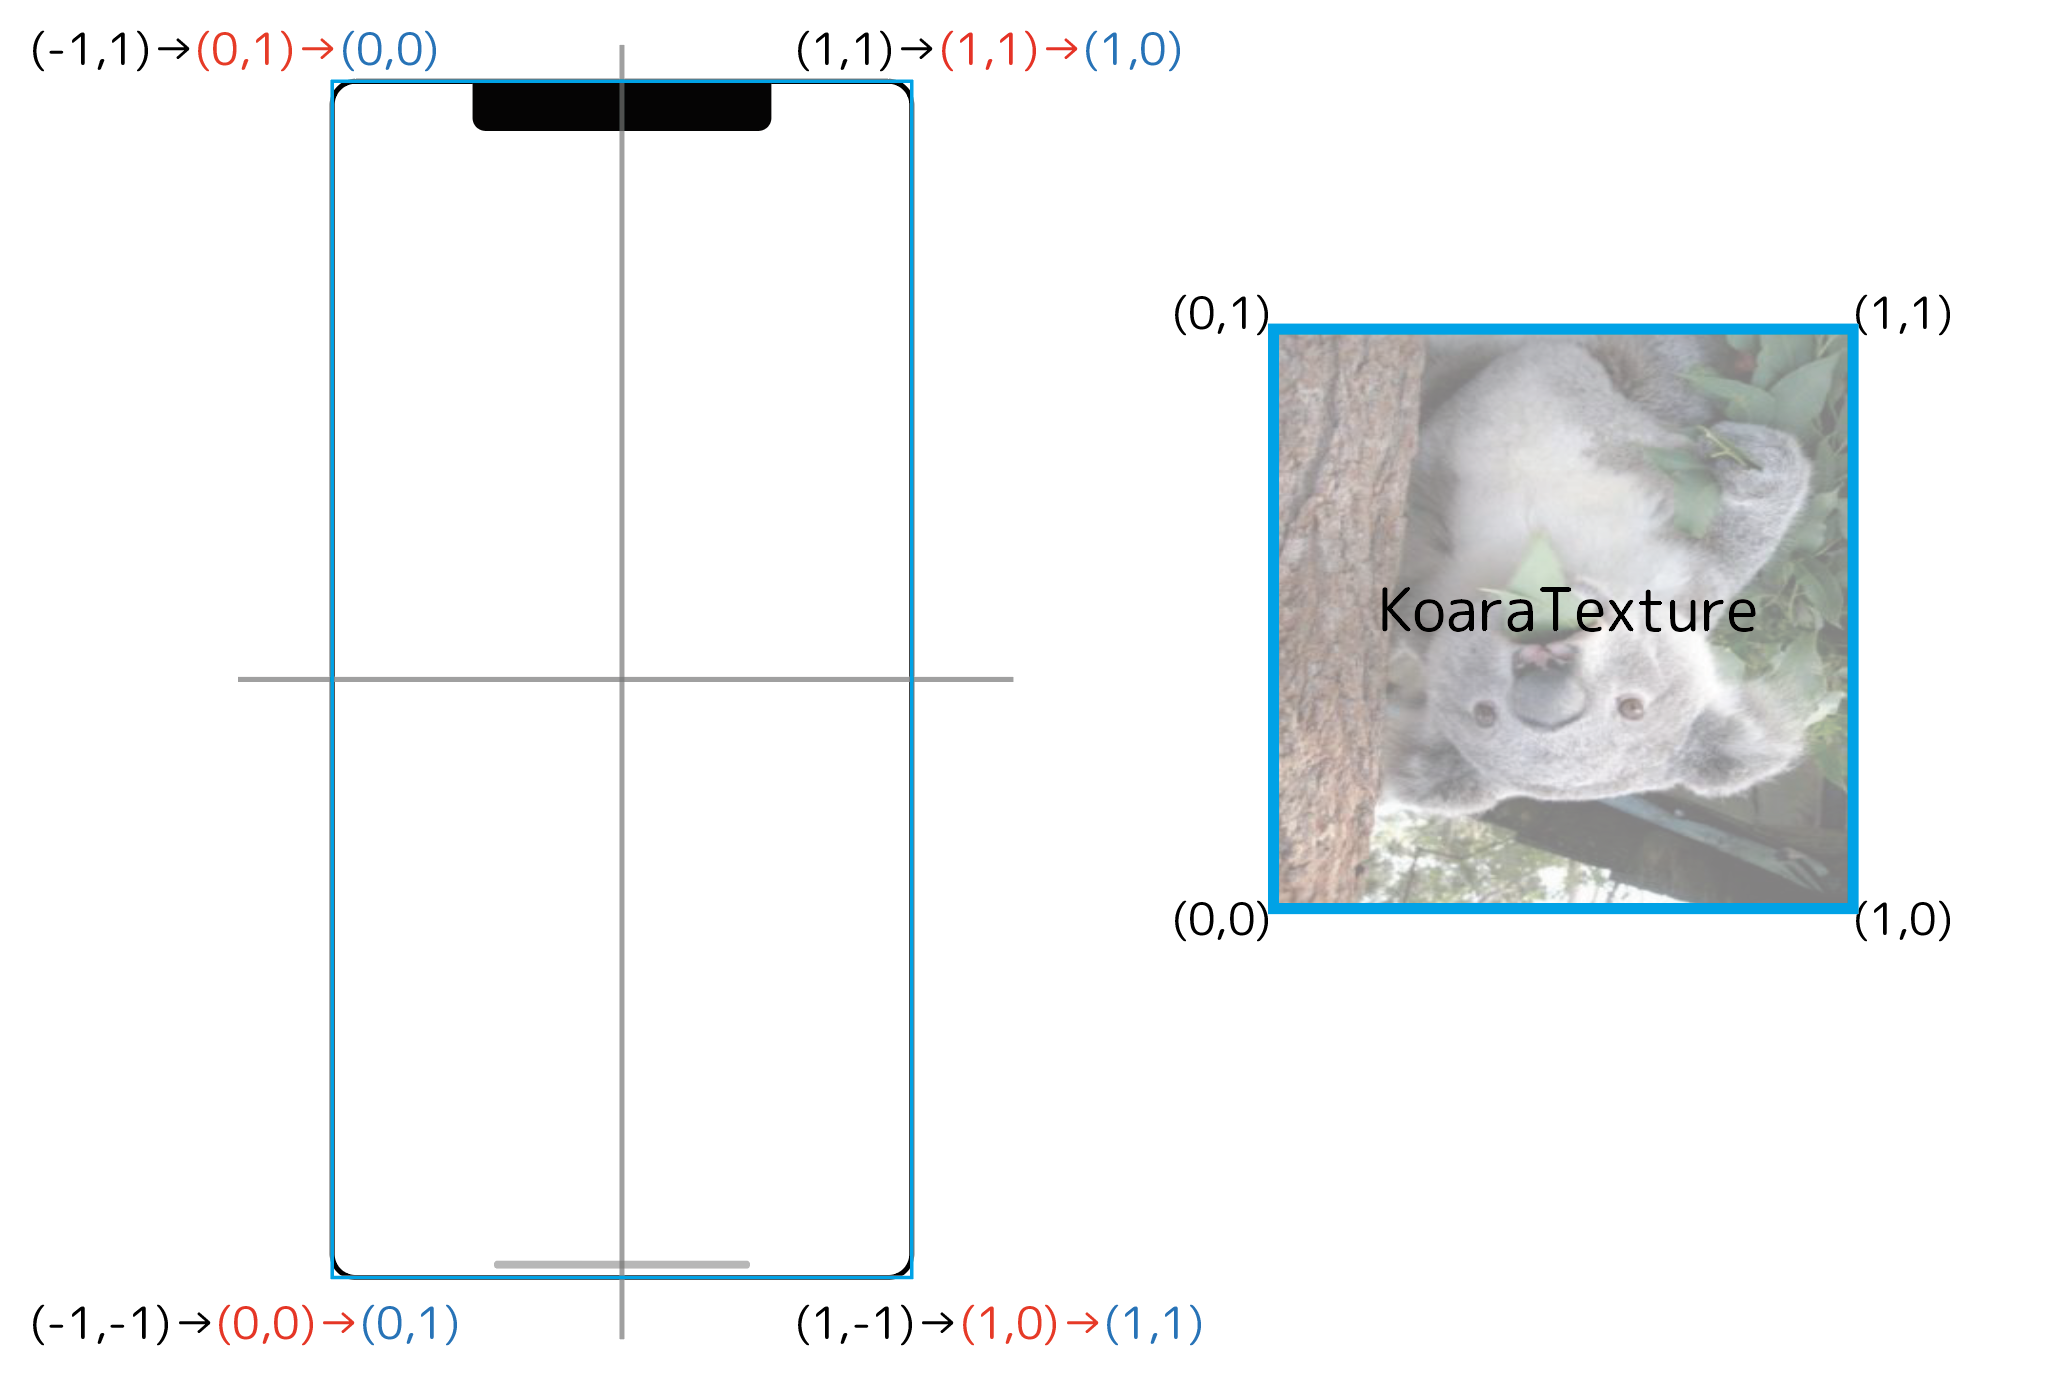
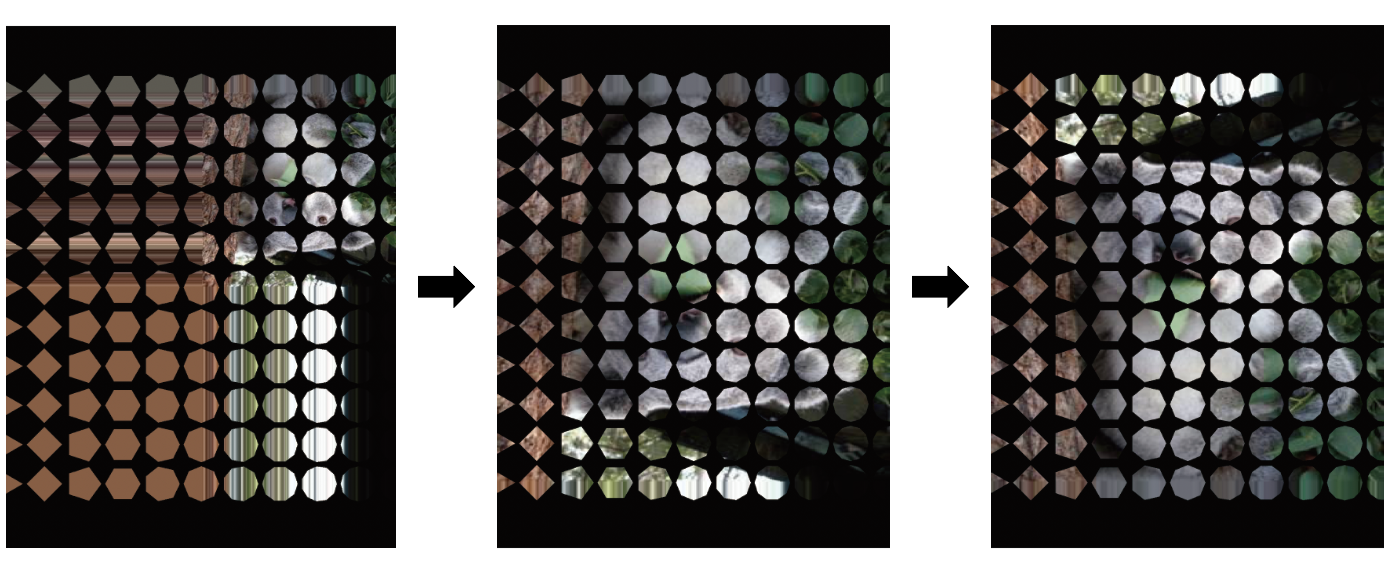
よって次のように遷移します.
- 左
- 座標変換を施さず,スクリーン座標をそのままテクスチャ座標に適用した出力結果
- 真ん中
- $(\text{スクリーン座標}+1)/2$という処理を施し,$ 0.0 \le x,y \le 1.0$という範囲に変換しテクスチャを出力結果
- 右
- 上の範囲の変換を行い,かつ$\text{スクリーン座標}.y = 1.0 - \text{スクリーン座標}.y$と上下を反転させてテクスチャを出力した結果.
この画像の上下の際の方はスクリーン座標への変換を間違えてしまい,歪んでいますが,記事内のコードとサンプルコードは修正しました.
こんな感じで,ポリゴンを使って,Koaraにマスクをかけてみました.
サンプルコードのvertexシェーダ内のコメント部分を有効にしたりすると,回転したりします.
もうちょっとなんかやる
マスクは終わりで,普通に$3:4$の長方形の上で,Koaraと遊んでみましょう.
と思ったけど寝たい!またじゃあね!