この記事はNCC Advent Calendar 2018の1日目の記事です.
NCCとは
1日目ですし,NCCの説明から.
NCCは明治大学の公認サークルです.プログラミングを中心とした技術系の情報・知見共有を目的としたサークルで,弊学総合数理学部のメンバーが中心となっています.
勝手にやってるMetal連載
最近Metalを初めて楽しくなっちゃったのでたくさんoutputしてみる会です.
- [Rendererを作る] ← イマココ
- プロシージャルモデリング的な何か
- フラグメントシェーダで遊ぶ
- テクスチャで遊ぶ
Metalをやりはじめた
去年のアドベントカレンダーでも,CreativeCodingな記事を書きましたが,今年はshaderです.
Processingで書くのも楽しいですが,GLSLにも手を出そうと少し前にShaderを始めました.もともとiOSエンジニアで,Swift1.0の頃から戯れていた身からするとMetalに手を出すのは必至だったわけです.
ということで,今年の弊サークルのアドベントカレンダーで連投しようかなというわけです.
でも,GPUプログラミング,Rendererを作るだけでなかなかしんどい.(WebGLわからん)
なので,連投だし,今日はRendererでいいかなあって()
ほぼ同じコードをgithubにあげておくので連投と共にcommitもします!
Metalを一緒にやろう!
GPUを使ったレンダリングの流れ
- 頂点を用意
- ローカル座標と呼ぶ
- VertexShader
- ローカル座標を変換する
- FragmentShader
- 色を付ける
流れはこれだけです.
このVertexShaderとFragmentShaderを用意して描画するところで,MetalのAPIを叩くわけです.
この辺をまとめてRendererとして抜き取っちゃいます.
Rendererで使うものたち
よく使うオブジェクトについて説明していきます.
コードを書くときに,ただの社協になったりするとつまらないので頑張って書きます笑.
基本的にMetalのDeveloper Documentationから引用しています.
一度iPadを使ってこういうものを書いてみたかったので,ついでにあげてみます...笑

これらを実現するMetalAPIたちです.
MTKView
An object that implements the MTKViewDelegate protocol can be set as a MTKView object’s delegate. A delegate allows your Metal application to provide a drawing method to a MTKView object and respond to rendering events without subclassing the MTKView class.
MetalKitに実装されているViewです.
MTKViewDelegateに遵守したオブジェクトを利用して,MTKViewに描画することができます.
作成するRendererもこのDelegateに遵守させます.
MTLDevice
The MTLDevice protocol defines the interface to a GPU. You can query a GPU device for the unique capabilities it offers your Metal app, and use the GPU device to issue all of your Metal commands.
MTLDeviceを通して,GPUにアクセスすることができます.(引用の太字部分)
正確には,GPUにアクセスするためのパイプラインを構築するために利用します.
MTLDeviceは,MTKViewを表示するViewControllerのviewDidLoad内で生成してRendererをinitする際に渡します.
MTLBuffer
The MTLBuffer protocol defines the interface for objects that represent an allocation of unformatted, device-accessible memory that can contain any type of data.
allocation of unformattedとは結構迷ったのですが,おそらく分割されていない割り当てられたデータです.そんでもって,Swiftで表現できる型ならば,構造体でもMTLBufferにすることができます.
MTLBufferはMTLDeviceのmakeBuffer(略)というメソッドを用いて作成します.この関数の引数は色々あります
勝手な解釈
分割されていないというのは,GPU側でデータを受け取る際の解釈の仕方でそのデータの型が決まります.
例えば,n個のfloat4の配列をMTLBufferにしても,分割されていないので外から見れば float が$4n$個並んでいるだけです.
「float3で受け取る!」と決めれば,先頭の方から3個ずつデータを受け取れる気がします.
MTLBufferに対して,MTLTextureがAn allocation of formatted image dataと説明されているからです.
MTLLibrary
A MTLLibrary object contains Metal shading language source code that is compiled during the app build process or at runtime from a text string.
基本的に,コンパイルされたMetal shading language(MSL)のコードにアクセスするために使います.
こちらもMTLDeviceからmakeDefaultLibrary()というメソッドを用いて作成します.
MTLFunction
この関数が,GPUの各スレッドで実行されるやつです.
MSLでサポートされている関数,すなわちMTLFunctionは以下の3種類です
- Vertex
- Fragment
- Kernel
VertexFunctionとFragmentFunctionは後述のMTLRenderPipelineStateと結びついています.描画するためのshader関数です.
今回は詳しく扱いませんが,KernelFunctionはMTLComputePipelineStateと結びついています.GPGPU,ComputeShaderと言われる類のshader関数です.
どれもMTLLibraryからmakeFunction(name: String)メソッドを用いて関数を呼び出し,対応するPipelineと結びつけます.
-
MTLRenderPipelineDescriptor
-
MTLRenderPassDescriptor
MTLRenderPipelineState
The MTLRenderPipelineState protocol defines the interface for a lightweight object used to encode the state for a configured graphics rendering pipeline.
とか
The MTLRenderPipelineDescriptor sets up a prevalidated state.
MTLRenderPipelineDescriptorをもとに作成されます.
MTLCommandQueue
command queue is an expensive object to create, so you want to create only one and reuse it.
コマンドキューを生成するのは大変だから使いまわせと
MTLCommandBuffer
command buffer objects is cheap to create.
コマンドバッファーを作るのは簡単だから,毎フレーム作っていいよと
MTLRenderCommandEncoder
GPUにデータを渡す(バインドする)役割を担ったり
最後の最後のdrawPrimitivesもここですね
Rendererを作る
import Foundation
import Metal
import MetalKit


class Renderer:NSObject {
    // local datas
    private var vertices: [Vertex]!
    private var vertexBuffer: MTLBuffer!
    private var indices: [UInt16]!
    private var indexBuffer: MTLBuffer!
    // for MetalAPI
    private var mtlDevice: MTLDevice!
    private var mtkview: MTKView!

    private var commandQueue: MTLCommandQueue!
    private var pipelineState: MTLRenderPipelineState!

    init(metalKitView mtkView: MTKView) {
        super.init()
        self.mtkview = mtkView

        guard let device = mtkView.device else {
            print("mtkview doesn't have mtlDevice")
            return
        }

        self.mtlDevice = device

        commandQueue = device.makeCommandQueue()
        vertices = [Vertex]()
        indices = [UInt16]()
    }

    private func buildPipeline() {
        let library = mtlDevice.makeDefaultLibrary()
        let vertexFunction = library?.makeFunction(name: "vertexDay1")
        let fragmentFunction = library?.makeFunction(name: "fragmentDay1")

        let pipelineDescriptor = MTLRenderPipelineDescriptor()
        pipelineDescriptor.vertexFunction = vertexFunction
        pipelineDescriptor.fragmentFunction = fragmentFunction
        pipelineDescriptor.colorAttachments[0].pixelFormat = .bgra8Unorm

        do {
            try pipelineState = mtlDevice.makeRenderPipelineState(descriptor: pipelineDescriptor)
        } catch let error {
            print("Failed to create pipeline state, error: ", error)
        }
    }

    private func buildBuffer() {
        vertexBuffer = mtlDevice.makeBuffer(bytes: vertices, length: vertices.count*MemoryLayout<Vertex>.stride, options: [])
        indexBuffer = mtlDevice.makeBuffer(bytes: indices, length: indices.count*MemoryLayout<UInt16>.stride, options: [])
    }

}

extension Renderer: MTKViewDelegate{

    public func draw(in view: MTKView) {
        guard let drawable = view.currentDrawable,
            let renderPassDescriptor = view.currentRenderPassDescriptor else {
                print("cannot get drawable or renderPassDescriptor")
                return
        }
        let commandBuffer = commandQueue.makeCommandBuffer()
        let commandEncoder = commandBuffer?.makeRenderCommandEncoder(descriptor: renderPassDescriptor)
        commandEncoder?.setRenderPipelineState(pipelineState)
        commandEncoder?.setVertexBuffer(vertexBuffer, offset: 0, index: 0)
        commandEncoder?.drawIndexedPrimitives(type: .triangle, indexCount: indices.count, indexType: .uint16, indexBuffer: indexBuffer, indexBufferOffset: 0)
        commandEncoder?.endEncoding()
        commandBuffer?.present(drawable)
        commandBuffer?.commit()

    }

    public func mtkView(_ view: MTKView, drawableSizeWillChange size: CGSize) {

    }

}

// ViewController(Rendererを宣言する場所から呼び出すメソッドたち)
extension Renderer {
    public func setVertices(_ vertices: [float3]) {
        self.vertices += vertices.map({ (pos) -> Vertex in
            return Vertex(position: pos)
        })
    }
    public func setIndices(_ indices: [Int]) {
        self.indices += indices.map({ (n) -> UInt16 in
            return UInt16(n)
        })
    }

    public func applyTouch(touch: float2) {
        uniforms.touch = touch
    }

    public func start () {
        buildBuffer()
        buildPipeline()
        mtkview.delegate = self
    }
}

struct Vertex {
    var position: float3
}
よくあるUniform変数を作る
- time
- mouse
- アスペクト比
- スクリーン場の座標が,長方形ですがx,y共に $-1 \le x, y \le 1$ となっているので,縦に歪んでしまいます
- スクリーン座標系に戻してあげましょう
- 第三回で図とともに比較的詳しく説明しています.
これを構造体で定義しておいて,それをそのまま渡しましょう.
受け取り先のshaderコードにも同じ構造体を定義します.
struct Uniforms {
    var time: Float
    var aspectRatio: Float
    var touch: float2
}
    private var preferredFramesTime: Float! // 毎フレームにかかる秒数

    init(metalKitView mtkView: MTKView) {
        super.init()
        // ~~ 略 ~~
        uniforms = Uniforms(times: Float(0.0), aspectRatio: Float(0.0), touch: float2())
        uniforms.aspectRatio = Float(mtkView.frame.size.width / mtkView.frame.size.height)
        uniforms.time = 0.0
        preferredFramesTime = 1.0 / Float(mtkView.preferredFramesPerSecond)
    }

    public func draw(in view: MTKView) {
        uniforms.time += preferredFramesTime
        // ~~ 略 ~~
        commandEncoder?.setVertexBytes(&uniforms, length: MemoryLayout<Uniforms>.stride, index: 1)
    }
    override func touchesBegan(_ touches: Set<UITouch>, with event: UIEvent?) {
        if(touches.first == nil) { return }
        let loc = touches.first!.location(in: view)
        let resolution = view.frame.size
        renderer.applyTouch(touch: float2(Float((loc.x/resolution.width)*2.0-1.0),-Float((loc.y/resolution.height)*2.0-1.0)))
    }

    override func touchesMoved(_ touches: Set<UITouch>, with event: UIEvent?) {
        // 同じ
    }
shaderのコードはこんな感じです
# include <metal_stdlib>
using namespace metal;

struct VertexIn {
    float3 pos;
};

struct Uniforms {
    float time;
    float aspectRatio;
    float2 touch;
};
struct VertexOut {
    float4 pos [[ position ]];
    float3 color;
    float time;
};

vertex VertexOut vertexDay1(constant VertexIn *vertexIn [[buffer(0)]],
                            constant Uniforms &uniforms [[buffer(1)]],
                            uint vid [[ vertex_id ]]) {
    float3 pos = vertexIn[vid].pos;
    VertexOut out;

    out.pos = float4(pos,1.0);
    out.color = float3((pos.xy+float2(1.0))/2.0, 0.7);
    out.time = uniforms.time;

    return out;
}

fragment half4 fragmentDay1(VertexOut vertexIn [[stage_in]]) {
    float4 p = vertexIn.pos;
    float3 c = vertexIn.color;
    float t = vertexIn.time;
    return half4(c.x, c.y, (1.0+cos(t))/2.0,1.0);
}
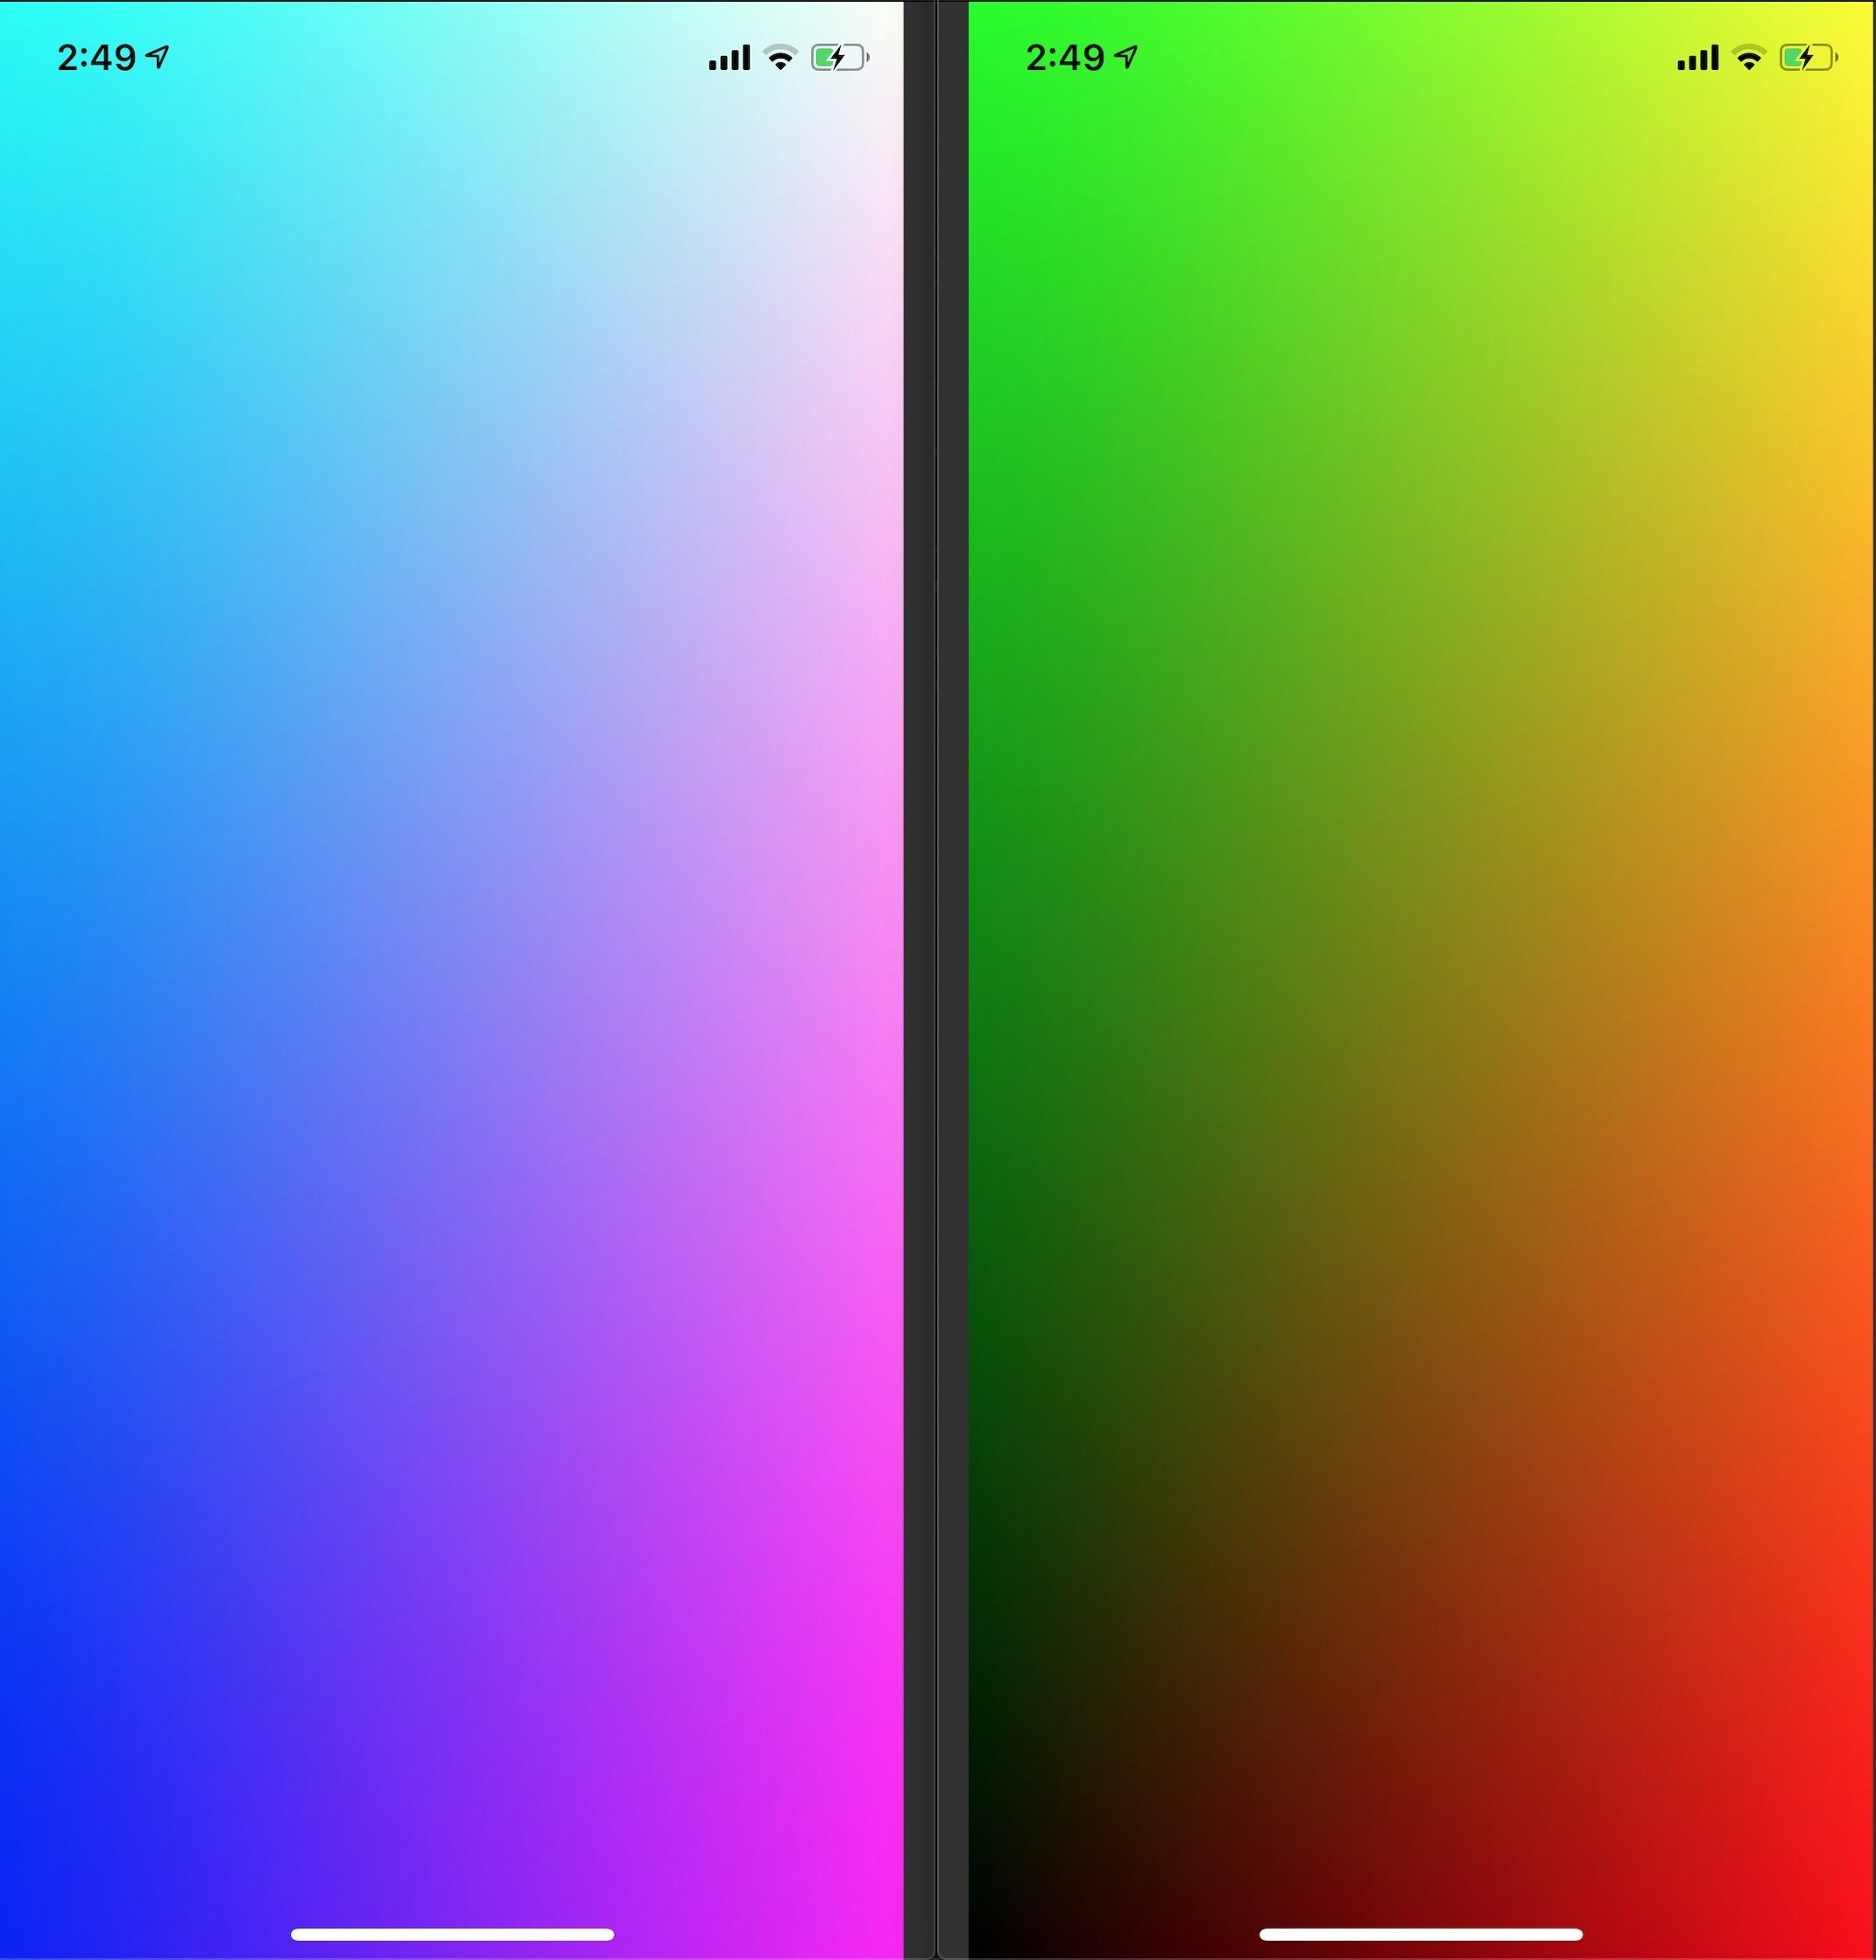
次の間を行き来するようなグラデーションのアニメーションになります!

Swift書く人がいない
弊サークルにiOSアプリ作ってる人がいません.誰かやろう
コード
今日のコードをはこのリポジトリのDay1に入っています.