さあ前回までで、カスタムアクティビティの表示のカスタマイズができたので、今回はその表示データの外部ファイル化とローカライズについてです。
外部化とは表示している文字列を設定ファイルに外出しすることです。ローカライズとは、英語圏では英語表示、日本語圏では日本語表示するなど、アプリが起動しているロケール?(カルチャというらしい)ごとに表示言語を切り替えることです。
表示するデータは外部ファイル(リソースファイル)にしておいて、リソースファイルをカルチャ毎に用意しておきます。アプリは起動された環境のカルチャに応じて、読み込むリソースファイルを切り替える、という仕組みですね。
さて、この外部化とローカライズのやりかたは、Visual Studioというかnupkgにはどうも標準的なやり方があるようで、それらを参考にします。
また、UiPath Studio のローカライズ(言語切り替え)についてですが、バージョン2018.3から対応しているようなので、今回は稼働確認に UiPath Studio 2018.3.2を使用しています。
というわけで、今回のローカライズの話は、
- 表示している文字データの外部ファイル化
- 外部ファイルをカルチャ毎に作成
- 言語対応してビルドしたnupkgを UiPath Studio 2018.3.2 へインストール
- アプリ側(UiPath Studio)のカルチャを切り替えて、画面表示が変わっていることを確認する
というのがメインの話となります。
その前にカルチャの確認
ちなみに UiPath Studio 2018.3の言語切り替えに応じて、いま使用しているカルチャが変化するのですが「いまどのカルチャで起動しているか」を、こんな感じのアクティビティを作ってコンソール出力してみました。
namespace Utils.PathUtils
{
    public sealed class CurrentCultureCheck : CodeActivity
    {
        protected override void Execute(CodeActivityContext context)
        {
            Console.WriteLine(Thread.CurrentThread.CurrentCulture);
            Console.WriteLine(Thread.CurrentThread.CurrentUICulture);
        }
    }
}
実行結果は、日本語で起動しているときは
  <-空かnull
ja
英語で起動しているときは、
  <-空かnull
en
となっていました。ようするにUiPath Studioの設定画面の言語切り替えによって、カルチャが en とか jaになったりするって事みたいですね。
ja-JP とかそんな値が返ってくるのを期待したのですが、まあ、とにかくこうなっています。
一応このソースへのリンクはコチラ。全体のどこに置いたかとか知りたい方はどうぞ。
https://github.com/masatomix/UiPath_Path/blob/c1e1944dd3c9875f932d45eabaf3f725e18ab392/Utils/PathUtils/CurrentCultureCheck.cs
やってみる
では、外部化とローカライズ開始です。
ソースコード
まず対応前の初期状態は、こちら。
https://github.com/masatomix/UiPath_Path/releases/tag/localization_init
ココから開始します。該当のコミットをCheckoutしてもらえばそのまま開発を開始できます
で、修正した結果の今回の成果物はこちら。
https://github.com/masatomix/UiPath_Path/releases/tag/localization_finish
該当のコミットをCheckoutしてもらえば、そのまま今回の成果物を確認できます。
さき書いてしまうと、差分はこんなかんじになっています。
https://github.com/masatomix/UiPath_Path/compare/localization_init...localization_finish
文字列の外部化
まずは文字列の外部ファイル化から。以下、プロジェクトにリソースファイルを追加する手順です。
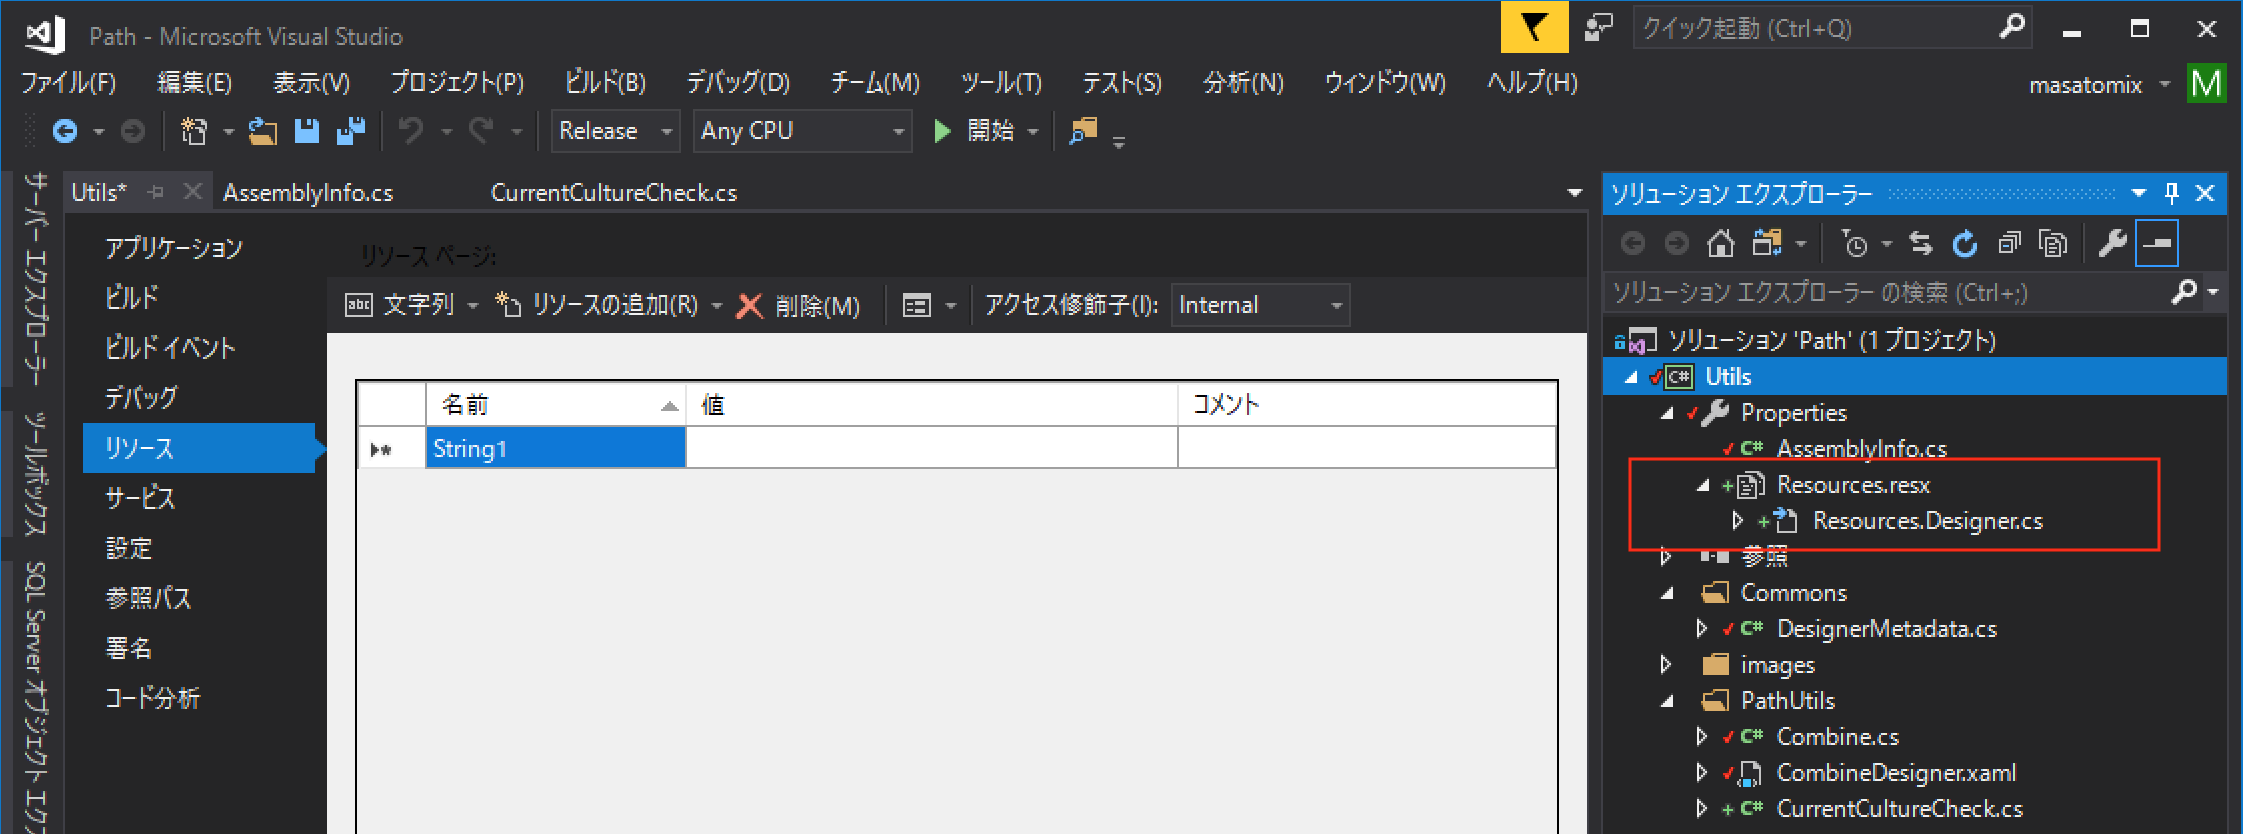
プロジェクトを開いたら、ソリューションエクスプローラのプロジェクト名「Utils」を選択して ALT + Enter(右クリック >> プロパティでも同じ)。いつものアプリケーションの設定画面が表示されるので、左メニュー部の「リソース」をクリックします。

リソースファイルはまだないと言われてますので、作成するにはココをクリック、とあるのでその通りに。

ソリューションエクスプローラにも、
- Resources.resx
- Resources.Designer.cs
が追加されていると思います。
最後に、下記のリソースのアクセス修飾子を Internal から Publicに変更しておくのがよいようです。

コレをやると、ソースの差分を見ると Resources.Designer.cs 内の Resourcesクラスがinternal -> public に変わったり、*.csprojファイル内の Resources.resx が PublicResXFileCodeGenerator ってのになったりしてました。
どうも
Properties.ResourcesがXAMLから参照できない
っていうページを見ると、XAMLから呼び出すときにはpublicじゃないとダメ、ってことかな。またこんどしらべよう。
外部化した文字列を記述
上記のように、key1,key2に対してそれぞれ Hello World1. Hello World2. ってデータを設定しました。
このように設定すると、アプリケーションからは
string value1 = Utils.Properties.Resources.key1;
string value2 = Utils.Properties.Resources.key2;
Console.WriteLine(value1);
Console.WriteLine(value2);
ってアクセスすることができるようになります。
確認のためnupkgを作成して、UiPath Studioにインストールして、UiPath Studioのコンソールにセットした値が表示できることを確認しておきましょう。
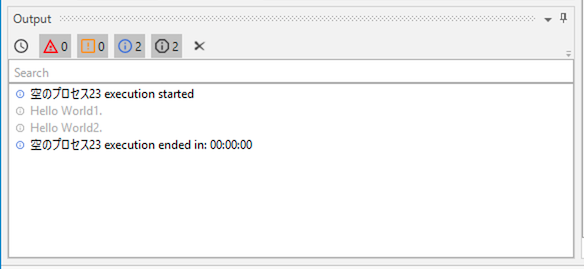
こんな感じになるはずです。
ここまでで、文字列の外部リソース化が出来ました。
DesignerMetadata.cs で使用する
さて、このように「文字列のリソースファイルへの外部化」を 見た目をカスタマイズする際にでてきた DesignerMetadata.cs に適用します。
namespace Utils
{
    public class DesignerMetadata : IRegisterMetadata
    {
        public void Register()
        {
            AttributeTableBuilder builder = new AttributeTableBuilder();
            addCustomAttributes_PathUtils_categories(builder);
            MetadataStore.AddAttributeTable(builder.CreateTable());
        }

        private void addCustomAttributes_PathUtils_categories(AttributeTableBuilder builder)
        {
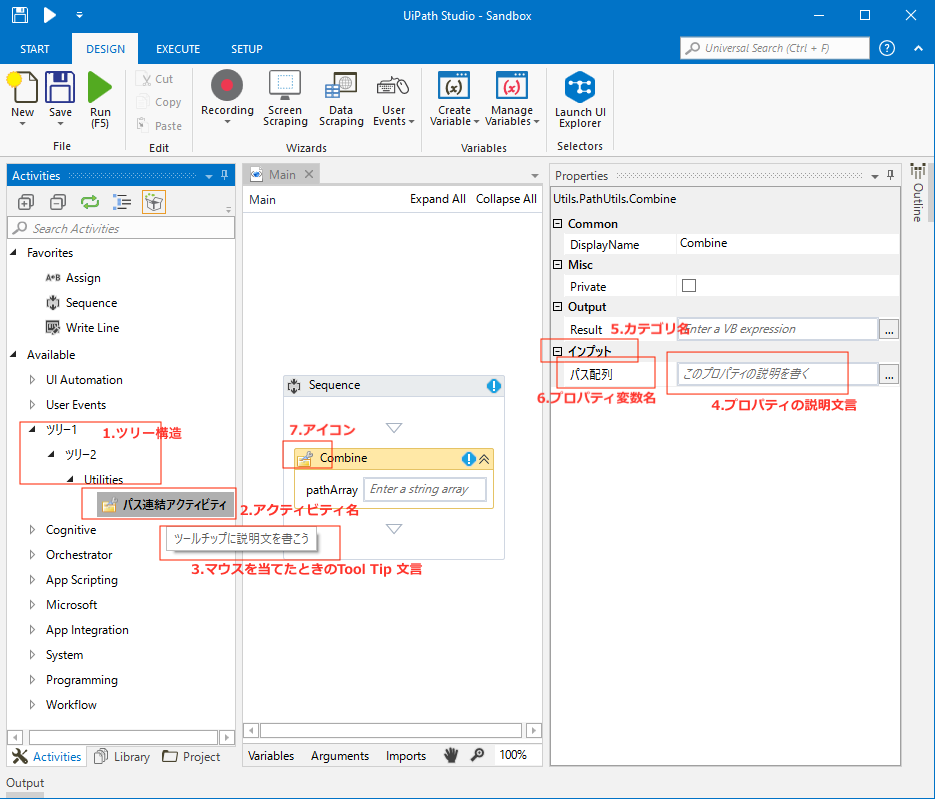
            // 1.Activitiesペイン上のツリー構造を構築する。
            {
                string PathUtils_categories = "ツリー1.ツリー2.Utilities";
                builder.AddCustomAttributes(typeof(Combine), new CategoryAttribute(PathUtils_categories));
            }

            // 2.Activitiesペイン上のアクティビティ名
            {
                builder.AddCustomAttributes(typeof(Combine), new DisplayNameAttribute("パス連結アクティビティ"));
            }

            // 3.Activitiesペイン上のアクティビティをポイントしたときに表示されるツールチップ文言
            {
                builder.AddCustomAttributes(typeof(Combine), new DescriptionAttribute("ツールチップに説明文を書こう"));
            }

            // 4.プロパティペイン内のプロパティの説明文言
            {
                builder.AddCustomAttributes(typeof(Combine), nameof(Combine.PathArray), new DescriptionAttribute("このプロパティの説明を書く"));
            }

            // 5.プロパティペインの、カテゴリ名
            {
                builder.AddCustomAttributes(typeof(Combine), nameof(Combine.PathArray), new CategoryAttribute("インプット"));
            }

            // 6.プロパティペイン内のプロパティの変数名
            {
                builder.AddCustomAttributes(typeof(Combine), nameof(Combine.PathArray), new DisplayNameAttribute("パス配列"));
            }
        }
    }
}
これらの文字列を、外部化していきましょう。まずは、リソースファイルはこんな感じに。
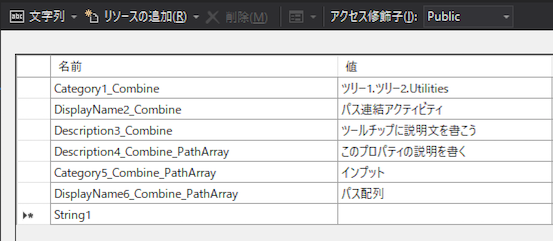
| 名前 | 値 |
|---|---|
| Category1_Combine | ツリー1.ツリー2.Utilities |
| DisplayName2_Combine | パス連結アクティビティ |
| Description3_Combine | ツールチップに説明文を書こう |
| Description4_Combine_PathArray | このプロパティの説明を書く |
| Category5_Combine_PathArray | インプット |
| DisplayName6_Combine_PathArray | パス配列 |
つづいて、上記の名前を使用するように、ソースを下記の通り変更します。
using System;
using System.Collections.Generic;
using System.Linq;
using System.Text;
using System.Activities;
using System.ComponentModel;
using System.Threading;
using System.Activities.Presentation.Metadata;
using Utils.PathUtils;
using Utils.Properties; // ココ

namespace Utils
{
    public class DesignerMetadata : IRegisterMetadata
    {
        public void Register()
        {
            AttributeTableBuilder builder = new AttributeTableBuilder();
            addCustomAttributes_PathUtils_categories(builder);
            MetadataStore.AddAttributeTable(builder.CreateTable());
        }

        private void addCustomAttributes_PathUtils_categories(AttributeTableBuilder builder)
        {
            // 1.Activitiesペイン上のツリー構造を構築する。
            {
                builder.AddCustomAttributes(typeof(Combine), new CategoryAttribute(Resources.Category1_Combine)); // ココ
            }

            // 2.Activitiesペイン上のアクティビティ名
            {
                builder.AddCustomAttributes(typeof(Combine), new DisplayNameAttribute(Resources.DisplayName2_Combine));// ココ
            }

            // 3.Activitiesペイン上のアクティビティをポイントしたときに表示されるツールチップ文言
            {
                builder.AddCustomAttributes(typeof(Combine), new DescriptionAttribute(Resources.Description3_Combine));// ココ
            }

            // 4.プロパティペイン内のプロパティの説明文言
            {
                builder.AddCustomAttributes(typeof(Combine), nameof(Combine.PathArray), new DescriptionAttribute(Resources.Description4_Combine_PathArray));// ココ
            }

            // 5.プロパティペインの、カテゴリ名
            {
                builder.AddCustomAttributes(typeof(Combine), nameof(Combine.PathArray), new CategoryAttribute(Resources.Category5_Combine_PathArray));// ココ
            }

            // 6.プロパティペイン内のプロパティの変数名
            {
                builder.AddCustomAttributes(typeof(Combine), nameof(Combine.PathArray), new DisplayNameAttribute(Resources.DisplayName6_Combine_PathArray));// ココ
            }
        }
    }
}
画面表示に使用する文字列が、外部化されました。再度、UiPath Studioに配置して確認してみてください。下記のように、外部化する前とおなじUIが得られたかと思います。
日本語リソースを追加
さあ勢いでデフォルトのリソースファイルに日本語の文字列を外部化してしまいましたが、実際はデフォルトのリソースファイルには英語の情報を記述しておくのがよさそうです。
リソースファイルの構成は
- Resources.resx ← デフォルトのリソースファイル
- Resources.ja.resx ← カルチャが ja のときに使用されるリソースファイル
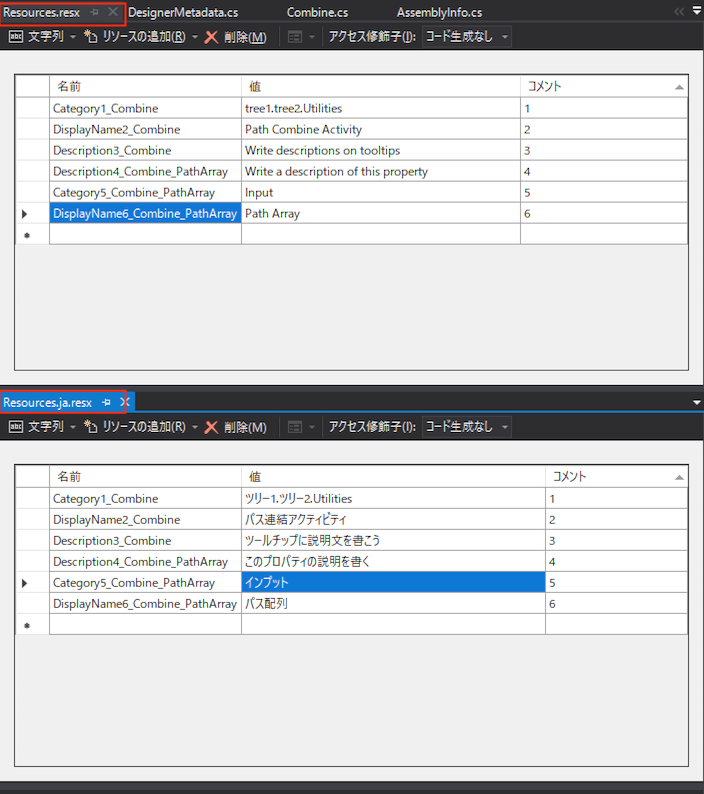
とファイル名とカルチャ名が対応するようになっています。なのでResources.ja.resx を作成して、そちらには日本語のリソースを記述し、もとの Resources.resx には英語のリソースを記述するようにこれから変更していきます。
Resources.ja.resx の追加は以下の通り。
ソリューションエクスプローラの「Properties」を右クリック >> 追加 >> 新しい項目 を選んで、

リソースファイルを選択、ファイル名を Resources.ja.resx にすればOK.
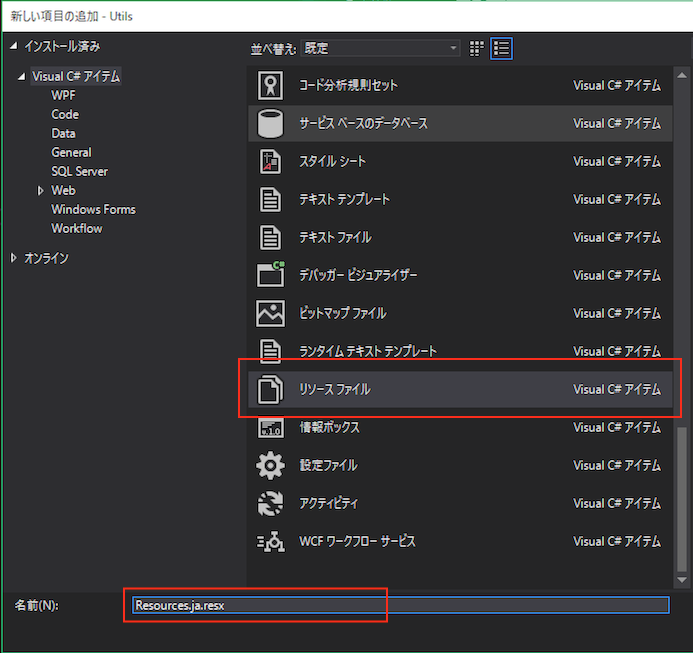
ソリューションエクスプローラにも表示されていればOKですね。

さて、いまのところ
- Resources.resx いきおいで書いた日本語リソース
- Resources.ja.resx 空っぽ
になっちゃったので、Resources.resx の内容を、Resources.ja.resx へ転記し、Resources.resxには英語の情報を記載します。つまりこんな感じ。
Resources.resx
| 名前 | 値 |
|---|---|
| Category1_Combine | tree1.tree2.Utilities |
| DisplayName2_Combine | Path Combine Activity |
| Description3_Combine | Write descriptions on tooltips |
| Description4_Combine_PathArray | Write descriptions on tooltips |
| Category5_Combine_PathArray | Input |
| DisplayName6_Combine_PathArray | Path Array |
Resources.ja.resx
| 名前 | 値 |
|---|---|
| Category1_Combine | ツリー1.ツリー2.Utilities |
| DisplayName2_Combine | パス連結アクティビティ |
| Description3_Combine | ツールチップに説明文を書こう |
| Description4_Combine_PathArray | このプロパティの説明を書く |
| Category5_Combine_PathArray | インプット |
| DisplayName6_Combine_PathArray | パス配列 |
日本語リソースをnupkgに追加する
さて、リソースファイルをデフォルトと日本語版を作ったので、またまたnupkgにして完了、でよさそうですが、実はVisual Studioでビルドをすると、いままで作成されてきた
[プロジェクト名]\bin\Release\kino.UiPath.Utils.Activities.dll
だけでなく、
[プロジェクト名]\bin\Release\ja\kino.UiPath.Utils.Activities.resources.dll
というファイルができています。このファイルはカルチャーが ja のリソースファイルが入っているDLLです。
参考:
ローカライズされた NuGet パッケージを作成する
そしてこのファイルですが、いつものnupkg作成コマンド:
nuget.exe pack Utils.csproj -Prop Configuration=Release
をやっても nupkgに取り込まれないみたいなんですね。↓ほら、入ってないんですよ。。
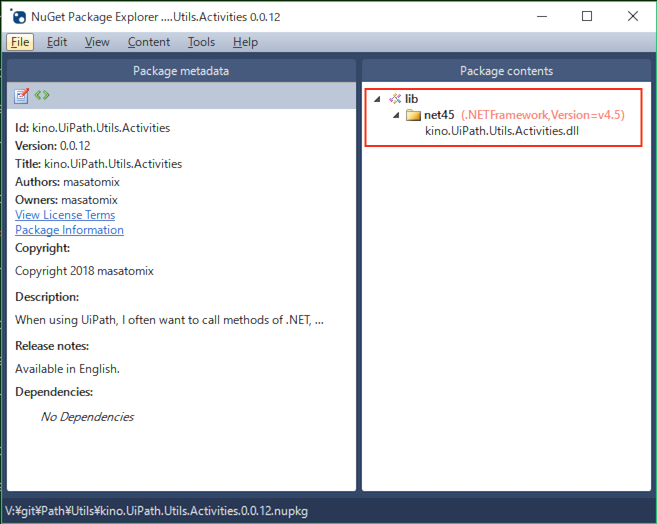
リソース用のDLLを含ませるオプションとかあるのかな?って調べましたがよく分からず、結局 nupkgを作成するときにパッケージングを制御する *.nuspec ファイルに以下の設定を追加しました。
<?xml version="1.0"?>
<package >
  <metadata>
    <id>$id$</id>
    <version>$version$</version>
    <title>$id$</title>
    <authors>masatomix</authors>
    <owners>masatomix</owners>
    <licenseUrl>https://www.apache.org/licenses/LICENSE-2.0</licenseUrl>
    <projectUrl>https://github.com/masatomix/UiPath_Path</projectUrl>
    <requireLicenseAcceptance>false</requireLicenseAcceptance>
    <description>
When using UiPath, I often want to call methods of .NET,...
</description>
    <releaseNotes>
Available in English.
</releaseNotes>
    <copyright>Copyright 2018 masatomix</copyright>
  </metadata>
    <!-- 追加ココから -->
    <files>
      <file src="bin\Release\ja\*.dll" target="lib\net45\ja" />
    </files>
    <!-- 追加ココまで -->
</package>
まあベタに、、ja 配下のファイルを lib\net45\ja へコピー、、と。 前に、nuspecに書いてあった、微妙なfilesタグに記述の削除 に成功したんですが、またfilesが復活してしまいました。。まあ仕方ないです。
何にせよ、この構成で再度nupkgのビルドを実行します。できあがったら、作成された nupkg の中身を見てみましょう。
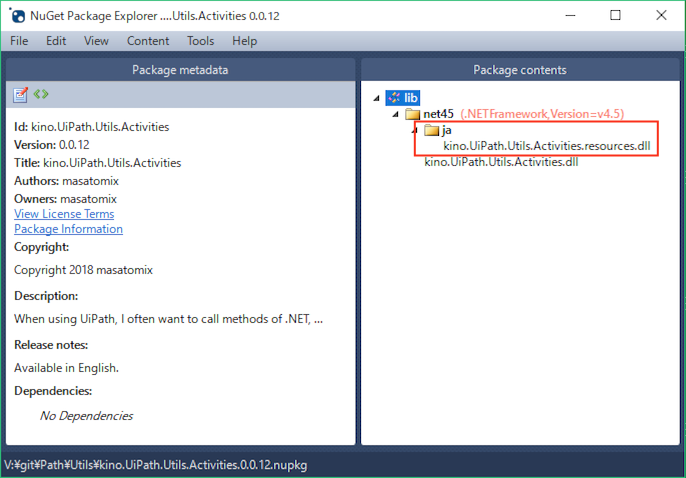
\ja\kino.UiPath.Utils.Activities.resources.dll が 追加されましたねー。
確認
さあ、nupkgを、UiPath Studio 2018.3 へインストールして、起動してみましょう。結果は、
英語モードだと、、下記の通りデフォルトのリソースファイルが使われています。。
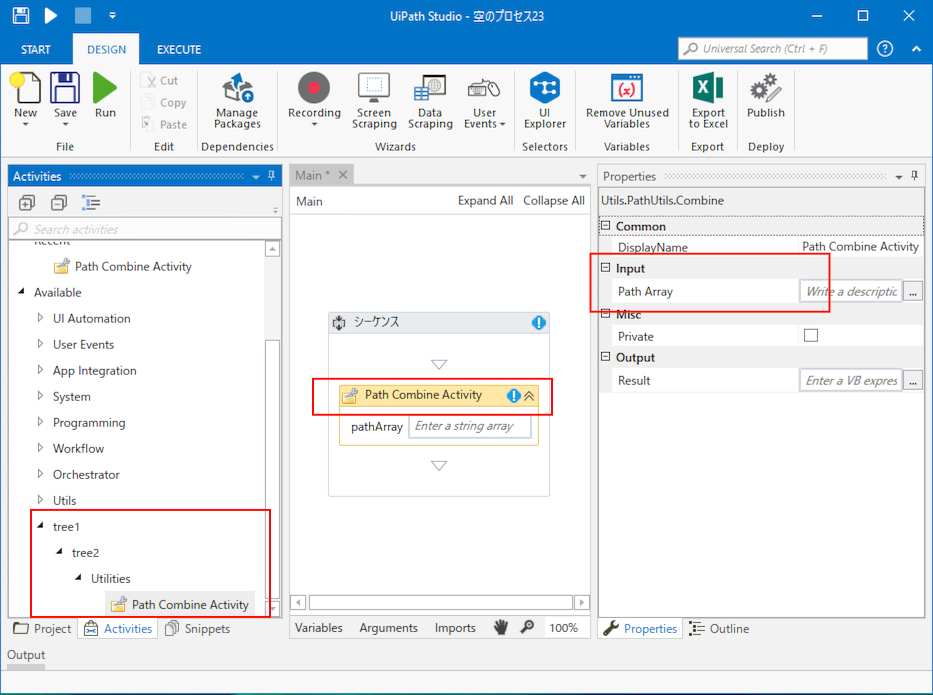
そして、日本語モードだと下記の通り、日本語リソースファイルが使われています。。

いい感じですね。ちなみに、カルチャー(表示言語)の切替は、UiPath Studioの Start >> Settings >> Language で可能です。

以上で、UiPath Studioの言語設定に応じて、表示する言語を切り替えることが出来ました!
今回取り扱わなかったのですが、XAML 上の文言の外部リソース化・ローカライズもあるのですが、またそれは別記事にします!
2018/11/07追記
カスタムアクティビティ開発で、リソースの外部化とローカライズを行う(XAML版)
別記事を作成しました。
2018/11/07追記 ここまで
お疲れ様でしたー。
関連リンク
-
UiPathのカスタムアクティビティ開発で、見た目のカスタマイズを行う
この記事の前回の記事。ビルドの仕方とか、はしょってあるところはそっちに記載があるので、お手すきであれば見てみてください。 - UiPath Studioで使用するカスタムアクティビティの作成方法この記事の初回記事。
- C#でアプリを多言語対応した際に行ったことまとめ XAML側のローカライズはほぼここに情報が。。
- アプリケーションのグローバライズとローカライズ
- ローカライズされた NuGet パッケージを作成する
- UiPath/Community.Activities 中のヒトのサンプル
- 今回の完成版のソース
- 本アクティビティのマスターブランチ
- nugetのダウンロードリンク kino.UiPath.Utils.Activities
