概要
私はC#+WPFでよくアプリを作成していますが、ある時、「アプリの使用言語を切り替えられるようにしたい」といったことを考えました。
少なくとも.NETの世界では、「表示データを配列で持っておいて選択肢毎に表示を切り替える」といったゴリ押しは 下策 らしく、WPFの場合はResources.resxを使用するのが定石とされています。
じゃあそれでいいじゃん……と思いましたが、そこそこ手間取ったので備忘録としてこの記事にまとめることにしました。
※使用したソースコードのリポジトリ→https://github.com/YSRKEN/MultiLanguageSample
※以下の記述は、ぐらばくさんの次の記事を相当参考にしています。文章も私の記事より遥かに精緻ですので、最初からこちらを読んでもいいかもしれません。
WPF アプリの国際化 (多言語対応) と、実行中の動的な言語切り替え | grabacr.nét
作業の流れ
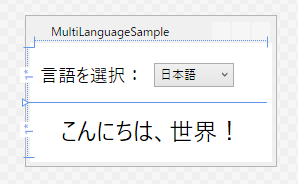
ここでは下敷きとして、次のようなデータを用意しました。
ごく普通のWPFアプリケーションですが、**「コンボボックスで複数言語を切り替え」**までを実装します。
<Window x:Class="MultiLanguageSample.MainWindow"
	xmlns="http://schemas.microsoft.com/winfx/2006/xaml/presentation"
	xmlns:x="http://schemas.microsoft.com/winfx/2006/xaml"
	xmlns:d="http://schemas.microsoft.com/expression/blend/2008"
	xmlns:mc="http://schemas.openxmlformats.org/markup-compatibility/2006"
	xmlns:local="clr-namespace:MultiLanguageSample"
	mc:Ignorable="d"
	Title="MultiLanguageSample" Height="150" Width="250">
	<Grid Margin="5,5,5,5">
		<Grid.RowDefinitions>
			<RowDefinition/>
			<RowDefinition/>
		</Grid.RowDefinitions>
		<Grid Grid.Row="0">
			<Grid.ColumnDefinitions>
				<ColumnDefinition Width="auto"/>
				<ColumnDefinition/>
			</Grid.ColumnDefinitions>
			<TextBlock Grid.Column="0" Text="言語を選択:" FontSize="18"
					HorizontalAlignment="Right" VerticalAlignment="Center" Margin="5,5,5,5"/>
			<ComboBox Grid.Column="1" SelectedIndex="0" Width="80" Height="24"
					HorizontalAlignment="Left" VerticalAlignment="Center" Margin="5,5,5,5">
				<ComboBoxItem Content="日本語"/>
				<ComboBoxItem Content="英語"/>
				<ComboBoxItem Content="中国語"/>
			</ComboBox>
		</Grid>
		<TextBlock Grid.Row="1" Text="こんにちは、世界!" FontSize="24"
				HorizontalAlignment="Center" VerticalAlignment="Center" Margin="5,5,5,5"/>
	</Grid>
</Window>
リソースファイルを用意する
多言語対応するには、まずその文字データを用意しないことには始まりません。
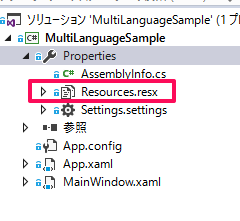
ソリューションエクスプローラーでPropertiesを開くと、「Resources.resx」があるかと思います(無ければ右クリックから追加可能)。これは言わば「デフォルトの表示言語」ですので、多言語対応アプリならとりあえず英語用にしておくことを推奨します。
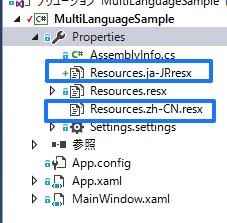
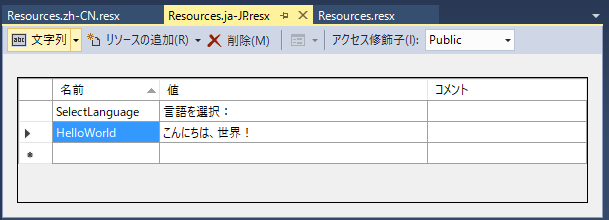
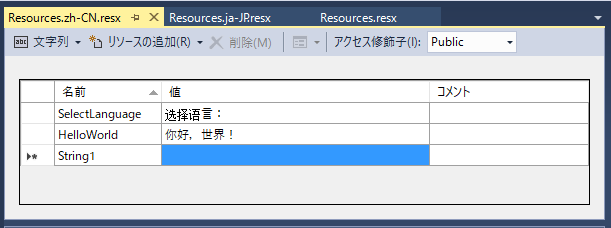
また、「Properties」を右クリック→「追加」から、リソースファイル(*.resx)を追加することができます。上記サンプルでは日本語(ja-JP)・アメリカ英語(en-US)・中国語(zh-CN)に対応予定ですので、それぞれのファイルを追加します。
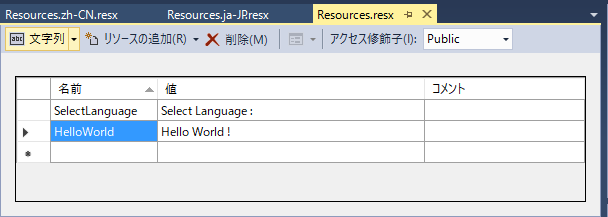
更に、表示メッセージをVisual Studio上から入力していきます。いずれもアクセス修飾子をPublicにする必要があることと、「名前―値」の対応における**"名前"は各ファイル同じ**にする必要があることに注意が必要です。
リソースファイルの中身をXAMLにあてがう
当然ですが、文字データだけあってもそれが読み込めなければ意味ありません。
そこで、XAMLに数行追加して、上記リソースファイルの中身にアクセスするようにします。
<Window x:Class="MultiLanguageSample.MainWindow"
	xmlns="http://schemas.microsoft.com/winfx/2006/xaml/presentation"
	xmlns:x="http://schemas.microsoft.com/winfx/2006/xaml"
	xmlns:d="http://schemas.microsoft.com/expression/blend/2008"
	xmlns:mc="http://schemas.openxmlformats.org/markup-compatibility/2006"
	xmlns:local="clr-namespace:MultiLanguageSample"
	<!-- この行を追加 -->
	xmlns:properties="clr-namespace:MultiLanguageSample.Properties"
	mc:Ignorable="d"
	Title="MultiLanguageSample" Height="150" Width="250">
	<Grid Margin="5,5,5,5">
		<Grid.RowDefinitions>
			<RowDefinition/>
			<RowDefinition/>
		</Grid.RowDefinitions>
		<Grid Grid.Row="0">
			<Grid.ColumnDefinitions>
				<ColumnDefinition Width="auto"/>
				<ColumnDefinition/>
			</Grid.ColumnDefinitions>
			<!-- この行を変更 -->
			<TextBlock Grid.Column="0" Text="{x:Static properties:Resources.SelectLanguage}" FontSize="18"
					HorizontalAlignment="Right" VerticalAlignment="Center" Margin="5,5,5,5"/>
			<!-- この行を変更 -->
			<ComboBox Grid.Column="1" SelectedIndex="0" Width="80" Height="24"
					HorizontalAlignment="Left" VerticalAlignment="Center" Margin="5,5,5,5">
				<ComboBoxItem Content="日本語"/>
				<ComboBoxItem Content="英語"/>
				<ComboBoxItem Content="中国語"/>
			</ComboBox>
		</Grid>
		<TextBlock Grid.Row="1" Text="{x:Static properties:Resources.HelloWorld}" FontSize="24"
				HorizontalAlignment="Center" VerticalAlignment="Center" Margin="5,5,5,5"/>
	</Grid>
</Window>
すると、起動するOSの言語設定に応じて、「x:Static properties:Resources.云々」と書かれた箇所が変化します。つまり、英語設定なら英語、中国語設定なら中国語を表示するようにできるわけです。
なお、リソースファイルで設定していなかった国・言語を選択していた場合、デフォルトのResources.resxに記述した表示メッセージが参照されます。
切り替え機能を設ける
ここまででもとりあえず多言語対応できていますが、どうせなら切り替え機能を付けたいですよね?
そこで、次のような作戦を取ります。
- 自作クラスでは、次のような機能を提供する
- プロパティ機能を利用してResourcesを返す(ラップ機能)
- 生やしたメソッドから、返すResourcesの中身を変更する(切り替え機能)
- 変更した場合、その変更をXAML側に通知する
- XAMLから参照するResourcesを自作クラスのものと差し替える
- プログラム内で切り替え操作を行った場合、自作クラスの切り替えメソッドを叩く
まず、上記機能を実現する自作クラスはこんな感じです。
using MultiLanguageSample.Properties;
using System.ComponentModel;
using System.Globalization;
using System.Runtime.CompilerServices;

namespace MultiLanguageSample {
	public class ResourceService : INotifyPropertyChanged {
		#region シングルトン対策
		private static readonly ResourceService current = new ResourceService();
		public static ResourceService Current => current;
		#endregion

		#region INotifyPropertyChanged対策
		public event PropertyChangedEventHandler PropertyChanged;
		protected virtual void RaisePropertyChanged([CallerMemberName] string propertyName = null) {
			PropertyChanged?.Invoke(this, new PropertyChangedEventArgs(propertyName));
		}
		#endregion

		/// <summary>
		/// リソースを取得
		/// </summary>
		private readonly Resources resources = new Resources();
		public Resources Resources => resources;

		/// <summary>
		/// リソースのカルチャーを変更
		/// </summary>
		/// <param name="name">カルチャー名</param>
		public void ChangeCulture(string name) {
			Resources.Culture = CultureInfo.GetCultureInfo(name);
			RaisePropertyChanged("Resources");
		}
	}
}
このコードのポイントとしては次の通りです。
- static classではなくシングルトンなのはINotifyPropertyChangedに対応するためです
- INotifyPropertyChangedに対応したのは、カルチャー切り替え時に即座にUI表示が切り替わるようにするためです
- ChangeCultureメソッドの引数としては、先ほどの
"ja-JP"や"en-US"などになります - ChangeCultureメソッドの引数が出鱈目だと、CultureInfo.GetCultureInfoメソッドの部分で
System.Globalization.CultureNotFoundExceptionが出ます。なので、必要な場合は例外機構などで対策して下さい
次に、XAMLを書き換えます。
<!-- 書き換える前 -->
<TextBlock Text="{x:Static properties:Resources.HelloWorld}"/>
<!-- 書き換えた後 -->
<TextBlock Text="{Binding Source={x:Static local:ResourceService.Current},
	Path=Resources.HelloWorld, Mode=OneWay}"/>
最後に、切り替え用のコードを記述します。
ResourceService.Current.ChangeCulture("ja-JP"); //上記サンプルでは「日本語」を表す
ResourceService.Current.ChangeCulture("en-US"); //上記サンプルでは「英語」を表す
ResourceService.Current.ChangeCulture("zh-CN"); //上記サンプルでは「中国語」を表す
注意事項
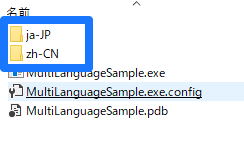
上記のようにリソースファイルを追加してビルドすると、ビルド先に次のようにフォルダが作成されます。
(「デフォルトの表示言語」の分のフォルダ・ファイルは作成されません)
それぞれのフォルダ内には「(exe名).resources.dll」といったファイルが生成されていると思いますが、その中身は上記のリソースファイルだと考えて下さい。つまり、例えば次の画像から「zh-CN」フォルダを削除すると、中国語部分の表示ができなくなります。
まとめ
上記のようなコードを追加するだけで、アプリを多言語対応にすることができました。
冒頭にも書きましたが、実際に動くコードの全体は次のリポジトリに置いてあります。
https://github.com/YSRKEN/MultiLanguageSample