ずっと調べているUiPath Studio のカスタムアクティビティ開発。いままでの記事はこんな感じ。
いままでの記事目次
- UiPath Studioで使用するカスタムアクティビティの作成方法
- UiPath Studioで使用するカスタムアクティビティの作成方法 つづき(GUI構築)
- UiPathのカスタムアクティビティ開発で、外部ライブラリを使用する
- UiPathのカスタムアクティビティのnupkgの作り方(元記事の訂正)
- UiPathのカスタムアクティビティの配置場所について
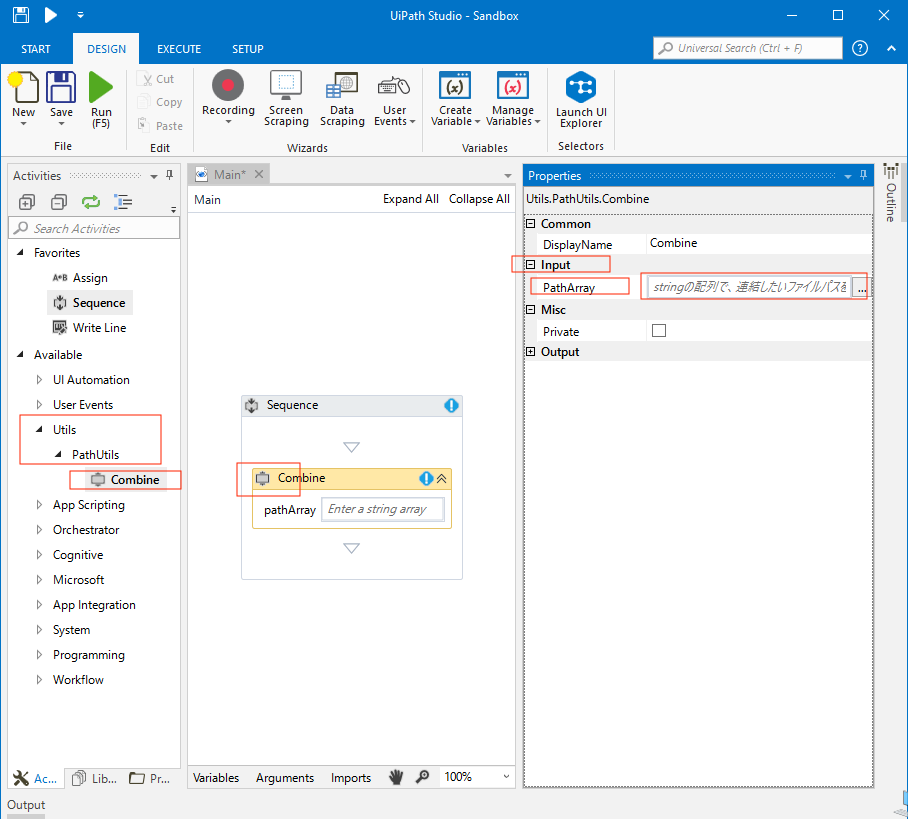
さてなんとなく開発のやり方が分かってきたところで、あとやりたいのは「Studio上での見た目のカスタマイズ」と「そのローカライズ」などがあったりしますが、まずは見た目のカスタイマイズについてです。
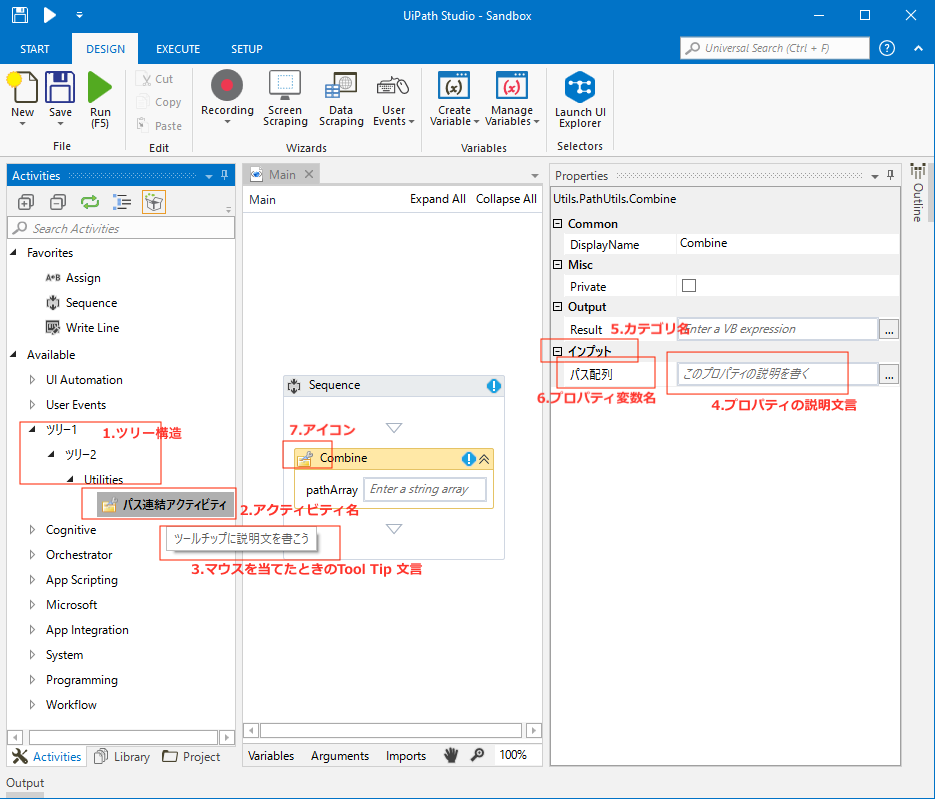
見た目のカスタマイズといってるのは、ざっくり言うと、
- Activitiesペイン上のツリー構造
- Activitiesペイン上のアクティビティ名
- Activitiesペイン上のアクティビティにマウスを当てたときのツールチップ文言
- Propertiesペイン上の、プロパティの説明文言
- Propertiesペイン上の、カテゴリ名
- Propertiesペイン上の、プロパティ変数名
- カスタムアクティビティのアイコン
愛着がわくというかなんというか、、自作してる!って感じがでてきますね。。
やってみる
ソースコード
まず対応前の初期状態は、こちら。
https://github.com/masatomix/UiPath_Path/releases/tag/gui_attribute_init
ココから開始します。
で、修正した結果の今回の成果物はこちら。
https://github.com/masatomix/UiPath_Path/releases/tag/gui_attribute_finish
さき書いてしまうと、差分はこんなかんじになっています。
https://github.com/masatomix/UiPath_Path/compare/gui_attribute_init...gui_attribute_finish
見た目をカスタマイズする、DesignerMetadata.cs の追加
プロジェクトに下記のコードを追加します。このクラスは IRegisterMetadata のサブクラスになっていて、UiPath Studioにこの nupkg が読み込まれたときに、自動的にロードされるようです。
using System;
using System.Collections.Generic;
using System.Linq;
using System.Text;
using System.Activities;
using System.ComponentModel;
using System.Threading;
using System.Activities.Presentation.Metadata;
using Utils.PathUtils;

namespace Utils
{
    public class DesignerMetadata : IRegisterMetadata
    {
        public void Register()
        {
            AttributeTableBuilder builder = new AttributeTableBuilder();

            //string PathUtils_categories = "Utils.Path Utilities";
            string PathUtils_categories = "ツリー1.ツリー2.Utilities";

            // Activitiesペイン上のツリー構造を構築する。
            // ドットで階層を表現する
            builder.AddCustomAttributes(typeof(Combine), new CategoryAttribute(PathUtils_categories));

            // Activitiesペイン上のアクティビティをポイントしたときに表示されるツールチップ
            builder.AddCustomAttributes(typeof(Combine), new DescriptionAttribute("ツールチップに説明文を書こう"));

            // プロパティペイン内のプロパティの説明
            builder.AddCustomAttributes(typeof(Combine), nameof(Combine.PathArray), new DescriptionAttribute("このプロパティの説明を書く"));  //クラスのプロパティに直接 Desc書いたのと意味おなじ。

            // プロパティペインの、カテゴリ名
            builder.AddCustomAttributes(typeof(Combine), nameof(Combine.PathArray), new CategoryAttribute("インプット"));  //クラスのプロパティに直接 Categoryを書いたのと意味おなじ。

            // Activitiesペイン上のアクティビティ名
            builder.AddCustomAttributes(typeof(Combine), new DisplayNameAttribute("パス連結アクティビティ"));  //クラスに直接 DisplayNameを書いたのと意味おなじ。

            // プロパティペイン内のプロパティの変数名
            builder.AddCustomAttributes(typeof(Combine), nameof(Combine.PathArray), new DisplayNameAttribute("パス配列"));  //クラスのプロパティに直接 DisplayNameを書いたのと意味おなじ。

            MetadataStore.AddAttributeTable(builder.CreateTable());
        }
    }
}
このように、クラスや、そのクラスのプロパティ(メンバ変数)に対して、XXAttributeをAddすることで情報を記載していきます。
一つ一つ見ていくと、以下の通り。
1. Activitiesペイン上のツリー構造
string PathUtils_categories = "ツリー1.ツリー2.Utilities";
builder.AddCustomAttributes(typeof(Combine), new CategoryAttribute(PathUtils_categories));
とすると、

のようになります。ドットがデリミタになって、階層構造を構築します。
ちなみにデフォルト状態ではC#のnamespace名がセットされるようです。なのでnamespaceの階層がそのままツリー構造になる感じですね。
Activitiesペイン上の、2.アクティビティ名、3.ツールチップ文言
builder.AddCustomAttributes(typeof(Combine), new DisplayNameAttribute("パス連結アクティビティ"));
builder.AddCustomAttributes(typeof(Combine), new DescriptionAttribute("ツールチップに説明文を書こう"));
ちなみに、DisplayNameAttribute については、直接クラスに対して、
[Designer(typeof(CombineDesigner))]
[DisplayName("パス連結アクティビティ")]   ← コレ
public sealed class Combine : CodeActivity
{
...
とAttributeを書いたことと実質等価なようですが、ローカライズを考慮したときに前述のやりかたのほうが相性がよいようでなので、このやり方を採用します1。
また DisplayNameAttribute はデフォルト状態ではクラス名のCamelCaseをスペースに変換してセットされるようです。Combine → Combine、CurrentDir → Current Dir ですが Base64Encode → Base 64 Encode などおしいっ、てヤツも。
Propertiesペイン上の、4.プロパティの説明文言、5.カテゴリ名、6.プロパティ変数名
builder.AddCustomAttributes(typeof(Combine), nameof(Combine.PathArray), new DescriptionAttribute("このプロパティの説明を書く"));
builder.AddCustomAttributes(typeof(Combine), nameof(Combine.PathArray), new CategoryAttribute("インプット"));
builder.AddCustomAttributes(typeof(Combine), nameof(Combine.PathArray), new DisplayNameAttribute("パス配列"));
ちなみに、これらはそれぞれ、直接クラスのプロパティに対して、
[Description("このプロパティの説明を書く")]
[Category("インプット")]
[DisplayName("パスの配列")]
public InArgument<String[]> PathArray { get; set; }
とAttributeを書いたことと実質等価なようですが、先と同様の理由により、このやり方を採用します。
ちなみにDisplayNameAttribute はデフォルト状態では、クラスの変数名がそのままセットされるようです。
7.アイコン
アイコンは、GUI上で下記の通り設定します。
<sap:ActivityDesigner x:Class="Utils.PathUtils.CombineDesigner"
    xmlns="http://schemas.microsoft.com/winfx/2006/xaml/presentation"
    xmlns:x="http://schemas.microsoft.com/winfx/2006/xaml"
    xmlns:s="clr-namespace:System;assembly=mscorlib"
    xmlns:sap="clr-namespace:System.Activities.Presentation;assembly=System.Activities.Presentation"
    xmlns:sapv="clr-namespace:System.Activities.Presentation.View;assembly=System.Activities.Presentation"
    xmlns:sapc="clr-namespace:System.Activities.Presentation.Converters;assembly=System.Activities.Presentation" >

    <sap:ActivityDesigner.Resources>
        <ResourceDictionary>
            <sapc:ArgumentToExpressionConverter x:Key="ArgumentToExpressionConverter" />
        </ResourceDictionary>
    </sap:ActivityDesigner.Resources>
    <!-- ココから -->
    <sap:ActivityDesigner.Icon>
        <DrawingBrush>
            <DrawingBrush.Drawing>
                <DrawingGroup>
                    <DrawingGroup.Children>
                        <DrawingGroup>
                            <DrawingGroup.Transform>
                                <MatrixTransform Matrix="1,0,0,1,0,0"/>
                            </DrawingGroup.Transform>
                            <DrawingGroup.Children>
                                <ImageDrawing ImageSource="../images/folder_wrench.png" Rect="0,0,16,16"/>
                            </DrawingGroup.Children>
                        </DrawingGroup>
                    </DrawingGroup.Children>
                </DrawingGroup>
            </DrawingBrush.Drawing>
        </DrawingBrush>
    </sap:ActivityDesigner.Icon>
    <!-- ココまで -->
    <Grid>
        <Grid.ColumnDefinitions>
            <ColumnDefinition Width="3*"/>
            <ColumnDefinition Width="7*"/>
        </Grid.ColumnDefinitions>
        <Grid.RowDefinitions>
            <RowDefinition Height="*"/>
        </Grid.RowDefinitions>

        <Label Content="pathArray" />
        <sapv:ExpressionTextBox
        Expression="{Binding ModelItem.PathArray,
            ConverterParameter=In,
            Converter={StaticResource ArgumentToExpressionConverter},
            Mode=TwoWay}"
        ExpressionType="{x:Type s:String[]}"
        HintText="Enter a string array"
        OwnerActivity="{Binding ModelItem}"
        MaxLines="1" Grid.Column="1" />
    </Grid>
</sap:ActivityDesigner>
なんだか階層深すぎですが、
<ImageDrawing ImageSource="../images/folder_wrench.png" Rect="0,0,16,16"/>
このようにアイコンを設定しています。
さてプロジェクトへのアイコンファイルの追加ですが、xamlがある場所からの相対パスとなるので、そこから一つ上にのぼって imagesディレクトリを作り、そこにpngファイルを物理的に配置します。
で、Visual Studioは自動的にディレクトリやファイルを追加してくれないので、先ほど作ったimagesディレクトリをソリューションエクスプローラのUtilsの場所にドラッグ&ドロップします。

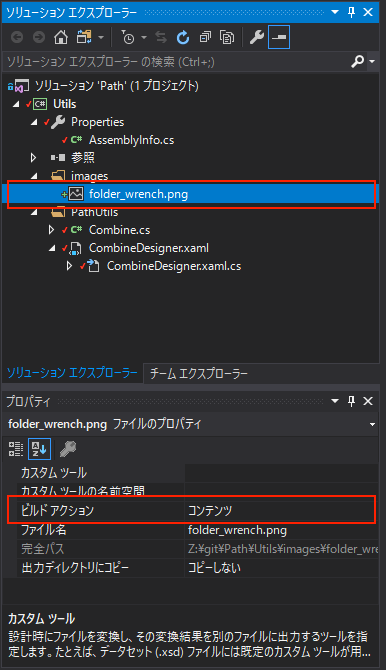
さてもうひとつ重要な点ですが、このように追加されたpngアイコンですが、プロパティの「ビルドアクション」がデフォルトでは「コンテンツ」になっているようです。コレを「Resource」に変更しないとアイコンとして利用出来ないようなので、忘れずに変更しておきましょう。
ちなみにアイコンはむかっしからある、
http://www.famfamfam.com/lab/icons/silk/
を利用させていただいています。感謝。
さあプロジェクトをリビルドしてnupkgを作成して、Studioにインストールしましょう。カスタマイズ後のUIが表示されればOKです!
おつかれさまでした。
関連リンク
- 【UiPath】カスタムアクティビティのアイコンを変更する アイコン変更について、参考にさせていただきました。ありがとうございます。
- UiPath/Community.Activities 今回のDesignerMetadata.csや、このあとやるローカライズなどはココを思いきり参考にしました。はじめ自前でちょーーー調べてめちゃ時間使ったんだけど、答えは以前みていたUiPathの中のヒトのリポジトリにありましたorz。感謝。
- 今回の完成版のソース
- 本アクティビティのマスターブランチ
- nugetのダウンロードリンク kino.UiPath.Utils.Activities
-
クラス内で、プロパティに直接Attributeするやり方は
[Category("インプット")]などの引数の文字列が定数である必要があり、その制約が、ローカライズしたときのキー値を渡すやり方と相性が悪いんです。その結果Attributeのサブクラスを作らなくてはいけなくなったり何かと面倒でしたorz ↩


