はじめに
Angular + Scullyでブログアプリを作ったものの、仕事から疲れて帰ってきて 「記事を書くのにPCを起動する」 という行動が自分的にはものすごくめんどくさかった。
iosには「#Type(開発者の方)」というiPhoneからMarkdownを書くのにとても便利なアプリがあり、これで通勤・帰宅中にiPhoneで記事を書いて投稿できればなぁ…。
と思ったので構成を考えて構築してみた。
今回はその内容を共有する。
使用した技術と構成
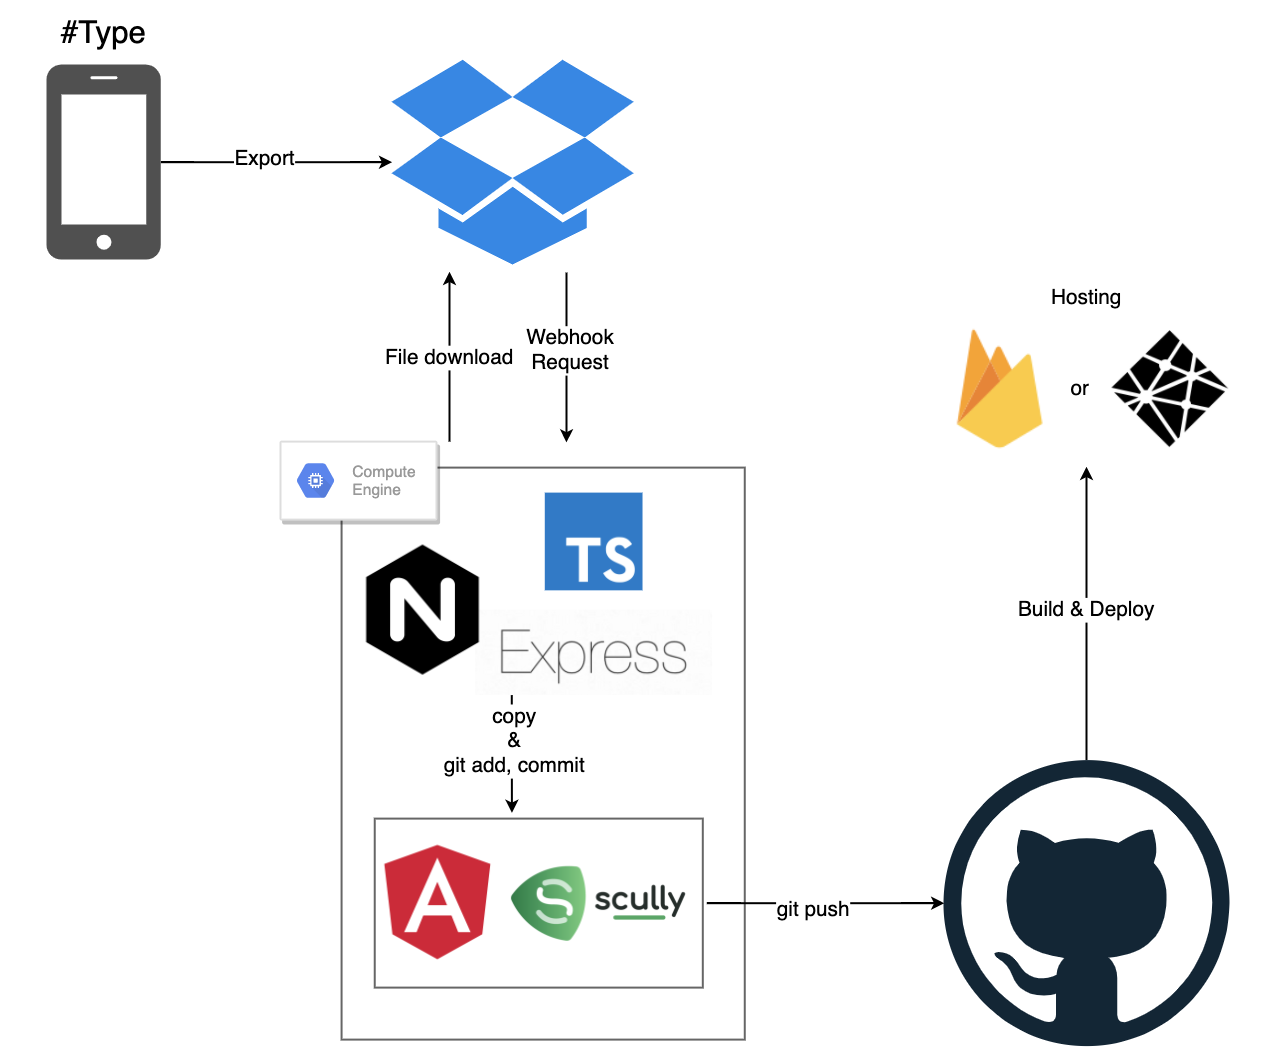
構成

流れ
- 「#Type」アプリでMarkdownで記事を書き、そのファイルを Dropboxにエクスポート する。
- Dropbox側に Webhookを設定しておき、ファイルアップロードをトリガーに自作のAPIへリクエストを投げてもらう。
- 自作のAPIでは、 作成されたファイルをサーバーにダウンロード、そのファイルを「Angular + Scullyアプリ」のリポジトリにコピー、GitHubにコミット&プッシュ してもらう。
- GitHubへのプッシュをトリガーにNetlify等のビルドを走らせ、ホスティング。
構築の流れと参考サイト
GCEの設定
APIとAngularアプリを置いておく用 + Gitサーバーとして使いため、IaaSを使うことにした。
※正直ここはさくらでもAWS EC2でも良い。
参考: これから始めるGCP(GCE) 安全に無料枠を使い倒せ
ちなみに自分はCentOS7を選択した。
サーバーにGit, Nginx, Node.js, Foreverをインストール
参考:
CentOS7 Git2系をyumからインストールする。
CentOS7 に Nginx をインストールする
CentOS 7 Node.js のインストール手順 (yum を利用)
Node.jsでforeverを使ってスクリプトの起動を永続化する
Dropbox APIを使い始める前の準備
- Dropboxのアカウント作成。
- Dropbox app を作成。
APIの実装
DropboxのWebhook用APIを実装する際に、便利なSDKが提供されているのでそれを使うと楽に実装できる。
Dropbox for JavaScript Developers
もちろんTypeScript用の型定義も含まれている。
※ちなみに実装中にAccess Tokenを記載したままPushしてしまったことがあったが、そのときDropboxが「GitHub上にきみのAccess Tokenを見つけたから無効化しておくよ!新しいのを発行してね!」といったことをしてくれるので安心。ありがてぇありがてぇ…。
実装したAPIのリポジトリはこちら→ md-to-scully-from-dropbox
※以下のソースコードではExpressのサーバー起動処理は省略している。
ルーティング
- DropboxからのWebhook Requestを設定するときに 検証リクエストが投げられるので、それを受け取るためのGET用のルーティングを設定すること。
-
node-fetchをインストールして(global as any).fetch = nodeFetch;を記述しておくこと。(※参考リンクメモするのわすれてた…。) - DropboxからのWebhook Requestは POSTメソッドで投げられる。
import express from 'express';
import * as bodyParser from 'body-parser';
import * as nodeFetch from 'node-fetch';
import { HttpStatusCode } from './constants/HttpStatusCode';
import { pushMarkdown } from './use-case/PushMarkdown';
(global as any).fetch = nodeFetch;

class App {
    public app: express.Application;

    constructor() {
        this.app = express();
        this.config();
    }

    private config() {
        this.app.use(bodyParser.json());

        const router = express.Router();

        router.get('/', (req, res) => {
            const { challenge } = req.query;
            res.set({
                'Content-Type': 'text/plain',
                'X-Content-Type-Options': 'nosniff',
            });
            return res.status(HttpStatusCode.OK).send(challenge);
        });

        router.post('/', async (req, res) => {
            try {
                console.log('Start Push Markdown');
                await pushMarkdown();
                return res.status(200).send('Markdownの追加に成功');
            } catch (e) {
                console.error(e);
                return res.status(500).send('Markdownの追加に失敗');
            } finally {
                console.log('End Push Markdown');
            }
        });

        this.app.use('/', router);
    }
}

export default new App().app;
ユースケース層
- Dropboxから最新のファイルの名前とDropbox上のファイルパスを取得。
- そのファイルの共有リンクを作成。
- 共有リンクからファイルデータを取得。
- 取得したファイルデータをサーバーに保存。
- 保存したファイルをAngular+Scullyアプリのリポジトリの対象ディレクトリにコピー。
- Angular+Scullyアプリのリポジトリで
git add, commit, push
export async function pushMarkdown() {
    try {
        const dropbox = new Dropbox();
        const { name, path_display: pathDisplay } = await dropbox.getAddedFile();
        const sharedLink = await dropbox.createSharedLink(pathDisplay);
        const fileData = await dropbox.getFileData(sharedLink);
        const savePath = await SaveFile.saveTextAsMarkdown(name, fileData);

        const commandExec = new CommandExec();
        commandExec.cp(savePath);
        commandExec.gitAdd();
        commandExec.gitCommit();
        commandExec.gitPush();
    } catch (e) {
        console.error(e);
        throw new Error('Markdownの取得に失敗');
    }
}
ドメイン層
ここでのポイントは2つ、
- 最新のファイルを取得する際、 Dropboxのフォルダ内に大量のファイルがある場合は1回で全ては取れない ので、
has_moreパラメーターとcursorをパラメーターを駆使して取得する必要がある。(※なんで更新時間の降順とか指定できないんだ…。不便…。) - 共有リンクを作成する際、既に作成済みの場合は例外が投げられるのでエラーコードで判別し、作成されている共有リンクを取得する処理が必要になる。(
createSharedLinkメソッドを参照)
import dropbox from 'dropbox';
import { AccessToken } from '../constants/AccessToken';

import FileMetadataReference = DropboxTypes.files.FileMetadataReference;
import FolderMetadataReference = DropboxTypes.files.FolderMetadataReference;
import DeletedMetadataReference = DropboxTypes.files.DeletedMetadataReference;

export class Dropbox {
    private _dropbox: DropboxTypes.Dropbox;

    constructor() {
        this._dropbox = new dropbox.Dropbox({ accessToken: AccessToken });
    }

    /**
     * 追加されたファイルを取得する。
     */
    public async getAddedFile(): Promise<FileMetadataReference> {
        const { entries, cursor, has_more: hasMore } = await this._dropbox.filesListFolder({
            path: '',
        });
        if (!hasMore) {
            const latestFile = this.getLatestFile(entries);
            return latestFile;
        }

        const nextEntries = await this.getLastEntries(cursor);
        const latestFile = this.getLatestFile(nextEntries);
        return latestFile;
    }

    /**
     * そのファイルの共有リンクを作成する。
     * ※既に存在する場合はそのリンクを取得する。
     * @param path
     */
    public async createSharedLink(path?: string): Promise<string> {
        if (!path) {
            throw new Error('共有リンクを作成する元のパスが存在しません');
        }
        try {
            const { url } = await this._dropbox.sharingCreateSharedLinkWithSettings({ path });
            if (!url) {
                throw new Error('共有リンクの作成に失敗しました');
            }
            return url;
        } catch (e) {
            const { error } = e;
            const { error: inError } = error;
            if (inError['.tag'] === 'shared_link_already_exists') {
                const url = await this.getSharedLinks(path);
                return url;
            }
            console.error(e);
            throw new Error('共有リンクの取得に失敗しました');
        }
    }

    /**
     * 既に作成されている共有リンクを取得する。
     * @param filePath
     */
    private async getSharedLinks(filePath: string): Promise<string> {
        const { links } = await this._dropbox.sharingListSharedLinks({ path: filePath });
        const linkData = links.find(link => link['.tag'] === 'file');
        if (!linkData) {
            throw new Error(`FilePath: ${filePath} の共有リンクが取得できませんでした`);
        }
        return linkData.url;
    }

    /**
     * 共有リンクからファイルのデータを取得する。
     * @param sharedLink
     */
    public async getFileData(
        sharedLink: string
    ): Promise<
        | DropboxTypes.sharing.FileLinkMetadataReference
        | DropboxTypes.sharing.FolderLinkMetadataReference
        | DropboxTypes.sharing.SharedLinkMetadataReference
    > {
        const data = await this._dropbox.sharingGetSharedLinkFile({ url: sharedLink });
        return data;
    }

    /**
     * Folderの最後までファイルを確認しに行く。
     * @param cursor
     */
    private async getLastEntries(
        cursor: string
    ): Promise<Array<FileMetadataReference | FolderMetadataReference | DeletedMetadataReference>> {
        let nextCursor = cursor;
        let nextEntries: Array<
            FileMetadataReference | FolderMetadataReference | DeletedMetadataReference
        > = [];
        const toTheLast = true;
        while (toTheLast) {
            const {
                entries,
                cursor: next,
                has_more: hasMore,
            } = await this._dropbox.filesListFolderContinue({
                cursor: nextCursor,
            });
            if (!hasMore) {
                nextEntries = entries;
                break;
            }
            nextCursor = next;
        }
        return nextEntries;
    }

    /**
     * 最新の追加ファイルを取得する。
     * @param entries
     */
    private getLatestFile(
        entries: Array<FileMetadataReference | FolderMetadataReference | DeletedMetadataReference>
    ): FileMetadataReference {
        const onlyAddedFiles = entries.filter(
            entry => entry['.tag'] === 'file'
        ) as FileMetadataReference[];
        return onlyAddedFiles[onlyAddedFiles.length - 1];
    }
}
Gitコマンドの処理での注意点は --work-tree, --git-dir を指定すること。これが指定されていないとAPIのリポジトリ内で git add, commit, push 処理がされてしまい、Angularアプリのリポジトリが更新されない。
参考: Git管理外のディレクトリからGitリポジトリを操作する方法
import childProcess from 'child_process';

export class CommandExec {
    private _targetRepository = '';

    public cp(savePath: string) {
        childProcess.execSync(`cp ${savePath} ~/angular-scully-blog-app/blog/`);
    }

    public gitAdd() {
        childProcess.execSync(
            `git --work-tree=${this._targetRepository} --git-dir=${this._targetRepository}/.git add ${this._targetRepository}/blog/.`
        );
    }

    public gitCommit() {
        childProcess.execSync(
            `git --work-tree=${this._targetRepository}/ --git-dir=${this._targetRepository}/.git commit -m "Create new article with Type and Push from API Server"`
        );
    }

    public gitPush() {
        childProcess.execSync(
            `git --work-tree=${this._targetRepository}/ --git-dir=${this._targetRepository}/.git push`
        );
    }
}
リポジトリ層
import fs from 'fs';
import path from 'path';

export class SaveFile {
    public static async saveTextAsMarkdown(
        fileName: string,
        data:
            | DropboxTypes.sharing.FileLinkMetadataReference
            | DropboxTypes.sharing.FolderLinkMetadataReference
            | DropboxTypes.sharing.SharedLinkMetadataReference
    ): Promise<string> {
        try {
            const fileNameExtension = path.extname(fileName);
            const fileNameWithoutExtension = path
                .basename(fileName, fileNameExtension)
                .replace(/\s+/g, '_');
            const fileNameWithMarkdown = `${fileNameWithoutExtension}.md`;
            const saveDirectory = path.resolve(__dirname, '../../files');
            const savePath = `${saveDirectory}/${fileNameWithMarkdown}`;
            fs.writeFileSync(savePath, (data as any).fileBinary, { encoding: 'binary' });
            return savePath;
        } catch (e) {
            console.error(e);
            throw new Error('ファイルの保存に失敗しました');
        }
    }
}
サーバーからGitHubへプッシュする際の設定
参考:
githubのリポジトリにアクセスするとパスワードを求められる時の対処
お前らのSSH Keysの作り方は間違っている
これであとはGitHubのリポジトリにプッシュできれば、それをトリガーにして「GitHub ActionsでFirebase Hosting」や「Netlify」等でビルド&ホスティングしてやれば良い。
さいごに
要所要所でハマりポイントがあったがなんとかできた。DropboxのAPIは便利だが、仕様がわかりづらい、ファイルリストを更新時間の降順で取得といったことができないのでそこは不便だった。
最近はアプリを作ることが多かったが、こういった効率化のための仕組みを考えるのは久々だったので良い刺激になった。
最後にAngularは良いぞ。