Flow Matching実践編:テキストから点群を生成する
はじめに
前回の記事では、Flow Matchingの理論的な基礎を深く掘り下げました。今回は、その理論を実践に移します。
やりたいこと:「笑顔で正面を向いた顔」のようなテキストプロンプトから、対応する点群画像を生成する
これは、Stable DiffusionやFlux.1といった大規模な画像生成モデルと本質的には同じ仕組みです。ただし:
- RGB画像ではなく、2D点群(x, y座標)
- 12,288次元ではなく、2次元(圧倒的に軽い)
- 1024個の点で「絵」を表現
「ローレベルなStable Diffusion」を自作するというイメージです。
目次
実験の全体像
パイプライン
画像 → VML記述 → Qwen要約 → CLIPエンベディング
                                    ↓
                        条件付きFlow Matching学習
                                    ↓
テキストプロンプト → CLIPエンベディング → 点群生成
技術スタック
- VML(Vision Language Model): FastVLM 0.5b(画像→テキスト記述)
- Qwen: Qwen2.5-7B-Instruct(長文要約)
- CLIP: ViT-B/32(テキスト→512次元ベクトル)
- Flow Matching: 自作の条件付きモデル
データセット:memoji顔画像
12日目のautoencoderを作った際に使ったmemojiの顔画像データを利用します。
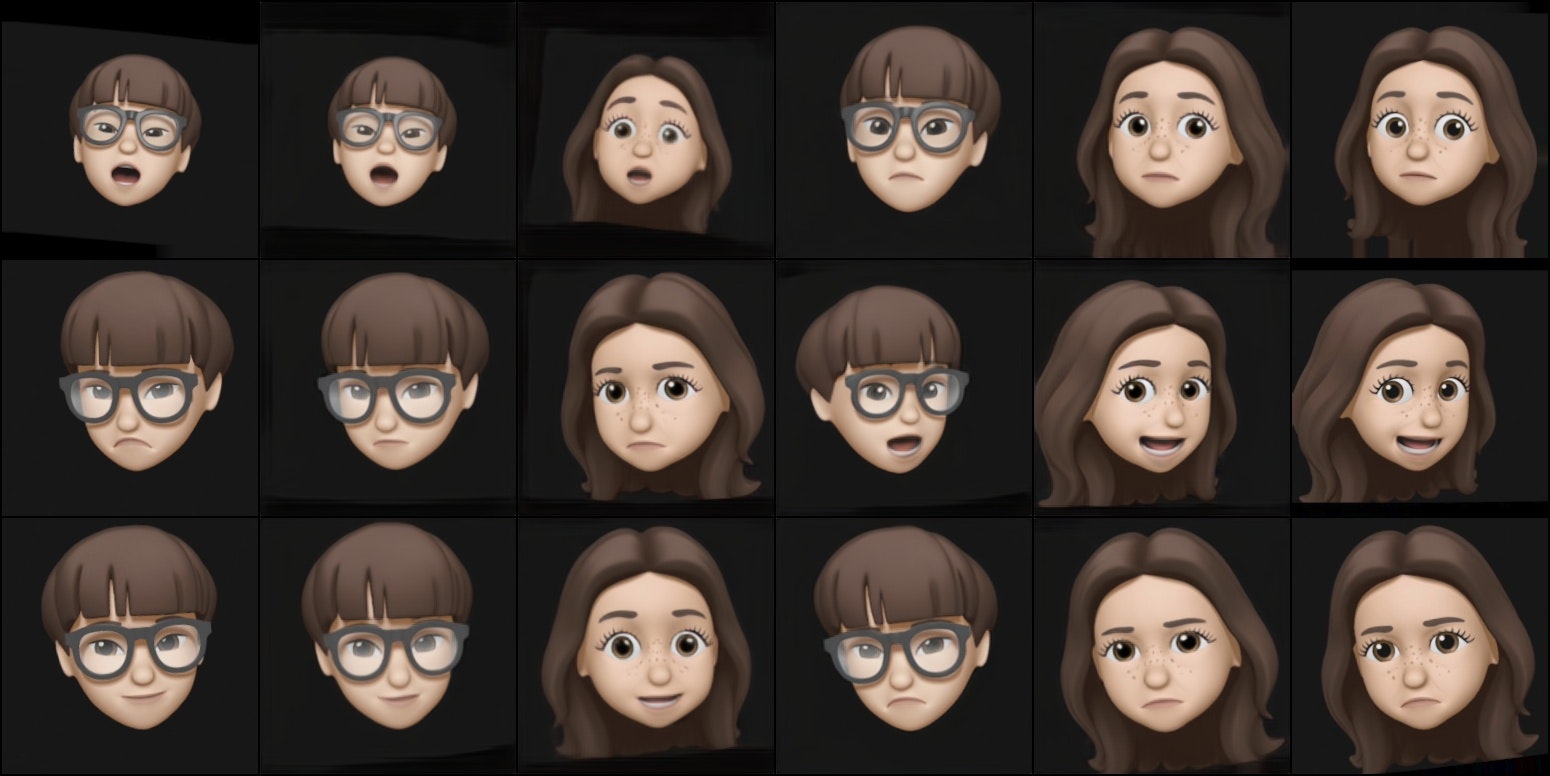
データの特徴
- 男性memoji: 1800枚
- 女性memoji: 1800枚
- 内容: 同一人物の様々な表情・角度・向き
元データは動画から抽出したため、隣接フレーム間の変化が小さすぎました。そこで6フレームごとに間引いて、多様性を確保しました。
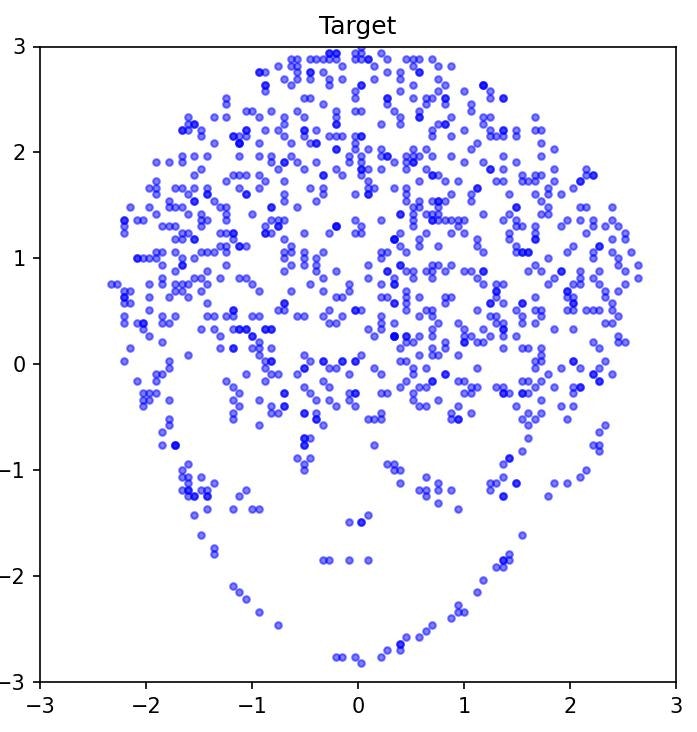
点群への変換
画像の暗い部分(data < 128)から1024個の座標をランダムサンプリング:
def get_target_points(image, num_samples=1024):
    # 画像の暗い部分を抽出
    mask = image < 128
    y_coords, x_coords = np.where(mask)

    # ランダムに1024点をサンプリング
    indices = np.random.choice(len(x_coords), num_samples, replace=True)
    points = np.column_stack([x_coords[indices], y_coords[indices]])

    # 座標を[-3, 3]の範囲に正規化
    points = (points / image.shape[0]) * 6 - 3
    return points
顔の輪郭・目・鼻・口などの濃い部分が点として抽出されます。
テキスト記述の生成パイプライン
Step 1: VMLで詳細記述を生成
FastVLM 0.5bを使い、各画像に対して200〜300単語の記述を生成:
プロンプト:
Describe this image in detail. Include:
1) Face orientation (front/left/right/up/down),
2) Facial expression,
3) Other notable features.
出力例:
The image shows a front-facing memoji character with a smiling expression.
The character has brown hair and is looking directly at the camera.
The expression conveys happiness with slightly raised eyebrows...
(200+ words)
問題: CLIPのトークン制限は77トークン。このままでは入らない。
Step 2: Qwenで要約
Qwen2.5-7B-Instructで、記述を短く要約:
プロンプト:
Summarize in 2-3 short sentences. MUST include:
1) Face orientation,
2) Facial expression.
Keep under 50 words.
出力例:
Front-facing memoji with a smiling expression.
Brown hair, looking directly forward.
Conveys happiness.
結果: 200+ words → 29 tokens(CLIPの77トークン制限に余裕で収まる)
Step 3: CLIPエンコーディング
Hugging Faceのopenai/clip-vit-base-patch32を使用:
from transformers import CLIPProcessor, CLIPModel

model = CLIPModel.from_pretrained("openai/clip-vit-base-patch32")
processor = CLIPProcessor.from_pretrained("openai/clip-vit-base-patch32")

# テキスト→512次元ベクトル
inputs = processor(text=[summary], return_tensors="pt", padding=True, truncation=True)
embeddings = model.get_text_features(**inputs)  # [1, 512]
embeddings = embeddings / embeddings.norm(dim=-1, keepdim=True)  # 正規化
エンベディング多様性の確認:
- コサイン類似度: 0.46〜1.00
- 平均: 0.82 ± 0.07
同一人物でも、表情や向きの違いで十分な多様性が確保できました。
データの保存
最終的に、以下の形式で保存:
{
    'image_paths': [...],                    # 302 paths
    'embeddings': Tensor([302, 512]),        # CLIP embeddings
    'point_clouds': Tensor([302, 1024, 2]),  # Point clouds (x,y)
    'model': 'ViT-B/32',
    'num_points': 1024,
    'num_samples': 302
}
ファイルサイズ: 約3.0MB(male_train_data.pt)
条件付きFlow Matching
データフローの可視化
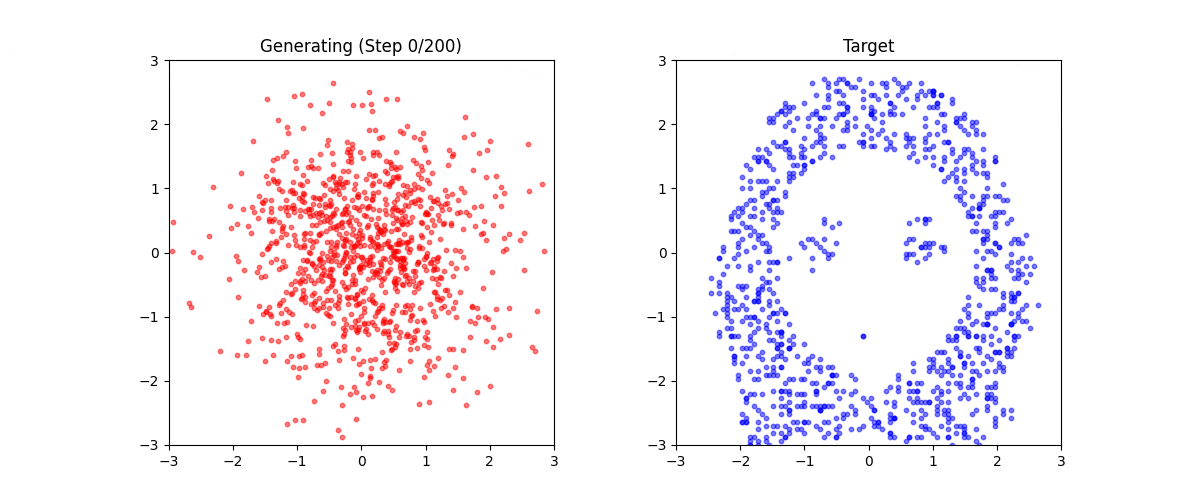
生成プロセス(推論時)
テキストプロンプトから点群を生成するプロセスを図示します:
ポイント:
- CLIP embeddingはループ外で1回だけ計算し、全ステップで再利用
-
各ステップで、現在の位置
xと時刻tをembeddingと連結 - モデルが出力する速度ベクトル
vで少しずつ位置を更新 - 200ステップ繰り返すと、ノイズ→点群画像へ変換完了
学習プロセス(訓練時)
どのようにモデルを学習させるかの流れ:
**ポイント**: - データ準備時に**VML→Qwen→CLIP**で一度だけembeddingを作成 - 学習時は`x0`(ノイズ)と`x1`(正解)の間を線形補間 - 正解は**単純な引き算** `x1 - x0` - モデルはこの引き算を予測できるように学習
アーキテクチャの変更
無条件版(23日目):
Input: [x, y, t]  # 3次元
  ↓
MLP (hidden_dim=128, layers=4)
  ↓
Output: [vx, vy]  # 2次元の速度ベクトル
条件付き版(today):
Input: [x, y, t, clip_embedding]  # 3 + 512 = 515次元
  ↓
MLP (hidden_dim=512, layers=6)  # 入力が大きいので強化
  ↓
Output: [vx, vy]  # 2次元の速度ベクトル
モデルの実装
class ConditionalFlowModel(nn.Module):
    def __init__(self, hidden_dim=512):
        super().__init__()
        # Input: x(1) + y(1) + t(1) + clip_embedding(512) = 515
        self.net = nn.Sequential(
            nn.Linear(515, hidden_dim),
            nn.ReLU(),
            nn.Linear(hidden_dim, hidden_dim),
            nn.ReLU(),
            nn.Linear(hidden_dim, hidden_dim),
            nn.ReLU(),
            nn.Linear(hidden_dim, hidden_dim),
            nn.ReLU(),
            nn.Linear(hidden_dim, hidden_dim),
            nn.ReLU(),
            nn.Linear(hidden_dim, 2)  # vx, vy
        )

    def forward(self, x, t, clip_emb):
        # x: [N, 2], t: [N, 1], clip_emb: [N, 512]
        inp = torch.cat([x, t, clip_emb], dim=-1)  # [N, 515]
        return self.net(inp)
モデルサイズ: 約800,000パラメータ
学習の1ステップ
def train_step_conditional(model, optimizer, x0, x1, clip_emb):
    optimizer.zero_grad()

    # ランダムな時刻
    batch_size = x0.shape[0]
    num_points = x0.shape[1]
    t = torch.rand(batch_size, 1, 1)

    # 中間地点
    x_t = (1 - t) * x0 + t * x1

    # 正解の速度ベクトル
    v_target = x1 - x0

    # CLIPエンベディングを各点に複製
    clip_expanded = clip_emb.unsqueeze(1).expand(-1, num_points, -1)
    t_expanded = t.expand(-1, num_points, -1)

    # モデルの予測
    v_pred = model(x_t.reshape(-1, 2),
                   t_expanded.reshape(-1, 1),
                   clip_expanded.reshape(-1, 512))
    v_pred = v_pred.reshape(batch_size, num_points, 2)

    # Loss
    loss = nn.functional.mse_loss(v_pred, v_target)

    loss.backward()
    optimizer.step()
    return loss.item()
生成(推論)
def generate_from_text(model, text, num_steps=200):
    # テキスト→CLIPエンベディング
    clip_emb = encode_text_with_clip(text)  # [1, 512]

    # ノイズからスタート
    x = torch.randn(1, 1024, 2) * 2  # [1, 1024, 2]

    # ODEを解く
    dt = 1.0 / num_steps
    for step in range(num_steps):
        t = torch.full((1, 1, 1), step * dt)

        # 各点について速度を予測
        clip_expanded = clip_emb.unsqueeze(1).expand(-1, 1024, -1)
        t_expanded = t.expand(-1, 1024, -1)

        with torch.no_grad():
            v = model(x.reshape(-1, 2),
                     t_expanded.reshape(-1, 1),
                     clip_expanded.reshape(-1, 512))
            v = v.reshape(1, 1024, 2)

        # 1ステップ進む
        x = x + v * dt

    return x[0].cpu().numpy()  # [1024, 2]
学習と結果
ハイパーパラメータ
epochs = 20000
learning_rate = 2e-4
batch_size = 1  # 現在はサンプルごとにランダム選択
num_steps = 200  # 生成時のステップ数
save_interval = 1000  # チェックポイント保存間隔
改善の履歴:
- 初期版: hidden_dim=256, layers=4, lr=5e-4, epochs=10000
- 改善版: hidden_dim=512, layers=6, lr=2e-4, epochs=20000
理由:515次元の入力に対して、256次元の隠れ層では容量不足だったため。
学習コマンド
python train_conditional.py \
  --data data.pt \
  --epochs 20000 \
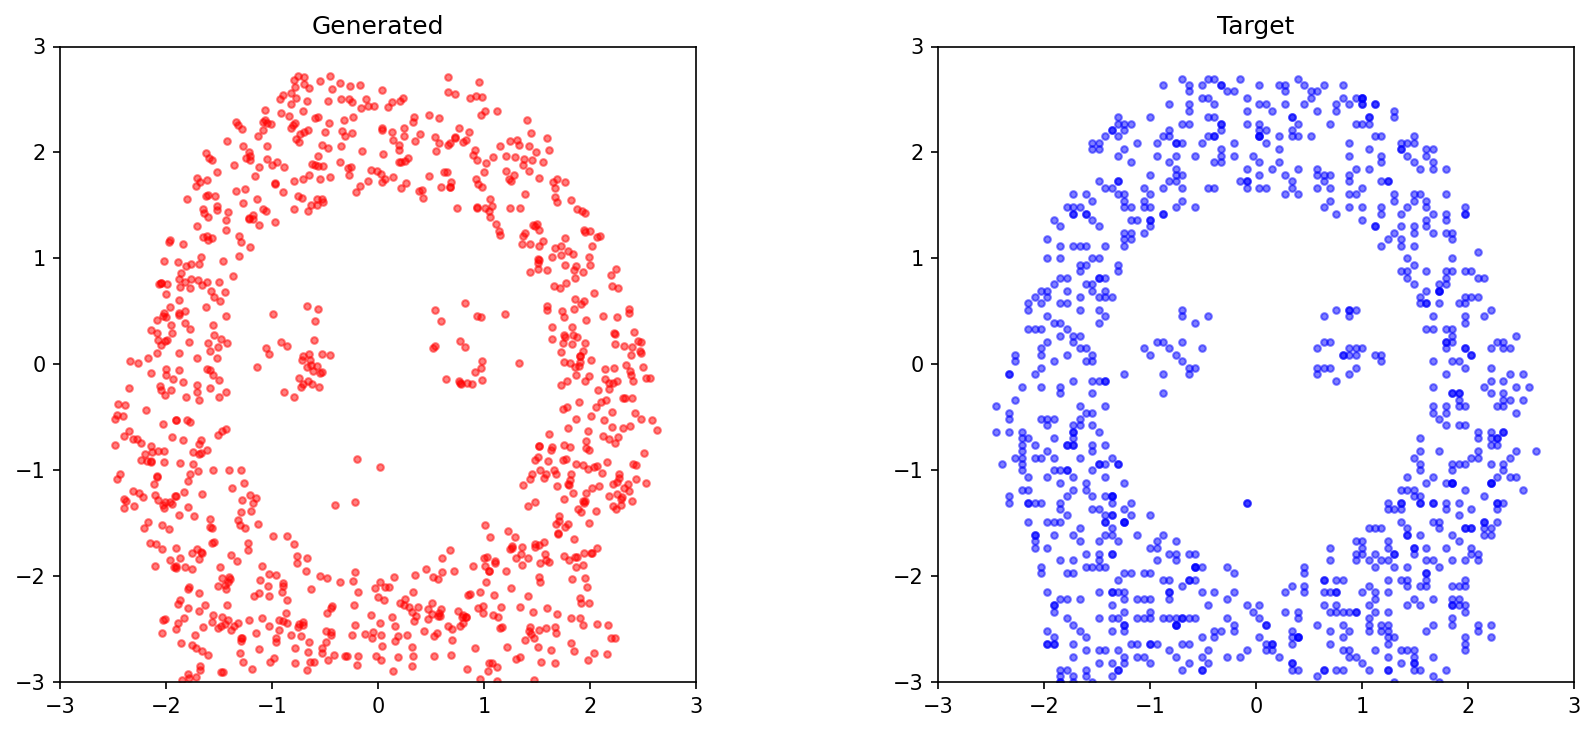
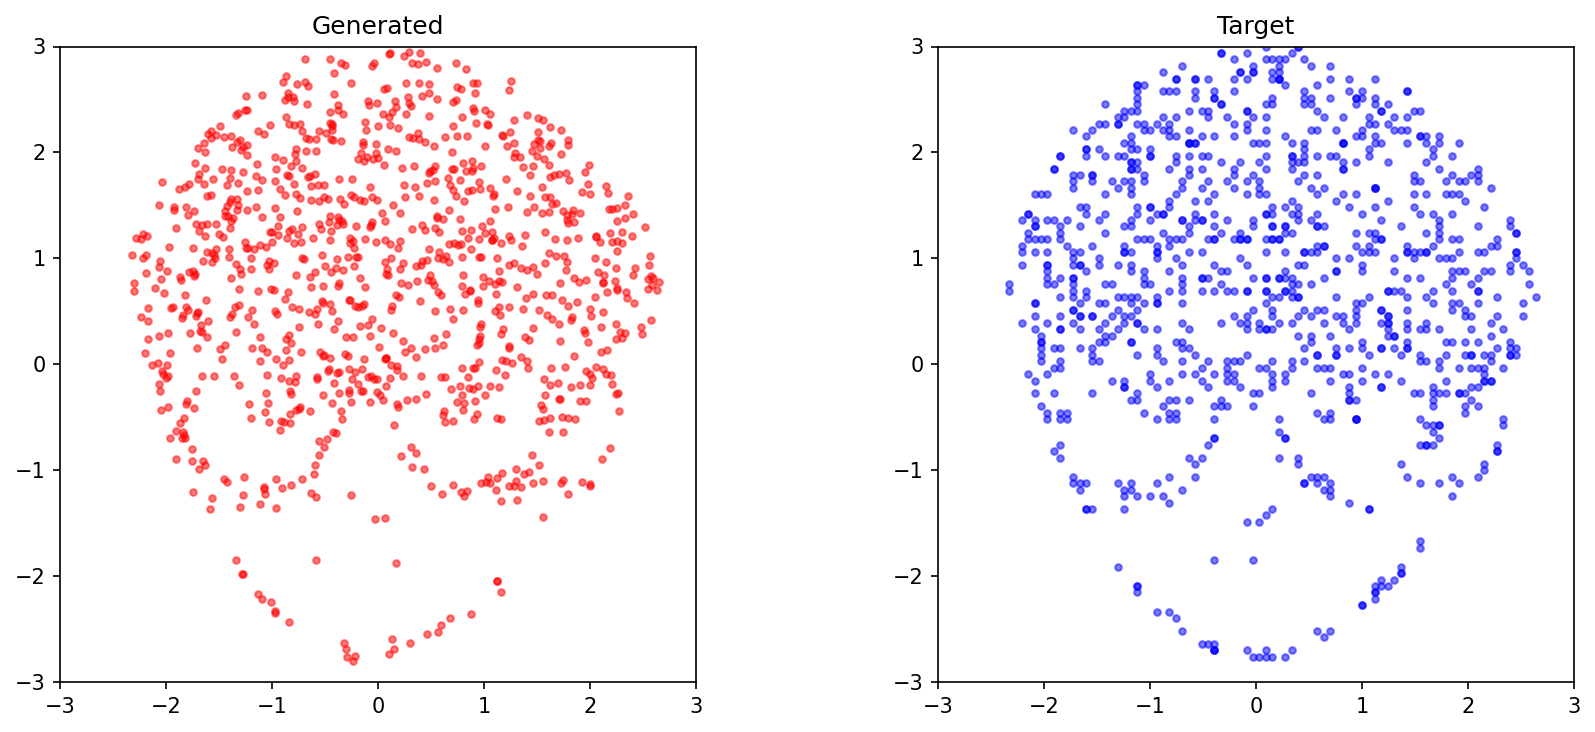
生成結果
学習後、任意のテキストから点群を生成できます:
python generate_from_text.py \
  --model model.pt \
  --text "Front-facing, smiling expression" \
  --output result.png
プロンプト例:
- プロンプト1: "Front-facing, smiling expression"
- プロンプト2: "Left-facing, neutral expression"
- プロンプト3: "Right-facing, happy expression"
生成例:

これは「ミニStable Diffusion」である
Stable Diffusionとの比較
| 要素 | Stable Diffusion | 今回の実装 |
|---|---|---|
| 入力 | テキストプロンプト | テキストプロンプト |
| 条件付け | CLIP (ViT-L/14, 768D) | CLIP (ViT-B/32, 512D) |
| 生成対象 | RGB画像 (64×64×3 = 12,288D) | 点群 (1024×2 = 2,048D) |
| モデル | U-Net (数億パラメータ) | MLP (80万パラメータ) |
| ステップ数 | 20〜50 | 200 |
| 学習時間 | 数日〜数週間(GPU多数) | 数十分(単一GPU) |
本質は同じ
どちらも:
- テキスト→ベクトル変換(CLIP)
- 条件付き拡散/Flow Matching(ノイズ→データ)
- 反復的な洗練(ODEソルバー)
という3ステップで画像を生成します。
あくまで ローレベル な Stable Diffusion
- 次元数が少ない: 12,288次元 → 2,048次元(6分の1)
- 表現がシンプル: RGB → xy座標(点描)
- 学習が軽い: 数億パラメータ → 80万パラメータ
しかし、「テキストから画像を生成する」という概念的な仕組みは完全に同じです。
高次元への拡張は可能
今回は2D点群ですが、以下のように拡張できます:
- RGB追加: [x, y, r, g, b] の5次元点群
- 高解像度: 1024点 → 10,000点
- 3D点群: [x, y, z] で立体モデル生成
- 潜在空間: AutoEncoderと組み合わせて、Latent Flow Matching
原理は変わりません。次元を増やし、モデルを大きくするだけです。
実装のポイント
1. CLIPのトークン制限
VMLが生成する記述は200単語を超えることが多く、CLIPの77トークン制限に引っかかります。
解決策: Qwenで要約(200+ words → 29 tokens)
2. データの多様性
同一人物のmemojiでも、表情・向き・角度が異なれば、CLIPエンベディングに十分な多様性が生まれます(cosine similarity: 0.82 ± 0.07)。
3. モデル容量
当初、hidden_dim=256で学習しましたが、結果が芳しくありませんでした。515次元の入力に対して容量不足だったため、512次元に増強しました。
4. 点群のサンプリング
同じ画像でも、画像から点描用の関数 を呼ぶたびに異なる1024点がサンプリングされます。これが自然なデータ拡張となり、モデルの汎化性能を高めます。
まとめ
やったこと
- memoji画像 から点群を抽出
- VML → Qwen → CLIP でテキストを512次元ベクトルに変換
- 条件付きFlow Matching でテキストプロンプトから点群を生成
- 「ミニStable Diffusion」 を自作
得られた知見
- テキストドリブン生成は小規模でも可能: 数十分の学習で実現
- CLIP + Flow Matchingは強力: 2次元でも十分に表現力がある
- Stable Diffusionの本質を体験: 高次元RGB画像でなくても、概念は同じ